Toys and crafts
Many children, especially those of primary school age, prefer to play games related to transport (for example, railways, car racing, etc.).
In addition, in stores intended for small customers, the shelves are full of various sets that are simply impossible to pass by. Such sets delight children with colorful figures and elements, and the opportunity to develop their imagination and creative abilities. However, it is worth paying attention to the fact that sometimes such sets contain parts and elements that can break or simply get lost. And perhaps some of them may simply bore the baby.
Therefore, so that the child does not lose interest in the toy set, you can make various additional elements together with it. And as a material for making homemade parts, you can use improvised means, which sometimes we do not pay attention to and throw away.
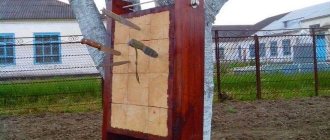
We offer you a small family master class on making a “Wooden Bridge” craft. You can use this craft for a toy railroad set, for playing “houses”, and “village”. Our craft is an approximate base that can be supplemented, painted in any colors, and placed on “beams.”
Everyone has seen wooden bridges (they are usually found in rural areas. But despite modern high-tech designs for cars and trains, wooden bridges are still in “demand” among local residents). And our craft will also be made of “wood”. The “building” material from which our craft will be made is the most common one, which we sometimes don’t even pay attention to. These are wooden ice cream sticks, bamboo skewers and sticks for rolls and sushi. This material is “small”, and when working with it, the child develops fine motor skills of his hands.
Required materials and tools
In order for bridges made of paper and cardboard to be of high quality, you should correctly select the tools and materials for the work. The main ones are:
1. Paper. It is optimal to opt for white and colored office paper. It is quite dense, non-slippery, and holds its shape well. Also suitable for modular bridges. Pollen office paper is colored on both sides, so the folds do not stand out. Another option is kami. This is special paper for origami. It is sold in the form of squares of different sizes. There are sheets painted on one side or both, and also equipped with ornaments. For simple models of bridges, you can take regular sheets of writing, colored paper for children's creativity, or wrapping paper with a matte surface.
If to build a layout you need to bend several layers of paper at once, it is better to take thin and non-slippery paper.
2. Glue. Adhesive is rarely used for modular bridges. It is only needed for attaching or gluing small parts. In other cases, the glue serves to strengthen the strength of the product. You can use PVA, glue stick, adhesive mass.
3. Scissors. You should only choose sharp scissors with free movement of the blades. It is recommended to prepare several pairs with blades of different shapes and lengths. For example, nail scissors with curved ends are suitable for cutting out small parts.
Before you start cutting out parts, you should test the quality of the scissors on a test sheet.
4. Pencil. Needed for work to mark parts. It must be sharpened or with a replaceable lead in order to draw a very thin line.
5. Ruler, triangle, protractor. These devices are necessary for drawing parts or folding them at a certain angle.
You may also need a cutter (for cutting several sheets at once), a knife or an awl.
Models of popular bridges made of paper and cardboard
Although the models differ in appearance, they have the same components:
- supports are the structures on which the bridge rests;
- spans - the body of the bridge through which traffic passes.
The models differ in the structure of the spans and are:
- beam;
- arched;
- hanging;
- pontoon
Externally they look like this:
We can highlight the most popular models of bridges made of cardboard and paper, which are made more often than others.
These include:
1. Railway. For example, a model of a single-track bridge is made without scissors and glue. The assembly parts are connected to each other without gluing.
Side view:
2. Another model is Tower Bridge. The diagram can be found in our gallery. Then print it out and follow each step exactly.
3. A simpler option using additional materials is a bridge made of cardboard and matches.
Process:
4. A bridge as an element of a large structure.
Wheels made of matches (schemes)
In this example, NO glue is used, and the strength of the product is provided by internal tension and friction.
There are several options for the wheel: with laying through 1 support match (it has 15 vertices, and 105 parts are used for it), through 2, 3 and 4 support matches, respectively.
Laying through 2 support matches.
The product consists of 95 parts, has 19 vertices and a small diameter that allows it to fit inside a wheel with a larger diameter.
Laying through 3 support matches
The diameter of this design is even smaller. The wheel has 21 points and is made of 84 matches.
Laying through 4 support matches
This design is the most difficult to assemble. The wheel has the smallest diameter and can fit inside the old match wheels. The design has 22 vertices and contains 66 parts.
Preparing your desktop
First of all, you need to prepare your table on which you will work. There should be no unnecessary things on it and every tool should be at hand. Not everyone has their own desktop and has probably already thought about creating one. Making a table is not difficult, but choosing a place for it in the house is difficult. The ideal option is an insulated balcony, on which you can do crafts at any time. I have already written about preparing the table in a separate article and tried to describe in as much detail as possible the entire process of creating it. If you don’t know how to prepare your workplace, then read the following Article. After you have completed the process of creating a table, try to start choosing your future craft.
Making a bridge out of matches
Arched bridge-viaduct made of matches
Should sick leave have at least some positive impact? At least on the website. The next debt cleanup begins with a very distant debt. I don’t know how I dared to admire this work myself without showing it to you. But better late than never. Therefore, I present to you a model of an arched bridge, made with my own hands by Alexander Pogudin from Moscow. Look at this miracle (click on the photo): .
Before you see the photographs, I advise you to get to know the author of this miracle. Do not scroll through this text, as you usually do with the License Terms of programs, there is much more interesting reading here.
“Born on April 26, 1991 in Togliatti, exactly five years after the Chernobyl disaster. After some time, I moved with my family to Moscow, where I live to this day. About the family: there is an older sister, a dumbass younger brother. I live with my mother and stepfather, the relationship is peaceful. I calmly communicate with my father and go to visit him - he lives two trolleybus stops after mine. In such favorable conditions I grow up, out of idleness inventing various activities. In kindergarten he began writing stories (the book with crooked letters has survived to this day). Confirmation that from kindergarten - in some stories the main characters were my classmates. I still write stories (https:///biografiya/rasskazy). Published a small edition book. Later there were prerequisites for modeling - modeling from plasticine (junior grades of school). Then - carpentry (this is approximately 5-7 grades). After that - modeling. I bought models and glued them together (grades 7-9). The model of the match bridge is the first creation of its kind, when I had no drawings, examples, or anything else to rely on. Everything from the very beginning to the very end was made up. And, flattering myself, I will say that it was not a bad idea. What prompted you to create the layout? Three things. 1. Idleness.2. Idleness.3. I finally gave a kick in the ass to the model of the Eiffel Tower on one site. Not on this) Also, sometimes from the same idleness I create different creative things on my computer. Cartoons in Macromedia Flash, editing video files and making jokes. I also sometimes like to do pyrotechnics and set something on fire or explode. Recently, the sulfur that was scraped from the matches for the model was successfully detonated. For more detailed information, delve into my LiveJournal. I also sometimes like to look at the stars through the telescope that I bought with my own money. A! Also at the dacha I make a model of my dacha. Unfortunately there are no photographs. Sometimes I draw. Apparently, parents and friends are delighted with the drawings.
We choose quality material
The main material is plywood. The choice is always difficult. Each of us has probably encountered such a problem as delamination of plywood from the end part and asked the question, what causes this delamination? Well, of course, this is mainly due to low-quality plywood. If this is not the first time you have picked up a jigsaw, then you can select plywood from the remnants of a previous craft. If you are new to sawing and you don’t have plywood, then buy it at a hardware store. Choosing material for sawing is always difficult. You should always choose plywood carefully, often look at the defects of the wood (knots, cracks) and draw conclusions. The difficulty in choosing plywood lies in the fact that no matter how you guess at its defects and shelf life. For example, you bought plywood, cleaned it, translated the drawing and suddenly it began to delaminate. Of course, this has happened to almost everyone and it’s oh, how unpleasant. So it is better to pay attention when choosing and choose good plywood. I wrote a special Article in which all the principles of choosing plywood are described step by step.
The history of the appearance of layouts
The areas of modeling that fans of layouts are interested in are different:
- Collecting rolling stock, rails, trailers.
- Collecting full-fledged railway models.
- Making miniature roads.
- Making copies of real existing trains and compositions.
- Creation of park models in the open air.
The first models appeared in Germany in the second half of the 19th century, and subsequently the scale in which they were produced was adopted as a basis by other manufacturers.
Models that copy the shapes and sizes of real trains are very different from children's toy roads with trains. Almost a century has passed since modeling became an exciting activity for adults. This forced many companies to begin producing improved models of trains and rails, producing houses, switches, traffic lights and semaphores, and landscape details.
Similar models
Weavers' Guild House (Wangen im Allgäu)
Paper model of the Weavers' Guild House in Wangen im Allgäu, Germany.
Roundhouse
Paper model of a roundhouse.
Psychoscareapy Horror House: Maximum Madness (Universal Orlando's Halloween Horror Night 2006)
Paper model of Psychoscareapy: Maximum Madness from Universal Orlando's Halloween Horror Night 2006 event.
Notre Dame Cathedral, France
Paper model of Notre Dame Cathedral, located in France.
Preparing for the ritual
Fortune telling of this type involves a symbolic ritual where a path for spirits is paved through some container. More often, such fortune telling is used to call betrothed in a dream. We will tell you about them in this article.
Try to prepare for fortune-telling in advance, because it will not be easy to do during the process.
- To begin with, get in the right mood. How confident you are in your abilities, how much you can trust magic, will affect the result.
- Do not treat fortune telling as entertainment. Even if the process itself seems frivolous or strange to you, do not neglect precautions. Spirits don't like to be looked down upon.
- Fortune telling "Bridge" with the call of the image of the betrothed refers to the rituals of black magic, and therefore can be dangerous for those who are in an unstable physical and emotional state. It is better for pregnant women, children, and the elderly to refrain from fortune telling or choose another option for fortune telling.
- For fortune telling you will need water. Prepare water blessed in the temple in advance. It is more effective in predictions and protects the caster from the negative effects of dark forces.
Drilling holes in the parts
As you have already noticed, the parts contain parts of the grooves that need to be cut out from the inside. To cut out such parts, you need to drill holes in them using a hand drill or, as in the old fashioned way, make holes with an awl. By the way, the diameter of the hole must be at least 1 mm, otherwise you can damage the elements of the drawing, which, alas, are sometimes difficult to restore. To avoid damaging your work table when drilling holes, you must place a board under the workpiece so as not to damage the work table. It is always difficult to drill holes alone, so ask a friend to help you in your task.
How to make a DIY bridge for crafts
You can very easily create three-dimensional crafts from matches. For example, you have a toy castle or town, why not complement it with a homemade bridge? You can’t immediately tell that it is made from ordinary matches - it looks so beautiful and natural.
We will need:
- matches with a reserve; - acrylic paints; - cardboard about 2 mm thick; - pack of toothpicks; - glue, candle.
Cut semi-ovals 30 cm long from cardboard, about 6 cm high at the peak. Cut out only four blanks, glue two together.
Next, cut out three parts and connect them together. The distance between the parts should be equal to two matches. Cut a rectangular tray from cardboard and glue it.
You can see what should happen in the photo. Don't forget - the width is exactly 2 matches! This is very important, otherwise you won’t get a smooth bridge.
The foundation for the future bridge is ready.
This is the most interesting thing - working directly with matches. Coat them with glue and place them on a cardboard structure. Do it on one side first.
Then cover the other side with matches coated with glue. For beauty, you can alternate the location of the edges of matches with sulfur.
Take toothpicks, coat the ends with glue and insert them into the edge of the bridge, maintaining an equal distance.
Use toothpicks to make a railing for the bridge. Wait for the glue to dry, holding the parts with your hands so that they do not fall apart.
Matchstick bridge made with glue. A similar bridge has already been made on our website. You can view it at this link. This one is very similar, but still a little different.
Cutting templates
Using templates greatly simplifies your work. Each part can be reused multiple times. The templates are provided ready-made, you just need to download and print. If the desired object is not available, then you should use a photo or picture. It is enough to transfer the schematic image onto paper, edit it, and cut it out. Then put it on a sheet of paper, copy and cut it out. For those who love design, creating your own models is more suitable. The advantage of templates is the possibility of repeated use and repeated creation of identical layouts.
Photo examples with diagrams
Site search
Categories
- Auto, motorcycle (20)
- Wardrobe (6)
- Pets (3)
- Home renovation (75)
- Doors (6)
- Tile (5)
- Roofing (4)
- Loggia (2)
- Windows (9)
- Heating (7)
- Gender (10)
- Ceiling (8)
- Walls (14)
- Food, drinks (12)
- Jam (1)
- Cooking at the dacha (2)
- Desserts (3)
- Baby food (1)
- Bakery products (1)
- Toys and crafts (15)
- Tools (7)
- Computer (1)
- PC programs (1)
- Furniture (17)
- Useful little things (24)
- Garden, vegetable garden (59)
- Plumbing (5)
- Sports (4)
- Creativity (67)
- Equipment (10)
- Electrical (4)
Archives
Subscribe to updates on Twitter
The last notes
Popular posts
Tags
sdelaysam.net > Toys and crafts > How to make a toy wooden bridge?
Many children, especially those of primary school age, prefer to play games related to transport (for example, railway, car rally, etc.). In addition, in stores intended for small customers, the shelves are full of various sets that are simply impossible to pass by. Such sets delight children with colorful figures and elements, and the opportunity to develop their imagination and creative abilities. However, it is worth paying attention to the fact that sometimes such sets contain parts and elements that can break or simply get lost. And perhaps some of them may simply bore the baby. Therefore, so that the child does not lose interest in the toy set, you can make various additional elements together with it. And as a material for making homemade parts, you can use improvised means, which sometimes we do not pay attention to and throw away.
Sawing parts
There are many rules for cutting, but you need to stick to the most common ones. First of all, you need to cut out the internal parts, only then according to the external pattern. There is no need to rush when cutting. The main thing is to always keep the jigsaw straight at a 90-degree angle when cutting. Cut out the parts along the lines you accurately marked. The movements of the jigsaw should always be smooth up and down. Also, do not forget to monitor your posture. Try to avoid bevels and unevenness. If you go off the line while cutting, don't worry. Such bevels and irregularities can be removed using flat files or “coarse-grained” sandpaper.
Stripping plywood
We clean our plywood with sandpaper. As you already know, “Medium-grained” and “Fine-grained” sandpaper is used for cleaning plywood when sawing. You've probably seen sandpaper in hardware stores, and that's what we'll need. In your work you will need “Coarse-grained”, “Medium-grained” and “Fine-grained” sandpaper. Each of them has its own property, but a completely different coating, by which it is classified. “Coarse-grained” sandpaper is used for processing rough plywood, i.e. which has many defects, chips, and cracks. “Medium-grained” sandpaper is used for processing plywood after “Coarse” sandpaper and has a slight coating. “Fine-grained” or otherwise “Nulevka”. This sandpaper serves as the final process for stripping plywood. It gives the plywood smoothness, and therefore the plywood will be pleasant to the touch. Sand the prepared plywood in stages, starting with medium-grain sandpaper and ending with fine sandpaper. Sanding should be done along the layers, not across. A well-polished surface should be flat, completely smooth, glossy in the light and silky to the touch. How best to prepare plywood for sawing and which sandpaper is best to choose Read here. After stripping, check the plywood for burrs and small irregularities. If there are no visible defects, then you can proceed to the process of translating the drawing.
The best manufacturers of parking lots for children's cars
Toys are made by many companies. Buyers of children's garages note that models from the following manufacturers are popular:
Polesie
This Belarusian company is considered the largest in the CIS for the production of gaming products. Its toy parking complexes are of good quality, and the material from which the toys are made meets sanitary and hygienic requirements, confirming its safety.
Polly
Russian manufacturer of children's environmentally friendly wooden toys. Despite the fact that the products of this brand have been on the market since 2014, today this company occupies a leading position among companies that use wood as the main material for making toys.
Early Learning Center (ELC)
A world-class British company specializing in the production of educational toys. It should be noted that during the manufacturing process of products, interaction is carried out with designers and child psychologists. In the Russian Federation, toys of this brand have been popular for more than 10 years.
Molto
Spanish brand. The company specializes in the production of safe, high-quality plastic toys, which is confirmed by relevant certificates.
Silverlit
A company that has been creating toys since 1977. Production is carried out in China with sales in many countries around the world. Product quality meets international standards. Hypoallergenic materials and safe paints are used in production.
WADER
The company was founded in Germany in 1956. Currently it is considered one of the largest companies producing plastic toys. A long history confirms the high quality and safety of toys produced by WADER.
Halsall Toys International (HTI)
A world-famous British manufacturer whose products have been known for over 50 years. The products of this company are distinguished by their interesting design, safe materials and high quality.
Technopark
One of the leading Russian manufacturers specializing in transport topics. The sets produced, including garages and parking lots, are usually equipped with metal cars. Interestingly, the brand cooperates with many automobile brands in the development and production of collections of car models.
Unogiochi (Faro)
An Italian brand that occupies one of the leading positions in the world in the production of toys for children. Like most leading manufacturers, Faro guarantees the safety of the materials used in the manufacture of its products. It should be noted that this company carries out quality control of both raw materials and finished products.
Majorette
French toy manufacturing company founded in 1961. The main focus is transportation. Today Majorette is one of the main manufacturers of licensed car models, as well as play sets and components for them.
Mattel
American brand founded in the first half of the 20th century. Currently considered the largest manufacturer of toys and games for children of high quality and meeting all safety standards. It was this company that released the world famous Barbie doll.
Dolu
Turkish toy manufacturing company. The products of this company are aimed at the development of the child, the manifestation of activity and the disclosure of his creative potential.
Options for building a garage
Before you build a garage for cars with your own hands, you should imagine what the future structure will look like. There are several basic options for its design:
- The simplest garage is a cubic-shaped object. It can store one or two cars. This is a fairly simple structure that can be created in just a few minutes.
- The second option is a garage in the form of a house. In terms of its main characteristics, it does not differ from the previous version, but has a slightly improved appearance.
- The most favorite option for boys is a multi-level structure, with parking, various slides and lifting mechanisms. This is an interesting design, but you will have to work hard to create it.
- A garage for cars (toys), consisting of several similar designs, will surely not leave any boy indifferent. In this case, you can create a whole complex for cars with your own hands.
- Another interesting option is a parking storage for cars, which can simultaneously accommodate up to ten or more road vehicles.
It is also worth considering the color and size of the future object.
- https://www.fun-edu.ru/poleznye-materialy/garazh/
- https://fb.ru/article/305088/detskiy-garaj-dlya-mashinok-svoimi-rukami