A bird made with your own hands from scrap materials is not just an interior decoration or a souvenir option. This craft will allow you to get closer to nature, and on a winter evening you will remember walks in the park. You can add it to a gift without spending extra money. To create it, it is enough to have colored or white paper, pencils, markers, bright fabric, feathers, plasticine or other inexpensive materials on hand. Some craftswomen make real masterpieces from eggshells, cereals, and plastic waste.
Paper plate craft
How to make such a bird craft? Disposable plates are taken. They are painted with the necessary paints and eyes are drawn on their surface, and a paper beak is also placed. The bird's wings and tail are best cut out of paper or made from real bird feathers.
You can also stretch a thread near the bird’s eyes, by which you can hang it, for example, on a chandelier, to then take wonderful photos of the bird’s crafts.
Crane beads
The crane is a symbol of an unattainably high goal. In China and Japan, he is considered a symbol of longevity, aristocracy and the true embodiment of the intelligentsia. In the East, people believe that if you make 1000 paper cranes, all diseases will disappear from a person. In the center of Hiroshima there is a monument erected to a little girl holding a paper crane in her hands. She was seriously ill and managed to make only 644 birdies.
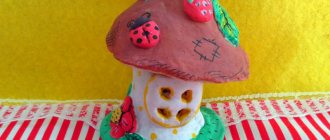
Application "Firebird"
To create such a craft, you will need pre-dried leaves of trees (linden, rose hips, birch, oak, etc.) of various colors, as well as large seeds, for example, pumpkins. Linden and birch leaves are glued onto a sheet of cardboard, which will serve as the body and head, respectively.
A fluffy tail is made from rosehip leaves; you can also add a small tree branch for a strong base. The seeds form the eyes and small details of the craft.
A tuft from some branch will help to completely decorate the “Firebird”. You can safely send this bird craft to an exhibition in a kindergarten.
Brooch parrot
Since ancient times, the parrot has been considered a symbol of well-being, prosperity and prosperity. It is he who is considered the protector of the home, as well as a symbol of freedom and long life.
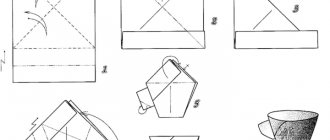
Origami birds
It is very easy to make this craft using the well-known origami technique. The essence is this: strips are cut out of colored paper, which need to be folded into a knot so that their ends are different in length.
Using scissors, the head of the bird is cut out on one side, and the tail part on the other. These origami will perfectly decorate your home at any time of the year, and in winter they will remind you of warm days.
Interesting secrets of weaving
When you put on a brooch, it’s true that you immediately feel a couple of ranks higher than who you are in everyday life. Let's admit it, when you put on a beautiful piece of jewelry, you immediately feel like a queen. But you need to know what and how, and under what clothes to wear. This is an important factor. Therefore, I propose to keep things a little secret.
A cashmere coat or the lapels of jackets are perfect space for jewelry. Fill the spacious parts of your clothes with more massive handmade items, and put on small accessories on narrow ones; you can use several miniature ones at the same time, creating your own unique composition.
Any brooch will also look luxurious on the collar of a raincoat, dress, shirt, or sweater. A stand-up collar goes well with small accessories, but a folding collar complements pairs well. The peak of their fashion was back in the 18th century. But all fashion is cyclical, so these days they are back in trend. Fasten the shirt collar tightly with a brooch under the chin, thereby creating a fashionable and stylish look yourself. And if the collar is decorated with a bow, place a handmade accessory in the middle. The most suitable motifs for jewelry would be insects, flowers, geometric figures or birds.
If we talk about the color scheme, then be sure to pay attention to ensure that it does not merge with the color of the clothes you are wearing. It is for this reason that colorful or floral brooches of solid colors are worn on jackets of the same tone, and monochromatic jewelry is worn with multi-colored ones.
A brooch that someone dares to put on their shoulder is a very unusual solution. But there is a guarantee that on this day all the praise and compliments will belong to you. These kinds of creative solutions never go unnoticed. Decoration on the pockets is a guarantee of a sophisticated look. Don't be afraid to experiment! Moreover, in this case, it will be difficult for people to distinguish: either you decided to be extraordinary, or this is the designer’s real idea.
Moving away from the topic of things, I think we should recommend putting brooches on bags, belts, wide-brimmed hats and other accessories. A few valuable sparkles will give weightlessness and playfulness to even the most serious women.
Birdhouses made from milk bottles
Don’t rush to throw away milk bottles and Kinder surprise containers, because you can make an attractive craft out of them. Round holes are cut in milk bottles, clothespins are glued to the bottom of the bottles, and the birds themselves are on them in the form of kinder boxes. Just decorate the birds' bodies with down or feathers, colored paper, and also draw eyes on them with a felt-tip pen, then the craft will be completely ready.
Hummingbird brooch video tutorial
The hummingbird is the smallest bird, but how many beautiful things it combines in itself. On the Caribbean islands, for example, it is considered an inexhaustible symbol of the richness and diversity of nature. She embodies incredible speed and agility.
Peacock from bottles
You will need multi-colored plastic bottles, foil, thin plastic, a log, a metal rod, foam, a stapler and glue. The body of the peacock along with the head is formed from polystyrene foam. Small indentations are made in the intended places for the eyes.
The log will be used as a base; you need to attach the peacock's body to it using a metal rod.
Feathers are sold from cut plastic bottles of different sizes: the longest for the tail, the shortest for the neck and normal size for the rest of the body.
One part of the future feather is rounded, and notches are made on the other to give a more realistic look to the feather. The tail feathers can be decorated with cutouts made of thin plastic and foil.
Decorations can be attached with a stapler or superglue. A beak is cut out of a piece of red plastic. The “feathers” are glued with a slight overlap onto each other to the body with superglue. You can make the crest the way your heart desires, but it is better to use colored plastic to create it.
The recesses for the eyes are painted over with felt-tip pens of any color. It is convenient to use some kind of mesh to form the tail. Its collection begins from the bottom edge. The made tail is attached to the body.
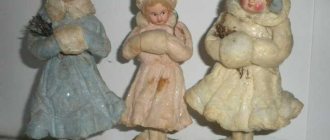
Christmas tree toy
You can decorate the New Year tree with original silhouettes of birds, which are done as follows:
- Mix one large spoon of starch with three tablespoons of sawdust. Four spoons of PVA glue are poured there. The components are thoroughly mixed. All that remains is to lubricate your hands with a suitable cream and knead the “dough”;
- Before you start sculpting the body, you need to prepare a dryer in which the workpiece will then be placed. To do this, use a recess in plasticine with an insert in the form of a toothpick;
- An oval shape is rolled out of the mass, from part of which the head is molded. The body arches slightly. Place the resulting blank on a toothpick coated with glue;
- Having sculpted the beak, it must be thoroughly attached to the base, and lubricate everything with glue, after the indentations have been made using a stack for the wings and tail;
- It will take several days to thoroughly dry the craft, and then process it completely using sandpaper;
- The resulting craft is painted with acrylic-based paints;
- Now you need to cut the rain into small pieces so that you can make shiny tassels;
- The wings are glued together with the tail, as well as a holder for hanging the toy on the Christmas tree.
Flamingo from bottles
To make this product you need large plastic bottles (5 and 10 liters), a polymer pipe about two meters long, a corrugated pipe about sixty centimeters long, acrylic, wire, foam.
The base body is made from the largest bottle. In its bottom you need to cut 2 holes according to the diameter of the polymer tubes (future legs). Feathers are cut from smaller five-liter bottles and attached to slits in the body.
A neck is made from a corrugated pipe, which is inserted into the neck of a ten-liter bottle. The head is cut out of foam plastic. Eyes are drawn with a felt-tip pen and a black plastic beak is attached. It is better to start attaching the feathers from the very bottom to the mesh.
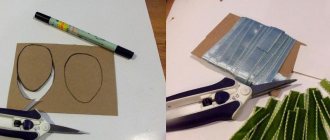
DIY bullfinch brooch made of beads and seed beads
Translated from Latin, bullfinch means “Fiery”. Most often, the bullfinch is associated with winter purity. In everyday life, it denotes the unfading warmth of the soul, generosity and purity. In order to create this wonderful winter brooch you need to work hard. But the result will make you very, very happy.
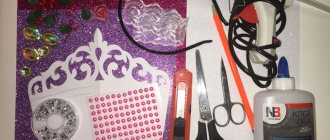
Accessories for work
- Felt (preferably black)
- Leather deputy
- Stencil
- Crystal beads (6 mm)
- Beads (black, red, gray and white)
- Monofilament
- Scissors
- Clasp
- Needle
- Jewelry glue
First, we outline the stencil with a pencil. But if you are good at drawing, you can draw by hand. Next, we embroider the outline of the bullfinch’s breast. We collect two beads, retreat a distance equal to it and enter there with a needle. Then, we bring the needle out in front of the last bead and enter it. We trim the entire breast in exactly the same way.
At the end, we pass the needle through all the collected ones. This way they will lie flat.
Next we will embroider the breast with 6 mm crystal beads. We collect one bead. We make an entrance with a needle next to it. Fill the entire bullfinch breast in the same way. Fill the gaps between the beads with beads of the corresponding red color.
We embroider the rest of the outline of the bullfinch in gray. We embroider the tail with stripes of black and gray.
We embroider the upper part of the wing with black beads (8mm). We string both the bead and the bead onto the needle, sew it on, and when returning, we only pass through the bead. We sew on the bead to hide the hole of our bead. Below, we sew 2 more beads, but their size is slightly smaller than the first. Under them we embroider two arcs with gray beads.
Then, we embroider vertical lines with black and light gray beads, filling the wing with them.
Near the eye we sew an oval using white, and sew 2 transparent beads inside it.
We cut out the finished embroidery. In order not to damage the seams, I advise you to use nail scissors. We trace the embroidery on cardboard, (you need to cut the cardboard a couple of millimeters smaller than the embroidery), cut it out, and glue it together using jewelry glue. We do the same with dermantine.
Edge trim
We cut about 2 meters of monofilament and insert the needle through all the layers, leaving a small tail, about 5 cm. Then we go through all the layers again, wrap the monofilament a couple of times around the needle and tighten it. This way we secured the working thread.
We pierce all the edges with two collected beads. Then we enter one of the beads from the bottom up and tighten the thread. Next, we collect one thing at a time. We repeat these same steps until the edges are finished.
This is such a wonderful brooch we got!
Video lesson
https://www.youtube.com/watch?v=S9i1MooXNaw&list=PL3KFxyeZl5PNEOSFt3aftSkVBFlUylJvu
Photos of bird crafts
Swan brooch made of black and white beads
The swan is the muse of poets. The song of the dying swan is the song of the poet, and his snow-whiteness is openness and sincerity. The famous “swan song” is a pointer to the final significant works of famous creators. It is known that the swan has a presentiment of its death, and its final chord is a song consisting of the unknown beauty of sounds. In general, he embodies chastity, prophetic abilities and is a symbol of proud loneliness and nobility.
Carved elements
Particularly difficult carving work on vegetables with dense flesh is required to create tail feathers. To do this, cut many identical blanks with a thickness of at least 5 mm. Next, cut off the excess pulp along the edges, giving the part the required shape. The tail feathers for the “Firebird” craft from vegetables can be made round, for example, from a long white daikon radish, then cut pointed corners on one side of the circles, and decorate the middle with carrot circles or cut-out parts from green avocado peel.
Cut out jagged leaves with a knife at the end of the feathers, as in the photo above, will look beautiful. Before making them, you can use a scraper to mark the veins by drawing a sketch. And only then, using the blade of a thin knife, cut out in-depth triangular strips.
Stork brooch woven with beads
In many countries it is considered the embodiment of a new existence: according to most superstitions, it delivers babies to homes. In the old days, they believed that the souls of unborn children live in a mysterious, separate place full of lakes, and only a stork is able to enter that place and take the child’s soul, bringing it into the company of living people. He is the guardian of the hearth and happiness, for this reason the display of this bird in the house will always help you and your family to exist in peace and prosperity. An amulet can be a picture of a stork in some object of the environment.
Beaded birds are a very good option for those who want to diversify their everyday clothes and add some color. Even novice craftswomen can do such things. Try it and make yourself happy!
Carving knives
To beautifully cut the “Firebird” craft from vegetables, you need to have several special knives. For novice craftsmen, it is enough to purchase a sharpened knife with a triangular blade and a carving knife with a rounded edge for cleaning the pulp.
If you like carving designs on gifts of nature and you often do carving, then purchase a set of tools, as in the photo above. Then you can not only cut out a firebird from vegetables, but also create a geometric or floral design on the peel, draw thin lines or make grooves. This will save a significant amount of time. If you have to cut the part twice with a corner knife, turning it in different directions, then with a special knife it will be enough to push the flesh once.
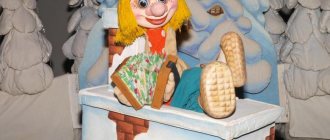
Stages of work
The first step is to wind the thread onto the cardboard. It will be necessary to make up to fifty turns.
Then you should cut and tie the threads, remove the cardboard. You should get a small ball.
The next step is to crumple a sheet of newsprint to the size you want the bird to be.
Wrap the figurine in the middle with red threads and tie the laces at the bottom. Then black and blue threads are wound crosswise.
The black threads are folded in half so that they are on top of the red ones. This will form the wings.
By tying black threads at the back of the figurine, we decorate the tail of the feathered songbird. A bunch of black threads in front is also tied and the head of the bird is indicated.
The final stage will be gluing the bird's beak and eye.
Useful tips
To make a bird from a plastic bottle look like a real one, you need to use the recommendations of experienced craftsmen.
They will help you avoid mistakes and get the job done in the shortest possible time.
Pro Tips:
- Before starting work, you need to remove the labels from the bottles. The easiest way to remove any glue remaining on the plastic is with warm water and a cloth.
- To ensure that the finished craft has an attractive appearance, it is not recommended to use plastic bottles with defects (scratches, punctures, etc.).
- Heating will help bend the plastic piece slightly or give it a more complex shape. As the temperature increases, the plasticity of the material will increase and it will become easy to deform. However, if you heat the plastic to 200-240 degrees, it will begin to melt.
- It is best to change the color of the workpieces using spray paint. This option will allow you to evenly paint the entire surface of the plastic and avoid drips.
- You can connect all the parts into a single structure using glue or wire. The second option is well suited for beginners, as it allows you to change the location of the workpieces.
Anyone can make a bird from a plastic bottle with their own hands. All work on the craft will take a minimum of time and effort, but will allow you to get an original decoration for your home or summer cottage.