Malachite is a semi-precious stone used as jewelry and ornamental material. It is perfect for jewelry, but decorative items made from malachite look more interesting and fascinating. First of all, when it is mentioned, the cycle of fairy tales by Pavel Bazhov “The Malachite Box” comes to mind. The hero of the story, Stepan, received exactly such a box as a gift from the Mistress of the Copper Mountain. Everyone would want to receive such a useful and beautiful thing and, perhaps, feel like the hero of a fairy tale, and you can do it yourself. This article will tell you how to make a malachite box with your own hands.
Imitation malachite
The use of malachite as a material for jewelry has been known for a long time. The semi-precious stone fascinates with its unique patterns with colors of all shades of green. That's why many people want to see it as the decor of their premises.
How to make a craft box that looks like malachite yourself? There are different ways to recreate the color palette of a stone:
- Painting with a roller or brush;
- Plasticine modeling;
- Tinting the dough.
A plasticine product can be a wonderful decoration. Soft during operation, and subsequently strengthened with a special varnish for hardening, it copes with this task perfectly.
A malachite box is a craft that will surprise all your loved ones and can be made together with your child. Such creativity
Horizontal fence
How to make a fence for a craft from branches? If you want to make a unique fence, then let's look at the following interesting option with horizontal rods. For such a fence, select wood cuts with a diameter of about 2 cm. It is advisable that all posts be the same thickness. The cross members should be thinner so that each section of the fence has at least two cross members. If there are small branches on the branches, you need to get rid of them with a sharp knife.
Before fastening the fence parts together, you need to thoroughly clean the edges with sandpaper and open them with acrylic varnish 2 times. The parts of the branch fence for the craft can be joined using a glue gun or D-3 wood glue. If your dad has golden hands, then you can ask him to drill holes in the stumps of the required diameter and, dripping a little PVA glue inside, insert a cross beam there. It is enough to hold it tightly for a couple of minutes, and the fence will be firmly fixed for a long time.
Making a plasticine casket
In order for a fairy-tale object to “appear” in front of you, you need the most ordinary means:
- A set of plasticine and a knife;
- Rolling pin for rolling out parts;
- Fixing varnish with brush.
The basis for the work can be a cardboard box, an unnecessary box or a purchased blank. If you have cardboard on hand, then using the template, you can make a similar item yourself. To decorate the inside you will need velvet or satin.
The color of the stone is reproduced using different colors of plasticine. Whitish, very dark, light green, shades of dark and light green and, of course, emerald. All shades are selected according to the taste of the manufacturers.
Usually, in this case, two types of varnish are used to process the finished craft. Decoupage or glassy.
The sequence of actions is as follows:
- Plasticine is rolled out from pieces into sausages, and then sausages of different thicknesses are made from them;
- They are cut into squares. The order of the colors is not important. The pattern of malachite is always random by nature;
- Stacks are made from pieces of different colors and flattened a little;
- An even stick is useful as a rod, around which a separate stack is bent;
- Then the stick is taken out and the work is completed without it;
- The columns are rolled into even sausages;
- The common plate is laid out from “sausage” cuts;
- The taken base is covered with layers whose color resembles malachite. The box is ready.
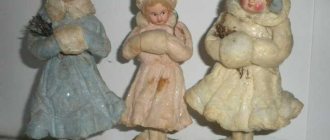
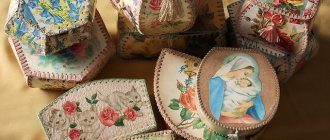
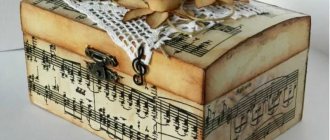
You can use the idea of P. Bazhov’s fairy tales to make your own malachite box as a craft for kindergarten. The basis can be a wooden box covered with organza with a satin lining on the inside.
“Moment” is quite suitable for pasting it. You can attach a “fairytale” lizard to the top, and decorate the sides with a golden ornament with rowan berries.
The portrait of the author of the beloved fairy tale can be secured with a stapler on the inside of the lid, framed by a frame of multi-colored stones.
Such a treasury can be replenished with various “values” over time. For example, there you can store jewelry made of natural stone, figurines of your favorite characters made by yourself, the crown of the Mistress herself, and many items that will always be interesting to look at for both children and their parents. Love for the fairy tales of the great writer comes with time, but begins from childhood.
Making a malachite box with your own hands in a step-by-step master class
Materials for crafts from plasticine:
- ball fine-grained plasticine that will harden;
- a small box with a plastic lid;
- beads and beads for decoration;
- a piece of felt;
- scissors;
- pencil with ruler;
- modeling board;
- rolling pin for rolling out plasticine, glue.
To make such a box, you can use coarse-grained and fine-grained ball plasticine. He is easy to work with. It does not remain on hands or clothes. With its help you can make a wooden, cardboard, plastic figurine or craft. Therefore, even a child can work with such plasticine.
Making a box with your own hands:
- The first thing to do is prepare the interior of the box. Using felt, they decorate the inside of the box. You need to cut out circles in advance, which will then be used for the bottom and lid. You need to make a wide strip that will be the same as the height of the box. Felt parts are glued or simply inserted. You can fix them using plasticine.
- Then the box is covered with plasticine and distributed over the surface. While the plasticine is soft, it is applied and applied with rubbing movements to the entire surface of the box.
- For the walls and lid, it is better to apply a thicker layer, then it will be easy to press the beads. But you can apply a light thin layer to the bottom so that the bottom is not visible. Use a rolling pin to level the walls. To make the bottom even, you need to place the craft on the board and press on it.
- Beads and beads are pressed into the still soft plasticine. To decorate the box, different colors of plasticine are used. You can make ornaments with cereals, sequins, buttons, shells, pebbles and kanzashi.
- The lid can be decorated with a three-dimensional felt flower, which is subsequently glued.
- This completes the manufacturing process. It is better to leave it for a day. At this time, the plasticine will dry and the beads will be securely attached.
The box is used to store jewelry. Your mother, sister or grandmother will love this gift.
Tubular newspaper box
It is very interesting to make crafts from newspaper tubes, where boxes are no exception. The products turn out to be so beautiful, memorable and original that for many this activity has long turned into an exciting “hobby”.
Initially, the tubes are prepared, and then the most interesting process occurs - braiding using a wide variety of patterns. They can be complex - for masters, or easy and simple - for beginners.
The corresponding coloring gives the product shades. Such a product can later be modified using a beautiful case and decoration items.
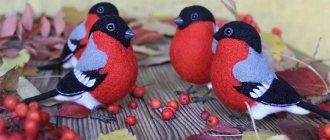
Beaded lizard
It won't take much time to make a snake. The diagram can be found on the Internet. It is simple and easy to make, suitable even for children.
First you need to choose beads. It can be transparent green, iridescent, blue-green, green with mother-of-pearl. Then start weaving according to the pattern. You need to string three beads onto the wire.
Then string 2 more beads onto the end of the wire. Then three more beads are collected and the opposite end of the wire must be threaded through these three more beads. This is how the head turns out.
Then the legs, torso and tail are made from beads according to the pattern. And now you have a beautiful snake.
Paper plus cardboard
To make your own original box from cardboard and paper, you need a little:
- Colored paper set;
- Glue with scissors;
- Cardboard (you can use a ready-made box);
- All kinds of decor.
How to craft:
- A base is cut out from the workpiece, which then needs to be glued together;
- A drawer that can be pulled out is made in a similar way from leftover cardboard. It is best to cover it with paper of the selected color;
- The upper part of the product is glued;
- For a partition, a small piece of cardboard with paper glued on top is suitable;
- The box is placed inside, and the box is decorated to your liking.
Box with a secret
You will need: thick white A4 paper, scrapbooking paper, glue, ruler, scissors, 4 paper clips, crochet hook or non-writing pen, decorative elements - twine, pendant, figurines...
Master Class
- Prepare a square of thick white paper measuring 18x18 cm. The size of the box will be 6 cm.
- Draw the workpiece into 9 squares of the same size using a hook and a ruler.
- Cut the corner squares to create a cross.
- Lift the squares up to form a box.
- Prepare 10 squares of scrap paper measuring 5.8 cm.
- Cover the outside and inside of the box with squares.
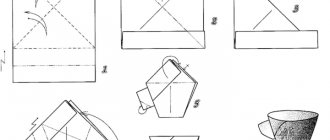
- Make the lid this way: cut out a square of thick paper measuring 8.2 cm and 2 squares of scrap paper of the same size.
- Step back 1 cm from the edges of the square and make a crease (draw lines with a crochet hook).
- Make diagonal cuts at the corners, then cut the cut pieces in half as shown in the image.
- Fold and glue the corners, then secure with paper clips and wait until dry.
- Make a small bundle of paper, tie it with twine and attach it to the bottom of the box, also don’t forget to put or write a secret.
- Decorate the box to your taste by attaching various decorative elements.
The box with the secret is ready! I recommend watching this video!
Photo crafts box
Historical information about vases
The first vases were used to store bulk materials and liquids. These vessels were made exclusively from clay. For greater strength, finished products were fired in special ovens or dried in the sun.
Vases were used to decorate the tombs of rulers and rich city dwellers. In Ancient Egypt, funeral amphorae were filled with fruits, gold and precious stones. The Egyptians believed that the pharaohs would need food and familiar luxuries in the afterlife. Already in ancient times, Greek and Egyptian potters decorated their amphorae with everyday scenes, plant ornaments and images of animals. Archaeologists use such finds to recreate scenes of everyday life, military battles, and festive rituals.
On the topic: methodological developments, presentations and notes
This presentation, containing riddles about professions, can be used in any extracurricular career guidance event held in grades 1-2. Animated slides arouse great interest among teachers.
The presentation contains a work plan for the Primary School Week.
The presentation was created in Microsoft Office PowerPoint 2007.
Presentation for the lesson.
"Farewell, ABC" for 1st grade students. The presentation is used: “My favorite friendly class.”
Master class and presentation for primary school teachers “Development of students in the process of forming a UUD. Development of fine motor skills. Smart hands mean a smart child. Lapbook is an interactive folder."
Source
Useful activities
Modeling is one of the types of fine art. It is based on giving plastic materials various shapes and creating compositions. This type of creativity is one of the most tactile, because in the process of work you need to touch the material. Such contact develops fine motor skills of the hands, which contributes to the development of speech. This happens due to the close location of the speech center of the child’s brain with the center responsible for the coordination of hands and fingers.
A child can create a large number of different images from just one piece of plasticine. At the same time, perseverance is developed, attention and memory are trained. By creating something with his own hands, a child not only realizes his creative potential, but also learns aesthetic thinking - the vision of beauty.
Tips from needlewomen
Working with cardboard is not difficult if you follow some tips:
- For cutting, it is better to use a special cardboard knife with a sharp end. If this is not available, then a regular or stationery one, but well sharpened, will do.
- Before cutting parts, be sure to draw a contour according to the template, strictly observing the dimensions.
- To bend thick cardboard, make a shallow cut along the fold line, using a ruler.
- It is not recommended to use colored stationery paper for decoration; it is better to replace it with one intended for scrapbooking.
- When gluing paper to a cardboard base, it is important that it is saturated with glue. Since applying a dry sheet will lead to the formation of bubbles. It should also be smoothed from the middle to the edges. The fabric is glued identically.
Brown box
First, coat the drawers with a primer, wait until it dries, then paint it dark brown and coat it with a protective varnish. Cut a piece of foam rubber that matches the size of the box, cover it with fabric and glue it to the bottom. Cut out labels from colored cardboard or beautiful thick packaging paper, label them and attach them to the boxes. Glue a piece of soft fabric to the bottom so that the surface of the tray does not get scratched when you take out the jewelry. Paint the tray with white paint, cover the bottom with fabric and screw hooks on top for decorations. If desired, you can further decorate the tray by gluing a white-painted foam decorative cornice to the bottom (you can buy it at any hardware store).
How to process the walls of a vase
First it needs to be processed in a special way. When your product is completely ready, carefully sprinkle the vase on all sides with potato starch. Potato starch must be dry. Now let your vase sit for a few days. This is necessary so that the plasticine becomes completely fat-free. After this, the starch must be swept away from the vase. Now take a brush and very carefully coat the entire surface of the vase with PVA glue. After the glue dries, your vase will be covered with a thin continuous film. The next step is to paint the vase with white emulsion paint. It is necessary to paint in several layers to ensure a durable surface. Now use your imagination and choose what colors to paint your product with.
You can paint a vase with Khokhloma painting, decorating the vase with ripe berries, green leaves, ornate curls, beautiful flowers, thick grass. Khokhloma painting, in principle, is not that difficult, and even you can handle its application. To make the painting of your vase more elegant and neat, use the thinnest brush for the job. Use gouache as paint. After you have painted the vase and the paint has dried, coat the product with varnish. That's it, your plasticine vase is completely ready, you can show off your work to your friends.