Our grandmothers and mothers found the pleasure of home creativity in making boxes from scrap materials. Moreover, the materials for such crafts are simple, and they are found in every home. And the finished products can be used as a handmade gift or simply to store various necessary little things in them.
Postcards always remind you of the holiday and the people who presented them.
Therefore, they can be made not only for a special occasion, but also as an interior detail, choosing materials and decor accordingly. How to make boxes from postcards with your own hands with step-by-step instructions will be of interest to many.
If you have a lot of postcards accumulated in your house, don’t rush to get rid of them, but rather give them a second life.
How to make boxes from postcards with your own hands
Open your closet and you're sure to find materials for a card box. These beautiful, bright, multi-colored cardboard masterpieces of printing that accumulate around the household are no longer needed, but you can’t just throw them away.
In this article we will look at how to make a box from postcards with your own hands.
With a reasonable approach, they can still serve. And they will become the basis for boxes of postcards made by yourself. Lovers of home crafts will especially appreciate this opportunity for home creativity. Using ready-made patterns, needlewomen can make exquisite boxes or beautiful gift boxes.
It will give a special flavor to the entire room where it will be located.
You can choose cards that match the style so that the box fits harmoniously and becomes an integral part of the interior.
Postcards should be selected approximately the same size and the themes of their images should be similar to each other. You will need scissors, regular sewing needles and different types of thread depending on the options for the future product.
These cute little things bring comfort and joy to your home.
Many families have accumulated whole mountains of postcards.
A simple do-it-yourself box
The eye of the selected needle should be wide. Choose the motives of the drawings at your discretion. We choose threads to match the patterns on the postcards, or vice versa in contrasting colors.
You can make a beautiful box from postcards with your own hands.
Note! Instead of regular threads, use cotton floss yarn, which is made by hand or machine specifically for needlework.
By following the instructions step by step, the craft can be made by those who have not yet had time to get involved in needlework.
Let's proceed step by step.
- First, let's decide on the sizes.
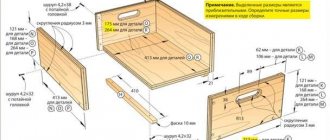
- Making a box with your own hands will require a diagram. It will allow you to clearly see the order in which the work is performed. All panels, the bottom, side inserts in the form of diamonds, the upper component of the lid with side segments are schematically reflected.
- After cutting out the two bottoms, they should be aligned with their back sides.
- Lines are drawn along the perimeter of the postcard inside the box, retreating from the edges by a centimeter. Using these actions we designate a line.
- Using decorative stitches, we sew the resulting two-layer part along the edges. For this we use floss threads folded several times. To avoid knots sticking out from the outside, we begin the stitching process from the side that will be inside the finished product.
- We use the same technique to connect the remaining parts with a double layer.
- At the end of the process, we sew the blanks by hand and sew them together.
Make holes on the parts, stepping back half a centimeter from the edge. This process can be done with an awl or a sewing machine without thread.
Carefully sew all the parts together in the following sequence: the bottom and legs, then the slices and all the front parts, the inside of the box.
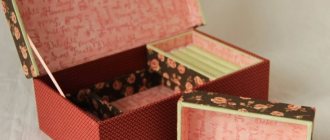
Here's how to make a box with your own hands quickly and easily.
The royal box of postcards is ready!
Postcard with a voluminous rose
The simplest option for crafts made from postcards (paper) is a rose, which will be a wonderful gift for your mother or grandmother. To do this, you will need 2 blank album sheets, pencils or markers, scissors and glue.
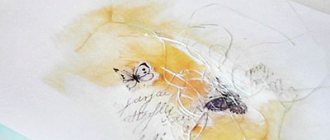
In order to get a rose craft on a postcard, you need to start by drawing 2 leaves on one sheet, which will then belong to the rose. Then we draw the rose itself, that is, its upper part with the petals. If the child is unable to make a rose on his own, because this is not the easiest flower, parents should definitely help their child. All drawn elements must be carefully cut out. Additionally, you need to cut 3 strips of paper measuring 5x20 mm.
The simplest option for crafts made from postcards (paper) is a rose
Now let's move on to the large landscape sheet. We fold it in half, and on the front side of the card we draw a flower stem. Next, take the previously cut strips and fold them in the shape of the letter Z. Glue one side of the folded strip to the back side of the cut out flower design. We do the same with leaves. Then we glue the second side of the strip to the places on the card where the leaves and flowers of the rose should be located.
Next, you can decorate the greeting card and crafts with beautiful inscriptions and wishes. The result is a gift that is simple to make but very cute in appearance.
Bookmarks from postcards: quick and easy
We have already offered several master classes on paper bookmarks, as well as making an unusual corner bookmark for books. To make a wicker bookmark, we only need one postcard, a pencil with a ruler and scissors. Take a postcard and draw stripes about 1 cm wide on it. Invite your child to help you carefully cut the strips. Then we fold each strip in half, and bend the ends of the strip inward. So we put together all the strips, which we will connect as follows: insert the ends of the strip on the right into the hole of the strip on the left and tighten. We do exactly the same manipulations with all subsequent strips. The ends of the last link must be glued together. The wicker bookmark does not fall apart due to the fact that each subsequent link is held together by the previous one.
Another option for making a bookmark from a postcard.
Take the postcard and fold it in half. Then each half needs to be bent in half again. We cut the middle into strips 0.5 mm wide up to the fold line along the entire length of the bookmark. Then each resulting strip needs to be folded left and right in turn.
How to make an oblong box
In this case, you can decide on the size and theme yourself. We use fairly thick threads. For a box of postcards with our own hands, we develop a diagram with dimensions - 80x165x55 (standard in millimeters).
You will need: postcards, floss threads, a needle with a wide eye, a ruler, a simple pencil.
We cut out three blanks 80x165, two of which are needed for the bottom. We use the rest together with another 165x100 rectangle for the lid. Next, we will prepare 2 parts for the inner box (50x80 and 50x165) and 2 for the outer box (80x70 and 165x70).
Redraw the drawing and make patterns of parts.
We move on to marking with a pencil and ruler and then cut out the parts. Under the base and for the lid we will cut out 8 and 2 side flaps, respectively. All postcard details will be duplicated with cardboard ones to give the future product strength.
Create the bottom of the box in this way: take 2 postcards and connect them together with the sides without a pattern.
Now it's a matter of technique. Using a sewing machine without thread, we go along the edges of all the cut out parts, putting together postcards and cardboard to create holes. Now we sew everything together by hand using a blanket stitch. You can experiment with the shape of the seam.
Make the first puncture from the wrong side so that the knot remains inside between the cards.
We connect the sheathed parts. We use a simple seam for two parts of the bottom. We sew on the short and long sides, bend them into an arch and sew them together, securing them with a flap. We alternately process the straight and semicircular sides.
Place adjacent pieces one on top of the other and pull the needle and thread through the horizontal stitches between the stitches to create a weave.
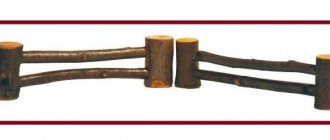
After the frame has emerged, we sew in the bottom and tighten the corners. The cover is sewn to one of the selected sides. If desired, you can add legs.
The classic box is ready!
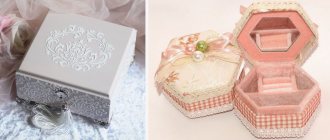
Oval jewelry box
This casket is a little more difficult to make than the previous one. To create it, you don’t need to draw a diagram, and thanks to its original shape, the box looks attractive and is suitable for a gift that even capricious teenagers will enjoy using.
For this box, it is better to choose postcards in the same color scheme. You will need:
- 8 postcards;
- floss;
- embroidery needle;
- scissors;
- awl.
Let's get started:
- On one postcard we draw an even oval and cut it out. Using it as a template, we make three more similar parts. Place the ovals in twos, facing outwards, and sew over the edge using loop stitches. You can first pierce the holes with an awl - this will make it easier to work.
- From the remaining strips we cut out the sides - strips 2-5 cm wide (at the discretion of the needlewoman). Their total length should be equal to twice the perimeter of the oval - it can not be calculated mathematically, but measured with a centimeter tape. It is better if the length of the strips is the same. We sew the folded parts together and along the edge using a buttonhole stitch. You will get a flexible ring.
- We make legs. It is convenient to make them 3.5 cm long and 2 cm high. We cut out four parts, fold them in pairs with the picture facing out, and sew around the perimeter. It will be much more interesting if you make a semicircular notch in the lower part of the legs, 1 cm away from the edges.
- We assemble the box. First, we sew the sides to the base - one of the ovals. Then we attach the legs to the narrow edges of the ellipse with a loop seam, placing them strictly symmetrically. We fasten the lid to one of the sides, making several stitches in three adjacent holes.
How to make surprise boxes
Despite the simplicity of the manufacturing process, this product will contain cute surprises. We will need sheets of colored cardboard, made ourselves or purchased paper moths. You will need paper for scrapbooking, double-sided tape, and transparent colorless plastic.
Both on a holiday and on a weekday, each of us will be pleasantly surprised by a box with a surprise made of paper.
A surprise box (Magic Box) is a unique gift that is suitable for all holidays.
The pattern is simple. We take a square sheet of cardboard according to the size of the box. Stepping back from each edge, draw parallel lines. We cut out the squares at the corners and get a cross. We bend the structure along the sides of the central square, getting a box. We draw out the lid according to the dimensions of the bottom (plus a few millimeters) adding two centimeters on each side. Fold along the lines and glue.
Making a surprise box with your own hands does not take much time and brings a lot of pleasure.
The outer sides can be decorated with anything you want (drawings, cutouts, glitter, etc.). We attach butterflies to strips of colorless plastic with tape to the ends, and glue the other end to the bottom of the box.
An original postcard-box with a do-it-yourself surprise.
Note! The surprise could be other insects, plants or mythical creatures.
Literally anyone can make gift boxes with their own hands.
When the lid is opened, the box splits into four parts, releasing the creatures hidden inside.
You can make boxes with surprises with your own hands in honor of a romantic holiday.