Review author: Terrari School of Design
Any home is always marked with its own unique address, to which various correspondence is received. So that the addressee can receive it in a timely and convenient manner, there are special devices - mailboxes, where letters, receipts and newspapers are neatly folded.
If in apartment buildings these products are made in a single standard style and are part of the overall system in the entrance, then in private homes the postal devices are absolutely individual and exclusive.
Features of a mailbox for home
Most often, a mailbox in a country house is located on the street near the entrance to the territory. Therefore, it is subject to some requirements that are not always relevant for access products:
- fasteners must be especially reliable and resistant to corrosion;
- the mail opening must have a protective canopy against precipitation and road dust;
- the door for removing correspondence should be located at the bottom of the product and have a hinged design so that small letters, receipts and postcards do not fall out when opened;
- It is advisable to equip the box with a locking mechanism to protect it from outsiders;
- In order not to interfere with mail and advertising brochures, you can install a small table or shelf next to the box.
A street mailbox, as a rule, is one of the elements on the front side of the estate, so it is advisable to combine its design with the design of the facade and fence.
You can purchase a standard design at a hardware store, but it will be much more interesting to try to make the thing yourself.
Exclusive products can enliven and decorate the local area - this is proven by colorful photos of hand-made mailboxes.
Required thickness
The thickness of the material should be selected depending on the goals pursued. For example, to store children's toys, it will be enough to use a material thickness of 4 to 6 mm. Similar parameters are suitable for storing food. If the product will be placed on the street, then the thickness should be from 8 mm. For heavy items or tools, it is also better to use thick material.
Variety of models
Before you start making a mailbox, you need to think about its dimensions and design, decide on materials and location. If this is not just a design element, but an active device, it should be positioned so as to provide convenient access for both the postman and the owners.
Products can be presented in different images and forms, but three main types can be distinguished: traditional, American and English.
American mailbox
This type of device for receiving mail has the same design, but a different design. The American model looks like a trailer with an opening end. The space inside is quite narrow, so large correspondence has to be rolled up.
The main feature of the design is a special flag, which, when raised, indicates that there are letters in the box that require sending. American mail carriers are responsible for collecting letters and mailing them.
American-style mailboxes are installed on a separate wooden or metal post.
Made of metal
This design is the most durable and durable, but it is much more difficult to make. To do this, you will need minimal skills in processing metal structures. So, to build such a product you need to prepare the following tools:
- a metal sheet;
- Bulgarian;
- jigsaw or saw;
- welding machine;
- anti-corrosion impregnation;
- dye.
The workflow looks like this:
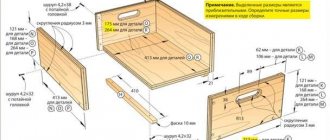
- The first step is to take a sheet of metal and cut a piece of it measuring 23x23. Next, using a saw, we remove any snags and roughness from the edges. This fragment will serve to construct the upper arch and side walls.
Metal mailbox diagram
- Next you need to make the bottom. The shape of this fragment is an even rectangle. The dimensions should be 9x21.
- Then we bend the top cover to create an arch shape. To do this, you can use any durable rounded object - for example, a large diameter pipe, a barrel, etc.
Bend the sheet into an arched shape
- After this, you need to attach the lid to the lower fragment. Make a ¾ bend on the bottom sides of the top rounded part at a 90 degree angle.
- We take the lower fragment and place it inside the arch. Using spot welding, we solder both elements to each other.
Bend the edges of the sheet and weld
- Now it's time to make the back of the box. Trace the panel on a piece of paper with a pencil. Add another ¾ to the drawing. This gap will be needed so that the part can be bent on the sides.
- We weld the bent ends to the back side of the panel in the same way as the previous soldering process.
- The front of the box will be almost the same as the back wall. However, it must be provided with a hinge to open and close the sash.
- Finally, we treat the assembled structure with a special anti-corrosion compound and paint it in the desired shade.
Cover the box with an anti-corrosion compound
An American mailbox will require more effort to operate, but will be stronger and more durable
English mailbox
At the entrance to country houses in Great Britain, stationary structures are installed in the form of a massive brightly colored cabinet with a table. The material used to make this stylish and beautiful mailbox is brick or metal.
The product is made in the form of a poster stand, a miniature telephone booth or a house model, harmoniously combined with the architecture.
Design options
This type of product includes original mailboxes, made with your own hands from improvised materials and common household items: plastic bottles, boxes or containers.
Any durable and waterproof material can serve as the basis for an exclusive item, and step-by-step instructions will tell you how to make a mailbox with your own hands.
Types of products
Today, a plywood box can be made in different shapes, types and for different purposes.
- Mailbox.
- Product for collecting children's toys.
- Design for sending fragile and valuable parcels.
- Toolbox.
- For storing and transporting vegetables, fruits and other products.
In addition to the main types, you can make gift packaging from raw materials, as well as niches as a cabinet and other things.
Self-production
Having decided on the installation location, shape and dimensions of the structure, you need to decide what material the mailbox will be made from. Factory products sold in stores are most often made of metal.
However, not all home craftsmen have welding skills and have the necessary equipment, so the best option for creating a device for correspondence is wood.
To make a mailbox you will need:
- wooden blocks and thin board;
- fasteners;
- hand power tool.
The following steps should be followed:
- Find a suitable drawing or make it yourself.
- In accordance with the drawing, prepare box parts of the required sizes from boards and bars.
- A hole for mail must be made in advance either on the lid or in the upper part of the front wall, equipping it with a protective visor.
- The hinged door is also prepared in advance. It is attached to the product using hinges and is equipped with a lock.
- Next, the box is assembled using bars and fasteners.
The finished design is the basis for an exclusive item. To turn a simple object into a work of art, you need to decorate it.
You can use anything you like to decorate your mailbox: natural material, toys, Christmas tree garlands and much more.
The final stage of work is installation of the product. Usually it is mounted on the fence from the outside or inside. The main thing is that the item is clearly visible and accessible.
A beautiful and original hand-made mailbox can decorate the entrance area of any country house, delighting the owners and lifting the spirits of passers-by.
Useful tips
The most frequently asked questions arise about attaching the mailbox to the fence. There are several options:
- On the back wall, 2 holes are made in the middle or on the sides and through them the box is secured to the fence with clamps. The disadvantage is that water flows in during rain or snow. Mail becomes damp.
- Additionally, a beam is prepared, the length of which is equal to the width of the mail box. The rail is attached to the fence using angles or bolts. Then, using self-tapping screws from the inside of the box, they are attached to a reinforced beam.
- The product is secured to the wall using bolts and nuts. To do this, make 2 holes on the sides in the back wall. Transfer the marks to the wall and drill a hole.
Designers advise that when sawing elements, strictly adhere to the dimensions indicated in the drawing. Carpenters recommend additionally strengthening the gluing and joint areas with moisture-resistant sealant or epoxy glue.