- October 27, 2018
- Crafts
- Natalia Penchkovskaya
A craft that has a fence has a finished look, so usually craftsmen, when making different houses or flower meadows, place a small fence around them. You can make it yourself from absolutely different available materials. The items used are plastic bottles and their caps, wooden ice cream sticks and barbecue skewers, matches and corrugated packaging cardboard, pasta and sea pebbles. The list of materials from which you can assemble a small fence for crafts is endless. It is important to know not only what to use for this design, but also how to connect the elements together so that the composition looks solid and is strong.
Children in kindergarten and school often make crafts from natural materials. Teachers set the task of creating conditions for cognitive and research activities, developing students’ creative imagination, fantasy, and the ability to work with their own hands with natural and waste materials. Making crafts requires perseverance and determination, accuracy in work and the desire to make the craft the best. This fosters independent thinking and work skills that will be useful to children in later life.
In this article we will look in detail at how to make a DIY fence so that it is beautiful, original and durable. The photographs presented in the article will give a clear idea of the appearance of such a structure, and detailed instructions for performing the work will help make it faster and easier. Of course, you don't have to completely replicate the DIY fence patterns described below. You can use the knowledge gained to create your own unique piece, adding new elements, depending on the main construction of the craft.
Flaws
- The service life of a fence made of birch posts is not too long compared to concrete or metal fences;
- Requirement for care. Such a fence must be periodically treated with special compounds to protect against rotting, parasites and insects;
- A blind and high fence shades the area, which is bad for plants;
- The tree can be cut down or set on fire. If the owners are absent for a long time, the birch fence may well be dismantled for firewood.
Return to contents
Using Popsicle Sticks
This DIY fence can be made from identical rounded wooden ice cream sticks. They can be easily purchased in stores, and for working with children, they can be collected over the summer, when ice cream is eaten in large quantities. Making such a fence is simple. On a flat surface, lay out the sticks in a row and attach two horizontal ones on top of them. You can use either PVA or a glue gun.
It is better to make a fence from popsicle sticks in small sections, as in the photo in the article. Now you know how to make a fence for a craft, but that's not all. You need to install it in a vertical position, and this is much more difficult. One simple way is to cut two strips of green cardboard, install them at right angles to the surface of the base and glue them on both sides to the fence section. The upper edge is cut into strips, imitating grass. You can applique flowers to complement the composition.
If the fence for a garden craft is made especially strong, then it can be strengthened with gypsum mortar. For example, if the craft is a hut made of branches, then around it you can lay out a “sausage” made from a mixture of plaster and water. When the solution begins to set, insert the fence sections into it. After hardening, they will be firmly fixed. Subsequently, you can use gouache or acrylic paint to paint it green, as if it were a mound overgrown with grass.
Master Class. Fence for a mini garden on the window
Elena Sidorova
Master class. Fence for a mini garden on the window It’s not for nothing that winter is angry,
Spring is knocking on the window
And he drives him out of the yard.
The influence of the surrounding world on a child's development is enormous. Natural phenomena and objects attract children with their beauty and diversity. By observing them, the child enriches his sensory experience, on which his further creativity is based. The children of our group felt the arrival of spring! It's time to plant a vegetable garden . I wanted to do something unusual, close to a real garden . The idea quickly became a reality.
At hand were ice cream sticks, ceiling plinths, liquid nails, and white gouache. Sunflowers for decorating a fence , made specifically for a fence .
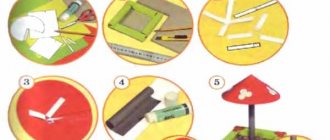
1. Cut 2 parts of the plinth of the same length and lay them out parallel to each other.
2. Glue the sticks along the entire length at the same distance.
3. the fence over and glue the legs - balloon sticks - in three places for stability. You can make more legs. Depends on the length of the fence . The length of my fence is 70 centimeters , three legs were enough.
4. Next, we place the fence on its legs with the front side facing us.
5. We begin to paint it. You can also paint it lying down. Whichever is convenient for you. to paint the back side of the fence .
6. My fence is ready ! We decorate it with sunflowers.
7. Determine the place for the fence in the garden .
Article on the topic: What is the diameter of the pipe for a fence made of corrugated sheets
Here's what I got.
Master class “A well for a vegetable garden on the window” Master class. A well made of clothespins. Materials: wooden clothespins, ice cream sticks, wooden skewers, twine, glue gun. Master class “Onion trees” (vegetable garden on the window) Spring has come. In our harsh Far Eastern climate, it is so far only on the pages of the calendar. In another month and a half, everything will begin to turn green. Master class “Mini postcard for Mother’s Day” Master class “Mini postcard for Mother’s Day” Mothers’ Day is approaching, everyone is thinking about what gifts to give our mothers. Master class “Mini -hats” Master – class “Mini-hats”. To make a hat we will need: 1. Thick cardboard (circle diameter 15 cm) 2. A jar of sour cream. Master class “Mini-topiary” There are so many different master classes on the MAAM portal. Today I want to add one more. I did this kind of work with my students. Master class “Mini topiary from plasticine” Each teacher in the group has plasticine from which you can no longer make a snowman or a tomato (too small or mixed. Master class “Frosty patterns on the window” Looking at children’s work with Elena Tynyanaya, Tatyana Goryacheva and other colleagues, I really liked the arched shape of the window. That’s when I decided. Our group pride: a mini-vegetable garden on the window! We wanted to create a mini-vegetable garden in the group, but it turns out, well, very big garden! Why did this happen? Yes, because there are a lot of ideas and I want to. Planting seeds and growing a “garden on the window” (senior and preparatory groups) Planting seeds and growing a “garden” on the window. Senior preparatory group. Educational objectives: Development thinking, imagination of children.Master class “Snow patterns on the window” In our age, the age of “double-glazed windows,” small children, even in such frosts as now, practically cannot see frosty patterns on the window.That’s why.
Article on the topic: How to make a spark arrester for a bathhouse
How to make a fence for crafts from paper straws
Recently, products made from newspaper tubes have become popular. They are used to weave baskets and boxes, make houses and pen stands, vases and boxes. The photo below shows how a hut with a small fence around the building was assembled from individual elements.
Before assembling a fence for a DIY craft, you need to twist a large number of tubes. This is not difficult to do, but the process may take some time. It is best to make all the preparations for work in advance. To create a tube, prepare pages from any printed publications. This could be a newspaper or a glossy magazine. The sheet is placed on the table surface and twisted into a tight tube using a knitting needle. The corner at the end is glued to the last turn with PVA glue.
To work on the design, the tubes are cut with scissors into pieces of the required size. A fence for a children's craft can be easily assembled from two long tubes and several short slats, as in the example in the photo. They are held perfectly if their end part is smeared with thick PVA glue. Subsequently, the fence can be painted with gouache or acrylic paints or varnished.
Making and making mock-ups of walkways and miniature fences: Christmas Village Displays
Christmas Village Stands
Any model home, building, plaza, park, farm field or path is certainly enhanced when formal boundaries are introduced.
By using a small picket fence, you can create this border without completely blocking the landscape of your Christmas village, as you can still see through the gaps in the fence.
Lemax sells a particularly nice roll of wire fencing that is cheap to buy and easy to lay out, but making your own fencing is even cheaper and very easy as it's an ideal kids project for kids to get involved in. Everything you need to make your own at home , is thick cardboard, brown paint, glue and scissors.
First paint one side of the card with brown paint and leave to dry. Then paint the other side of the card and let it dry. Cut the card into small rectangular strips to form wooden fencing slats, keeping the width roughly equal (5 to 6mm is ideal). Trim them to length (about 2 inches/5 cm) and cut out small triangles at the top of each length. You will need approximately 11 pieces to create a 4"/10cm long fence.
It should be noted that instead of using a map, you can always visit your local model store and buy very thin strips of wood, which are often sold for making items.
How to make a fence model
Then, on a sheet of glass or plastic (something that glue won't stick too, like a glass cutting board), lay out all the fencing slats, spreading them out evenly. Using a brush, apply a little white glue and glue one of the long strips along the vertical strips towards the bottom, to connect them together.
Photos showing the back and front of the homemade cardboard fence, (front and back):
It should be noted that you can also try collecting ice sticks on a stick throughout the year and use them to make a picket fence after cutting them in half.
This photo shows a completed model of a cardboard fence set in a Christmas village setting, providing a realistic border to a small park:
Picture of another miniature fence. This rather ornate fence is made of plastic and sold by Lemax (under the name Classic Victorian):
This effective paved path was printed on card stock (from the computer) and framed with homemade hedges, a model grass mat and fishing line. illuminated porcelain New Year's buildings:
Photos of fences, pebble paths and roads courtesy of Lemax:
Easy fence options for kids
If a child of senior preschool age has received the task of making a composition for an exhibition, then you can offer to make a craft from the pine cones, acorns, chestnuts and leaves collected in the park. It could be simple mushrooms in a clearing, a figure of an animal or a fairy-tale character. The sculptures made must be placed on a solid base. This could be thick cardboard, a plastic plate, or a piece of foam sheet. A fence made from natural material will also look beautiful. The parts are placed around the perimeter of the base, for example in a circle.
A fence made of small chestnuts glued next to each other will look original. A “forest” of green-painted pine cones will look interesting.
You can make a fence of twigs around a cardboard house. For crafts, you can cut them in the park. How to use them will be described in detail later in the article. Children will do a great job with a fence made from halves of walnut shells. They can be placed around the building in one row, or they can be attached in a checkerboard pattern in two or three levels.
Features of the construction of fence from boards
If you plan to weave a fence fabric with your own hands from a more durable material - boards, you need to select blanks of maximum length. In this case, the distance between supports can reach 1.5 m.
Between them there are intermediate strips installed vertically. Their number is determined by the degree of rigidity of the material, as well as the length of the section.
When a wicker fence is constructed from boards, the wood is laid with the end side down, on top of each other without gaps. Checkerboard weaving is used. The boards must be very long. This material can easily withstand bending loads.
After installing the pillars, install two vertical boards between them, then fix the horizontal ones on these vertical ones.
Metal pillars for such structures are concreted. A combination of a fence and a concrete foundation protruding above the ground surface and brick pillars is allowed.
Other types of braids
The veneer structure is somewhat different, as it is assembled from sections consisting of a frame and woven fabric, which is secured with self-tapping screws and nails. Another option for a fence is vertical weaving.
Ready-made version of a fence made of boards, see the video below for more detailed instructions.
To implement it, they use birch branches, freshly cut, as long as they are flexible enough. The material is attached with self-tapping screws and nails to horizontally oriented crossbars.
Such structures also require pillars, however, they can be placed quite far from each other. At the final stage, the fence is treated with a protective compound and painted.
Photo gallery of wicker fences
Below are photos of ready-made examples of wickerwork, made from various raw materials, using the most popular weaving techniques.
A wicker fence will add folk color to the area. Proper preparation of the material and moisture treatment will significantly improve the appearance of the fence and its service life. If you wish, you can master the weaving technique yourself and start installing the fence.
Installing a birch pencil on the foundation
A fence foundation is a great way to protect wood from premature deterioration and improve its appearance. Wooden logs can be installed in combination with decorative pillars made of concrete stone or brick. In this case, the birch pencil can be positioned both vertically and horizontally.
- The first step in creating a combined wooden fence will be the construction of the foundation.
An example of installing birch fence pencils on a strip foundation
Finally, you can decorate the fence in your own way. Leave it a natural look, treating it only with stain, drying oil or matte varnish. Add color by painting with any paint. Another interesting option is a picket fence in the form of colored pencils - original, fun and pleasing to the eye.
Original finishing - recommendations
Have you decided what materials you will use for decoration? If the issue is resolved, then proceed to the most creative moment - design. With a superficial approach, it seems that it is easy and simple to make a fence that will not only protect your favorite plant from damage, but will also add a decorative element to the overall design. This is wrong. It is unlikely that bottles of different sizes dug into the ground or chaotically dumped stones will become a worthy decoration. Even in chaos, a single style should be visible. For example, when creating a fence from used car tires, having artistic taste, you can create thematic compositions.
A colorfully designed composition of tires pleases the eye
It is very interesting for small children to walk among the flowers, meeting along the way a wild swan spreading its wings or a funny frog.
It's nice to meet a charming frog in the garden
It is worth noting that tire fencing is practical, making it possible to realize any fantasies, but they require certain skills and special tools for cutting. Plastic or glass bottles are easier to handle. The main thing here is to maintain a certain color scheme that harmoniously combines with ornamental plants. Make decorative elements (roses, daisies) from plastic waste and decorate the ends of the bottles with them. This will give individuality to the structure. Decorating a wooden fence will bring pleasure to all members of your family. Give children jars of colorful paints and you'll end up with double the benefits - a painted fence and silence until each piece of wood turns into a rainbow.
When decorating a wooden fence, use bright colors
Decorative elements can be figurines of fairy-tale characters cut out of plywood. A small fence for low-growing plants made from computer disks does not require additional decoration. In sunny weather, discs arranged in several rows will create a unique glowing effect that can attract the attention of neighbors in the area.
When arranging fences for flower beds, flower beds, and front gardens, try to adhere to the following tips:
- To fence the central part of the site, choose natural stone. It will add significance and weight to your composition. A stone slide located in the viewing area will add originality and fundamentality.
- When using wooden elements, cover them with paint or a special varnish that matches the natural greenery of the area. A protective coating will not only improve aesthetics, but also protect the wood from rotting.
- Decorate fencing from scrap materials in moderation without disturbing the visual balance. They should only shade and emphasize the natural beauty of plants.
When bringing your design ideas to life, do not lose your sense of proportion. The principle “the more the better” does not work in this case. The beauty of living plants can be lost behind a clutter of small elements.
Video: what types of fences there are for flower beds
We offered many options for dividing fences made from auxiliary materials. It’s not at all difficult, with a little imagination and perseverance, to build an original fence that will be the envy of your neighbors. Involve your household in the process - this will allow you to get closer and feel how pleasant it is to improve your garden plot together. Don’t rush to get rid of household waste (empty bottles, disused car tires) - it can be used as original decorative elements for your property. Remember - “the road can be mastered by the one who walks”! Experiment, master new technologies, and your site will become a role model!
- Author: Dmitry Feferman
Hello! My name is Dmitry. I am 52 years old. Mechanical engineer by training. Three years ago I mastered the profession of a copywriter. I am confident that my engineering training and practical experience will help in writing interesting and readable articles. I think they will interest readers. I find the topics offered on the site interesting and useful. For me, this is an opportunity to gain experience and share knowledge. Rate this article:
- 5
- 4
- 3
- 2
- 1
(21 votes, average: 3.2 out of 5)
Share with your friends!
Weaving from branches
Our ancestors have long used wicker fences to enclose their homes. Even today, many summer residents like to build decorative fences in their courtyards. For crafts for kindergarten, you can also create a fence using weaving from branches. There is a lot of preparatory work ahead. You need to cut flexible rods with a diameter of 3 - 5 mm and select thick aluminum wire. You will also need tape and brown floral tape.
The wire is cut into equal sections according to the height of the future fence posts. Then each section from below is bent at a right angle. By connecting three pieces of tape together with tape, we get a stable column on a tripod. Wrap a brown ribbon over the tape to imitate a wattle branch. Then install the posts on the base. It is more convenient to use a candy box by turning it upside down. Then all the tripods will be on the bottom, and only the brown pillars will be visible on the front side. It is on them that weaving is done from the bottom up, inserting the twigs in a zigzag. The next element of the fence must be started on the other side. Repeat the weaving pattern until you get the desired height of the fence.
Choosing a birch pencil
A birch pencil fence can be installed in two ways:
- Traditional. In this case, the pillar sinks into the ground;
- Combined. The palisade is installed on the foundation.
This is what birch pencils look like for installing a fence
The material will need to be prepared - selected by size, debarked, sawed and planed. However, if you need a palisade made of smooth, calibrated trunks, it is better to buy the material ready-made.
The cost of fencing made from birch pencil is quite affordable. Most often, birch pencil is sold in packages. Its price per cube is approximately 1,700 rubles. You can also buy the material individually - approximately 35 - 40 rubles. a piece.
Palisade - do it yourself
- An important part of building a fence is measurements and calculations. You will need: a tape measure, a piece of paper, a pen and a calculator.
An example of a picket fence made of birch pencils
These calculations are made before purchasing the material to determine the required quantity. If the construction plans include a gazebo, it is not superfluous to calculate the material for it at the same time. At this stage, it is important to decide on the option for securing the logs. The fence can be strengthened using the traditional method of digging each log into the ground. When purchasing and preparing logs, you need to take into account the digging height. Another method of fastening: this is a lower beam pre-fixed in the ground, and pencils are placed and attached to it. In this case, the height is calculated taking into account the beam;
Preparation and processing of material
- One end of the post is sharpened with a pencil ax at an angle of approximately 40 degrees.
- Before installing the fence, the wood must be treated with antiseptics; after installation, it will not be possible to apply a protective composition to the ends of the trunks.
- Septic tanks must be used that are suitable for wood and outdoor use. Special solutions for protecting wood from insects, moisture and fungus come in two types. Some form a protective film on the surface of the wood, while others penetrate deeply into the fibers. Impregnating compositions are more effective.
- Particular attention should be paid to the part of the log that will be buried in the soil.
Fence post installation diagram
Varieties of willow branches
Almond
Most suitable for creating a wicker fence with your own hands. Its value lies in the easy removal of the bark. Such branches, after undergoing treatment, become bronze in color.
Willow
The branches have smooth bark with a reddish tint. The fence turns out to be beautiful, but not very durable.
Hemp
The branches are highly flexible. Weaving a fence requires a minimum of time. Two-year-old branches that have a greenish tint are most suitable.
Cardboard product
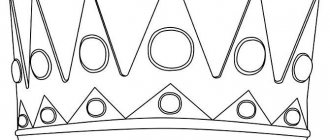
For the fence, you can use either ordinary white or colored cardboard, which is sold in stationery for schoolchildren, or corrugated packaging from old boxes. The cardboard fence for the craft is cut out with scissors or a sharp linoleum knife. First, draw the outlines with a simple pencil using a ruler. You can make a one-piece product, but carefully cutting out the internal holes will be problematic, and the child is unlikely to cope with such a task on his own. It is easier to cut out individual planks in large quantities, and only then assemble them on the back side with horizontal long jumpers. To make the fence for the craft strong, you can glue together 2 parts for each plank. To ensure that they match exactly, it is best to fold the cardboard in half and only then cut out both parts along the contours at once, and only then attach them to each other. To do this, use thick PVA glue.
The shape of each element of the fence can be very different. You can draw simple pointed edges on top, as in the photo in the article, or you can make a curly top or draw all the planks in the shape of a trapezoid, where two adjacent parts will form a rectangle.
What's great about a paper fence for crafts is that you can color it to your liking. First, a background color is applied, on which you can draw any ornament, flowers, or make an inscription. A fence made of corrugated cardboard is denser than a regular one, but to paint it you will have to apply the background twice, since the first layer will be visible. The version that is not covered with paint at all, in which a thin layer of top paper has been removed, looks interesting. In this case, a light brown corrugated part will remain on the front side, which will imitate wood.
If the fence is small in size and made in the shape of a square or rectangle, then it will stand firmly in one place and without any supports. If only a fragment of the fence is needed in the work, then the last sections are made longer and the very edge of the double planks is not glued, but, on the contrary, is opened in different directions at right angles to the fence. You can additionally attach a rectangular strip of cardboard to the bottom, then the fence will stand perfectly in place.
If the craft is small in size, then it makes sense to place it in the middle of any box. You can use shoes. Then its edges will need to be converted into a fence, cutting off the excess cardboard to the desired height, and using the edge of a knife to cut out the internal holes for the slats along the drawn contours. This is convenient because you can change the height of the fence by making tall and carved posts at the end of each section or semicircular gates that can open. In addition, there is no need to strengthen the edges of the fence, since the structure will be already strong.
Movable toys
Toys of this kind are of great interest to children. Simply by pulling a thread you can create movement of your arms or legs.
And the figures are created very simply; for this you will need: cardboard, buttons, thin wire, strong thread and scissors.
Creation stages:
- On the cardboard we draw the legs and tail - moving parts. We put dots at the base.
- In place of the points, we make fastenings by threading thread or wire through them. Buttons are suitable as a fastener.
- We glue the body and head onto a bamboo stick. You can use tape.
- We put fasteners into the holes made on the legs and combine them with the body. Using an elastic band, we tie the paws together, making two holes in each paw so that they are placed very close to each other and the thread is not visible.
- By analogy, we fasten the tail with the hind paw.
- Tie another thread to the thread located between the paws. It is she who will launch the mechanism.
- We decorate with colors to your liking.
Using these instructions you can make bunnies, chanterelles, and bear cubs. And it will be a whole puppet theater that will impress any kid.
In the form of ancient amphorae
To be honest, we don’t even know what to properly call such a fence, but it is clearly sculptural, and installed in a classical or medieval garden of a certain country villa. But we won’t go into much thought, but simply pay attention to the details, because you can create something similar at your own dacha.
In our picture you see amphorae from which branches of a certain plant emerge.
You can simply repeat this by ordering amphorae of the desired shape and size from a concrete workshop, and also installing branches from country trees in them, having previously painted them in gold, silver or bronze color. But let us immediately warn you that even painted tree branches will not last long, and therefore, if you really like this fence, combine concrete and forging, it will be nice and durable!