Surely every girl has been caught in the pouring rain at least once. As a result, my favorite dress was ruined. At best, it could be restored after complete drying. But many fabrics can become deformed due to excessive wetting. This is especially true for decorations on dresses.
To prevent this from happening again, it is recommended to have a raincoat with you. You can purchase it ready-made on the website https://www.prstyle.ru/catalog/umbrellas/raincoats/. Here, raincoats already have comfortable and functional cases. If shopping online is not your style, you can always do everything yourself.
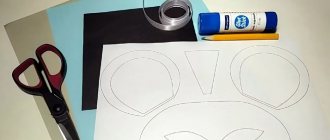
It's easy to sew a raincoat
A product that does not require a pattern can be made by a person without special knowledge and skills. It is a little more difficult to sew a trench coat, even if there are patterns. They can be bought or downloaded on the Internet on websites that teach sewing. A craftswoman without experience should not take on the job if the raincoat is supposed to have a lining. This can be done beautifully and efficiently by professional seamstresses. You can contact the atelier, where they will cut and sew a raincoat of the desired style according to your figure.
If you know how to use ready-made patterns or have ever done this type of needlework, then the work will be easy to complete. You can design a raincoat based on patterns for a dress, you just need to increase the increments and expand the product downwards.
Main details:
- back;
- shelf;
- selection;
- sleeve;
- collar.
They will need to be laid out on fabric folded in half in the direction of the grain, outlined and cut. There will be 2 copies of all parts, and one copy of the back, since the pattern is laid on the fold of the fabric. Now all that remains is to baste, try on and sew the product.
This is interesting: Pattern for a women's raincoat with a warm lining (36-44 euros)
Medieval hood: pattern for a cloak
A cape is considered an excellent addition to a carnival or fashionable costume. This item of clothing has been used since ancient times to keep warm, to mark one’s status, or simply for attractiveness.
What does a medieval cloak look like? In general, a hood
also suitable for a jacket:
- First of all, the fabric is selected. Wool, cotton silk, flannel and cotton are suitable for such a cape. You should buy fabric in 2 colors. One for the outside, the other, lighter, for the lining.
- The next step is to measure the circumference of the neck and choose the length of the cape. The neck should be measured at the very base. Then measure the distance from the shoulder to the possible required length. Write down all measurements on a piece of paper. The length of the product may also depend on the style. The robe-like style is worn to the ankles or calves in most cases. The style, reminiscent of a cape, is made to the elbow or slightly lower.
- Then measure the circumference of the neck to calculate the radius. To calculate it correctly, the girth must be divided by 2, then divide the resulting number by Pi. Round the resulting number up to a larger integer, and this will be the radius.
- Take the fabric and lay it in 4 layers. First, they lay it in half across, then in half again, it should come out square. Rotate the fabric so that the corner of the center point is in the upper left corner.
- Draw a neckline on the fabric. Take a piece of twine and pin it to the left corner of the folded material. They put a piece of chalk on the other end, it should come out like a kind of compass. Draw an arc with this compass from the top to the left edge.
- Draw a bottom line. To the radius you need to add the length of the cape you want to get. If there is not enough string, it can be lengthened and another one can be inserted, which will classify the bottom.
- Start cutting. You can start making the pattern by adding 1.5 cm in advance for the seams. Once the pattern
is ready, you can cut out the lining. It is necessary to do the same thing as described above, only using the material prepared for the lining. - A front incision is made on the cape. Unfold the key and backing parts and place them one on top. Then they are placed in two to create a semicircle. Cut fabrics along any fold. There is no need to touch the other fold. The front incision is made in the same way.
- Lay and chop the material with the front side facing inward. The resulting semicircles must be unfolded and one piece placed on top of another so that the outer side is in the middle. Carefully check that all the sections are accurately connected, and you can chop them.
- An allowance of 1.5 cm is placed around the perimeter. One of the straight sides does not need to be stitched to the end; leave space so that the part can be turned out later. As you stitch the material, it is necessary to fasten the thread before starting and at the end, so the product will be securely sewn.
- Turn the product inside out and iron it.
- Sew up the left hole. To do this, use a sewing machine or stitch by hand.
- For sewing, lay out the part with the wrong side facing you. They cut one side, just like they cut a cape.
- Place and sew along the back seam. Place it inside out again. After the part is folded, the length of the hood should be 45 cm.
- To assemble the product, go through the top edge with 2 lines, so it can be assembled. Here you can also sew either by hand or by using a machine.
- How to sew a hood to a product. The hood
are secured with the front side facing inward . Make sure all cuts are laid flat. Sew down the parts, remembering to leave room for allowance. It is also necessary to fix the threads so that the seam does not come apart.
Important! To prevent the fabric from fraying, it can be processed. After the cloak
- the tent is ready, it can be beautifully decorated. For example, instead of fasteners, you can use ribbons.
Or use an eye needle to tie a loop and sew on a large button.
You can try trimming the hood
fur. Only when purchasing fur, you need to make sure that it does not have a smell. Using a similar principle, you can make a children's superhero cape. You just need to take a little less material.
Take the child’s measurements and proceed from there. A raincoat is considered an excellent and convenient thing that will protect a person in wet weather. Moreover, sewing such a thing does not take a lot of time.
Pattern
A raincoat with a hood is also very easy to make. To sew such a raincoat, you should stock up on waterproof material. If you make a raincoat of an average size, you need to take about 2 meters of material. When sewing a raincoat, like any other raincoat, you should follow the following order:
- You need to join the side seams using a sewing machine or by hand using a thread and a needle.
- The hood must be sewn to the neck. The edge at the bottom of the hood should be the same as the bottom edge of the neckline.
- To give the product the strength of the sleeves, the edges and bottom must be treated with binding.
- If there are fasteners, the choice of their material depends on your own desires.
- You can decorate with drawings, applique or rhinestones.
Cloak made with your own hands It should be noted ! The raincoat can be created in one piece by simply cutting out a hole for the throat.
Your ads will be inserted here by
Easy Plugin for AdSense
.
Please go to the plugin admin page to Paste your ad code OR Suppress this ad slot.
It just won't work to put a hood
. From all that has been said above, we conclude that any product is easy to sew on your own. The main thing is to have the desire, stock up on patience and the necessary material.
External module
Do you know where meteorological temperature and humidity sensors are located? They use special ventilated housings similar to plungers. White. So I wanted to do everything beautifully. On thingiverse I found an interesting project “DHT22 TEMPERATURE HUMIDITY SHELTER” from the author of NEO BUILDER.
As you can see from the render, this is the same meteorological plunger. The project was developed specifically for the DHT22 sensor. So this turned out to be what I needed. I was pleased that in addition to the STL files, the archive with the project included detailed instructions for assembling this case. As a result, it was this project that I decided to implement, so to speak, in plastic. PETG plastic from the ABSmaker company was used for printing; if you are interested, here is an article about it “PETG plastic from the ABSMaker company. Brief review and review." Naturally, the model was printed from white plastic.
And this is what I got:
The body is printed from a large number of elements and then assembled onto 3 M4 studs. For assembly, I specially purchased a stainless steel stud and nuts also made of stainless steel. I did this so that rust spots would not appear on the body in the future.
However, another problem arose here. How to securely secure the sensor so that the wires do not come off. And everything held up well. As a result, we had to make a special socket to which the sensor and the wire from it were soldered.
As a result, the sensor was glued and soldered to the socket. A wire was soldered to the socket. Then a layer of protective waterproofing compound was applied to the soldering areas. Like this:
Well, after that, with the help of a small self-tapping screw and electrical tape, the sensor was secured inside the housing.
Sewing a raincoat with your own hands
The simplest option for sewing a raincoat is a polyethylene poncho model. The material consumption in this case will not exceed 2 m, so the result will be a rather economical thing. The length is measured as follows, taking into account the width and length. When the first indicator is greater than the second, then 2 lengths will be needed, plus 20 cm for the notch for the neck and processing the bottom.
- Find the neck circumference and radius.
- The radius is added to the length of the cloak.
- The material is laid out on a flat surface and leveled well.
- The middle of the edge is located and a dot is placed with a marker.
- A semicircle is drawn with the center at the marked point.
- For the neck, a perpendicular to the edge is drawn from the mark, on which the radius of the recess is marked.
- A circle is drawn and cut out.
If you choose the option with a hood, you can make it from leftover material and cut it out of a square measuring 25x25 cm.
When assembling the raincoat, the front edge of the hood can be immediately hemmed, folded in half, or treated with braid. The bottom of the raincoat is processed in the same way. The lower edge of the hood is aligned with the neckline and pinned. At this stage, it is better to try on the poncho and adjust where necessary. If everything is in order, the hood is attached.
We sew clothes for dogs ourselves
Every owner wants his pet to stand out from others, look good and be healthy. In winter, warm clothes will help make your dog smart and at the same time protect him from wind and dampness. But you don't have to scour your local stores to find the size, style, or color you like. You can do everything your pet needs on your own. The most basic and simple clothing option is a triangular bandana around the neck. This is where we will begin our series of master classes.
Materials and tools you need to have on hand to make something like this:
- Thick flannelette fabric
- Velcro fastener
- White pompom
- White faux fur patch
- Scissors, thread, needle, sewing pins, sewing machine
The procedure will be as follows:
- To cut out a rectangular piece of fabric of the desired size, measure the circumference of your dog's neck and add 5 cm. The resulting value will be the length of the rectangle. Its width should be half as long.
- Fold the flap in half lengthwise so that the opposite sides match. Mark the center of the rectangle on its bottom side. Then draw two lines from this point to the top corners and you will have an isosceles triangle to cut out.
What to consider when sewing a raincoat from bags
- Draw pattern lines along the fabric texture (stripes). This technique will make the product less brittle.
- Try to form fragments of the product in such a way that the inside and outside textures match. Sometimes it's hard to tell which side of the bag is which, so pay attention to the texture and color.
- Make sure all seams are on the inside of the jacket.
- Cut out identical pieces by folding the material either in half or just together. This will save a lot of time.
- When ripping bags, use scissors or a utility knife. Do not cut them into pieces, otherwise the fabric will begin to fray and additional time and money will be required for processing.
Progress
- Print or draw a pattern.
- This pattern is suitable for creating a medium sized women's raincoat.
- Cut out all the pieces.
- Cut out four pieces for the sleeves. Separate the two bags. Do not touch the hem (the part where the handles are inserted). One bag should be enough for two sleeves.
- Divide the other bag without folding. It will be used for two pieces of the back.
- In the next bag you open, do not touch the hem either. This will save you from having to finish the bottom edge later. If the handles are in the way, carefully tear them out and stitch the torn areas. From the resulting piece, cut out two front pieces.
- Cut two pieces for the hood using leftover pieces or a new bag.
- Connect the sleeves.
- Take two sleeve pieces and sew along the longer edge. Repeat this for the other sleeve. When unfolded, there should be two pieces that match Figure A.
- Then sew along the other edge as in picture B.
- Sew the back.
- Connect the two pieces and stitch along the long edge.
- Connect the back to the front parts.
- Sew the shorter vertical edge of the front to the edge of the back, right first. Repeat this step with the other front piece on the left.
- Sew on the sleeves.
- Secure the inverted sleeves with needles on the wrong side of the product, and then stitch. Do not sew the shoulder edges all the way. Later they will be sewn to the hood.
- Form a hood and sew to the base of the product.
- Then use a hem stitch along the edge of the hole.
- Sew the hood to the base.
- Finish all exposed edges of the piece.
- Cut two pieces from the handles of the bag (10 cm each) and sew them into the seams on the sides, thereby forming loops for the belt.
- To make the belt, sew two handles of the bag. Light with fire or stitch the ends so that they do not fray.
- Form two more long strips of handles and sew them along the bottom edge of the raincoat to protect that edge from quickly fraying.
- The raincoat is ready.
02instructables.com
instructables.com
instructables.com
How to sew a windbreaker for a dog (instructions with pattern)
To do this you will need the following materials:
- Warm fabric
- Elastic band (“elastic band”)
- Elastic cord, two tips and a clamp for it
First, we take measurements and make paper patterns, only then we move on to sewing.
How to take measurements
- The volume of the neck is measured at its base, at the widest part. Always add about 2 cm to this figure so that the dog can breathe freely.
- The length of the neck is the distance from its base (the widest part) to the top of the head.
- Chest girth is measured at the widest part of the chest, just behind the front legs. You also need to add about 2 cm to this indicator (for very fluffy dogs - 3 cm) so that the animal does not feel tight in clothes.
- The length of the sternum begins at the shoulder blades and ends behind the rib cage, where the dog's torso begins to taper.
- Waist circumference is measured at the narrowest part of the torso, between the chest and hips.
- Back length is the distance from the base of the neck between the shoulder blades to the base of the tail.
- The length of the leg is equal to the distance from the lower edge of the shoulder blade (where the leg meets the torso) to the floor.
- The girth of the leg is measured at its base (the place where the leg meets the torso).
Body pattern:
1. Draw a rectangle that is the length of your dog’s back and the width of ½ the circumference of his chest.
2. Mark the length of the sternum (A) on the rectangle
3. Mark the center of the rectangle in height (B)
4. Draw a smooth curve from A to B. In the figure, the curve that is more suitable for female dogs is marked in pink. The curve more suitable for the male sex is marked in blue.
5. Mark ½ of the circumference of the neck (C) and a point about 1 cm (a little more or a little less, depending on the size of the dog) from the edge of its long side (D). Connect both points with a smooth line.
6. The opening for the sleeve should be slightly narrower than the circumference of the neck, but at the same time be free enough for the dog to move around without interference.
Sleeve pattern:
in the top picture on the left
1. Measure your dog's feet
2. Draw a rectangle whose length is equal to the length of the leg and the width is half of it.
3. Draw a smooth curve at the top of the rectangle according to your leg circumference
4. Leave a small seam allowance on the right side and along the top edge of the pattern (the left and bottom will not be needed)
Hood pattern (in the picture on the right):
in the top picture on the right
1. Measure your pet's neck circumference
2. Draw a rectangle using the length of the neck and ½ its circumference for the length and width of the piece, respectively.
3. Slightly round the top right corner of the rectangle
4. Leave a small seam allowance along the bottom, left and right sides of the piece. Don't add anything at the top.
5. Mark the places where the hole for the lace will be
6. Fold the piece of fabric in half, wrong side out. Attach paper patterns to it, as shown in the photo, secure with sewing pins and cut out all the parts of the future windbreaker. Finish the edges of the fabric with an overlock or zigzag stitch.
Having completed the described manipulations, you can proceed directly to sewing the windbreaker. It consists of three stages:
Sleeve stitching
1. Wrap the rubber band around your leg, directly at the paw, to measure the girth of the cuff. Allow a small allowance as the tape will shrink a little when stitched to the fabric. Cut the resulting piece, and then another one of the same length.
2. Lay out the sleeve pattern on a flat surface, wrong side up. Stretch the elastic so that it matches the width of the fabric on the side where the cuff will be. Pin it to the pattern, about 1 cm from the edge, and stitch it in a stretched state with a zigzag so that it remains elastic. When you release the elastic, the fabric will bunch up. Do the same with the second sleeve.
3. Fold the bottom edge of the sleeve so that the elastic remains inside, stretch the pattern again and sew only the fabric. You should have a simple cuff.
4. Fold the sleeve in half lengthwise and stitch the edges.
Sewing the hood and body
5. Hem the fabric on the flat (not rounded) side of the pattern by 2 cm. You will thread the lace into this cuff.
6. Fold the rectangle in half and stitch the edge opposite the drawstring cuff.
7. Turn the hood inside out and thread the drawstring through the cuff. Place the clamp and lugs on it.
Sewing the sleeves and hood to the body
8. Fold the rectangular body pattern in half, wrong side out, and stitch the edges between the sleeve holes. Sew the sleeves and hood to the corresponding holes and turn the windbreaker right side out. And now your jacket is ready!
Decorative elements
In the case when a women's or children's raincoat is made, additional decorative elements can be added to it for beauty. The best option would be to decorate the raincoat with thermal stickers. However, this option is not suitable for raincoats made of polyethylene. You can also consider a raincoat option made from various materials.
Combined option
Materials and tools for work
Since we will be making a functional and practical item, it is important to use a material that does not allow water to pass through. The easiest way to do the work is from polyethylene.
Let's prepare the following for work.
- Polyethylene – 2 m.
- Bias binding for processing.
- Reversible plastic clasps and clear buttons.
- Measuring tape, ruler.
- Felt pen or ballpoint (gel) pen.
- Scissors.
- Sewing machine.
Choice of style and fabric
To sew a raincoat for a woman, waterproof and water-repellent fabric is used. It can be bought both in specialized construction departments and in sewing stores. It is necessary to check with the seller the level of moisture protection and breathability of the fabric.
Such fabrics are used to make sportswear or travel accessories such as tents, awnings or special suits. Since this item of clothing is not designed for constant wear, it is better to resort to cheaper materials, such as lavsan or ordinary polyethylene fabric.
A raincoat of average size requires about 2 meters of material.
Important! There are two styles of raincoats. This is a raincoat made from two squares or a semicircular raincoat. Raincoats can be different in length and width. It all depends on personal preference.
Wide raincoats are convenient, under which you can hide a bag or backpack. For sewing, you may need a zipper and other accessories. Many craftsmen have learned to sew raincoats from thick, comfortable bags from IKEA.
Hardware
And so, in the modern world, almost all of our “smart” devices communicate via Wifi, and in addition to the fact that I really didn’t want to drag any communication networks to the installation site, the choice in favor of WiFi became obvious, and It is not advisable to use any other wireless networks, because I have all the... Accordingly, the base for our platform should be a microcontroller that already has this same wifi on board. What comes to mind? That's right, ESP8266. You can also use ESP32. But there is no point in a more powerful microcontroller.
The most budget-friendly and pain-free solution in this case is the use of WEMOS D1 Mini modules. The required number of conclusions is there and is excellent. For this project I used the Wemos D1 mini module from the Greatwall seller (reserve). It would be possible to use modules from RobotDyn. But something didn’t work out for me with them. Well, okay. Saving is always nice