It is customary to organize New Year's events in schools and kindergartens - matinees, masquerades. This is cool! Our task is only to prepare. And it all starts with an image that will be completed with a DIY carnival mask. Here you will find templates that are suitable for scenes and additions to the costume.
Also check out the master classes. For example, how to make a cool accessory using papier-mâché technique. In general, dress up, have fun and don’t worry about where to look for masks. Everything you need is already here and waiting for you. All that remains is to select and save.
Making a costume
Let's look at making a New Year's transforming robot costume in its simplest form - from cardboard.
Materials
| Material | Quantity | Price |
| Thick packaging cardboard | Two sheets measuring at least 100 cm x 100 cm | From 70 rub. per sheet. You can use sheets of old packaging cardboard - then it's free |
| Hot melt adhesive | 2-3 rods | From 50 rub. |
| PVC bottles | 2 pieces | For free |
| Sleeve for paper napkins or toilet paper roll | 1 piece | For free |
| Total: about 300 rubles. |
Complexity
This is a fairly simple suit to make and does not require any special skills. The manufacturer only needs to think carefully about how the parts will fit together and be careful when measuring and marking. Fortunately, cardboard is quite easy to process and imperfections can be quickly corrected on the spot.
The technician will also need to be able to work with a heat gun.
What else will you need for work?
There is not enough paper to make a mouse mask with your own hands. You will need to use a number of additional things, the number of which depends on your imagination and the desired result. For the simplest work, all you need is paper, scissors, and glue.
However, for a truly magical craft that will appeal to adults and children equally, you need much more:
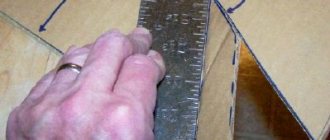
- cardboard (preferably uncoated. 2-3 sheets);
- paper (colored gray colors);
- scissors;
- ruler;
- pencil;
- glue;
- marker;
- additionally: hole punch, string or tape (optional) for the rim;
- good mood.
What else will you need for work?
Which fabric to choose
The texture and type of fabric for sewing a mask do not matter. But it must be exclusively natural material - cotton or linen. Chintz, calico and similar fabrics are perfect - you will definitely find them at home in the form of unnecessary pillowcases or old T-shirts.
Although synthetics are stronger and withstand constant washing better, they are not suitable for sewing masks. The fact is that natural fabric allows air to pass through and allows you to breathe normally, but under synthetics a greenhouse effect is created - an ideal environment for the growth of bacteria.
How to choose a foundation?
Papier-mâché, as you might guess, is paper pulp. And in order for the mass to keep its shape, PVA glue or another paste-fixer is added to it. Paper, old newspapers, napkins, paper towels will also be suitable raw materials. But for the base, without which you can’t make a mask, you can choose one of two options: either any old mask that fits perfectly on the face, or an inflated balloon.
If the first option is chosen, the blank will be just a standard mask, without decoration or irregularities, without noticeable defects on the plane. It is recommended to wrap it in cling film. This is done so that the paper pulp that will stick to the workpiece does not stick to it.
The balloon is also quite convenient to use: it can be easily removed later and breaks itself when the material dries.
You can also make the base for the mask from foil. The foil needs to be folded in several layers and applied to the face, and then with your fingers make indentations according to the shape of the face so that the foil follows its contours. We can say that it will be almost a cast. True, this is not the only way to make a foundation directly on the face.
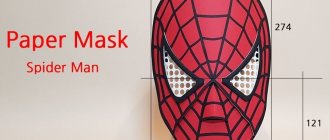
Printable head masks: templates for a matinee
Is the child participating in the scene or does his look lack the finishing touch? Here you will find templates for masks of fairy-tale characters, animals, birds, insects, fish, vegetables and fruits.
It is better to make the headband for masks of adjustable length. Head circumference in children can vary significantly. It will also come in handy if adults want to participate in skits.
Masks for a scene from the fairy tale “Turnip” and “Kolobok” for kindergarten
Grandparents are suitable for both stories.
The following characters are exclusively for “Turnip”.
And here are these animals from “Kolobok”.
And of course, the main character.
Forest and domestic birds, insects, fish - templates for printing on paper
Birds, fish and insects are often present in the scenes. Also, carnival masks can become part of a New Year's costume.
We make New Year's masks with our own hands in the form of parrots
Make your own New Year's masks in the form of unusual parrots. In this mask you will be a bright and unusual character. Check out these instructions, I hope they help you create something of your own.
Idea for DIY New Year's masks
If you are interested in Venetian-style masks, there is an excellent instruction about carnival masks.
Or you can make your own mask design, such as a cat, instead of parrots.
Step 1. Start with modeling
You will need:
• A good mask, strong enough to withstand some weight and hot glue (about 90 rubles)
• Modeling clay
• Hot glue gun
• Felt in various colors
• Something like a rolling pin
First, roll out the clay to a thickness of 6mm.
Make an irregular diamond shape. The clay is very pliable, if you molded it incorrectly, just scrunch it into a ball and roll it out again.
Fold your diamond in half. Then straighten it again. You will end up with a rib in the middle.
Step 2. This is the fun part...
Now, relying on your imagination, sculpt the shape of the beak. I looked at the birds when I created my beak.
Place the beak on the mask and secure it with tape to find the optimal location for it. I attached the beak in the forehead area.
During the first 6 hours, dry the beak on a rolling pin. Then scrunch up a piece of paper towel and place it under the beak while it dries to help hold its shape. It takes a total of 24 hours to dry.
Step 3. What you should know...
Here are a couple of things you should know:
1. Make sure the beak is straight on all sides, even from the inside.
2. Make sure you can see everything through the mask.
3. If the beak has some roughness, this is normal. This makes it look more realistic. And when you paint it, nothing will be noticeable at all.
Step 4. Dry, paint and glue
Once the beak was dry, I detached it from the mask and spray painted it.
The first layer was absorbed into the clay and did not look good. Apply a few more layers.
Then use hot glue to attach the beak to the mask.
Step 5. Now the fun really begins...
I cut feathers from felt. Next they need to be glued.
Apply glue to the base of the feather.
Apply the glue to the mask, not the felt, to prevent the glue from bleeding through the fabric. Although, if you have thick felt, then this is not a problem.
Start gluing from the center of the forehead and work in different directions.
Glue the first row along the edge. Make sure the feathers extend slightly beyond the edge of the mask.
Ninja Turtle Mask
You will need: orange and green felt flowers, a simple pencil, scissors, a glue gun, Velcro.
Master Class
- Print the template.
- Transfer the pattern to felt, then cut out the pieces.
- Cut 2 orange strips for ties.
- Glue the parts together using a glue gun.
- Attach Velcro in the desired places.
The turtle mask - ninja Michelangelo is ready! I recommend watching this video!
Source
How to decorate?
Decoration depends on the purpose of use. The easiest way to color the mask is with spray paint or gouache or acrylic paint. You can cover it with fabric - velvet or satin. To make the mask look original and interesting, rhinestones and feathers and various decorative tricks are used.
For Halloween
A dark, mysterious mask that plunges you into terrible thoughts is enough to look convincing at this holiday. It is proposed to make the formed base black; acrylic matte paint is suitable for this. The color is applied in 2 or even 3 layers. By the way, black perfectly masks unevenness. A bright red accent is made on the lips; glossy acrylic is suitable for this.
Next, a silver marker will be used, as well as a large rhinestone or a piece of foil or a plastic mirror. This will be the “third eye”, which is glued to the forehead, which is more convenient to do with a glue gun. And now the ornament begins to be created from it. It looks impressive, but it is not difficult to draw; the main thing is to maintain harmony and symmetry.
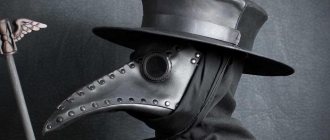
To make a mask of a treacherous cat or fox in the style of horror cartoons, you will have to extend the ears. This is done at the time of formation of the base. To make the mask look more impressive, artificial wool or other textured fabric is used that will convey the fur of the animal. The eyes stand out brightly and fantasy-like. Or you can repeat the Anbu mask, which is not very difficult to make - the main thing is to clearly form the contours. A Halloween mask should be full of mystery.
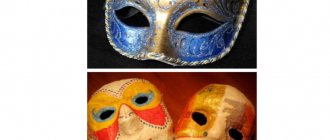
Carnival
Carnival masks hide the faces of the heroes, and the more riddles there are, the better.
How to decorate such a mask:
- lace;
- decorative braid;
- beads;
- artificial pearls;
- sequins;
- beads
It’s difficult to come up with something more precise than painting. If you choose the most universal paints, it will probably be acrylic. It can help make subtle accents, although sometimes pastels are used for this (to form the desired shade of blush, for example). If necessary, use varnish, including for hair. Glitter varnish perfectly forms the finishing layer of a carnival mask.
For the New Year
You can play with the good old story, where at the New Year's party all the boys are bunnies and the girls are squirrels. And if these are adults, even more interesting. You can immerse yourself in Victorian motifs and be inspired by the aesthetics of Alice in Wonderland. The paint layer should be thick enough so that the paper is not visible at the base of the mask. Features that require expressiveness must be complete (nose, eyebrows, mustache - as necessary). Fragments of faux fur can be stuck on the cheeks of these characters.
Sometimes a mask requires not just a nondescript elastic band that will hold it tightly on the head, but a beautiful design and this detail, for example, in the form of a velvet ribbon. Masks are covered with lace fabric or a veil, edged along the contour with a relief braid - there are a lot of options.
But most of them require artistic skills from the master, because such masks attract more attention and look like an art object created at home, which is especially nice.
To learn how to make papier-mâché masks with your own hands, watch the following video.
From a plastic plate
- Take a plastic plate and make slits for the eyes in it, having previously measured the necessary parameters of the face. Cover the resulting mask with gray paint, preferably aerosol, it goes on more smoothly. But if you don’t have a spray can on hand, both watercolor and gouache will do.
- While the paint is drying, work on the ears - they can be made using the same felt, paper, cardboard. Use PVA glue to secure the ears at the back, and draw a muzzle or recreate it using improvised means: buttons, leather (nose), threads or soft wire (whiskers), etc.
- Now, using an awl or hole punch, make holes for the elastic along the edges of the mask and secure. You can do without ties by making a mask on a stick, which has its advantage. There is no need to measure the length of the elastic band, and the size of the Rat mask or Mouse mask in this case will suit anyone: both a child and an adult.
Tags
complete the carnival maskAlso carnival masks make a carnival mask Carnival masksfelt. Carnival masks All carnival masks on paper from paper on paper from paper from paper. from paper from paper and from paper and from paper and from paper with your own hands with your own hands. with your own hands with your own hands with your own hands with your own hands with your own hands you need to make eyebrows how to make a cool one How to make a mask Then make the cutouts
childrenchildrentogetherpartcutoutarticleclassdrawcapguinea fowleaglesitewhitetodayonlydatareadyappliquefoamcoloredorigamiphotoscissorscanaries