An origami eagle figurine is best placed in a study or workplace in an office. According to Feng Shui, it symbolizes financial wealth, success in business and career growth. There are other meanings that depend on the position of the figure, its pose and dynamics. Thus, a sitting eagle with folded wings means longevity, wisdom, foresight and good health. The soaring bird is associated with glory, the flourishing of vitality, victory over circumstances, and recognition of merit. An eagle that lands with its paws forward is associated with a nest, a strong family and the birth of children.
Key characteristics of the scarecrow
In order for the monster to protect the garden from birds, it is necessary to fix moving shiny parts on it. If the shiny structural elements are stationary, they will not frighten the birds. Objects should move with the slightest breath of wind and create sunbeams around. Their unpredictable behavior will cause birds to stay away from the area. A children's foil pinwheel has suitable characteristics.
Instead, you can use magnetic tape from cassettes, strips of foil and Christmas tree rain. Unused CDs hanging on a string make a good effect. Random and sharp sounds are considered a sign of danger for birds. Birds in quiet summer cottages are especially shy. Even small noises disturb them.
To create the necessary sounds, you can hang ringing metal objects on the garden scarecrow to scare away birds. Starlings and sparrows react warily to the rich blue color, which is not often found in nature. Therefore, the scarecrow should have clothes or large details in a cornflower blue shade. The presence of their dead relatives on the site is considered an alarm signal for birds. It is not necessary to look for a dead sparrow. You can hang models of dead bodies on a garden scarecrow.
Predatory representatives of the class have a terrifying influence on birds. You can “arm” the monster with figures of a falcon, golden eagle or eagle. Even painted predators can protect the area from thieves. The garden monster should be made from materials that are resistant to weather conditions.
Design option for a garden scarecrow using materials that are always at hand
It would be nice to make a monster that simulates a person. The animals are scared away by the owner, who is on the site. How to make a big monster the size of a man?
Origami eagle
An origami eagle figurine is best placed in a study or workplace in an office. According to Feng Shui, it symbolizes financial wealth, success in business and career growth. There are other meanings that depend on the position of the figure, its pose and dynamics. Thus, a sitting eagle with folded wings means longevity, wisdom, foresight and good health. The soaring bird is associated with glory, the flourishing of vitality, victory over circumstances, and recognition of merit. An eagle that lands with its paws forward is associated with a nest, a strong family and the birth of children.
Merry Scarecrow: A Nightmarishly Beautiful Creature
We will make a scarecrow-mannequin (what did you think?)), yes, an ordinary scarecrow, but not just beautiful, but also very functional. It’s no secret that birds (sparrows, thrushes, tits, crows, etc.) – invaders of our crops – eventually get used to the usual scarecrow and cease to be afraid of it. So let's do something unusual.
Scarecrow at the dacha
- We take two slats 2 m and 1 m long, knock them crosswise, taking into account the fact that to form the “head” you will need to leave 30 cm and the same amount to dig into the ground. The rest of the slats will be the “body” of the mannequin.
- Dress the mannequin as brightly as possible (sample in the photo). You can fasten clothes with a regular furniture stapler.
- Hang a bright hat on the top of your head and secure a small weather vane above the hat.
- Make a “necklace” for the stuffed animal from bright scraps.
- Take several aluminum cans, make holes in them (you can drill them), hang the cans on a strong rope mixed with small bells, and secure the rope to a horizontal rail.
- Blow up a few balloons and attach them to the stuffed animal's arms.
That’s it – now this “security device” is ready for work and defense. At the slightest breath of wind, bells and jars will ring, and balls and shreds will create the illusion of movement. Now your harvest is not threatened by any invaders. By the way, do not forget that the scarecrow should be placed as close as possible to the protected berries.
Do-it-yourself matrix clock
I've recently been thinking about buying a watch.
, I wanted something
simple and minimalistic
. I couldn’t find anything interesting for myself, so I decided that I would make them myself. I reviewed a lot of material on this topic, but nothing.
My salvation was when I found an attractive option for myself.
The author explained in detail how and what it works. I was attracted to his watch; there was nothing superfluous about it. I decided to repeat it, in his article I found a list of components, code for Arduino
and a complete diagram according to which everything was soldered.
If you want a simple watch with the ability to choose the color of the dial, I recommend that you read this article: Clock - matrix on Arduino and addressable WS2812B LEDs.
I hope my information will be useful.
Thank you! All the best!
Where to start?
Feathers
can be made from plastic bottles, you will need quite a lot of them. To ensure that their shape and dimensions are different, make blanks of different sizes. How fluffy the feathers will be depends on the width of the strips into which you will cut the parts. Feathers should be of different sizes; for convenience, they can be sorted into bags.
The body can be made of synthetic foam. It is easy to use and does not break. Select in advance a beautiful post on which the bird will be attached.
For the beak
A red plastic bottle will come in handy. Using a thin black marker, draw the contours of the beak so as not to spoil the material.
In order for the breast to be colorful and bright, it must be covered with plastic of all colors, and then the feathers must be attached step by step. A glue gun equipped with silicone rods will do the job perfectly. When attaching feathers, you need to swap parts of different colors and sizes.
Peacock's back
should be covered with longer and more voluminous feathers. To make a tuft, the material must be cut into very thin strips. The peacock must be completely covered with feathers, so you need to carefully ensure that there are no uncovered areas of foam.
Glue the blanks onto the neck, moving to the head. If before you didn’t know how to make a bird out of a plastic bottle, then at this stage of work you will begin to understand the intricacies of this process. Now the peacock begins to acquire a beautiful appearance.
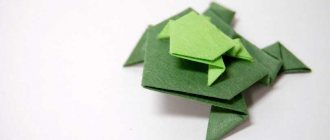
Bald Eagle
From a single-sided sheet of paper you can easily create a bald eagle, the national symbol of the United States. Thanks to the thoughtful arrangement of colored and white parts, an impressive resemblance to the original is achieved. Endemic to North America, the bald eagle was revered by the indigenous inhabitants of the continent - the Indians. He was considered a mediator between people and gods, and was often depicted on ritual frescoes, reliefs or utensils.
Step-by-step instruction:
- Fold the 15x15 square in half, from left to right. Let's reveal it.
- We mark the center, folding from top to bottom. We add all four corners to this mark.
- We get the basic “Pancake” shape. We go around the inner corners to the right and left edges.
- We first make folds on the white diamond. Then we open the resulting “pockets” and transfer them to the basic “Fish” form.
- Fold the workpiece in half into a “mountain”. Turn it over to the reverse side.
- Raise the first layer along the dotted line.
- We fold the figure across “mountainwise”.
- We bend the right side on the front side. And, symmetrically, on the back.
- We fold back the valves of the first layer and turnover.
- We open the workpiece according to the arrows.
- We draw out the “beak” and “paws”.
- We open the upper corners and flatten them, indicating the “eyes” of the bird.
You can twist the “wings” a little with a pencil to give them additional volume.
Garden scarecrow made from plastic bags
Rusting polyethylene, fluttering from the slightest gust of wind, is perfect for creating a scarecrow for a summer cottage. If you choose garbage bags of different colors and sizes, you will get a cute figure. But blue items should dominate. Scotch tape is useful to secure the material.
To create a garden guard from plastic bags, you need to dig a pole (1.5-2 m) into the ground and attach a transverse strip or branch to it with a nail. It is better to choose a package for your head that is dense and plain, without inscriptions or drawings. The face must be clearly visible. The bag is stuffed with rags, tow, plastic bags or synthetic padding. It is better not to use paper, as any damage to the material will lead to the destruction of the figure during rain.
Connection diagram for scarecrow slats
A face is drawn on the head with a black marker. The scarecrow is decorated with a hairstyle made of magnetic film. It can be glued directly to the head or onto a paper backing that will later be attached to a garbage bag. To prevent your hair from accidentally flying away, you need to secure it with a plastic scarf and tie a beautiful bow in front.
The scarf is glued with tape. The body is made from one dense package. It is put on the pole from below through a hole specially made in it. Secure the bag around the figure’s neck with tape. It can be filled with material to add volume or left hanging freely. For the sleeves you need two more bags.
Step-by-step instructions for making a garden scarecrow
It is better to attach polyethylene to the frame with tape from the inside to reduce the impact of moisture during rain. You can put small bags or mittens on your hands. The skirt is formed from several layers of large garbage bags of the desired color. They are attached to the figure's belt and flutter freely in the air.
If you pre-inflate them, the skirt will look even more impressive. You can hide the attachment point by placing a plastic belt around the scarecrow’s waist.
You can attach garbage bags and CDs on strings to the palms of the plastic lady. They will flutter in the wind, enhancing the terrifying effect. If you additionally hang tin cans on threads, the scarecrow will make loud sounds.
A simple model of a flying bird
The origami eagle will benefit if it is folded from decorative paper, for example, from gold foil. Many peoples, including the Japanese, attribute the royal bird to the solar cult, endowing it with divine properties. Therefore, golden shades will be especially appropriate. The eagle is also considered to bring wealth, both spiritual and material. To improve your financial situation, it is recommended to place its images next to money or jewelry.
For the figure you will need a square of 15x15 cm. We start from the white side.
Step-by-step instruction:
- Alternately fold the square along two diagonals, then from top to bottom and from right to left. We fully open all the folds.
- Fold the top right and left edges to the central axes. Let's expand.
- Bend the top back along the dotted line.
- Add the three marked points to the middle. Open the central part and flatten it into a diamond shape.
- We outline the folds along the dotted lines.
- Lower the top triangle. Opening the folds. Raise the lowest point.
- We get the basic “Bird” shape. Turn the workpiece over.
- Make a zigzag fold in the center.
- Lower the triangular valve as shown in the figure.
- We outline the folds along the diagonals.
- Open both sides according to the arrows and press.
- We fold the figure along the vertical axis into a “mountain”.
- Rotate 90° counterclockwise.
- Fold the wing along the dotted line. We repeat the same action on the reverse side.
- We lower the left acute corner using a reverse fold, forming a head.
- We bend the “wing” as shown in the figure. And repeat on the back.
- The model is ready.
An origami eagle can bring not only symbolic, but also very real wealth. If you make it not from ordinary paper, but from a large bill.
Foam duck
Perhaps the easiest material to use for making garden figures with your own hands is polystyrene foam. Just keep in mind that the foam crumbles a lot, so use only a very sharp knife and carefully glue not only the base, but also the edges of your workpieces. By the way, you cannot use regular Moment glue, it corrodes the foam, so use a special glue for foam , which is sold in any building materials store.
Template for garden figure
- Apply a pre-designed sketch onto a thick sheet of foam plastic, for example, like in this picture.
- Then carefully glue the two parts of the duck, and to secure the legs and wings, cut holes in the body, insert the blanks and also secure them with glue. That's it - the workpiece is ready. If necessary, you can slightly “cultivate” it with a sharp knife.
- Before you start painting the figurine, prime it with white putty and then paint it with acrylic paints.
The end result is such a cute little duck.
Foam duck
Using this technology you can make a wide variety of figures. As you can see, you can create garden figurines with your own hands from absolutely any available material. From wood and rods, plaster and foam plastic, plywood and rubber, polyurethane foam and stone, plastic bottles and iron cans, various leftover building materials, etc. You just need to look around, dream a little, put your hands to it and go ahead - create original beauty at your dacha. And ideas from our articles and collections will help you get inspired:
- Garden figurines, or Game... with dolls
- DIY garden sculpture. Concrete house
- Glass sculptures in the garden
- My first experience in making a concrete sculpture (master class)
- Funny figures for the garden
Concrete application technology
After applying a layer of concrete, when it begins to harden, the master makes furrows on the surface of the concrete. This is done so that the next layer has a strong connection with the previous one.
Many DIYers recommend applying the next layer without waiting for the previous one to completely harden in order to improve adhesion. Our author strongly advises waiting for it to completely harden (at least for seven days). This was also confirmed in the manufacture of one of the concrete hollow angel specimens.
The time can be significantly reduced. To do this, a hardening accelerator is introduced into the concrete mixture. This is what we did when making a garden flower vase. The influence of accelerators is also very important when making a mixture for a construction 3D printer.
T. Neil recommends applying a concrete layer about 2 cm thick. It all depends on the composition of the mixture. Many cement plasters allow you to lay a layer of 5 cm in one go.
Neil can be understood; in this case he uses ordinary concrete without polymer additives. If you have nowhere to rush and want to save money, then this is a completely acceptable option.
Giraffe made from a car tire
Now let’s make a funny giraffe from an old car tire and two chocks, 1 m and 0.3 m long.
Tire giraffe
- We dig the tire halfway into the ground.
- We knock down two blocks with the letter “G” and dig in the “letter” next to the tire.
- We cut out the ears, eyes and nose from a plastic bottle, paint them and attach them to the giraffe’s “face”.
- The tail of this model was a broken spout from an old iron watering can, but you, of course, can come up with something else.
- Then we paint the garden figurine with bright acrylic paint. That's it - our giraffe is ready!
Jew's harp case
Back in pre-Covid times, a friend came to visit me from another city. We walked around the center for a couple of days, I showed him our museums and attractions, and then on Arbat we met a seller of jew's harps. Not the most authentic souvenir for Moscow, but a friend took one for himself. A case would be nice for the jew's harp, of course. Especially the one with the curved tongue, and the seller offered a pair laser cut from plywood.
B-52 strategic bomber against moles
It seems to me that anti-mole noisemakers for pest control in a summer cottage do not look very aesthetically pleasing and can be improved. At the same time, you can involve children in useful joint activities. Based on this, we put together a three-engine aircraft to repel pests.
To implement the idea, eight plastic bottles were required. The master class on making crafts is as follows:
- For the fuselage, a tall and thin bottle with smooth sides is better suited. Selected colors of the source material will decorate the repeller.
- For the motors on the wings, two small bottles with the neck cut off were used.
- From bottle number four we cut out wing blanks, as in the photo. The marker marks the places of cuts for attaching the wings to the fuselage.
- Cuts were made on the fuselage and engine housing to install the wings; they are also marked with a marker. Their length corresponds to the width of the connected wing, excluding the length of one cut on the wing.
- Now we bend one cut on the wing. It becomes narrower and fits into a slot on the aircraft body or engine. We insert the wing into the corresponding slot. The bent part on the wing straightens and secures the connection. We move the wing along the slot on the body so that it is held on both sides. To fix the structure, we pass an electrode or wire through the fuselage and wing. We also mount the second wing and motor.
- Three slots must be made on the rear fuselage for the tail and rear wings of the aircraft. Their length is determined by the size of the latter according to the above diagram.
- The photo shows the tail and rear wings of the aircraft. The slots for mounting are marked with a marker. The tail is made of two layers of bent plastic, and the wings are single-layer.
- We cut out three screws from the bottoms of the bottles according to the pattern marked with a marker.
- To secure the central screw, you will need a self-tapping screw and a washer. In the center of the screw, drill a hole slightly larger in diameter than the self-tapping screw.
- The plug is screwed onto the neck of the fuselage container. First put a screw on the self-tapping screw, then a washer. The self-tapping screw is wrapped in a cork.
- The propeller blades on the wings can snag the wing, so four washers will be needed.
- Before driving screws into the engines on the wings, it is better to first drill holes in the latter.
- The tail and rear wings are mounted in the same way as the front ones.
- Now you should determine the center of gravity of the model and in this place drill a through vertical hole in the aircraft body for installation on a metal rod. As when assembling a simple pinwheel from a plastic bottle, a stop made of copper wire should be mounted on the pin. A washer must be installed between the stop and the aircraft body.
The bomber is ready to complete the task.
The bomber is a repeller for moles, birds and reptiles that can be installed in the garden. We wish you a productive and interesting time. Let this specially selected video help you.
It's interesting to know
Eagles are the largest representatives of the Accipitridae family. The wingspan of these birds is especially impressive, reaching 2.8 m in some individuals. Females are more massive than males and exceed them in size by about 25%. Man knows better than others the golden eagles, which some peoples train and use in hunting foxes, hares and even wolves. Eagles often attack game that is larger than them, especially sick or young animals.
There are other interesting facts:
- Eagles are monogamous birds and mate for life. In addition, migratory species return every year to their previous nest, which they build on the tops of trees or rocky areas.
- The diet of eagles consists of 100% meat. The menu of some varieties of winged predators can be called exotic. For example, the South American harpy prefers sloths, armadillos, anteaters and porcupines. And the inhabitant of the African savannah, the snake-eating eagle, is able to easily deal with any reptile, including such poisonous ones as the black mamba or king cobra.
- Eagles “serve” in the police of several countries: Denmark, the Netherlands and Great Britain. Their main task is to intercept drones, which are increasingly used for robotic terrorist attacks.
- An eagle's beak contains keratin and grows throughout life, like human nails or hair.
- The diameter of the nest of large birds of prey is up to 3 m, with a height of 1 m. The most massive dwellings are those of bald eagles, some “buildings” weigh 1 – 2 tons. Nests are located on old, dry trees that can withstand such weight. Sometimes an eagle couple builds a second “spare” home nearby so that they can move there if the first one collapses.
- Eagles' eyes are large and occupy about 50% of their heads, and their vision is 8 times sharper than that of humans. At a distance of more than 3 km, birds are able to see a rabbit running in the grass. At the same time, they have practically no sense of smell.
- Eagles flap their wings only when taking off or picking up speed. The rest of the time they soar, skillfully manipulating the rising currents of warm air. For these birds, the aerodynamics of the body are especially important, so their flight feathers fall out and grow symmetrically.
In conclusion - a gallery of origami eagles from the world's leading masters:
Hobby
So, the task came to make a wine table. I actually did it for the first time, hemorrhoids are awesome. But I’ve already started, there’s no turning back. The base is beech, we glue the shield, nothing new here.
We make a copier for the router.
It's the most dregs, the brushes have run out after 15 years of operation of the router, fortunately I picked it up, although it’s not the right size, but the router works and that’s okay.
I was thinking about how to screw the legs, I had to make additional strips for the canopies because I miscalculated a bit and the shield became thin and the shortest screws came out.
According to the classics, mineral oil for impregnation.
Sculpture on a 3D printer
Once ready, printed on two Delta 3D printers, 12 kg of plastic was used
When it was completely dry, primed it
The frame of the bench was welded, decorative inserts were milled using a CNC router
We assembled the bench and also primed it
Rings and earrings were printed on an SLA 3D printer, glued and also painted
The sculpture is ready, the next day they took it to Abkhazia (the woman for whom the maternity hospital was made from Abkhazia, the city of Gagra)
This work brought us a lot of positive emotions and increased our self-confidence! If you are interested in this direction, ask questions, we will definitely answer everything and, if you wish, subscribe to our family workshop on Instagram, we are glad to meet new people https://instagram.com/crazy_craft_sochi?igshid=8k54rikg0gqi
Hobby
And so, you asked from the very beginning, you receive it.
We have 50 oak boards, one 120 wide, the other almost 180. We joint 120 in two planes and get a 90 degree angle. The second one is a little more complicated; a narrow table will not take up the entire width at once, so we cut it in half.
We get blanks around 500mm. Let's move on.
We glue the shield, glue Tightbond 3, Google whoever needs it.
Here one plot is glued and has not yet been run through a surface planer, the second is sawn. Yes it burns, yes the old machine, but there is no money for a new one yet, alas, I will buy more orders and I will be happy.
Here I already ran it through a thicknesser, drew out the corners, I don’t have a carriage, I did everything with a square and manually by eye.
Sanded with 120, 180, 320 grit.
Mineral oil, I take lamp oil from the church, marinates for a little more than a day. This board has a net size of 490*310*50 mm, a net weight of 5,350 after oil of 5,500 exactly, the customer is satisfied. All the best.
Big and small
I had a log. Linden.
A cleaver and a sledgehammer are also available.
With the selected piece, I determined where to make the bottom of the future candy bowl, hewed off this place a little with an ax and planed it on a machine:
I sawed off the ends that had cracks:
With a pencil I roughly outlined what I wanted to cut out:
And then he began to wield a semicircular chisel:
Then he took her almost flat sister:
Using a file, I leveled the body where the internal sampling will be:
And here is the selection itself, carried out using a semicircular chisel and cranberry:
This is the look the candy bowl acquired after being treated with a bent rasp on the inside and a regular one on the outside:
I sprayed it with water, let it dry and removed the lint with the finest sandpaper. Then he repeated the process.
After painting with stain, it was planned to saturate the product with linseed oil, which is what I started doing:
But, unlike previous works, the oil behaved treacherously: it was absorbed unevenly, there were places where it disappeared into a bottomless abyss, and in the end something ugly and spotty came out:
To save the product, I decided to finish everything with nitro varnish. Here is the candy bowl after applying it in several layers:
This was followed by sanding the surface with the finest sandpaper.
. and grouting and polishing with flannel cloth.
- But I’m still better!
- Why are you better?
- And look at the sides I have! And I can also bite, if necessary.
Indeed, the sides. Come on!
“What kind of wood is it made of?” I ask.
- I'm from linden. And soaked in linseed oil!
- Fine. Let's go to the table, I'll take a photo.