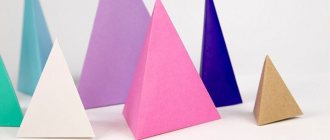
Wooden containers for measuring portions of rice and sake - “masu”, which were actively used in Japan during feudalism, are reflected in origami models of boxes with a lid. Paper products, of course, have another function: they serve as packaging for small gifts and sweets. But the external resemblance to the wooden prototype remains. Based on a square masu box, you can make several varieties - rectangular, triangular, and even heart-shaped.
Origami paper box
The first box should be easy to make and have a great appearance. Therefore, let's start making a regular square origami paper box.
For the creative process we will need:
- paper that is used for wrapping gifts (in the absence of such material, you can use regular colored paper);
- scissors;
- ruler and simple pencil;
- decoration elements of the finished product, if you want to decorate the craft.
Having collected the entire list of materials and tools, you can begin manufacturing. We will describe below how to make a simple paper box.
First you need to select the same material for the lid and base of the product. After all, the craft must be made in the same style.
Step-by-step instructions for making a square box:
- Making a box begins with creating a lid. Therefore, you need to take paper and cut a square out of it. The dimensions of the square can be very different, that is, they depend on the manufacturer’s idea. Next, draw diagonal lines on the square using a pencil and a ruler (you should get a cross).
- Bend the bottom corner. It is necessary to bend so that the angle lies exactly to the marked section in the center. Fold, fold one more time. It should line up exactly with the line in the center. It is recommended to iron all folds well so that they are visually visible on the paper. After ironing, the craft bends back to its original shape.
- Using a similar pattern, we bend the remaining corners of the square. The result should be a square with visually visible bend lines. Now you need to make cuts on both sides and fold the parts into the shape of a lid for the box.
We figured out how to make a lid for a box out of paper, now we move on to making the box itself.
Manufacturing proceeds as follows:
- It is necessary to cut a square from the selected material, but in this case it should be 3 mm smaller than the square cut for the lid. Manufacturing begins with constructing the bottom of the craft. The bottom folds in the same way as the lid.
- After bending and assembling the box, you need to decorate it. For this purpose, ribbon, appliques and flowers are often used. After decorating, all that remains is to glue the inner ends with double-sided tape.
And so, we figured out how to make a box out of paper in a simple origami way. But there are many other manufacturing options that have a more attractive appearance. These boxes will be discussed further below.
Hexagonal bonbonniere
Another popular model of an origami box with a lid is presented in the video. Its author is also Tomoko Fuse. The designer gives preference to products made from classic Japanese modules - she has created several varieties of tsuzura paper boxes, somewhat reminiscent of European bonbonnieres. Traditionally, such boxes were woven from bamboo, but paper models also look no worse.
The bonbonniere consists of 12 identical modules. They are divided equally for the bottom and lid.
Rectangular box
If you need to present a gift of a large size, then you should not purchase ready-made packaging. It will be much more pleasant for a person if the gift is in a homemade box, which will be in one original copy, compared to all the usual gift packaging.
The production of a rectangular box is carried out:
- from cardboard;
- from double-sided tape or glue;
- for production you will need scissors;
- pencil and ruler;
- various decorations that you like and are suitable for decorating the finished product.
Having collected the necessary materials and tools, we begin manufacturing. The manufacturing process begins with selecting and cutting out a template.
If it is not possible to print a template, you can draw and cut it directly on the selected cardboard. In this case, it is advisable to maintain dimensions and proportions.
The process of constructing a rectangular box:
Rectangular box
- We draw lines on the cardboard in accordance with the drawing in the photo and cut it out along the contour. Next you need to bend all the edges along the dotted lines. Since cardboard is a dense material that is difficult to bend, it is recommended to use something with a sharp edge for bending. This could be a pencil, a screwdriver, or even a nail file.
- After all the folds are made, and the shape of the box is obtained, in the places where the edges should be glued, apply glue or glue double-sided tape. Then we connect all the parts into a single structure.
- And so the box is ready, if a gift is to be given in it, then it needs to be decorated. To do this, you can use any decorating material you like.
The whole box is ready, you can put a gift in it and present it.
Round box
We've figured out the simple shapes of the boxes, now we'll tell you how to make a round box out of paper.
To make it you need to have:
- corrugated packaging cardboard;
- ruler;
- a simple pencil;
- a non-writing pen or similar object with a sharp edge;
- glue or double-sided tape;
- decoration elements.
Having collected the material, we begin production. The manufacturing process is performed as follows:
Round box preparatory stage
- We cut 4 circles from corrugated cardboard packaging, and 2 of them should have a smaller size;
- the circles are cut out, now you need to cut out 4 strips according to the size of the circles, one should be wide and the other narrow and preferably with a margin of length;
- glue the circles together;
final stage - take smaller glued circles (for the base) and glue a strip to them, so the base is ready;
- Now we use the same principle to make a lid from large circles.
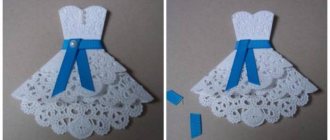
Especially for lovers
And finally, ahead of Valentine's Day, it's time to choose a festive box for a gift for your other half! Of course, the main attribute of each of them is the heart. It always speaks about love without words. 1.
2.
3.
What's so good about gift wrapping that you made yourself? She is unique! And the gift with it becomes doubly valuable. We have given you just some ideas for inspiration. Now you can safely start creating on your own. And when you get carried away with this process, you get something truly unique. Organize holidays more often for your loved ones, loved ones and friends. Good luck in your creativity!
If you find an error, please select a piece of text and press Ctrl+Enter.
Cake box
Cake box
As you have seen, paper can be used to make not only boxes of simple shapes, but also gift boxes of original and more attractive shapes. We made a round gift box. Now we’ll tell you how to make a paper box in the shape of a cake.
It is much easier to make such a box using a template. For work you will need:
- thick paper or cardboard;
- glue;
- scissors;
- pencils;
- ruler;
- optional decoration.
The edges of the lid can be either wavy or straight, the color of the material is chosen according to the manufacturer’s preference. The size is also chosen by the manufacturer himself, but please note that the base of the box should be 3 mm smaller than the lid. To make a box of this type beautiful, it is recommended to first make the craft from plain paper, and then start making it from thick material.
Cake box making process:
Scheme for a cake box
- take the template and transfer it to the selected material;
- after transfer, cut out the blanks;
- along the dotted lines, since the material is of high density and is difficult to bend, use a credit card or a ruler for ironing;
- glue the bottom and top of the product at the joints.
The entire box is ready, you can decorate it if desired or necessary. Why are ribbons, beads, flowers and appliqués often used?
heart
Just a few folds added to the traditional pattern of an origami masu box with a lid, and the simple model turns into a romantic “heart”. With its help, you can confess your love or even propose by hiding the engagement ring inside. For less significant gifts, such as sweets or macarons, the box is also suitable.
The modification was invented by Filipino origamist Romy Halabaso. It is noteworthy that the top of the product is shaped like a diamond, inside of which an equally valuable “heart in love” is “hidden”.
Christmas tree box
New Year is considered a holiday where everyone gives gifts to each other. To beautifully present a holiday gift to friends or relatives, many people buy New Year's packaging. But why spend money on this if you can make a box in the shape of a Christmas tree yourself. This craft will be exclusive and anyone will like it. We will now tell you in detail how to make a paper box in the shape of a Christmas tree.
To create such a holiday box you need to prepare:
- green paper, but double-sided colored cardboard is better;
- hole pliers;
- Christmas tree template;
- square and ruler;
- scissors;
- pencil eraser;
- pencil;
- office glue.
To decorate the finished craft, you can use beads, rhinestones and other decorative elements at your discretion. Beads can imitate New Year's balls, rhinestones will act as New Year's lanterns. If you're lucky, you might be able to find a small star for the top in the craft department. The Christmas tree will become elegant and festive. By the way, you can involve a child in making it; he will be interested in it.
Manufacturing is carried out in this way:
Christmas tree box (Step 1)
- using a ready-made template, it must be transferred to green cardboard, but in such a way that there are ears on the sides, which are necessary for the symmetry of the craft;
- the bottom of the outlined template is the bottom of the box;
(Step 2) - turn the paper over and pass the template again to get the same pattern, it is advisable to use a square and a ruler;
- after that, cut out the pattern with scissors;
- erase the pencil;
- Glue the joints of the Christmas tree.
(Step 3)
The Christmas tree is ready, all that remains is to decorate it and give it as a gift.
Choice of colors
The packaging and the item inside should be in harmony with each other, since color mismatch can spoil the overall impression of the surprise.
Primary colors:
Yellow. Sunny color, reminiscent of a ray of sunshine. Gift wrapping made in this tone gives a warm and cozy touch. Ideal for adding childlike spontaneity and playfulness to a surprise. It is not recommended to mix with other colors. But you can add purple, brown, blue or green decor on top.
Orange. A shade that personifies strong positive emotions and also sets one in the mood for admiration.
But it is important not to overdo it, since this particular color can both decorate a gift and ruin it. It is ideal to combine orange wrapper with green, yellow, brown, purple, blue and red.
- Pink. Great for gifts for women, as it evokes touching and joyful emotions. It is best to combine it with all shades of red and purple, and additional white decor will help to effectively emphasize the tone.
- Violet. This option is ideal for a mysterious and extraordinary gift, as it symbolizes secrecy, mystery and fantasy. It is best to combine this tone with white, silver, yellow and pink for gift wrapping.
- Red. This packaging tone signifies fiery feelings and passion, and sometimes symbolizes irritation and anger. Therefore, when giving preference to this color for gift wrapping, you should weigh everything, unless we are talking about surprises for the New Year, since the red tint is very relevant for this holiday.
It is ideal to combine red packaging with silver, gold, white, pink and gray tones.
- Blue. It is recommended to use this tone for gift wrapping for a man, as it is associated with success, nobility, and fidelity. Dark blue color harmonizes perfectly with blue, silver, white, yellow, and for lighter tones it is recommended to choose pale shades of yellow and pink.
- White. This tone is universal, as it can be combined with any bright color. But you should not give preference to it as the main color for packaging, since it is cold and therefore the impression of the gift will be the same. It is best used for contrast, using details in this shade, which will give the surprise a festive feel.
- Green. It is considered a neutral shade that is appropriate for any occasion. The variety of tones of this color allows you to choose the appropriate option for packaging. The green tone symbolizes prosperity and respect. It is recommended to combine dark shades with yellow, orange, white and gold, and light shades with brown, gray, yellow.
Popular articles Children's craft “Aquarium in a box”
- Grey. Used for gift wrapping, symbolizing nobility and restraint. And to add sophistication, it should be combined with red, pink and purple shades.
- Brown and black. These tones are rarely used, although they are recommended for formal gifts. But in order to dilute the tone, it is recommended to complement the wrapper with details in silver, purple or gold.
- Silver, steel and gold. It is best to use these colors as a complement to the main color. But it should be taken into account that steel and silver are cool tones, and therefore should set off packaging made in the same palette.
But it is better to decorate a gift made in warm shades with details in a golden tone. In addition, these colors combine well with white and black.
This will allow you to unobtrusively highlight the gift and give it a sophisticated look.
Special Occasion Box
Why did we call this box the “Special Occasion Box”? The fact is that her appearance is like a diamond. Just think about how nice it is to present a gift in the form of a tie to a man using such packaging material.
Special Occasion Box
Before making such a paper box, prepare:
- scissors;
- paper of any shade;
- sewing needle;
- ruler;
- glue;
- double-sided tape.
Let's get started:
- The first thing we need to do is print out the template. This is not necessary, you can simply redraw it. We will need two templates, one large, one smaller. You need to draw a template or print it directly on the paper from which the box will be made.
- Cut out the template using scissors. We place a map or ruler close to the resulting lines and carefully draw along them with a needle. You can use a special running tool.
- We need this running process in order to assemble the diamond into one whole during the manufacturing process. Please note that each line needs to be processed.
- Let's start assembling the structure. This step can be performed in several ways. You can treat the edges of the workpiece with glue and glue the first part of the figure; instead of glue, you can use tape.
- After gluing, iron the pressed lines again. The box is almost ready.
The interior design of the box depends on what kind of gift it will contain. If this is a ring, preferably on the bottom, put a layer of padding polyester and seal the remaining part. Our special occasion packaging is ready!
Sunboy Box
Let's consider another option for making a box using the Sunboy technique. In the original version, this packaging was used as a container for sweets. Today, various pleasant little things are stored in this box.
For manufacturing we need a square sheet.
Manufacturing process:
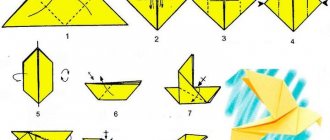
- First, let's start creating a “pancake” (base). We fold the paper, then bend and unfold all the corners to class=”aligncenter” width=”1024″ height=”680″[/img] Sunboy box diagram
- Once again bend the shape into a triangle. We bend the right side and turn the workpiece over.
- Now you need to make a valley fold. This fold is called so because the fold is drawn away from the person. Then fold the triangle again. The fold in this case should protrude to the top.
- Without changing the position, straighten the workpiece and bend the side from right to left. Expand the layer on top. We repeat the steps indicated above, but on the other side. In this case, the side on the left should bend to the right.
- Fold all sides towards the center. We bend the top layer, making sure that the angles between the sides are 90 degrees.
If the instructions seemed complicated to you, use the visual instructions megamaster.info, you will see that everything is not so complicated.
With two drawers
If you need to organize a place to store small items on your desktop, this video shows how to make a beautiful box with 2 drawers. You can put pins, paper clips, beads, and jewelry in them. No glue needed. To fold the box you need 1 sheet of A4 paper. Boxes that allow you to conveniently remove small items are made from 2 square sheets. The side length of each square is 13.5 centimeters. When the work is finished, you can decorate the box with stickers and label the boxes.