Paper crafts are such a multifaceted and fascinating form of creativity that I couldn’t pass it up. Since I myself am interested in various types of creativity, and I also have a growing assistant daughter who is constantly making something and cannot live without needlework. Then in our piggy bank there must be useful or simply interesting paper master classes on different topics and for different occasions. I think my piggy bank with paper master classes will be useful to you too. Here you can get inspiration or find a suitable idea, as well as watch the step-by-step manufacturing process. I collected those that in my opinion seemed interesting, original or useful. Some are difficult to make, and some are very simple and can be done with children.
For production, you mainly need paper (colored, plain white or corrugated, in some products cardboard) Scissors, pencil, ruler, glue. And most importantly, creative spirit)))
You are ready? Then let's get started!
Let's start with useful ideas from paper
Bookmarks for books made of paper with step-by-step photos.
Origami heart bookmarks
I also liked the idea of mittens on a string. You can draw these mittens yourself, or you can cut them out of paper for scrapbooking.
The next idea is anti-stress bookmarks, although they are indirectly crafts, however, this is also a type of creativity associated with paper, and besides, in our turbulent times they can be very useful. They can be printed or redrawn from the monitor screen.
Fun shark
Boys will surely like this craft, because who, if not little heroes, dreams of taming dangerous predators?
To make a shark:
- A circle is cut out of white paper, triangles are cut along its edges and folded inward. The result was a real shark's mouth;
- cut out a shark figurine from blue paper and glue it onto cardboard;
- Draw eyes on the shark and glue on its mouth.
The application is ready. This is such a charming shark.
Volumetric 3D paper crafts for interior decoration.
The next useful thing is interior decoration. With the help of paper we can create additional comfort in the house or set a certain atmosphere. You can also use paper crafts to decorate an area for photo shoots or create decor for a holiday. In general, there are a lot of ways to use it, so let’s move on to ideas.
Garlands of butterflies for decoration
You can also decorate the photo zone with butterflies, so that the butterflies are voluminous; you only need to glue the middle of the wings to be free.
Well, let's return to the garlands for now, they can be made in all sorts of different ways, for example in the form of such 3D hearts.
Or these glowing stars
You can also make voluminous droplets, circles or clouds, in general, anything you want and attach it however you like. At least make a garland, at least stick it on a wall, or even on a postcard in the form of an applique.
And for interior decoration, here’s an original idea)
Paper Wedding Decor Idea
But with such rosettes you can decorate any joyful event, be it a wedding, a children's party or a photo shoot.
What kind of cardboard is there?
Probably every person knows what cardboard looks like. Usually it represents a box in which something is packaged. This is the so-called waste cardboard. It comes in different thicknesses.
The thicker it is, the stronger the product will be. But such material is difficult to cut and glue. Therefore, it is better to make crafts with small elements from thinner material.
Cardboard is also made specifically for crafts. This is children's colored cardboard. There are quite a lot of varieties of such material. It can be coated, glossy, matte, metallized, with glitter. It is best to take a double-sided option.
How to make paper rosettes step by step:
And from semi-sockets you can make a very beautiful garland
To decorate your festive interior, you can make different voluminous fruits out of paper. In this master class you can see how to make tangerines or pumpkins, whichever you prefer. Using the same principle, you can make other fruits, for example: a pear or an apple, the main thing is to choose the right colors and make the proportions look like real fruits.
You can take paper in different orange shades. And green for leaves.
The paper needs to be cut into strips 4 cm wide and 18 cm long - 2 pcs, 23 cm - 4 pcs, 28 cm - 4 pcs. You should get 10 strips.
Each strip must be bent in the form of an accordion or fan.
Next, the paired strips must be glued together and closed into a ring.
There should be 5 pieces.
Then you need to glue the middle of each ring.
We collect all the rosettes together with glue.
And as a final touch we glue on the twig and leaves. The tangerines turned out to be a sight for sore eyes.)
Fruits or vegetables can also be prepared in another way.
For example, this children's paper craft “carrot”.
Or "apple".
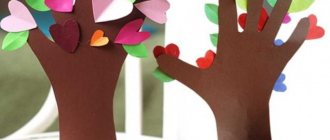
Autumn tree
To make a tree you will need several sheets of paper of different colors and cardboard. First, cut out and glue a brown tree trunk onto a sheet of cardboard. And bright autumn leaves are made from multi-colored paper squares folded into a fan.
It turns out very beautiful. This applique can be used to decorate a wall in a children's room.
Note!
DIY paper crafts: TOP-200 photos of exclusive ideas and craft options
DIY paper origami craft step by step: ready-made diagrams for creating beautiful origami at home (90 photo ideas)
Crafts from paper and glue for children: step-by-step instructions for creating interesting crafts with your own hands (90 photo ideas)
Children's crafts, postcards with paper applications.
Beautiful cards with appliqués can be made from colored paper and regular table napkins or corrugated paper.
Using the same principle, you can make a dress for ballerinas, only roll the paper not into a lump, but into a tube.
And with younger children you can make this cute hedgehog from narrow strips of paper.
Or a polar bear applique.
Craft instructions
Probably all parents know the situation when a child is tired of his toys and no longer knows what to do with himself.
- Origami from paper: 115 photos and video description for beginners on how to make origami
- Crafts made from corrugated paper are a simple and useful activity for you and your child, as well as a way to decorate your home.
- Easy paper crafts are children's fun as a tool for developing a child's creative potential in the examples in the photo.
If you constantly buy new toys, you can go broke. Moreover, this is entertainment for only a couple of days. Why not make a toy yourself together with your child.
Such activities bring together and help the child develop. The main thing is to be careful when working with thick cardboard. It can easily cut delicate baby skin.
Do not allow your child to use scissors or a utility knife alone.
Flower ball made of corrugated paper step by step
Our website also has an article on how to make paper flowers for candy bouquets.
Or how to make flowers from different materials.
And while we continue...
European art - quilling
Quilling is a technique for working with paper, also called paper rolling. If you master this skill, you can create amazing crafts, both voluminous and flat. But this direction requires a lot of endurance and patience. In order to create interior items or even simple figures, you need to twist not just a single spiral, but dozens, hundreds, sometimes thousands.
The resulting spirals are folded into various shapes that form modules. And you can use them to make photo frames and decorate albums, greeting cards, even beads and necklaces!
This direction came from the Mediterranean. In coastal Europe it was mastered back in the 15th century! And it gained popularity because of its availability and low cost. But even royalty did not disdain this direction; even Queen Elizabeth of England was fond of quilling at one time.
Origami, kurigami, kusudama paper crafts step by step
A selection of paper stars using different techniques.
I also consider beautiful boxes that you can assemble with your own hands to store various small items or even for gift wrapping to be useful crafts; see more ideas for wrapping gifts made of paper here.
Ball using kusudama technique.
Peacock
To make this beautiful bird:
- Several sheets of paper of different colors are folded like an accordion and glued together. This will be the tail;
- cut out the body of a peacock from cardboard, glue on the eyes and crest, draw a beak and feathers;
- glue the tail to the body - the handsome peacock is ready!
It’s not difficult to make such a handsome man
"Little Heart"
Kids really like everything bright and unusual. Then any process of creating a craft is interesting and mysterious. For the proposed option, you will need bright multi-colored paper with a corrugated base plus thick cardboard. An even heart shape is drawn on a thick sheet of paper. You can use a 20x20 cm stencil.
It is necessary to cut it out and additionally cut small squares of 2x2 cm in size from corrugated paper. Small areas of the heart are coated with glue. A square is glued to these places. You will need a toothpick to lift the edges. This fills the entire surface.
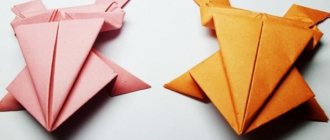
funny bird
Any child will love this bird. There is nothing complicated in this work - even a preschooler can handle it. Here are the instructions:
- Cut out all the details and color them to your liking.
- After the paint has dried, coat the blanks with hairspray for greater brightness.
- Glue each element of the work (eyes, head, wings, tail, body) with double-sided tape.
- Glue a wooden stick on the back side and stick it into a stand made of a block of wood or salt dough.
Fairytale "golden fish"
A child of four years old can make his own paper craft in the shape of a goldfish. What do you need? Round plastic plate - once. Thick cardboard - two.
Then everything is on the list: scissors, multi-colored paper sheets, stationery glue, pencils, decorated elements for the fish. Subsequence:
- turn the plastic plate over onto cardboard and trace it with a simple pencil;
- the resulting circle is cut out;
- draw a triangle inside another circle;
- cut it out. This is the tail of the fish;
- glue the cardboard circle and triangle together;
- stick yellow paper and decorations on top;
- cut out a blue circle and a smaller black one for the eye and stick it on.
Simple and fast. You can play with it or just admire it as a decoration.
Paper creativity is the basis of creative thinking
This material describes only a few areas of paper art. In fact, there are many more, you just need to let your imagination run wild. It is useful for people of all ages and professions to engage in such art.
It not only brings aesthetic pleasure, but gives inner harmony, develops thinking and allows you to calm down and forget about the bustle of everyday life.