The game process is recognized by modern teachers as a very effective way of providing children with the necessary information. Working together with them turns classes into an exciting process.
We offer several techniques for making crafts on the topic of traffic rules in a kindergarten with their own hands to instill a culture of safe movement on the street. In addition to road signs, children can make a mini-city filled with car models and traffic lights.
Road
It is easy to make models of houses and trees from small cardboard boxes. You can use plasticine and colored paper. Pedestrians will be construction figures or self-created characters. Small toy cars will fill the roadway.
Crafts on the road through the eyes of children are often used by parents and educators in the learning process. You can take it to a kindergarten or school to participate in the competition.
Traffic light
For it you will need cardboard in black, red, green and yellow. This traffic rules craft will decorate a child’s room. You will need to cut out the base from black cardboard according to the template. You can draw it yourself or pre-print the finished version.
You also need to cut out three circles and stick them on the base. You can make opening windows with poems. If you add eyes and a nose to a traffic light, you will get a fairy-tale hero. A small model made of plasticine or cardboard can be used to create a model of a city street.
You will get an original product if you use fabric for it. Sewing a traffic light is not difficult, you just need to select bright pieces of material. The finished product is hung on the wall.
Miniature city
A small city can even be assembled in the lid of a cardboard box. This composition includes several roads and sidewalks, houses, a school or kindergarten, and shops. It is imperative to create intersections and pedestrian crossings.
Master class on creating one of the districts of the mini-city:
- A diagram of the neighborhood is drawn up on the lid of the box. The basis is 2 wide roads intersecting in the center of the composition.
- The roads are formed from wide strips of black paper in the shape of a cross. Narrow black stripes are fixed parallel to them - sidewalks.
- Three-dimensional houses are made from paper. Windows, doors, decor, and signs are glued to them. The most important facilities for the child are highlighted: kindergarten, school, store, playrooms, etc. The houses are fixed to the bottom of the box, forming neighborhoods.
- Trees are made from twigs, toothpicks and plasticine and installed along the street and in courtyards.
- It is advisable to allocate one of the areas for a park. Here you need to install trees, glue the surface of a small lake, and make attractions out of paper.
- The road is being marked. A dividing strip is made from a thin white strip in the center. Near the intersection, “pedestrian zebras” are marked with small white stripes.
- Crosswalks and intersections are equipped with traffic lights and the necessary road signs.
- Cars are made from plasticine or paper. You can use small toy cars.
You can make several such crafts. They are put together to create a town. The roads must be connected to ensure the “passage” of cars throughout the mini-city.
Application
A child can make a simple product on his own. To do this, you need to prepare all the materials and tools. The plot is thought out in advance, then all the necessary details are cut out of paper. Paper vehicles, traffic lights and pedestrians are glued onto a cardboard or Whatman paper base.
Children create crafts of traffic rules for kindergarten with their own hands with pleasure. You can use stories featuring characters from your favorite cartoons or fairy tales.
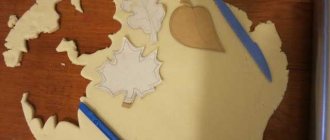
Idea No. 4. Traffic rules - Christmas tree
Let your child feel like a designer. In the process of creating this toy, children can be tasked with coming up with ways to decorate the Christmas tree and draw/color road signs.
We will need:
- thin sheet of foam;
- scissors;
- threads;
- Christmas tree template (you can draw it yourself or cut it out ready-made);
- paper;
- stationery knife;
- round lid;
- pen (gel pen is best);
- some decorations.
We transfer the tree to the foam. To do this, trace the template with a gel pen.
We attach the lid and mark the cutout on the tree.
Cut out with a stationery knife.
This creates a “window” for the future road sign.
Next, we create the design of the Christmas tree to your liking. For example, like this:
We cut out identical circles from paper and color them in the form of road signs. You can choose the simplest and most important ones so that the child can draw them himself.
We glue them together to make a double-sided sign, and thread a thread into it using a needle.
Using the same thread we hang the circle in the cut out window.
Add more shine to the Christmas tree.
All that remains is to sew a loop for hanging on a branch.
It turns out to be a “movable” toy.
The main feature is the play of details. A craft made of light foam plastic will be set in motion even by a light air flow, turning first one side or the other and flickering with its rhinestones. At the same time, the sign will rotate.
Using the same principle, you can make a tabletop Christmas tree. The craft does not require special skills, effort or materials.
Wall newspaper
Children themselves can create excellent visual aids.
This craft on the topic of traffic rules will help you learn more new and interesting things. The newspaper creates several columns. You can use historical information and make a crossword puzzle. Photos or drawings of non-standard signs from other countries are placed in a separate section. Children are delighted with the colorful tasks where it is necessary to determine the order of passage of vehicles. All this will help attract children's attention. Future drivers will study this publication with interest, gaining new knowledge.
We create a mini-city for studying traffic rules
The layout has a complex design. It will turn out large and voluminous, but its creation will require few materials. This craft on the topic of traffic rules will be a good teaching material. The mini-city is made from cardboard and colored paper using watercolor paints, brushes, scissors and glue.
Technique for making a city model
- Prepare cardboard boxes of different sizes. Cover them with colored paper and decorate them with windows cut out of plain white paper.
- Cut off the top of a large box and decorate its bottom according to the plan of the future city.
- If the project includes a river, paint it blue or cyan.
- Paint the road black and apply white markings.
- Cut out circles from cardboard and draw traffic signs on them. To install next to the road, glue it to a wire stand.
- A traffic light is created from a cardboard rectangle onto which colored circles are glued: red, yellow and green.
- You can stretch a wire across the road to serve as a wire for suspended traffic lights. Its ends are glued on top of the houses.
- Make trees, shrubs and flowers from plasticine. Create additional elements: benches in the courtyards, a bridge across the river, a fountain.
This craft will help you not only learn safety rules, but also colors. To make the layout more realistic, use Lego figures and toy car models.
Public or specialized transport can be created from matchboxes with colored paper glued to them. Instead of headlights, small buttons are glued to the boxes.
City layout for the game
Instead of a big city, you can create a small structure for playing traffic rules, which is suitable for preschool children:
- Cut a playing field out of a large cardboard box, place houses and signs on it, and crosswalks across the road.
- Come up with an interesting task for the pedestrian.
- You can use Kinder figures as characters.
- Cut and glue the game cube, placing the required number of dots from one to six on each side.
Have a nice trip and enjoy your time!
Coloring book
To quickly memorize the material, use interesting books. To do this, print out pictures on the topic and paste them onto the pages of the product. A rhyme on the topic or a riddle is placed under the image. The child must not only guess it, but also color the picture. The information received is well remembered by children.
An interesting option would be a book with different vehicles. It is worth reminding your child how to cross the road correctly. You can diversify the information if you place images of your child’s favorite characters on the pages of the book.
ProjectBook - baby “Road Rules”
#Publications #Class teacher #Primary school teacher #Additional education teacher #Educator #Creative work
Project Little Book “Road Rules” Authors: 3b grade students of Gymnasium No. 25 in the city of Kostroma, 2022.
Is it possible to create a book with your own hands?
Hypothesis: if you make little books “Road Rules” for the school library with your own hands, then schoolchildren will use them with interest and study the rules of the road. Hypothesis: if you make little books “Road Rules” for the school library with your own hands, then schoolchildren will use them with interest and study the rules of the road.
Problem While studying the topic of literary reading “Books are my friends,” we wondered if we could create a book ourselves. So that it is interesting, educational, colorful. We have questions 1. How to make a baby book? 2.What topic should I choose to make the book educational? 3. How to design a book to make it interesting?
Topic: creating a little book “Road Rules” Topic: creating a little book “Road Rules” Object: little book Goal: creating a little book for the school library
Objectives: get acquainted with the variety of forms and types of books; learn the stages of making a book and its structure, try yourself in the role of a master artist in making a book, select material for the book so that it is informative and interesting, complete your work carefully, colorfully, beautifully.
Stages of work Acquaintance with the history of the book and its structure. Preparatory stage.
Collection of information. We learned about how a book is born from a librarian when we went on an excursion to library No. 6
Selecting a topic. We decided that our book should be educational. During the discussion, we chose the topic “Road Rules”.
Information and research stage 1. We got acquainted with the history of road signs. 2. We set up a stand “The ABC of Safety” 3. We held a role-playing game “Traffic Police Inspector”. 4. Played mind games: “What? Where? Where from?”, “Put up a road sign”, “Guess what sign”. 5.Participated in an interactive lesson: “Dunno is in a hurry to go to school.” 6. We played the outdoor game “Traffic Light”.
Stages of making a book - babies Cover During technology lesson, we made a cover from thick material 20x15. Design the cover according to the theme
Stages of making a book - little ones Pages We made 19.5x14.5 pages from white cardboard. Secure the book with rings
Design of book pages - babies
Book design - babies Title page
Book design - kids Contents About the traffic light
Book design - kids Contents Road signs for pedestrians
Book design - kids Interesting pages Scanword puzzles Games Rebuses
Results of our work As a result of our work, the school library was replenished with new books - little ones.
Board game
You will need to print out traffic signs.
You need to make two sets. One will be needed for chips, and the second will be used for cards. The signs are glued onto cardboard and cut out. These chips will be distributed to the players. You will also need cards. Rectangles are cut out of whatman paper, onto which road signs from the second set are glued. You should find poems that are also pasted on the card.
The presenter distributes chips, and then takes out cards one by one and reads the verse. If a player sees that he has such a sign, he receives a card. The winner is the one who quickly collects all the cards that correspond to the chips received at the beginning of the game.
Children will definitely enjoy this interesting craft based on traffic rules. It will help you remember the signs faster and create fewer accidents on the roads.
Idea No. 2. Crosswalk
The next road sign that every child should know is a pedestrian crossing. To make it you will need the simplest materials: paper and glue. The tools that will suffice are a pencil and scissors.
Parents will need to prepare (print) images of the road sign and a pendant in advance.
We follow the step-by-step instructions below:
- Draw a sketch of a cube on paper.
- Cut it out.
- Glue on an image of a road sign.
- Fold the sides according to the layout and glue them together.
Don’t forget to attach a loop and decorate the craft with tinsel.
Looking at the sign made with his own hands, the child will definitely remember where he is supposed to cross the road according to the traffic rules.
Zebra
To teach your child to cross the road correctly, you need to talk about the rules in a playful way.
For this purpose, the little one learns poems about road markings. The hero of such works is often Zebra. To make it easier to memorize, you can make a zebra out of paper or sew it out of fabric. A cute animal will help kids remember a simple rule faster. The cheerful zebra will take part in daily games. It can be placed on a mock-up of an intersection, which you create yourself from cardboard and other available materials.
Do-it-yourself little book on traffic rules for kindergarten
Didactic manual “Baby book “Safe roads for cheerful children”
Author : Olga Nikolaevna Tipukina, kindergarten teacher MADOU “Child development center - kindergarten No. 77 “Zorenka” Veliky Novgorod Do-it-
yourself didactic manual for kindergarten “Baby book” “Safe roads for cheerful children”
Goal: to expand the knowledge of traffic rules for preschool children. Objectives : introduce children to the rules of the road, teach preschoolers to follow the rules of the road through play, educate preschool children to behave safely on the street. I offer a hand-made book for kindergarten teachers - a baby. This book will help introduce children to the rules of the road and teach them to follow them on the street. Children will learn new rules of safe behavior and reinforce already known rules of safe behavior in a playful way. The heroes of the book, two boys, will help them with this. Traveling with them through the pages of the book, preschoolers will learn proper behavior on the street. Book – baby “Safe roads for cheerful children” 1 page “Getting to know” Children get acquainted with the characters of the book.
The text is on the back of the typewriter. Heroes can be moved to other pages of the book. My name is Egorka, I go to kindergarten, I’ll tell you about an interesting walk.
I have an older brother, I’m always happy to go for walks with him. He is big, and the two of us walk down the street with him. Page 2 “Introduction to traffic lights and pedestrian crossings” The heroes move to the second page. The text is on the back of the traffic light parts. The traffic light windows gradually open from above and the text is read. After reading, the hero boys move to the other side of the road along a pedestrian crossing. You can “play” traffic lights with children (learn the purpose of traffic light colors). Traffic lights with Velcro. The top window of the traffic light: Here is the road on the way, You need to cross it. There are no cars on the road, only my brother is in no hurry. I pushed my brother a little: “Well, let’s go, the road is empty.” Only the brother answered: “No!” The traffic light is red! The traffic light turns red, even if there are no cars, This means that the path will become dangerous, Don’t rush onto the road! Middle window of the traffic light: - Look at the car, at the road and wait a little longer, There will be yellow ahead. The yellow light will wink at us, But it won’t call us on the road. He will warn us that green is ahead! The lower window of the traffic light: - Look at the road on the left, Look next to the right And walk boldly along the zebra crossing, Thank the traffic light. We switched to green, and my brother and I went further.
Page 3 “Bicycle” The heroes move to the third page. Children learn the signs that allow and prohibit cycling. With joy, I shouted to my brother: “Look, look, a bicycle!” My grandfather gave me the same one! My brother looked at the red circle and suddenly said to me sternly: - Adults and children love to ride a bicycle. With this sign it will become clear where it is dangerous for us to ride! Neither on a scooter nor on a bicycle. Children do not ride on the roadway! There is a bike path, everyone can ride here! Page 4 “Bus” The heroes move to the fourth page. The text is on the reverse side of the zebra. The bus moves along the roadway. Children become familiar with the “Bus Stop” sign and learn how to properly get off the bus and cross the road. With joy, I shouted to my brother: We see a sign ahead, We decided to approach it: It’s blue, rectangular, And there’s a black bus on it. And then my brother told me about this sign: - In this place, a pedestrian is patiently waiting for transport, If you are tired of walking, You can become a passenger. Get off at the stop and carefully walk around the back of the bus. Page 5 “Ball” Heroes move to the fifth page. The text begins on the sign with a ball, continues on the sign with a traffic light. Children learn the rule that playing ball near the roadway is dangerous. The car is moving on the roadway. We went into a huge store and bought a soccer ball. I wanted to take that ball and play a little. I say: “We can play as a couple on the sidewalk.” How free, look! We'll play great! But my brother didn’t give me the ball. He sat down and said sternly: “On the pedestrian road, even if it’s wide and free, we can’t play with the ball, Otherwise you might get hurt!” What if this new ball gallops off onto the road? Or you can just play too hard and end up under a car. And so that we don’t get hurt, Let’s go with you to the yard to play! Page 6 “Games in the yard” The heroes move to the sixth page. Text on the back of a large bubble. Children, remembering the rule that they can play ball on the playground, can play ball. The ball on the page is moving. Only in the yard and on the playground can you play with your ball without looking back. Page 7 “In the car” The heroes move to the seventh page. The older brother is below, and the younger brother is in the car seat. The text is on the back of the typewriter. Children can unfasten the seat belts, place their little brother in the seat and fasten the belts. We were going to take the groceries to grandma and decided to take them in our brother’s car. When I sat down in the chair, my brother said to me: - It is known, Before you set off, don’t forget to fasten your seat belt! In case of trouble, the Belt will save you from danger! Page 8 “Flicker” The heroes move to the eighth page. Text on the back of the typewriter. The child can attach the flicker on the machine to his clothes. The page is made with reflective elements. In the dark, children can shine a light on the page. My brother and I walked for a long time, the lights came on. We became poorly visible to drivers from a distance. - Mom attached a badge with a reflector, and now you glow like a firefly! So that we can be seen in the headlights, And so that a car doesn’t hit us, And so that the driver notices us, All children should wear flickers! Pages 9 and 10 “Meeting with the Traffic Light” The heroes move to the ninth page. There is a pop-up book in which children learn the rules of the road. The game "Signs" helps to strengthen the ability to distinguish road signs. The game consists of cards with signs and cards with poems and riddles about signs. Children find the required sign from a poem or riddle. Near the house by the road We met a traffic light: “I know you’ve been walking for a long time, you’ve studied a lot of rules.” Here's a book from me, Egorka, It's very interesting and important! Practice and play, remember the rules! Try not to forget them, so that you become a reasonable pedestrian! The board game “City Travel” helps children reinforce the rules of safe behavior on the streets and roads, distinguish and understand the meaning of road signs, develop mental operations, attention, memory, and speech. Page 11 “Returning Home” My brother and I reached the house. I learned a lot of rules. I’m very glad that I took a walk with my older brother today.
We recommend watching:
Do-it-yourself baby book for children from 1 to 3 years old Do-it-yourself educational book for kids Do-it-yourself educational book for children 2-4 years old Do-it-yourself educational book for children from 3 years old
Similar articles:
DIY baby book
KVN on traffic rules for older preschoolers
Didactic game for learning traffic rules in kindergarten with older preschoolers
Lapbook
The product will require a folder, which you can make yourself. Crafting traffic rules for school will be an excellent tool for children.
A laptop is made from sheets of A4 or A3 format. It may have a different number of sheets. They are covered with thematic pictures. Envelopes of various shapes are attached to the base, containing cards with interesting tasks, puzzles, and riddles.
A section with traffic signs should be provided. Lapbooks often contain interactive elements that attract children's attention and help them remember information faster.
Moving accordions, circles with arrows, windows with opening shutters will interest children. You can borrow ideas from more experienced craftsmen by looking at their work. They offer many interesting options for creativity.
Idea No. 5. CD ball
For those who are not looking for easy ways, but want to be proud of the result. You will have to work hard, but the craft can be safely submitted to a competition at school.
So, you need to prepare:
- compact discs (CD or DVD) - 12 pieces;
- drill/screwdriver;
- wire with wire cutters;
- glue gun;
- images of road signs (draw them or cut them out - it’s up to you);
- pattern in the form of a pentagon with equal sides. According to our calculations, the side length should be 6.5 cm.
First, cut out the pattern from plain paper. This is where a 75 degree protractor comes in handy. We drill 5 holes in the disk at equal distances.
We do the same with the rest. We take 6 disks and lay out a flower from them.
We attach 5 in a circle to the middle disk with wire. The result should be a hemisphere.
We do the same with the remaining 6 disks. We connect the two parts into one ball.
Glue circles with images of road signs in the center of each disk. We hide the seams and wire under the tinsel.
The toy is ready!
Soft road signs
Original products are sewn from felt of different colors. Bright and soft to the touch road signs will definitely please your baby. For them, the material of the required colors is selected, the products are filled with padding polyester. Such a craft of traffic rules for kindergarten will not go unnoticed at the competition. You can make several of these toys to use in class.
Another option would be to create soft cubes. Road signs are sewn onto their edges. The child will soon begin to recognize such signs on the way to kindergarten or school. He will look at them with interest and remember them, which will definitely be useful to him in the future.
Simple ways to make a traffic light
In older preschool age, you can safely make crafts using electrical parts. A very original option is a traffic light made from plastic bottles. 2-liter dark bottles will do. Three windows are cut into them with scissors or a cutter. Each of them contains light bulbs connected by batteries and equipped with power buttons.
To install a traffic light near an intersection, mount it on a portable PVC pipe. Cover the windows with colored glass or film. Bring the control device into operation by pressing the desired button.
Photos of crafts on the topic of traffic rules
+1