Finishing
When installing plastic windows, old wooden window sills are dismantled and replaced with new structures. Standard white surfaces do not suit all users. Recently, cladding with original mosaics and ceramic tiles has become popular.
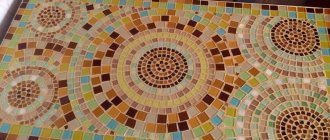
Classic option for finishing a large surface
Ebbs and visors of plastic windows
A plastic window is not only a double-glazed window and a frame, but also a number of additional elements, without which the window as a whole will not have a finished look and will not last for a long time.
For example, owners of PVC windows cannot do without such special devices as ebbs and canopies that will drain melt and rain water. These structures are installed on the outside of the window in its upper and lower parts, so they are invisible to the eyes of the inhabitants of the house. Ebbs and visors are designed not only to drain precipitation, but also to protect the installation seam under the window. If the seam is not closed in time, moisture will damage it, which can lead to the destruction of the wall and the window falling out. Even if you have an expensive PVC window installed without high-quality drainage, it may soon, in just a couple of years, become unusable.
Ebbs and visors can be made of plastic, tin, galvanized steel and aluminum. Today they are practically not made from tin, since it rusts too quickly, and also looks unsightly, spoils the facade of the building and allows water to pass through. Drains made of galvanized steel do not have these disadvantages, which is why they are now the most popular among consumers.
The color palette of the composition can be very diverse. In addition, such varnish helps to extend the life of the drainage system, as well as preserve its appearance. The ebb or visor covered with this composition will not fade in the sun and will be resistant to temperature changes. Window structures treated with polymer will give the appearance of the entire house a finished look.
After the all-metal sheet is painted, it is cut into pieces and given the required shape.
As you can see in the photo, the shape and size of the ebb and visor of a plastic window can be very different:
They are often made according to customer drawings.
It should be noted that ebb tides and visors are produced by both domestic and foreign manufacturers.
Those produced abroad will cost more, but this does not mean that they have better quality characteristics compared to domestic ones.
Drainage systems manufactured in Russia have a number of important advantages: low cost (and, consequently, low final price) and durability, which is ensured through the use of high-quality steel.
Compared to castings made of aluminum and plastic, steel structures are superior in a number of indicators:
- resistant to UV radiation;
- look aesthetically pleasing;
- resistant to precipitation (rain, snow) and temperature changes;
- resistant to corrosion;
- durable;
- resistant to mechanical damage;
- are inexpensive.
It should be noted that plastic moldings can also be used for installation on the outside of windows.
In addition, plastic elements are durable, do not require special care, do not fade when exposed to sunlight, and also increase the sound and heat insulation of PVC windows.
Visors and sills are easy to manufacture, but they require some work to install correctly.
This design will allow you to use drainage systems for the maximum amount of time.
The next section of the article is devoted to which slopes are best to choose for plastic windows.
Characteristics of materials
Different materials allow you to create a surface that matches the design of the room. Before using it, you need to consider its strengths as well as weaknesses.
Ceramic
Decorative ceramic material is used to decorate window and door openings in the kitchen and rooms with high humidity. It has high hygienic qualities. The advantages of slopes with ceramic tiles include:
- strength;
- wear resistance;
- low level of water absorption;
- hygiene;
- environmental friendliness;
- low price;
- durability.
The material is available on the market in a wide range of shapes, colors, and sizes.
Imitation stone
Imitation of artificial and natural stone makes it possible to bring various design ideas to life. The slab is made on the basis of fusible clay with quartz sand. Thanks to such components, the material is lighter in weight than tiles or ceramics.
This finishing reduces the load on the window opening. For cladding, stone-like tiles must be chosen very carefully.
The strengths of imitation stone include:
- light weight;
- compactness;
- variety (gloss, matte, texture);
- the ability to use for finishing window openings in the house;
- durability.
Finishing window slopes with tiles is easy.
The material is securely attached to the tile adhesive. To ensure the durability of the coating, it is necessary to carry out the work correctly. Attention is paid to the preparatory stage.
tiled
Ceramic tiles are a type of ceramic. It is distinguished by a glazed glossy surface, which is highly durable. Compared to ceramics, tiles cost slightly more. This is compensated by strength and durability.
The advantages of tiles include:
- high strength;
- resistance to chemical compounds;
- withstands the negative effects of direct sunlight and temperature changes;
- does not allow water to pass through;
- retains its appearance even after decades.
The material has a high level of hygiene, an affordable price and a wide range.
Thanks to its smooth surface, the coating is easy to clean using chemicals. You should not use abrasive materials for cleaning, as they can damage the top layer.
Mosaic
Using ceramic mosaics, they create an original design for window openings. Finishing the openings is not difficult. The main thing is to apply the adhesive evenly and carefully glue the mosaic.
DIY window sill tiling
DIY crafts and decorations from ceiling tiles for the New Year
The window sill, if the walls of the house are decorated with a single-color material, is one of the most visible and brightest places on it, so special attention should be paid to decorating it with your own hands, because against the backdrop of neat and even walls any imperfections in its cladding will be very visible, which means that the overall appearance of the house will deteriorate significantly. The requirements and conditions for finishing the window sill are the same as for other work - high quality material, careful measurements, and neat work
The requirements and conditions for finishing the window sill are the same as for other work - high quality material, careful measurements, and accuracy of work.
As for the first, in addition to high-quality tiles, the adhesive solution on which they will be laid is also important. Since we are talking about finishing an external window sill located outside the house, to finish it with clinker tiles you will need a plastic and necessarily frost-resistant tile adhesive mortar.
We recommend that you carry out the work of finishing the window sill with tiles yourself when the weather outside the window is warm - at least 5 degrees Celsius. There will be more when the temperature does not exceed 25 degrees, in order to avoid the glue drying out too quickly.
TOOLS FOR HOME AND GARDEN, HANDCRAFTS, ETC. PRICES VERY LOW
Most often, tiles are used to cover window sills in houses made of masonry materials - brick, foam or cinder blocks, ceramic blocks and others. In such houses, as a rule, a kind of “step” has already been poured or placed under the window sill, which will be its foundation. This base must be cleaned of dust and thoroughly primed to increase adhesion. If this is not done, the tiles from the windowsill will fly off within a year.
Before using the primer, be sure to check its compatibility with the adhesive solution; this can be done by checking the technical card of the latter, everything is described in detail there, what to use and with what.
If you are not making a new window sill, but are repairing an old one, then after you remove it, the base on which it lay must be puttied. In this case, it would be ideal to buy all three mixtures (tile adhesive, putty and primer) from the same brand (from the same manufacturer). As a rule, with this approach we can say with confidence that they will go well together.
Then prepare the tile adhesive according to the instructions on the package (Read more: How to prepare tile adhesive).
The first or contact layer is made thin and leveled with a trowel, after which the next layer must be applied with a spatula, its thickness should be equal to the teeth of a notched trowel.
On most window sills there is a slope towards the street; it is recommended to do it at an angle of 1-3%.
Now you can start gluing the tiles, leaving 6 mm gaps between them.
The tiles are smeared with glue to form grooves and laid so that they are perpendicular to the grooves made on the base of the window sill (intersecting or, more simply put, cross to cross).
Lay the tiles while simultaneously pressing on them for better distribution of the adhesive underneath them.
The next stage is grouting the joints (you can read more about grouting the joints between tiles here or here). As a rule, grouting of joints (unless otherwise expressly indicated on the packaging with the adhesive composition) begins within a day after laying the tiles on the window sill. This period increases if the ambient temperature is lower than recommended. The grout for tile joints on the windowsill, like tile adhesive, must also be frost-resistant.
Choosing window sills sparingly
The stereotypes of our consciousness attribute a high cost to marble (which is, in principle, true) and extend this opinion to granite and porcelain stoneware (which is not always true).
If made from granite or porcelain stoneware, the window sill can be even cheaper than a wooden one. Under the indispensable condition that it will be a composite product.
Let's explain in more detail. You can also order a solid window sill made of natural or artificial stone, several meters long to fit the dimensions of the window, and 30-50 cm wide. But such an order will probably cost more than all the PVC windows in the room, or even in the entire apartment. In addition, its weight will be so significant that it will require calling a special team of loaders and installers. Which will affect the size of the repair estimate in the most deplorable way.
The solution is to install a composite window sill. Now there are many companies on the market working with stone. And they always have production leftovers of granite, porcelain stoneware and even marble, which can be purchased at the lowest residual value. Moreover, the color and texture of the pieces will be quite identical, they will be processed, polished, etc. accordingly.
Naturally, a preliminary search for such stone “panels” will require time and effort, and you will need to travel to hardware stores and markets. But thanks to composite stone parts, you can save up to 50% of the price of a solid window sill; you can combine individual parts and perform the installation yourself. It is important to understand that with an active and successful search for material, almost everyone can afford a granite window sill. It will cost only several times more than a plastic window sill - and we have already described the advantages of stone over plastic.
Technology
- Once you have decided on the size of the tiles, you should know exactly how the tiles will be placed on the windowsill. There are two options to choose from: perpendicular or along the window. The choice is made taking into account to minimize the cutting of material as much as possible. To adjust the die to a certain size, use a glass cutter.
- Pre-mark the location of the cut using a marker. The tiles are placed on a flat and stable base, after which trimming is carried out at the designated points. While cutting, press firmly and firmly on the material.
DIY ceiling drawing: decorative element
- Next you will need a rubber hammer. They use it to tap the tile on the back side at the site where it is supposed to be cut off. If the tool is not at hand, you can use the handle of a spatula wrapped in a thick cloth or towel.
- It is necessary to break off with sharp movements, controlling the force. If your skills allow, you can trim the material using a grinder. Using this tool will save a lot of time and effort. Use this technique if you have professional skills.
Selecting masonry type
In most cases, the master has to choose from two options:
- Along the area around the window.
- Perpendicular to it.
The dimensions of the base should be taken as the basis for choosing the type. It is necessary to minimize unnecessary trimming of materials. To adjust the die to the dimensions, use a regular type of glass cutter.
After determining the location of the incision, the area is marked with markers. Cladding should only be carried out on a smooth surface that is firmly fixed. Otherwise, you will not be able to trim the marked marks.
You should not be afraid to press hard on the laid material. If you press weakly, then there is a chance that the tile will not press through.
To do the job carefully, a rubber hammer will help, which should be used to slowly tap ceramic products in places where there is a potential cut. As an alternative to a hammer, you can use the handle of a spatula. But you should wrap it in something soft (for example, a towel) in advance, otherwise there is a risk of damaging the product.
The selected part must be broken off with a sharp and forceful movement. If you are not sure that the process will be like this, it is recommended to use an angle grinder. It will save time and physical effort.
Traditional installation method
How to make LED curtain lighting with your own hands
Before you begin installing ceramics, you need to prepare high-quality glue. The solution is applied with gentle movements to the back side of the finish and the work surface. You can use a spatula to distribute the composition. During installation, you need to ensure that the elements of the pattern match.
There must be a gap between the dies. To ensure that all the parts lie at the same distance from each other, special plastic crosses are used, which also differ in size.
Experts recommend forming a slight slope of the structure from the window to the outside. Thanks to this, it will be possible to avoid the accumulation of condensation, since all the water will flow from the base of the frame to the very edge. The end parts are mounted only after the laying of the horizontal dies is completed. Once all the tiles have been laid, you can proceed to using putty. It is more practical to use a dark shade. Popular options:
The choice of putty shade depends on the color of the tile. Once the solution has completely hardened, the window sill is thoroughly cleaned. After this, the updated surface is completely ready for use.
Attention! During work, you need to ensure that all vertical and horizontal elements are as consistent as possible with each other at the joints
Subtleties of preparing the base
Each time cladding work should begin with this procedure. Carefully remove old enamel, putty, and other coating. You also need to remove all dust and dirt. After this, a deep penetration primer is applied to the surface. Increased attention is paid to the selection of high-quality ceramics.
If the window sill is compact, then the finishing material should be small. Elements measuring 10x10 or 15x15 cm are quite sufficient.
For large window sills it is better to choose larger tiles. In some cases, the choice can be made on elements measuring 40x20 or 30x30 cm.
It is not difficult to choose high-quality finishing ceramics. This material is available in a wide range.
How to choose and what to combine with
The most direct way is to match the material of the window sill with the frame. The frame will look more complete if the window sill is continued in the slopes. It is harmoniously combined with the color of furniture facades and some of the finishing.
Plastic structures are easy to install and do not require special care. It is advisable that the detergent used does not contain abrasives. PVC products are characterized by the ability to imitate wood or the texture of natural stone; you can choose different thickness, size, matte or shiny surface.
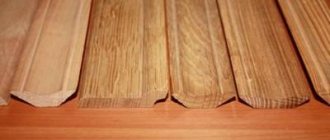
Wooden window sills are close to the classics, cozy, and have good thermal insulation properties. They will last longer if they are protected with a special coating and have less contact with moisture.
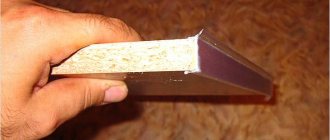
The top layer of MDF and chipboard is also laminated and covered with cork or “stone”.
In addition to the fact that a granite window sill will not fit plastic frames at all, it should only be purchased with a certificate; it can accumulate radiation. Marble is highly durable and comes in a wide range of color options.
What is necessary
To lay ceramics efficiently, you need to prepare the necessary tools and consumables. The standard list includes:
- Universal primer.
- Adhesive solution.
- Tile.
- Grout for seams.
- Pliers.
- Glass cutter.
- Hacksaw.
- Building level.
- Small rubber mallet.
- Standard spatula.
For the window sill in the kitchen, porcelain stoneware is the best choice. This material has high strength.
Basic set of tools
Porcelain stoneware is durable and high-density. The finished structure perfectly resists the influence of adverse factors. You can place hot dishes and heavy objects on porcelain stoneware.
How to decorate window slopes with plastic with your own hands inside the house
There are many answers to the question: “what is the best way to finish the slopes of windows inside?” The modern choice of materials for cladding and finishing allows you to create a unique design for any window. Step-by-step instructions for decorating the inside of a window with your own hands look something like this:
- measurements;
- preparatory activities;
- choice of finishing method;
- the design itself.
We take measurements
For measurements you will need a metal tape measure, for markings - a square and a pencil. You will have to measure the perimeter of the window itself, the opening leading into the room, and the distances between them. The dimensions are transferred to the material, the parts are carefully cut out, fitted to the opening, and adjusted if necessary.
Preparation for registration
During the preparatory activities, the surfaces are plastered and leveled. The space to be treated is cleared of construction debris, and the “bumps” of polyurethane foam remaining after installing the window are carefully cut off.
It is advisable that the opening located directly around the window be slightly smaller than the one “going” into the room - the slopes are attached at an obtuse angle (approximately 93-97 degrees). This will make opening the window easier and make the overall appearance more harmonious.
Finishing methods
At the next stage, the finishing method is selected - plastic panels, plasters, paint, etc. If plastic is chosen, installation of the frame is required. Thin, but even, durable, dry wooden slats about eight mm thick and up to 30 mm wide are suitable for this.
The frame is assembled and secured with dowels and self-tapping screws. A thin layer of insulation – expanded polystyrene, mineral wool, isolon, etc. – must be placed and glued under the plastic.
The verticality of the frame slats and the horizontality of the upper lintel are checked with a building level. The outer part of the opening is decorated with “F” shaped profiles, into which acrylic adhesive is pre-applied. The panels are inserted into them and pressed.
Calculation of surface thickness
It is possible to install a window sill made of artificial stone of any size. These parameters are limited only by the technical specifications.
The thickness of the slab is an important indicator. The strength of the structure and its service life depend on this parameter. Typically, window sills made of artificial stone reach a thickness of 1.25 - 3.0 cm.
A qualified measurer will help determine optimal indicators based on the following data:
- window opening dimensions;
- properties of the manufacturing material;
- specifics of operation.
Advantages and disadvantages
There are many options for successfully transforming window sills into stylish and comfortable interior elements. Such designs give their owners a number of obvious advantages, as they allow:
- save usable space and rationally use available space;
- implement interesting projects in any room;
- correct the poor shape of the room;
- create an original interior element;
- save on buying ready-made furniture;
- realize creative ideas;
- make designs with your own hands according to personal needs.
The disadvantages of implementing such ideas are that:
- there is cold coming from the window - in winter it is better not to sit on the windowsill;
- excessive lighting results - additional sun curtains may be required;
- batteries are placed under the windowsill - during the heating season your feet may be hot;
- If you cover the radiators with countertops and cabinets, air exchange is disrupted - it is difficult for heated air to circulate due to the obstacle that has appeared. A way out of this situation can be grilles built into the countertops and furniture doors. Moving the radiators to another wall and installing a heated floor will help correct the situation.
Installation of window sill boards
There are two ways to make a high-quality concrete window sill yourself. In the first case, the window sill board is cast separately. In the second, it is manufactured immediately on site. By choosing the latter option, the problem of how to make a concrete window sill is solved in a comprehensive manner.
Components of the window sill board:
- formwork;
- cement mortar;
- metal grid;
- power tools and connecting elements (screws, bolts).
Making concrete window sill boards with your own hands begins with formwork. It is recommended to make a form for pouring concrete on site - the window sill . This is the best option, allowing you to install a concrete window sill with your own hands in a short time with a minimum of cost.
Formwork
When making formwork, the width and length of the future product are measured. For example, at 17 cm, the width of the board should be 2-3 cm, the height – up to 4 cm. This is enough for the window sill to be of standard dimensions.
The connection of wooden structures is made with self-tapping screws using a drill and screwdriver.
The figure below shows the finished structure adjacent to the working surface. The difference is that the window sill in the photo is open.
After excavating and processing the outer corner, the window sill is cleaned from dust, debris and dirt. A brush and broom are not effective. Cleaning is done with a vacuum cleaner. At this stage, the preparation of the working surface is completed.
The photo shows the formwork from the inside of the window sill. This is the look the finished structure should have for pouring a window sill indoors.
View of the formwork from the inside of the window sill
Iron fixing elements are used to install the formwork. They allow you to reliably install the product.
Iron staples are used to secure the formwork.
At the bottom of each element, two holes are made for self-tapping screws for installing the formwork. The work uses screws (used ones are allowed) and a screwdriver. The finished formwork looks like this:
Fixing the formwork with self-tapping screws from below looks like this.
Fixing the formwork with self-tapping screws
To prevent the cement mortar from leaking out, additional structures are nailed to the sides. This concludes the production of formwork.
Preparing the surface for pouring cement
After cleaning the window sill part, a structure of the required width is made from the mesh. It is needed for high-quality filling. Folds in half and is secured with wires for reliability. Each piece of wire is lowered into a brick hole and secured to the mesh.
For high-quality filling, a mesh is fixed to the window sill
If there are gaps between the formwork and the window sill, silicone is used. It will help avoid leakage of the solution.
Cement mortar
To make the mixture, cement, sand, and crushed stone are used. The proportions for the solution are one to two, that is, 1 hour of cement / 2 hours of sand. It is recommended to use grade 400 concrete . The resulting mass should not be very thick.
After preparation, the solution is poured in, initially filling the holes in the brickwork.
First, the mortar is poured into the holes of the bricks
After filling you should get a picture like this.
Subsequent finishing of the window sill is carried out only after the concrete has completely dried
After this, the surface is left to dry completely. After which the surface is polished, decoratively processed, and overlays are installed.
How to tile a wooden window sill
In order to lay tiles on the windowsill you will need: cementless acrylic adhesive, liquid nails adhesive or polyurethane sealant, as well as cement-based tile adhesive.
Sequencing:
- Remove household dirt from the windowsill.
- Apply a thin layer of cement-based adhesive into which the paint mesh is pressed to create a strong base suitable for laying tiles.
- The surface is leveled and dried.
- Working with tiles and laying them out. Based on its size, it is worth determining how it will be located on the windowsill - perpendicular or along the window. Trimming tiles is done using a glass cutter or grinder. First you need to select the cutting location and use a marker to make the necessary marks. Then it is placed on a flat surface and, with firm pressure on the tool, its incision is made. You need to break it off with a gentle blow on a flat corner. If you use an angle grinder, the work will take much less time.
- As soon as it is laid out, it is necessary to remove dirt from its surface and wait until it is completely dry.
- Then, between the laid tiles, it is worth placing the grout of the desired shade. After working with it, its undried residues are removed from the surface. As soon as the grout has dried, the renewed window sill should be thoroughly washed.
Then the plasterboard sheet is primed, dried and tiles are laid on it.
GKL has different thicknesses, so it is best to take a plasterboard sheet with a minimum thickness of 6.5 mm, used for bent structures.
In addition, you can use an acrylic primer as a base, and glue the tile itself with epoxy glue.
However, it is best not to lay tiles on a wooden base and remember that this is only a short-lived option. There are other adequate methods, thanks to which the window sill will be as durable as the apartment building itself.
The fastest way to decorate a window sill with mosaics
If you can’t look at your PVC window sill without sighing, there is an excellent solution - decorating the window sill with mosaics.
The WINDOWS MEDIA portal offers the fastest and easiest way to make an effective and practical window sill yourself - by gluing a glass mosaic on a grid to its surface. In this case, the composition can be monochromatic or cast in all the colors of a kaleidoscope. It is good to form a pattern from pieces in colors that harmonize with the color of the walls.
Mosaic on the windowsill: multi-colored decor
Required materials and tools:
- glass mosaic in chips on a grid of different colors
- tile adhesive
- substrate degreasing agent
- self-adhesive tape (wide)
- notched trowel
- grout
- mosaic press
- rubber spatula for grouting
- sponge
- scissors
STEP 1. Cut the glass mosaic into strips from factory blanks placed on a PVC mesh. Depending on the composition of the pattern, the stripes can be of different lengths.
STEP 2. Lay the mosaic segments on the windowsill, creating a pattern.
Step 3. Glue wide self-adhesive tape onto the laid mosaic pieces. Thus, we combine all the elements of the mosaic pattern and remove it entirely from the window sill.
STEP 4. Next, you need to prepare the substrate: apply tile adhesive to the dust-free and degreased window sill using a notched trowel.
STEP 5. Very carefully transfer the mosaic composition to the windowsill, lay it flat, pressing it evenly with a special press. Carefully remove the adhesive tape.
STEP 6. Make an edging using a single mosaic strip. When the adhesive solution has hardened (approximately 24 hours), apply grout in a neutral color or matching the color of the mosaic.
STEP 7. After the grout has dried, the excess is removed from the surface of the window sill with a sponge moistened with water.
Mosaic on the windowsill: plain decor
The mosaic on the windowsill can also be plain. Then the process of applying it looks a little different.
For this you will need:
- plain glass mosaic in chips on mesh
- glue gun
- liquid nail glue
- rubber spatula
- grout
- White Spirit
- sponge
- wire cutters
STEP 1. First place sheets of glass mosaic on the windowsill to determine the required dimensions. We cut out the corresponding fragment with pliers, taking into account the edging of the bend.
STEP 2. Degrease the surface of the PVC window sill using white spirit or another similar substance.
Step 3. Using a gun, apply a small amount of glue to each segment. Then carefully lay out the mosaic canvas on the windowsill, pressing each square well against the backing.
STEP 4. After the adhesive layer has completely set (about a day), we begin grouting. The composition is applied using a rubber spatula. Excess is removed with a regular dishwashing sponge.
Practical and aesthetic result - mosaic on the windowsill
Glass mosaic tiles are very smooth, so dirt will not accumulate on the surface of the window sill. Thus, in addition to the fact that it looks beautiful, this decorative window sill is also easy to clean. Accordingly, it can become a harmonious addition to the kitchen or bathroom.
If you are concerned that the mosaic window sill will be “cold” in winter, you can insulate it. To do this, after preparing the base, lay a sheet of extruded polystyrene. Then reinforce with plastic or metal mesh and apply a layer of screed of 50 millimeters. Then begin the standard process of gluing the glass mosaic according to the first or second option.
Tile window sill: material features and do-it-yourself installation
A tile window sill is most often made in the kitchen, because here this additional space is also used for placing dishes, household appliances, and arranging indoor plants in pots. The lining of the window sill in this room should be moisture-resistant, durable, resistant to stress and easy to maintain.
Features of the material
Due to its performance characteristics, the tile is ideal for decorating a kitchen window sill, because moisture and various contaminants accumulate here. This cladding may even increase its strength.
Compared to a plastic surface, the tiles do not turn yellow and do not lose their aesthetic properties over a long period of use. This material also benefits from an aesthetic point of view.
A wide variety of shades and textures allows it to be used with any interior style. The material comes in different sizes, but 10x10 tiles are best for window sills.
It is quite large, it looks aesthetically pleasing, and there are few seams between the elements when laying it.
Scope of application
Most often, a tile window sill is made in houses made of brick, ceramic concrete, foam concrete or cinder blocks.
In these houses, the window sill, as a rule, has already been filled or a kind of blank has been made that will serve as its base.
If there is already a window sill, but you need to make a new cladding, you must first remove the old one. Next, the surface of the window sill is carefully leveled, all dents and chips are filled with putty. In order for the tiles to last for many years, you need to purchase putty, primer and glue from one manufacturer in stores.
Ceramic tile cladding
Ceramics are used in rooms with high humidity: in the kitchen, bathroom, shower. To correctly calculate how much material is needed for covering a window sill, you need to measure its surface, compare it with the dimensions of the tiles and add 20% for possible defects.
You can do it yourself by tiling the window sill, if you follow some nuances. The material must be laid at a slight slope so that the water that falls on the windowsill does not flow into the corner, but goes to the floor.
For window sills protruding beyond the wall, you first need to make a concrete base and reinforce it with steel mesh or rods with a diameter of at least 4 mm.
Before laying the tiles, check the tightness of the joint where the window sill meets the window. Existing cracks must be treated with silicone putty intended for wet rooms.
Ordinary mastic will not work here, as due to high humidity it will quickly begin to crumble.
For cladding, you can use not only white tiles. It is necessary to take into account the design of the room; in some cases, color will look more advantageous.
Some homeowners turn a tile window sill into a real work of art, but it’s difficult to do it yourself; it’s better to turn to professionals.
In general, the price of a tile window sill directly depends on the quality of the material, the manufacturer and the cost of repair work.
Decoration with mosaic tiles
Recently, tiling the window sill with mosaic tiles has become popular. The process of laying mosaics is much simpler and does not take much time. This design looks modern and stylish.
The only disadvantage of this cladding is that it has a lot of seams, because the mosaic is much smaller than ordinary ceramic tiles.
Moisture can accumulate in the seams and mold can appear, making it difficult to care for the surface. The problem can be avoided if you purchase high-quality grout for joints; you should not skimp on this.
When choosing a mosaic for cladding, you need to understand in advance that you need to take more care of such a window sill.
As a decoration, you can purchase a ready-made mosaic in the store or make it yourself from broken tiles. The second option will require certain skills in working with glass. If you do not have such experience, then it is better not to experiment so as not to get injured.
Before laying the mosaic, the surface of the window sill is prepared in the same way as for ceramic tiles. Then special glue is applied to it and mosaic elements are laid. Excess pieces of material are cut off with a glass cutter. Excess grout is removed with a rubber spatula. After the surface is completely dry, clean it with a damp sponge.
Original mosaic decoration
This facing material looks unusual. The installation process is more accessible than the option with ceramic tiles, since the procedure for finishing the window sill takes less free time. A correctly selected mosaic decorates the room.
The only drawback of such cladding is that there will be many seams on the surface, which can become the main reason for the rapid growth of mold and mildew. Such areas are difficult to clean from contamination. To avoid this problem, you need to use high-quality grout.
The dimensions of the mosaic can be easily adjusted. Before laying, the work surface is prepared in the same way as with tiles. At the final stage, the base should be thoroughly cleaned of dirt and construction dust.
When laying transparent mosaics, the glue should be white. Insulation of the base is carried out before finishing work.
The video shows an original version of finishing a used window sill with homemade mosaics:
Tiles - on the windowsill. What is the most “harmful advice” you have received for your home?
Everyone who started a renovation had to listen to advice from mom, dad, relatives, and friends on how and what to do best. Not all advice is good. Houzz.ru surveyed its readers—designers and non-designers alike—and they shared stories of “bad advice.”
- Lay carpets. Everywhere. And they were very surprised when they didn’t do that.
— Make arches instead of “boring” openings)
— Ceiling installers are actively offering black glossy ceilings.
- Yes, everyone always advises to stretch the ceiling! It's so beautiful! Maybe I don’t understand something, we never use them in projects, and I would never make them for myself...
— I don’t remember much, but from the last one: remove unnecessary sockets, put sockets with a gold rim, wallpaper on the ceiling, suspended ceilings, different floor coverings in a one-room apartment, block the doorway with bricks so that the door is shorter and, accordingly, cheaper, a mirror with engraving.
— Tiles in the bathroom up to the ceiling, because “that’s how it’s done.”
- “Why are you making so many sconces everywhere? Are there not enough chandeliers for you?”
— The table MUST be under the tablecloth. I just have to and that’s it.
— And all sorts of little things like remote controls in cellophane))).
Photo: uznayvse
— I remembered how the foreman strongly recommended a protective frame for sockets. “And so that the areas around the sockets do not get dirty.” Even then we thought that this was even worse than the remote control in the bag).
— They advised to abandon a normal bed with a high-quality mattress in favor of a folding sofa (“but the guests will come, where will they sit?!”)
— Refuse white furniture because it gets dirty.
— They recommended sticking tiles on the ceiling. Seriously, a friend gave me this advice. It’s like that in his kitchen - he says so that the neighbors don’t flood it.
— But for my former customer (IT technology, a vegetarian who constantly goes to some mysterious Ashram of his), his sister advised him to place an iconostasis on the wall in the kitchen from the beginning of the renovation. There is only an island, a bar counter and an empty plasma wall. And once every six months he always writes to me by email - maybe he should? True story, by the way.
— I believe that you can and should listen to a professional, but only in the part in which he is a professional. For example, if a foreman insists on the technology of work, then he is right, but if he interferes in interior decisions, advises “to remove the red stripe,” “hang a shelf over there,” or “cover this little seam with a neat plastic cover,” then such advice will go straight to ballot box...
European-quality renovation. Photo: blackseaplus
— They advised us to make one bathroom in a two-story townhouse with an attic. Like, why do you need three bathrooms? There are two of you. Well, yes, they used to do without water closets at all.
— Lower the ceiling to 3.30 m because it will be difficult to paint later.
- Why are all your walls gray? - the mother-in-law was indignant. — At least make the corridor yellow.
“And my mother, looking at my gray walls, suggested covering all this disgrace with flowered wallpaper (certainly flowery). You see, everyone who gets painted like that (what programs have you seen enough of?) will definitely have it remade, and you’ll get tired of it.
— Leaving the bathroom, the guest suggested putting a peg under the wall-mounted toilet, “otherwise someone might be heavier.” »
— Throw out the antique floor-standing, ceiling-high, 19th-century mirror in a carved wooden frame and buy in its place “a normal wardrobe, like all normal people have.”
— Advice from a realtor is to replace the pre-revolutionary parquet with a new one.
— A month ago I bought my first apartment. Two friends arrived. And it began... “You don’t have curtains on the windows! How so? The first thing you need to do is curtain the windows! Everyone can see everything!” By the way, I have an amazing view from the window - there is a square under the windows, somewhere in the distance there are other houses and even further away - the mountains. Fifth floor. I can't stop looking at it. No! They even brought curtains with them!
- Let's cover your window sill with tiles, it won't be visible anyway, there will be tulle hanging there.
Photo: yardyam
— My family didn’t so much advise me as dissuade me, something like “white walls are like in a hospital”, “it’s colder with painted walls than with wallpaper”, “white doors - they’re ugly”, “flooring without thresholds and it’s the same everywhere - it’s somehow strange,” and much more...
Advantages of artificial stone.
The main features of using artificial stone, which is porcelain stoneware, are as follows:
- good wear resistance;
- color stability under the influence of ultraviolet radiation - it does not fade;
- excellent impact resistance;
- hygiene.
The structure of the material may differ for different batches of samples. Therefore, the selection of suitable colors should be done in a well-lit room, preferably near a window.
If you ask yourself: why a window sill? Get a fairly simple answer. In addition to technical necessity, it serves as protection from the cold, increasing the warmth of the walls. Therefore, correct installation is extremely necessary; be sure to install it on a regular balcony or a protruding part - a bay window.
Installation procedure
When ordering a porcelain stoneware window sill, ask everything you are interested in, and in addition to the price, ask about installation.
Let's consider the option when you have a new building or you have already removed the old window sill and cleaned the surface of excess:
- Using polyurethane foam, we tighten the gaps.
- After drying, check and clean.
- Place it so that it fits snugly.
- We blow foam in 5-6 places between the window sill and the balcony. It depends on the size of the window.
- After the foam has dried, remove the excess.
If you decide to install the structure yourself, ask a professional again. The specialists at the company where you will order the window sill will be happy to advise you on how to do it better.
Service
Manufacturers of porcelain stoneware window sills have reached a level where they are not only equal to the qualities of natural ones, but even surpass some of them:
- ability to retain heat;
- pleasant to the touch;
- the solid structure will not allow fungus or bacteria to form;
- does not absorb moisture.
All this suggests that caring for artificial stone products has become even easier. Busy women will appreciate this. Instead of cleaning, remove stains with detergent - just wipe with a napkin or sponge.
If scratches appear, you can safely sand them.
Deciding on the size
The choice of size will please you - length and width are unlimited.
Many people use the windowsill as a place to drink coffee, read a book or surf the Internet. But it is not very reliable on a plastic window sill, especially if it was not installed by professionals. So, it is possible to make a custom-made window sill-table from porcelain stoneware.
Housewives with a small kitchen will also appreciate the convenience. If desired, specialists will make a window sill-tabletop.
No matter how you use one of your favorite places in the house - for its intended purpose or not, it will serve and delight for a long time.
Do-it-yourself tiling and tiling of window sills - photo
Photo 1: Correctly placed tiles
- contact layer of glue distributed with a trowel over the base.
- drainage holes should always be located above the window sill.
- window frame.
- external window sill.
- end profile.
- polyurethane foam.
- house wall.
- an aluminum profile with strips of fiberglass reinforcing mesh, embedded in a layer of putty, strengthens the corner under the window sill.
- thermal insulation.
- putty mass on thermal insulation.
- Installation of tiles begins from the middle of the window and moves towards the slopes to maintain symmetry.
- clinker tiles for window sills can be glazed. It looks more beautiful, but this does not affect the choice of glue.
- the outermost tile should be recessed into the wall to protect the area under the window from the formation of drips.
- external plaster.
- The junction of the window sill with the window and with the wall is protected with silicone sealant.
- the distance between the tiles cannot be less than 6 mm; the final width of the seam is selected so that the outer tiles do not have to be cut off.
- a layer of adhesive applied with a notched trowel, made with an appropriate slope, constitutes a direct base for the tile. The grooves created by the passage of the notched trowel serve to increase traction.
Photo 2. Sectional laying of tiles on a window sill
- The tiles must fit under the window frame, otherwise they are easily damaged when pressing on the outer edge.
- the joints are sealed with silicone or a special acrylic sealant intended for external use.
- external window sill.
- The end profile is attached to the wall using anchors, and the space underneath is filled with low expansion polyurethane foam.
- interior plaster.
- house wall.
- thermal insulation.
- external plaster.
- putty with recessed corner profile.
- The bottom surface of the tile is grooved and not covered with glaze, which increases the adhesion of the adhesive solution.
- The drip line prevents water from flowing down the façade under the window sill.
- Before installing the tiles, adhesives are applied, including to its lower surface.
- a layer of glue with a formed slope, laid on a leveled base.
Decorative treatment of window sill
After the surface has dried, all sagging, roughness and protrusions are removed with a spatula. Below in the photo is the window sill after drying.
After drying, the surface is leveled with a spatula.
Then final leveling is carried out using putty (gypsum or ready-made acrylic). The number of layers of the composition is at least two . The main thing is to achieve a smooth final surface.
After the putty has dried, the surface is sanded with fine sandpaper. Next, dust is removed from the window sill and primer is applied again.
A perfectly flat surface is shown in the photo.
Final leveling is carried out using putty
After final drying, the surface is painted. Take light-colored enamel or a water-based version - it does not have a pungent odor. Painting is done in several layers with a brush or narrow roller.
DIY window sill and slopes
When making a wide window sill, you must not forget about the access of warm air from the heating radiator to the glass; for this, you can provide special technological holes in the window sill for the passage of air.
The air holes can be covered with a decorative grille.
When ordering a window, you need to take into account the gaps along the frame, since gypsum is inserted behind the frame. An old concrete window sill, in this case, will serve as a good foundation.
Window sill installation
The distance from the old window sill to the window frame should allow the installation of a metal profile.
The foam that emerged during installation of the window unit is removed.
For this, a knife with replaceable blades was used.
The upper profile is made with a protrusion beyond the old window sill.
The main thing is not to forget to check the level; all guides must be in the same plane.
A horizontal guide (end of the window sill) is placed on short profiles.
Control is carried out using a level.
To do this, it expands using vertical guides, which are fixed to the upper profile.
The window sill frame is ready
The frame of a window sill from a metal profile can be made in any other way, reducing or increasing the number of stiffeners.
The purpose of the frame is to create rigidity and withstand the load exerted on the window sill.
Installation of drywall on the window sill frame
We cut out the upper part of the window sill from plasterboard.
To do this, it is convenient to use a wood saw with a fine tooth.
Having previously secured the lower part of the gypsum board to the window sill frame, we fill the entire space between the guides with foam.
A temporary profile is attached to the bottom of the window sill; it will prevent the tiles from sliding vertically while they are being laid.
Installation of plasterboard slopes
There should be a gap between the gypsum board slope and the wall, which will subsequently be filled with foam.
In this way, all window slopes are secured.
When filling gaps with foam, be careful and remember, foam expands very much, so you need to fill the space in doses.
Finishing slopes and window sills with tiles
If desired, the window sill can be finished with anything: plastic, natural wood, etc.
In this case, it was decided to use tiles, since they are not afraid of moisture, sunlight and temperature changes.
To finish the edges of the window sill, you can use a special metal profile.
When cutting, a lot of dust is generated, it is necessary to use a respirator and eye protection.
The seams between the tiles are grouted, the seam between the window and the tiles is filled with sealant in the color of the grout.
The corner of the slopes is closed with a plastic corner which is glued with mounting adhesive; in addition, the window can be framed around the perimeter, using, for example, a wooden frame.
Peculiarities
A properly installed window sill will decorate any room. Finishing with universal tiles is a rational solution. This material is not afraid of moisture, resistant to dirt and stress. High-quality cladding increases the strength of the structure. Tile surpasses even plastic in all respects, as it does not fade, is not afraid of contamination, and is easy to clean.
An original option for the kitchen
No. 7. Finishing slopes with metal
Metal slopes are used only for exterior decoration; they began to be used back in Soviet times. This is one of the most successful ways to protect slopes from the outside. Among the main advantages we note:
- resistance to moisture, temperature changes, microorganisms, sunlight;
- metal does not crack like plaster and does not require regular coating renewal;
- metal tolerates low temperatures well, unlike plastic;
- metal with a polymer opening has enormous durability, does not rust, retains its shape and color, and protects windows from blowing;
- the color of the metal can be any, so the finish can be successfully combined with any façade material;
The main disadvantage is only the high cost, but every year you will not have to whitewash, tint the slopes or seal cracks in the plaster. It is best to install such slopes immediately after the installation of the window is completed.