Home > Useful > Sublimation is the most popular among mug printing technologies
The question of how to print on mugs is of interest to many. Transferring pictures, photos and inscriptions to any product (including dishes) is in great demand today. A cute cup with a cute design is always a pleasant souvenir and gift, because it is an item without which it is difficult to imagine a person’s life. For many of us, drinking tea and coffee is one of our pleasures.
Printing images on mugs is widely used for their purposes by marketers, designers, tourism managers, etc. Nowadays, this is very popular. They successfully use printing logos on mugs to increase brand awareness and credibility of enterprises and companies. Our article is intended for everyone who is faced with the need or desire to become the owner of such products. In it you will learn the names of the technologies used and what their features are.
Working with polymer clay
Polymer clay decor always looks bright and unusual. It is pleasant to work with this material - it is soft, flexible, easily takes on the desired shape and holds it, and has colors and shades to suit every taste.
When buying clay, carefully read the instructions and check the expiration date.
Firing ceramics at home
Oven firing is an option if you are working with fire clay. But, if you're willing to spend a little more money, you can buy an inexpensive stove.
Benefits of oven roasting:
- It's cheap because you already have it.
- Usually allows you to create decent ceramics.
- The resulting products are quite durable.
But if you want to take the process more seriously , then you need an oven , because your home oven will not give the desired temperature. It has many advantages over the oven:
- Your products can be more varied.
- You will be able to create the right atmosphere for work.
- You will be able to work with a wider variety of glazes and clays.
- The process is easier to manage because it is slower.
- Allows the use of high-temperature (bisque) firing, which makes the ceramic stronger.
An oven is a good place to start if you're going to learn how to do this at home. But we advise you, once you have learned a little, consider buying a kiln or firing at a studio near you.
Instructions
There are a number of instructions for working with polymer clay that you should always remember.
- Choose fresh clay. It is softer and easier to mold.
- Pay attention to the baking temperature indicated on the package. If it is exceeded, the clay will burn, and if it is not baked enough, the clay will crumble.
- Wear gloves to avoid leaving fingerprints on the clay.
- After baking, glue the decor to the mug with epoxy glue.
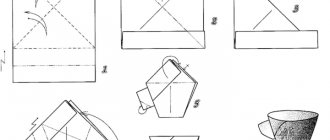
Simple paper cup: craft for little ones
Before you start making paper mugs, you need to prepare all the materials that may be needed during the work.
This includes paper, cardboard, scissors with glue, paint, simple tape and, if possible, you need to purchase a special stationery knife.
Useful lifehacks
If the clay is so soft that it is impossible to work with it, place it between two sheets of paper, press down and leave for a while. The paper will absorb excess plasticizer, and the clay will become harder.
For clay that is too hard, there are special gels and softeners. You can use a small amount of sunflower oil to make the clay soft. Remember that the baking time depends on the size of the part or figure.
You can take colored clay, or you can use light, plain clay. Pastels allow you to color unbaked clay. Clay that has already been baked can be painted with acrylic paints.
It is better to coat the finished product with a special varnish. This can be plastic varnish or yacht varnish. This will further protect the clay from scratches and environmental influences.
The mug with clay should be placed in a cold oven. The mug should warm up evenly and gradually. Otherwise it may crack. Do not put a mug decorated with clay in the dishwasher.
Varnish selection
Any mug will look beautiful, sparkling with gloss. Therefore, the decorative elements on it need to be coated with varnish, which will not only decorate the product, but also make it more durable. There are matte, semi-matte and glossy varnishes.
Acrylic coatings are considered the best option. They are diluted with water, dry quickly and have almost no odor. The mug, coated with acrylic varnish, is not afraid of water and mechanical impact.
Tools and materials
Decorating and decorating mugs with polymer clay is a labor-intensive process that requires patience. Before starting work, you need to prepare all the necessary tools.
- Clay in several colors, it is better to take FIMO or Cernit.
- Epoxy adhesive.
- A cup without a pattern and without a three-dimensional texture.
- Toothpicks, straws, manicure tools that can be used to add texture to the product.
- Stacks, scissors, knives and blades.
- Rolling pin for rolling out layers.
- Wet wipes to smooth the clay and remove dust particles.
Ideas for implementation
Almost any idea can be brought to life on a mug. You can make a reproduction of a simple painting, sculpt a character from your favorite cartoon, or write a wish to the person who will receive this mug. The main thing is to decide in advance what exactly you will sculpt and prepare all the necessary materials so as not to be distracted by searching for them while working.
Polymer clay bear
Take a piece of paper and a pencil. Draw a teddy bear of the required size. The finished product should not protrude beyond the edges of the mug or interfere with drinking tea.
Using carbon paper, make another picture of the same bear. We cut out one sample along the contour. We apply the second one to the inside of the cup at the level at which you want to see the result.
Decorating the product
To decorate means to decorate, with color or relief, glaze or painting.
There are a lot of decoration options:
- relief;
- painting;
- glazing;
- inlay;
- embossing;
- seal;
- reservation;
- openwork;
- silk screen printing, etc.
Ceramic paints can be applied to the product by hand painting. The drawing can be drawn as an outline for decoration, or you can work impromptu, which is more difficult, of course.
The process of making a bear
Making a figurine begins with choosing shades of clay. Knead the clay in your hands until it is comfortable for modeling.
Roll out the main color with a rolling pin - the base on which the figure will be made. Attach the prepared stencil and carefully cut it out of clay. Fix the flat figure on the mug so that there are no dents. Do not press too hard or drag with your nails to avoid unevenness.
You can cut out the muzzle using a stack. Start in small depressions - the eyes. If you want to get a more voluminous image, use thinly rolled black plasticine to create the muzzle. You can choose any color for the eyes. The pupils should be black.
Roll out ovals of the same size. These will be the paws.
If you want to decorate the teddy bear, you can add decorative elements - a bow, a bell, a ball, a flower, etc.
When the figurine is ready, place the mug with polymer clay in the oven. Set the temperature and time indicated on the packaging of the purchased clay. After baking, carefully remove the decor from the mug using a glass scraper.
Degrease the surface of the figurine and mug with alcohol or acetone. Glue the bear onto the mug using glue. It will take about a day for the glue to dry completely. After this, the mug can be used.
What do photo centers offer?
Sublimation
The sublimation method is used to produce small (from 1 piece) volumes of souvenir products. The technology itself is similar to thermal transfer. It is very simple, but requires expensive equipment.
Algorithm of the wizard’s actions:
- Printing a photo in a mirror image.
- Drying to avoid distortion of the design.
- Fixing the dried paper with thermal tape.
- Place the mug in a heat press at a temperature of 160-200 °C for several minutes.
- Removing and removing from paper.
If everything is done correctly, a clear, colorful imprint will remain on the surface of the dish. If you overheat the mug, the design may become blurry; if you underheat it, white spots will appear.
Theoretically, you can do thermal sublimation yourself (if you have the equipment), but in fact you can always miss a number of important nuances that will affect the quality of the image. Therefore, it is better to order sublimation photo printing in a workshop: it will come out faster, better and cheaper.
Heat press for sublimation on mugs
Hot decal
The technology allows you to put a photo on a mug made of almost any material: ceramics, porcelain, glass, enameled metal. Hot decal is used to produce large quantities: it is not practical to heat up a muffle furnace for one cup. The high energy intensity of the process makes it expensive, but the image quality is worth the investment. The picture turns out juicy: the colors will not wash off or fade over time.
A design applied using the hot decal method can be rubbed with coarse abrasives - it will not be scratched.
Gilding and silvering of contours or individual areas of the surface are used as decoration. The image is literally sealed into the surface of the souvenir: it does not fade due to frequent washing and does not crack over time.
The hot decaling process can be done as follows:
- Decal printing. A drawing layout is prepared in a graphics editor, which is then multiplied into the required number of copies. The carrier can be paper gummed with decal paints.
- Decal sticker. Printed images are pasted onto objects. This is a labor-intensive process that requires extreme care. Afterwards the product is dried.
- Firing in a high temperature oven. The oven is heated to +250 °C, the products are placed in it and left to dry for a day. Then the oven is heated to a temperature above +573 °C. At this temperature, the top layer of the mug softens and the decal melts into the pores of the base, firmly attaching to the surface.
Cookware kiln
Strict requirements are imposed on the room where high-temperature furnaces operate: the temperature must be kept at 20-25 ° C, humidity - within 55-65%.
You can watch how to make a cold decal in this video: