- Tools for modeling from polymer clay
- Helpful tips when working with clay
- Polymer clay at home
- Polymer clay flowers Calla lilies
- Lily
- Rose
- Orchid
In the 1930s, Germany invented an amazing material for creating extraordinary products – polymer clay. At first, dolls were made with it, but in the 60s it rapidly gained popularity, after which clay began to be used to create various sculptures and compositions.
Nowadays original jewelry, souvenirs, and flowers are created from this material. Wedding bouquets are excellent made from polymer clay, so clay has become an indispensable material for wedding celebrations.
You too can learn how to make gorgeous crafts from this wonderful material. In order to create your first masterpiece, you will only need to familiarize yourself with the material below.
Cold porcelain technique
Creating realistic flowers from polymer clay is a popular hobby these days, often called "ceramic floristry", "polymer floristry", "realistic floristry" or "floral sculpture".
This delicate art originated in Japan more than twenty years ago, where the first schools teaching flower sculpting were opened.
To create flowers, two fundamentally different types of clays are used - cellulose-based and starch- and polymer-based. The first type is conventionally called “marshmallow clay”, the second - “cold porcelain”.
Both types of clay harden in air without heat treatment or additional intervention and are therefore also called self-hardening plastics.
The drying speed of such clays depends on the thickness of the rolled layer and the degree of humidity in the room.
The special properties of these materials make it possible to achieve maximum similarity and realism in colors, subtlety and grace in work.
In the process of sculpting flowers from polymer clay and other products, you need to take small pieces of clay from a pack, paint them and wrap them tightly in polyethylene so that the material does not deteriorate.
When sculpting, you need to periodically add a small amount of baby cream (or any fatty cream without fragrance) to the clay - this way you can work with the material longer and not be afraid that it will begin to dry out and crack.
An open pack of cold porcelain must be stored without access to air; it is advisable to wrap it in several layers of polyethylene and place it in an airtight plastic food container.
It is also advisable to wrap marshmallow clays tightly in plastic, then wrap them in a damp cloth and put them in another plastic bag.
This will prevent the clay from hardening and weathering for a long time.
Polymer clay, also called cold porcelain, is denser to the touch than cellulose clay, a little tough to sculpt, and is rolled out into the thinnest layers possible, which allows you to achieve realistic flower details.
As you can see in the photo, flower petals made from cold porcelain after drying become translucent, elastic, flexible, hard and smooth to the touch:
The product hardens completely within several hours, depending on the size and thickness of the parts.
When hardened, the unpainted material gives a yellow or gray tint, slight transparency and takes on the appearance of plastic; to give the petals greater velvety, naturalness and tenderness, a small amount of white oil paint (titanium white) is added to the clay, or cold porcelain is mixed with a piece of white marshmallow clay, which gives it additional softness and whiteness.
A little history
This art form was invented by monks in Europe during the Middle Ages. When they trimmed the edges of gilded books and twisted them around the ends of birds' feathers. Thus, it turned out something similar to a golden miniature.
Making figures from strips of paper twisted into spirals
This is where the name quilling comes from. From the English word “quill”, which translates as “bird feather”. At the very beginning, this was done in poor churches, especially in the 19th century, quilling was a favorite pastime of noble ladies.
In the twentieth century they forgot about him. And at the end of the last century, quilling began to return to people's homes as a hobby.
As a result of his wandering around the world, their own schools began to be formed in each country. And each nation brought something of its own to this type of art. For example, eastern schools differ from European ones in the complexity of patterns, which allows eastern people to create masterpieces of art.
And the Korean school differs from the European one in that when winding the paper, a rod is not used, and everything is done by hand. The works of the Korean school are very complex. In our country this art became popular at the end of the twentieth century.
The art form was invented by monks in Europe during the Middle Ages
Therefore, few of us know this type of art thoroughly. I will introduce you to the basics of this art form, give advice, give examples and try to give you all my knowledge. Let's start with the basics.
But before you start doing this type of creativity, you need to prepare. That is, purchase the necessary tools for the job.
Tools
To properly make a flower from polymer clay, you need to have tools in your arsenal, without which working with it will be difficult or completely impossible.
First you need to take care of organizing a flat surface for sculpting. It is best to use a flat plastic board or tile. It is strictly forbidden to use boards for cutting food if it is intended that they will come into contact with food again.
To cut out various elements from polymer clay and divide it into parts, you need to purchase a scalpel or a stationery knife. The ideal choice would be to purchase a special construction knife with interchangeable blades of different sizes and shapes.
Popular articles Cool congratulations on March 8, 2022. How to congratulate women on March 8
To roll polymer clay into thin layers, you must use a rolling pin. A clear acrylic rolling pin works best.
Also take care to buy cling film - when exposed to air, polymer clay loses its plasticity in 10 minutes, after which it becomes unsuitable for work.
Calla lilies
The simplest flowers to make at home. The time spent on work will not exceed several minutes. These flowers can make excellent earrings.
How to properly make a flower from polymer clay:
We recommend reading:
- DIY polymer clay jewelry: review of the best master class with step-by-step instructions for beginners (150 photos of original ideas)
- Quilling for beginners (200 photos) - step-by-step instructions with description. The best master class on creating quilling crafts with your own hands
DIY paper orchid - a review of the best ideas and tips from craftswomen. Step-by-step instructions + master class (photo + video lessons)
- You should prepare clay of two colors, a toothpick, a knife, beads and rubber gloves.
- Mix the clay and roll it into a ball, which is then cut into two equal parts.
- Pull out the edge of the flatbread made from a hemisphere and roll it into a ball shape.
- Then you should give the resulting part the shape of a bud.
- Use a toothpick to make holes and insert beads and an earring into them.
Molds and cutters
When working with cold porcelain, texture molds are used to achieve realism and the correct texture of petals and leaves.
They differ for each specific type of flower, but there are also universal molds that can be used for several different flowers at once.
Molds for flowers made of polymer clay convey in detail the shape of the curves and the pattern of veins of petals and leaves.
Most of the ceramic floristry molds available are made from polyester resin.
They are absolutely hard to the touch, translucent, tough. The assortment is represented by many different plants, but the texture can be a little rough and the clay rolled out too thin can tear on them.
For convenient work, I advise you to coat the polyester resin mold with a small amount of rich cream before use (you can use any baby cream), so the clay will tear less and the petal can be easily removed from the texture.
Also, when mastering the technique of making flowers from polymer clay, it is convenient to use silicone molds for the confectionery industry (for working with mastic).
They are flexible and elastic to the touch, their designs are thinner and more realistic, the print is delicate and neat, and at the same time the clay does not stick to them or tear.
You can make a silicone mold yourself from two-component silicone sealant, and you are guaranteed to get a realistic imprint from any interesting plant that will last a long time.
To make beautiful flowers from polymer clay, cutters—metal or plastic cutting molds—are used to create petals and leaves of the most correct and realistic shape.
They make the work much easier and faster; all elements turn out smooth and identical.
It is most convenient to use cutters in combination with a pasta machine - initially roll out a thin layer of cold porcelain in it, placing it in a special film, and then cut out the required number of elements with a cutter.
Making pistil and stamens
Cut the clay rolled out into a thin layer into strips, one of which should be wider for the pestle. Its end should be brown.
We recommend reading:
- DIY paper hyacinth: the best master class for beginners with step-by-step instructions and diagrams from A to Z (130 photos)
- Paper stars - instructions on how to quickly and easily learn how to make beautiful stars with your own hands (100 photos of finished works)
- A paper crown is a simple instruction for creating original jewelry with your own hands. Templates, diagrams, master class, exclusive design (110 photos)
For smaller petals, bend the edges with a needle.
Straighten the paper clip that plays the role of the frame and fasten the flower on it, sequentially securing the pistil, stamens and petals.
Safety precautions
Each master class on flowers made of polymer clay should begin with studying the safety rules when working with this material.
Despite manufacturers' statements about the safety of polymer clay, it contains phtholates, which can negatively affect human health if the material is handled carelessly and carelessly. It is best to work with polymer clay while wearing thin latex gloves. When working with plastic, it is not advisable to eat or smoke.
If you bake polymer clay in a home oven, then after polymerization of the products you need to clean it well. It is best to place a deep dish filled with water and set the oven temperature to maximum for 10-15 minutes, then turn off the gas and leave the door open for 20-30 minutes.
Templates
These templates are suitable for working with threads, plasticine, isolon and leather. Metal and wood do not require diagrams. Save and print the picture you like.
Tools for working with polymer clay
Before you start work, you need to prepare everything you need:
- Polymer clay.
- Working surface. It should be a flat, smooth surface. You can use glass, plastic, ceramics.
- Small knife. A construction or stationery knife with spare blades will do.
- Rolling pin for working with acrylic. You need to choose one that makes it convenient to roll out the clay.
- A syringe with special attachments for making curly stripes and floral elements.
- Cutters. Molds designed for cutting out shapes.
- Stacks. Tools for working with plastic materials (clay, plasticine).
- Varnish for coating polymers.
- Brushes of different sizes.
- Wooden toothpicks.
- Napkins.
- Accessories.
Izolon
Usually this material is used in construction as insulation, but experienced craftsmen have found other uses for it. Izolon produces beautiful large-scale decorative panels. They decorate festive halls, create corners for photo shoots and decorate restaurants where weddings are held.
The insulation is cut into strips and glued to pre-painted plywood or a sheet of plastic.
Those who have seen such creations live say that such decorations resemble airy marshmallows. They are unlike crafts made from scrap materials.
Experienced craftsmen recommend that beginners try their hand at small-sized panels. 3 options for DIY crafts:
Master class for beginners
Homemade polymer clay flowers are usually more realistic than those made from any cellulose clay, because cellulose clays are completely matte and do not provide the same fineness and transparency as cold porcelain.
The process of working with cold porcelain is longer and more labor-intensive, but it opens up great scope for the implementation of ideas.
Cellulose clays are very soft, delicate and velvety to the touch, light and pleasant to sculpt.
For beginners making flowers from cold porcelain, it is much easier and faster to work with such materials, you can get by with fewer tools and devices, often no molds, no glue, no cutters, no additional dyes are required - any shade can be achieved by mixing different clays colors in any proportions.
Ready-made flowers are lighter in weight and more decorative than those made from cold porcelain. When frozen, the petals are completely opaque and matte.
Hand-made flowers from cold porcelain require careful handling, but are not fragile and do not break when dropped.
When in contact with water, flowers from both types of clays may lose shape and/or color, so dry cleaning of the products is preferable, for example, using a large brush.
Once made, polymer clay flowers can be further protected by covering them with a layer of matte or shiny acrylic varnish for ceramic floristry.
The video “Flowers from cold porcelain” shows how products are varnished:
Quilling snowflake
Almost every one of us can create winter decor with our own hands. Snowflakes are considered the most common decorations for New Year's interiors. It is these details that can create a festive mood.
For work, you can use several shades of paper strips. In this way, it is possible to create a three-dimensional texture for the future workpiece. What will you need for the craft? This list includes:
- Glue;
- Small size pins;
- Stencil;
- Special paper.
It is recommended to first draw a sketch of the future model. It is important to think about the location of each detail. To create a beautiful snowflake you will need the following shapes:
- Square – 6 pcs.;
- Petal - 8 pcs.;
- Circle – 10 pcs.
The size of the finished craft will be 10 cm. It is best to make blanks using a toothpick. It allows you to make curls denser, and the shapes are voluminous to the touch.
When all the figures are prepared, lay them out on a paper template. In this way, it is possible to create an individual design for the future product. We carefully glue each element to each other using a thin brush. Excess glue can negatively affect the finished result.
In the upper part we attach a shiny thread, which will later allow you to secure the New Year's decorations on the tree. The photo of the quilling craft shows the finished result.
Recipe for making polymer clay at home
If you don’t have ready-made clay, you can make it at home. But do not forget that homemade clay cannot be called a full-fledged analogue of purchased material, since it will only vaguely resemble it, mainly due to its softness and ability to harden. The composition will be completely different.
To create a mass for modeling at home you will need:
- corn or potato starch (with corn starch the mixture will be lighter) – 100 g.
- glue – 100 g.
- lemon juice – 2 tbsp.
- hand cream or Vaseline – 1 tsp.
- mineral oil (for example, baby oil) – 2 tsp.
- heat-resistant container and mixing spatula.
Method of preparation: combine starch, glue and Vaseline, mix everything well until smooth. Add lemon juice and oil. Place a heat-resistant container in a water bath at moderate heat and, stirring constantly, bring to a mushy consistency. Remove from heat and mix the resulting mass thoroughly. Let cool completely. To avoid drying out, store in a cool place, tightly wrapped in film.
If you need to make the material colored, then add pigment during the kneading process. You can also paint finished work. It is advisable to use acrylic paints and fix the result with polymer varnish.
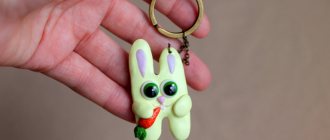
How to make a keychain with your own hands - many master classes and creative photo ideas
Do-it-yourself foam crafts - features of work, master classes, photo examples
Twisting device
Twisting of paper strips is done with a special tool - a steel rod inserted into a comfortable handle.
At the same time, eastern craftswomen use a device similar to an awl, while European craftswomen use a tool with a forked end. Beginners are advised to adhere to the European school.
Chandani and her brand ChaNoJa
She lives in Switzerland, works for a transport company, and makes jewelry in her free time. Chandani also loves to travel.
She has traveled to Southeast Asia, the Middle East, the United States, Canada, Ghana and Costa Rica, exploring different cultures and customs that have broadened her worldview.
The brand “ChaNoJa” is named after three masters - Chandani - Norbert - Yael. Chandani's enthusiasm was so infectious that her friends joined her.
❝My life was exciting and adventurous in many ways, but something was missing: creative expression! In 2013, I learned about polymer clay, was inspired by the works of artists and decided to try it myself. I realized that creating clay jewelry is my calling... My art is created from my soul and my heart, not from my head. Beauty lies in “imperfections that are perfect,” as in nature. I feel like my talent is a gift from the Universe!❞
Making flowers
To quickly learn how to sculpt flowers yourself, you need to start with simple work in order to understand the basics of working with such a capricious material.
For beginners, it is best to start learning how to make simple flowers such as callas. To make this flower, you need to take clay of two matching colors, latex gloves, a stationery knife and stacks. Instead of stacks, you can use simple toothpicks.
Roll both pieces of plastic into long sausages and wrap one of them around the other. After this, roll the clay and one ball. Divide it again into 2 balls, and then into 2 sausages. Tear them into 3-5 pieces and roll into 1 ball. This will help you achieve a marbling effect.
Next, carefully cut the ball into 2 equal parts. Form them into 2 pancakes with a slightly elongated edge. Lightly pinch it with your fingers. Fold the bottom edge into a funnel shape and slightly open the flower.
For more complex flowers, the petals must be cut individually with a knife. To give flowers a more natural look, you can give them structure using molds or stacks.
You can also use acrylic paints to tint plastic. Beautiful ideas for flowers and their manufacture can be gleaned from sites dedicated to the manufacture of such products.
Quilling Basics for Beginners
The production of paper products begins with a drawing. In this type of art, a drawing is a diagram according to which in the future an unusual craft will be made, which can bring a bit of brightness and unforgettableness to your interior. First, let's look at how simple diagrams are drawn and which magical crafts come out of them using the example of making a snowflake.
A wonderful DIY gift
We will need:
- Pencil.
- Colored paper.
- Scissors.
Now take A4 paper and fold the sheet so that you get a right triangle. Cut off the unnecessary excess part and fold it three times. Then we draw patterns on it and cut them out.
When we have mastered the initial and simple technique of making crafts, which we discussed above, we move on to more complex ones. Let's learn how to make rolls. It is the main element in the quilling technique.
A mouth-watering work of art
We will need:
- Colored paper.
- Pencil.
- PVA glue.
- Scissors.
Rod for creating rolls
At the very beginning, you need to outline the future composition with a pencil on the blank for the greeting card or the place where this product will be located upon completion. The next thing we need is to make a roll. To do this, we need to take a thin and long strip of paper and wind it onto a specially prepared rod.
After this is done, we must let the roll unravel. The end of the roll must be carefully glued to the resulting spiral. Now you can give the roll any shape, be it a drop, a heart or a month.
Will decorate any home
Tip To avoid getting smeared with glue, you need to apply it to the parts of the product quite a bit. This can be done using a toothpick.
Special paper for quilling is sold. It's better to use it.
And now we come to the main elements of quilling.
How to work with polymer clay?
First, learn some rules:
Wash your hands thoroughly, as clay absorbs dirt
The work surface should be perfectly clean, and it is better to wear a scarf on your head. Apply talc to the clay so that it does not stick to your hands. It is better to accurately calculate the required amount of material; painted clay does not last long. If the clay is dry, you should add a little hand cream. The work requires caution and accuracy; clay crafts are fragile. The materials are sold in packaging, do not open them in advance. To preserve the clay for a long time, it is better to put a damp cloth in the package.
Some tips missed earlier
- The density of quilling paper should be between 120-160 g per square meter. Since it is precisely this density that creates the strength of crafts and will keep their shape well.
- The length of the strips should be 30 centimeters. Both the pomp and volume of the product depend on it. If possible, you should try to find ready-made quilling strips.
- The width of the paper strips should also adhere to the specified dimensions, namely: 3-5 millimeters.
- It is necessary to diversify the color scheme. So that the products do not look dull and identical. For this purpose, stores sell quilling paper in a variety of colors and patterns.
You can make any picture using this technique.
Making flowers from clay
When the clay is ready to work and all the necessary tools are at hand, we begin to create.
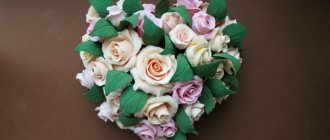
Rose
These beautiful flowers occupy a leading position in popularity, both in live form and as a model for creativity.
The process of preparing a rose from polymer clay: take part of the material, make an oblong sausage out of it, cut into 7-9 pieces. Roll them into balls about a centimeter in diameter. To create the center of the flower, take the first ball, roll it out and twist it into a spiral. From the remaining parts you need to make petals. Place the ball on your palm and spread it with the thumb of your other hand, forming a petal. In this case, the upper edge of the petal should be thinner and the lower edge thicker.
After processing all the balls in this way, we begin to collect the flower. Take the center of the future rose and carefully attach the petals to it. Place each next petal overlapping the edge of the previous one.
A clay rose is well suited for decorating jewelry or assembling a bouquet.
How to make a dress out of paper with your own hands - working with the material, types, tips, photos
How to make a cat craft with your own hands - review of materials, step-by-step instructions for beginners, photo examples
Orchid
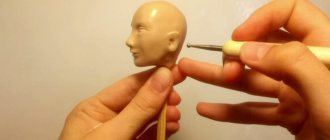
Now let's start creating an exquisite orchid. In addition to the basic tools for work, you will need: wire, a stack with rounded ends, a mold to imitate the surface of a sheet, paints of the desired shades.
In order to make an orchid you will need three elongated oval petals, two large round petals and the middle of the flower.
We form a sausage from a piece of polymer clay of the desired color, roll it out to 2-3 cm. We pinch one edge and separate it into petals with a knife. Each of the resulting sections must be given the desired size, shape and texture. To obtain characteristic irregularities and veins, a special mold is used.
Lay the bottom row of elongated oval petals with the Mercedes badge and make a depression at the point of their contact. Give a slightly wavy shape to the edges of the petals. Next, place round petals in the center, smooth them out in the same way, and model the edges. Roll out some of the light clay to about 3mm. For the core of the orchid, cut out a small figurine in the shape of a nesting doll.
Popular articles Decorative pillow
Place it on your palm and stretch out the edges using a stack. If desired, you can tint it with pink pastels. Place the resulting blank in the middle of the flower and lightly press with a round stack. Roll a small ball, making a transverse stripe on its surface, and place it in the central recess.
The orchid is ready, all you have to do is bake it!
Calla lilies
These easy-to-make flowers are ideal for beginners.
You will need two shades of clay, a knife, a toothpick and decorative beads.
Roll out the clay mass into separate sausages of different colors. Tuck them under each other, resulting in a ball. Repeat the steps several times until you get a marble effect. Then cut the ball in half.
Spread one portion over your palm. Pull the bottom edge out and pinch it with your fingers. Carefully fold the top edge, like a paper bag.
You can put decorative beads in the middle. You have made a calla bud!
Lily
Thinly roll out some of the clay of the desired color, mark the boundaries of future petals with an awl or needle. In total you will need three large and three small petals
Carefully cut out the pieces with a sharp knife. To enhance the effect, you can draw lines that imitate the veins of a petal
Leave the resulting fragments to dry. At this time, prepare the center of the flower, consisting of the pistil and stamens. Roll out a piece of clay and cut into narrow strips. Make one of them wider than the others, and make a pestle out of it.
To assemble the lily, take a wire or a straightened paperclip and secure the pistil and stamens to it. Then attach the petals symmetrically, starting with the small ones. The lily flower is ready!
How to make polymer clay with your own hands
If you can’t buy ready-made polymer clay in a store, you can make it yourself at home by following a simple recipe.
Required ingredients:
- Flour – 1 tsp.
- Children's cosmetic oil.
- PVA glue – 1 tsp.
- Corn starch – 1 tsp.
To prepare a plastic material, flour must be combined with starch and glue added. Stir the resulting mass until it becomes clay-like. After this, add five drops of oil so that the mixture does not stick to your hands.
Paint the clay with acrylic paint. Dropping a few drops onto a piece of clay, knead it in your hands until a uniform color is obtained.
Basic elements of quilling step by step (photo)
Before you start making magnificent paintings and panels, it is better to immediately learn how to make basic modules . Stock up on white stripes (you don’t mind using them for training) and practice.
All elements begin with the formation of a spiral. Take a wooden skewer (or a special awl), fix the edge of the paper strip, holding it with your fingers, and twist the spiral. Glue the edge with PVA glue and remove the element from the stick.
This produces a module called “ tight spiral ”.
If the turns of paper do not lie one on top of the other, but go down a little like a “ladder,” then you can make a “ cone ” module.
But all other elements are formed from the “ free spiral ” module. It curls just like a tight spiral, but you should glue the edge when the paper unwinds a little. To do this, use a ruler with circles, or you can simply loosen your fingers a little and allow the paper to straighten out.
From the “free spiral” you can make the following elements with your fingers:
- “ oval ” - you need to flatten the circle a little;
— “ drop ” — an angle is formed from above;
- “ eye ” - two opposite corners are drawn out;
- “ triangle ” - three corners are formed;
- “ square ” - has four corners;
- “ month ” - like a curved “eye”;
- “ petal ” - a curved “drop”;
- “ heart ” (aka “ arrowhead ”) - like a “triangle” with a curved side;
- “ leaf ” (“ox”) - flattened “eye”;
- “ flower ” is a curved “triangle”.
These are all closed type (or closed ) when the edge is glued to the base. These are not all modules and you can find other names in different sources.
And there are also elements that are called open . The edges of the strips do not stick to them.
For example, " horns ". You need to fold the strip in half and twist the spirals on the outer sides.
If the spirals twist inward, the “ heart ” element comes out.
“ twig ” is obtained if the spirals are twisted on one side.
“ Curl ” is an element when the two ends of a strip are twisted in an S-shape.
This is not a complete list of open elements.
When you learn how to make all these modules, then any craft will be within your power.
Sequence of work
Paint the clay with a brush, and form a small protrusion in the center of the piece. To make the center of the flower, cut a cross from a piece of clay using a cutter. If there is no form for cutting, you must do it yourself with a knife. The ends of the cross-shaped workpiece are consistently bent inward.
Then bend the wire at an angle of 90 degrees. Place the center of a flower coated with glue onto the end of the wire.
Make the middle of the flower in the form of a small grain, on which an incision should be made, and place it in the center of the orchid. The flower is decorated in all available ways.
A painted piece of clay with a projection is rolled out and placed in a mold. The required number of petals is made in the same way.
In case of difficulties encountered during the work, it is recommended to familiarize yourself with photos and video master classes on making flowers from polymer clay published on the world wide web.
Instructions for working with clay
To make the creative process as enjoyable as possible, and to make your products beautiful and neat, when working with polymer clay, follow the following rules.
Safety precautions
- work only with protective gloves;
- do not bake objects made of polymer clay at the same time as cooking;
- do not exceed the temperature range, as when overheated, the material releases toxic substances that can cause poisoning;
- After baking, ventilate the oven and kitchen.
Adviсe
before you start creating clay products, you need to knead the material well with your hands, so it will become warm and pliable, which will simplify working with it; do not allow air bubbles to enter, this may deform the finished product; To avoid drying out, store the bag with polymer clay tightly closed; the sticking of specks to the clay will help prevent talc; do not remove crafts from the oven immediately after baking, as cracks will form with a sharp temperature change; finished polymer clay crafts are fragile and therefore require careful handling.
Today, polymer clay modeling is a popular form of creativity among adults and children. This process is very exciting and once you create your first clay accessory or decorative item yourself, you won’t be able to stop!
From this article you learned what polymer clay is, what tools are needed to work with it, how to prepare clay yourself, how to make flowers, and also received tips on how to properly work with this material.
Come up with and implement your ideas in clay products to decorate your home, as a gift to friends, or for sale.
Success in creative work!
Family creativity
In recent years, it has become obvious that this type of creativity is available not only to adults, but also to children. Not only do they enjoy participating in the manufacturing process, but they also gain skills that are essential for the development of the child’s personality. They develop dedication, perseverance and the ability to achieve their goals.
In the process of creating handicrafts from polymer clay, the author feels like a real artist, capable of not only expressing his creative credo, but also achieving true heights in the fine arts.
Stages of creating a peony
- Add a little red clay to the white clay and mix together using stretching movements.
- Divide the resulting mass into 12 pieces of 1.5 cm and 20 pieces of approximately 1 cm.
- Form teardrop-shaped elements from the resulting pieces. Pinch the thickened tip and smear it over your palm, and then, using a stroking motion, make a concave petal with a small stem.
- Glue the petals in pairs - large with large, small with small, moving one of the two to the side.
- Fan together the smaller pieces so that the concave side is on the inside.
- Form the center of the peony by twisting the resulting fan in a spiral.
- Glue the remaining large petals around the central part with the convex side inward.
Creating leaves
- Mix green and white clay. Once you have a light green color, add a little more green, but do not mix them together completely. This will give you a veined texture.
- Make a drop, press it to the surface of a special acrylic mold to obtain a sheet.
Making buds
- The pink clay remaining when creating the flowers is mixed with red, but not mixed completely. Roll the resulting plastic into a ball with a diameter of approximately 2 cm.
- Three or four small cakes are made from green plastic that was not used for leaves, and then they are glued over the bud so that they look like sepals.
Each piece is glued to floral wire and left to dry completely for 24 hours.
Assembling the boutonniere
- Wrap the wire elements with tape. To make it fit better, stretch it before use. Using regular tape, connect the pieces together. There is no need to make the stem too long. Leave no more than eight centimeters, cut off the excess with pliers.
- Tape is also used for wrapping the base under the boutonniere. Wrap the ribbon around the stems and secure the end with a pin. The final touch will be a bow made from ribbon.
Forming a bouquet
If you are creating a full-fledged flower arrangement, there is no need to use tape. The wire in the bouquet will be almost invisible.
- To get a beautiful bouquet, connect several flowers using tape. Once it is formed, add leaves to the composition.
- Mark how tall the bouquet should be, cut off the excess stem into pieces. Reliability of fixation can be achieved with pins, which are used to pin each turn made.
- The resulting luxurious bouquet of peonies is decorated with a bow.
We create complex shapes
In addition to simple forms, several types of parts are used to create paper displays. One of these are “horns”. They consist of two paper blanks twisted in different directions.
To do this, use a long strip. It is carefully folded in half. The right end is wound in one direction, and the left end in the opposite direction. Surely each of us has noticed similar elements on children's cards.
The next difficult element is considered to be the “heart”. It is made using the same method as horns. However, the curls must be in the same direction. The middle of the strip is carefully folded with your fingers. Similar elements are widely used to create greeting cards for Valentine's Day.
The “crescent” shape is made using the “petal” method. To do this, the central part is designed in the form of a tight coil, which is subsequently carefully unraveled. Using your fingers, open one of the sides, giving it the shape of a comma.
Making a triangle for quilling is quite simple. To do this, the paper is wound clockwise around the rod. The end of the strip is carefully glued to one of the sides. Gradually the spiral unwinds on its own. To give clear angles to the top and side parts, tucks are made while forming a neat triangle.