Polymer clay has become a fashionable and affordable hobby relatively recently. The material, which does not require complex production processing, allows us to obtain factory-quality products. And if polymer clay becomes your hobby, the earrings and beads in your personal collection will be 100% exclusive.
You will learn from this article how to make jewelry from polymer clay with your own hands, the materials and tools necessary for the work, and the value of tips and recommendations for beginners. And also - 15 plastic jewelry with step-by-step master classes, and all this is clear, accessible and simple.
What it is
Polymer clay has been produced around the world since the 1930s. The composition has changed over time and at the moment it is a plasticine-like material that hardens under the influence of heat, turning into polyvinyl chloride.
The mixture itself is colorless, and various additives give it color and plasticity. That is why, depending on the manufacturer, its properties may vary.
There are several types:
- Glow in the dark;
- Iridescent in the light;
- Mixture with metallic color;
- Liquid;
- Colorless or translucent.
Wildflowers bracelet
We make a forget-me-not by rolling out a droplet with a round head and making 5 cuts on it. This is the middle in the form of a five-pointed star. We straighten these petals and flatten them with a stack or knitting needle. Glue a bead onto the wire and pierce the middle of the resulting flower. The bracelet blank is wrapped with such elements.
Manufacturers
To make a craft from polymer clay with your own hands, it is important to choose the right material for creativity. The following manufacturers are currently represented on the Russian market:
Russian-made clay, as a rule, is noticeably inferior to Western analogues, but is superior in price. Often the color range is quite narrow, and the finished craft can be fragile. The main companies on the market are Tsvetika and Artifact.
German clay presented by Fimo is one of the oldest on the market with a huge selection of colors. The only drawback is the high cost of one package, but it is ideal for professional work.
Each manufacturer, having their own clay production formula, endows it with special properties characteristic only of their company. For example, Kato clay must be baked at high temperatures, and Belgian Cernit may slightly change color after heat treatment.
Necessary equipment
- Gloves that will help you avoid staining some light-colored material, such as white or light yellow.
- Various kinds of beads, buttons, sparkles, decorative threads and, in a general sense, everything that can be used to decorate a model.
- A plastic or wooden surface on which modeling will take place, since it can be problematic to clean it from the table.
- A knife that feels comfortable in the hand, and the blade is hard enough not to bend when cutting clay.
- Varnish, for processing the product, you can use construction varnish on water or from companies that produce clay.
- Moisture-resistant sandpaper for removing fingerprints and polishing.
- You can use toothpicks to make small holes.
- A roller for rolling out clay, such as a wooden rolling pin.
- Wire to form the frame of the model around it.
How to make clay at home (step-by-step recipe)
You don’t have to go to the store to buy the material, but prepare it at home. The main ingredient is PVA glue, without it nothing will work.
For the simplest recipe you will need:
- PVA glue (100 ml);
- corn starch (100 g);
- baby oil;
- fat cream.
Your actions:
- pour glue into a glass;
- prepare a portion of starch in another container;
- heat the glass container, place it in a water bath, pour glue into it;
- add a spoonful of cream, mix well;
- add a spoonful of oil, mix well;
- slowly pour in the starch, stirring constantly (while keeping the container in a water bath);
- We take the material out of the glass container, put it on the board, knead it like dough (work for 5-8 minutes with gloves).
The clay is ready! You can grease it with cream and wrap it in cling film.
Tips before you start
It is important to properly bake or treat the material to achieve polymerization. At any master class on how to make a craft from polymer clay, you will hear three possible options.
Note!
- DIY military crafts step by step: 150 photos of the best craft ideas for children for school or kindergarten
- DIY crafts for May 9 step by step: 150 photos of the best crafts for Victory Day
- DIY crafts for February 23rd step by step: master class with photos and descriptions of how to make crafts for Defender of the Fatherland Day
In the first case, the clay hardens on its own; you need to put the resulting craft in a closed box or container for several hours or days. For some materials, wrapping them tightly with plastic cling film will be sufficient.
In the second case, you will need to immerse the product in boiling water for several minutes, and then rinse in cold water. This method guarantees that the figurine will not burn from exposure to temperature.
Well, the most common way is to put the craft in the oven. The time can vary from five to forty minutes, depending on the size and manufacturer.
Some models will require the process to be repeated several times, alternating with cooling. The temperature is usually about one hundred degrees. After the time has elapsed, the figurine is taken out and allowed to cool.
Selection of materials and components
To work with polymer clay, it is worth acquiring auxiliary tools and materials to make the work easier. But you can start with the very minimum - a few blocks of polymer clay are enough.
Buy the rest as needed, if the activities captivate you and you want to immerse yourself in creativity.
Choosing polymer clay
The most important thing is polymer clay. There is a huge assortment of plastics in stores, and it will be difficult for a beginner to decide.
The first step is to determine the type - self-hardening or baked. It is better for beginners to work with baked goods, because... it is easier to learn.
Next, select the manufacturer's brand:
- Fimo;
- Premo;
- Cernit;
- Sculpey;
- Artifact.
The most popular Fimo and Artifact (from a Russian manufacturer). They are preferred because of their low cost and availability. You can find very cheap offers on Aliexpress, but the composition and quality of the material is unknown.
Tools for modeling and decoration
To work with clay you need special tools. Not all of them are required, because it all depends on the style and theme of your work. Many of them can be replaced with improvised means, so as not to spend money on expensive tools.
- Dense and smooth board for modeling. You can use tiles, glass, plastic board. Special silicone substrates with markings are sold, which both protect the table from clay and serve as a stencil when creating identical elements.
- A glass rolling pin or bottle to prevent the clay from sticking to it when you roll out layers of clay.
- A utility knife or blades to cut the clay into small pieces.
- Use wooden toothpicks or sticks to insert into the beads while baking to keep the holes straight.
- Gloves for working with clay will protect both your hands and the clay.
- Thin metal wire to create a frame for the figurine.
- Set of stacks for polymer clay. It includes tools for finer work with clay: applying a pattern, leveling the surface, connecting parts, etc.
- An extruder is a syringe with attachments, like its confectionery counterpart. You can squeeze clay through it and get even sausages of the desired size and shape.
- A paste machine allows you to quickly make an even and thin layer of clay.
- Stencils and stamps. In stores you can find many auxiliary tools that allow you to create elements of different shapes or apply patterns with one click. For example, silicone molds allow you to quickly create many identical elements (beads, leaves, petals, etc.).
In addition, you may need napkins or foil to use when baking the finished product.
Baking tools
The clay must be baked exactly according to the instructions - at a certain temperature and a specific number of minutes. Violation of the conditions may ruin the work.
You can bake the finished product on any heat-resistant surface. But in the future you cannot use this container for cooking - harmful substances may remain.
When heated, clay releases plasticizers that are harmful to humans. If the oven is used for cooking, be sure to clean the oven walls. But there is one trick - some masters use a culinary sleeve during baking. They place the backing with the product in it, close it, and then just throw it away. Nothing gets on the oven walls, and you save time on cleaning.
If you bake on a metal surface, lay down baking paper to prevent the figurine from burning.
In addition to the above, you may need napkins and foil to place under some items. When firing round parts, you can make a stand out of foil (like the letter W) and fix the beads on it. This way they won’t roll out or flatten under their own weight.
Assembly tools
Complex structures need to be assembled together after baking. Typically, wire or fishing line is used for this. It will be difficult to perform such delicate work by hand, so it is better to use additional tools:
- pliers to connect the wire;
- wire cutters to cut off excess wire;
- pliers to twist the wire.
In some cases, small holes need to be made in finished products. A machine with mini drills will help.
To begin with, you can use available tools.
You can also join the products together using special glue:
- polymer glue-gel for polymer clay, which can be baked in the oven;
- water-based latex adhesive, which after drying becomes completely invisible;
- superglue on cyanoacrylate, which instantly and very firmly adheres to the elements (there is no room for error).
Do not try to make a large monolithic product at once. In some cases, it is worth making each element separately and then fastening them together.
Berries
Knead the clay in your hands to make it softer. Take white clay and any other berry color, we will use pink.
Make an even triangle out of white, like a small piece of cake, and roll out the second one, not very thin, to one millimeter thick.
Roll out small sausages from white and red flowers and connect them together.
Wrap the white sausage rolled out in step 2 so that the edges of the flat clay overlap slightly with the second one. Our berries will be formed from these sticks and they should not be large.
Note!
DIY airplane craft: the best options for creating an airplane from paper, cardboard and plastic. 120 photo ideas
- DIY crafts for March 8 step by step - a review of the most beautiful crafts for International Women's Day (120 photo ideas)
- Diaper cake for a girl - 180 photos of ideas for original diaper cakes + DIY instructions with examples of finished products
The resulting product should be stretched in length, reducing its size in width. Be careful not to tear the sausage.
Cut the resulting result into small pieces.
A white piece rolled out to length is enveloped in a pink layer, to which the slices cut in step 6 are stuck in a circle.
Next, we will wrap the resulting result in a red flat sheet of red clay, rolled out in width and length.
Stretch the resulting sausage depending on what you want to get. If this is some kind of beautiful craft like a keychain, then it can be thicker and larger; if this is a future necklace or pendant, then make it smaller. Cut the resulting sausage and place it in the oven.
Lily making process
Instructions with description for beginners:
Roll out the clay thinly. Use a toothpick or needle to mark 3 large and 3 small petals.
Cut out the marked petals. Draw veins on them. Product elements must be given time to dry.
Button
Did you find an old beautiful button in your chest of drawers or at your grandmother’s? Why not try to apply it in our creativity. Although we will be making buttons, the process is similar for a century-old coin.
Make small balls from any color, you can even use leftovers. Attach a button to the resulting balls. Use a toothpick to make holes for the threads and place in the oven.
Sand the finished products, remove any unevenness and roughness from the edges, degrease and varnish.
There is a second version of this product using old tulle or any other textured fabric containing an expressive pattern. This is an ideal polymer clay craft for beginners.
Roll out a thin layer of clay of any color. Attach a piece of the fabric of your choice to it, then cover it with a plank and press it. Next, remove the fabric and use any round product, for example, a cork, to make a circle.
Take a toothpick and use the stencil of a real button to make holes for the thread. Send the resulting products to the oven, after which you can sand and varnish.
Mokume-gane
Several layers of clay are placed one on top of the other, rolled out, the resulting layer is folded in half, rolled out again - and so on several times. The clay is pressed onto a rolled out layer using various lids, round hollow things of different sizes (from a ballpoint pen to a glass), a knife and other shapes. Then they carefully cut off a very thin layer of clay from above, and a very unusual cosmic pattern is obtained.
Processing Tips
Any material on which you bake a model leaves marks on the product. To rid the figurine of traces of being in the oven, degrease it and use fine-grained sandpaper.
Not every product needs to be sanded, but only those that need it. If after the oven you notice unevenness and lumps, then proceed to processing; if there are none, then degrease and varnish.
Watercolor
The watercolor technique involves layering small layers of polymer clay on top of each other. These layers are rolled out and torn by hand, and then placed on top of the product and smoothed out, creating a pattern reminiscent of watercolors.
Volumetric models
These works already belong to the average type of complexity. Once you have gained the skills to work with tools and materials, you may want to do something more interesting. It’s understandable, buttons and berries are good, but someone also makes keychains, vases and even animals.
Below are instructions on how to make a Santa Claus and animals craft from polymer clay.
Tools
Before you start working, you need to prepare a tool for modeling with polymer clay. You will need:
- hard, flat surface (tiles, plywood, plastic board, durable cardboard);
- stationery knife;
- Glass bottle;
- thin sticks;
- brushes of different sizes;
- stencils;
- soft wire for frame;
- latex gloves;
- napkins;
- baking foil
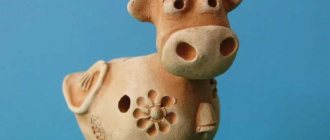
Bunny
The basis of these cartoon characters is a sphere, and therefore we can make them without much difficulty. Choose any color you like and roll into a smooth round ball.
Make ears in the form of small ovals from the same material. Take some pink clay and tear off small pieces, roll them into small sausages, and then secure them to your ears.
Add a pink button nose to the bunny, and use a blunt pencil lead to make small holes under the eyes. Tear off tiny pieces of black clay and roll into small balls. Flatten them and place them where the bunny's eyes would be.
Attach the ears to the round head, slightly behind it. Make four small sausages from the same clay as the head. Longer for the arms, thicker and shorter for the legs, and secure them to the body.
The model is ready, you can put it in the oven. If desired, add a small chamomile to it as a decoration.
Remember that if you make a figurine, in the end it should not fall on its side or fall in any way.
Making an orchid
After acquiring the necessary experience, beautiful flower ideas will arise in the imagination of needlewomen, and making an orchid from clay will not seem too difficult.
Birdie
Roll a small ball, as in the case of the bunny, immediately making small indentations under the eyes with a blunt pencil. Make eyes from black clay and place them on the body.
Similarly, place the beak of a different color for our bird. Remember that in itself it is conditional and can represent a small, slightly elongated sphere.
Make a heart out of pink or red material - this will be our tail. When finished, flatten it slightly and place it behind your head. The bird must lean on it so as not to fall.
The wings will be the same color - two small flattened droplets on the left and right of the body.
Small sausages of the same color as the beak will serve as paws. Make four, two for each, and you can send the model to the oven.
Kaleidoscope
It is made in the same way as a mosaic, with the only difference being that the kaleidoscope is a combination of geometric shapes inside a roll. At the same time, the roll most often does not have the shape of a circle, but the shape of a square or triangle.
Santa Claus
The difference between Santa Claus and Father Frost is only in the color of his clothes. The American one is red, and the Russian one is blue. You can decide for yourself what you will do without any problems. Below are instructions for beginners.
Similarly to the bird and the hare, roll a small ball - this will be our head.
Make four tiny spheres, two larger ones from white clay and two smaller ones from black clay. Flatten the white pieces, you should have two small pancakes. Place them on the head, and on them there are black balls - the eyes are ready.
Make a beard of your choice from white clay, then place a button nose between the eyes, and from it two sausages that will be mustaches.
Roll out a small layer and make a red cone out of it and secure it on your head. The rim of the hat will be a thin white sausage. Top the hat with a white clay bead. Use a blunt pencil lead to create a mouth for grandpa.
Make Santa's ears from the same clay as his head.
According to the principle of how we made the hat, Santa should have a torso, legs and arms. Don’t forget about the boots and attach them to your feet and send the resulting model to the oven.
Recommendations from experts
Tips that should not be neglected:
- Before sculpting, the clay is kneaded.
- The work surface and hands must be clean.
- Hair is pulled back or tucked under a scarf or other head covering.
- Talc is applied to the clay.
- It is necessary to calculate the required volume of clay for the product, since the clay will become unusable after a short period of time.
- If it dries out, add a little hand cream to the clay.
- Due to its fragility, care is required when handling finished clay products.
- To increase shelf life, place a damp cloth in a container with clay.
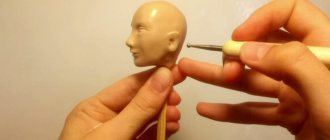
Human Simulation
The most complex of the figures presented in this article. You may have seen various kinds of photos of characters made from polymer clay on the Internet. They are made using a wire frame. We have prepared some tips for you to ensure that your model turns out to be the most successful.
For tall animals or people, use a metal rod. If the character has a flat part, then it is possible to use a mesh on which the base will be applied.
Observe the proportions; for this, it would be a good idea to look at the instructions for artists, where all the necessary parameters are given.
The peculiarities of proportion include the fact that cartoon characters cannot have, say, five fingers, unless we are talking about completely realistic figures.
The wire frame will need to be secured to the table somehow so that it does not fall and is able to stand. The frame should be plastic and have medium softness; it is better not to use metal that is too hard.
Magnets
An ideal polymer clay activity for children would be making refrigerator magnets. Knowing the technique already, coming up with something for you will not be difficult.
Remember that you should always use your imagination, because the most difficult is not always the best. You may have many options for creativity - these are some kind of parrots, the face of your domestic cat, New Year's decoration in the form of magnets for the refrigerator. Moreover, using a magnet, you can make a holder for needles.