Everyone has one or several hobbies. Some connoisseurs buy unique items at auctions, others prefer to collect handmade creations. Ordinary sulfur matches (sticks, cuttings) are considered a common basis for creativity. They are sold in any store at an affordable price, which is why they are a priority material for creating decorative products. In addition, you can make crafts from matches, both small and large.
- Choosing the brand and type of glue for crafts made from matches
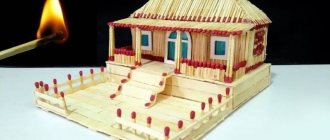
- Building a match house
- Step-by-step instructions for crafts made from matches
- Making a match house without glue
- Matchstick house step by step
- The easiest crafts from matches
- Match well at home
- Church made of matches
- Assembling a match temple: step-by-step instructions
- conclusions
Create handicraft masterpieces for every taste. Creative work with matches allows you to develop attentiveness, fine motor skills and perseverance. It is especially recommended to involve young children in this skill; they will be interested in participating in the making of houses, figurines and fortresses from matches.
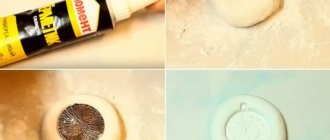
Not everyone likes store-bought matchboxes with green and brown sulfur. It is important to note that anyone can make matches at home. All that is needed for this is prepared wooden sticks and wax candles of the required colors. The recipe for making it is extremely simple: light the candles and melt the wax; its thickness should be at least a centimeter. Dip each stick into hot wax and place it on the table so that the heads do not touch the surface. Once the wax has cooled slightly, shape the tops into the desired shape.
In this article, we will take a closer look at the right choice of glue for wooden models, look at how to assemble crafts without using adhesive mixtures, describe instructions on how to build a house of matches, and give recommendations on how to properly make match products with your own hands.
Choosing the brand and type of glue for crafts made from matches
To create an original wood product, use any PVA glue. For crafts made from matches, craftsmen advise using an adhesive that will be transparent after drying. This way the finished craft will look more impressive.
You already know how to make matches at home with your own hands. In order to create a match craft using glue, we recommend choosing one of the types shown in the image.
Inspirational ideas
From matches you can make not only three-dimensional figures, but also entire landscapes. To repeat the “house under the birch tree” picture, just carefully study the arrangement of matches. If desired, matches with green heads can be used for the crown of the tree.
To build the houses shown in the following pictures, simply study them carefully and try to understand the sequence in which the matches are laid.
Sources
- https://SamoDelino.ru/detskie-podelki/domik-iz-spichek.html
- https://tvojdizajn.ru/domik-iz-spichek-kak-sdelat-bez-kleya-svoimi-rukami-poshagovaya-instrukcziya/
- https://mimiledi.ru/rukodelie/podelki/dom-iz-spichek-bez-kleya-kak-sdelat-svoimi-rukami-poshagovaya-instruktsiya.html
- https://www.MasterVintik.ru/kak-sdelat-krasivyj-domik-iz-spichek/
- https://minyt-ka.ru/kak-sdelat-domik-iz-spichek.html
- https://VseProKley.ru/podelki/domik-iz-spichek
- https://www.promyhouse.ru/rukodelie/podelki/domiki-iz-spichek-svoimi-rukami.html
Building a match house
The “house of matches” craft is characterized by the greatest monotony. This is a painstaking task, but the result is worth it. To make a house of matches and glue, you will need the following materials: 3-4 boxes of matches, a toothpick and glue. It is also important to find the optimal surface for this activity. For example, a small piece of cardboard for a blank or regular plasticine works well. We pour the glue into some kind of lid or bowl for more comfortable work.
Step-by-step instructions for crafts made from matches
- Let's make the base. To do this, we place two cuttings parallel to each other. The distance between them should be about two centimeters. It is advisable that the sulfur be removed from the first two - this will help make the foundation a little smoother.
- We apply a strip of glue approximately a millimeter wide to the edges of the sticks, after which we place the next two sticks above. This should create a square.
- Using the same principle, we lay the cuttings until we reach the planned height of the house.
- There is no need to immediately lay a new level - the previous one should dry out at least a little.
- Now we move on to building the ceiling. To do this, you need to tightly lay the matches on top of the walls of the house, previously lubricated with glue.
- Once again, apply a thin layer of glue to the top level of the craft, so the product will become a little denser.
- Determining how to make the roof of a house is quite simple. To do this, combine the two parts. The second one will have to be built separately. Fold the long and short sticks in turn, and to make them hold more firmly, fasten them with two more on top of all folded ones.
- When both parts of the roof are ready, connect them together and place them on the house.
If you want to visualize the whole process, we recommend watching a video on how to make a matchstick house with your own hands.
Tips from needlewomen
The following tricks will help you quickly master the algorithm for creating crafts:
- In order for the house to look aesthetically pleasing, it is necessary that the heads are positioned harmoniously - in rows they should look in the same direction. In other options, they are alternated, maintaining symmetry and uniformity.
- The entire work process requires special care and attention. Just one awkward move can ruin the whole job, and you'll have to start over.
- A CD box is most often used as a workplace. Dough or plasticine can be used as a base; the material is rolled out and laid on a flat surface. One of the advantages of this choice is that the house does not slip.
- In order not to spoil the already assembled structure, tweezers are used for “jewelry” actions.
- To maintain the required distance between the “logs” in the first rows of the base, a ruler is laid on the surface.
- If a child is involved in creativity, you should avoid the possibility of a fire hazard. The matches are poured into a container prepared in advance, and the boxes are thrown away. It is not only safe, but also convenient for work.
- Using matches with multi-colored heads in your work, you can give the product additional attractiveness.
- When choosing a material, it’s a good idea to look into the box. It is important that not only the “logs” are even, but also that the heads are small and of the same size.
- When starting the creative process, everything unnecessary is removed from the workplace. Any little thing, even a slightly wobbly table, can play a cruel joke and reduce all efforts to zero.
- To align and push parts, use not only tweezers, but also a toothpick.
Making a match house without glue
You can create a matchstick house without using glue. Making your own product from matches without glue is quite easy. To do this, you will need a stand for the house and a coin with a face value of five kopecks.
Matchstick house step by step
- We place the matches parallel to each other.
- We take eight more and place them on top of the two already lying. The heads with sulfur need to be turned in one direction so that the craft has an aesthetic appearance.
- Then we again take eight sticks and place them parallel to those already lying so that the heads are again placed with gray in one direction.
- Between adjacent matches you need to install a gap approximately two millimeters thick.
- We place four sticks in the shape of a well, turning the heads with sulfur in different directions.
- In the same way we build several more rows. The optimal number is six.
- After all the rows have been built, we take eight more matches and place them in the same way as the bottom row, parallel to it.
- On top we again make a flooring of six cuttings.
- For stability of the structure, we place a coin on it.
- We place four more sticks along the edges of the created square.
- We also place the matches around the perimeter, lowering them down the house so that the heads with the sulfur are at the same level.
- Carefully remove the coin. To do this, you can use tweezers.
- We carefully squeeze the house from all sides, thereby leveling it. We place the house with the foundation up.
- To make a house made of matches without glue stable, we strengthen the walls of the structure. To do this, we vertically place several more cuttings outside, the sulfur heads of which should point upward.
- Next, we once again lay the block of matches on the outside, but they should already be horizontal.
- On the side of the resulting structure we insert four more pieces, those that are located vertically, we raise them a little and proceed to the construction of the attic, on top of which we place the roof.
- Now all that's left to do is to build a prototype of the door and chimney. To do this, break the sticks in half. From those parts that have sulfur on them, we build the elements we need.
Before you start making, we recommend watching a video on how to make crafts from matches without glue in the instructions:
We work with children
It has been proven that working with matches strengthens the nervous system. Children are interested in creating panels on colored cardboard. Before work, pour the matches out of the box and put them aside:
The sulfur heads are dipped in office glue and dried. Now matches can be used by children. It's easy to make a beautiful applique out of them. First, the outline of the figure is drawn on the cardboard. The matches are carefully glued along the contour. Then, using the mosaic method, sectors parallel to each other, the pattern is completely filled with matches. If necessary, they are cut to the required size at a certain angle or straight. From a distance, the rows of matches resemble shading. For the template, any contour drawings of animals and toys can be used. If desired, the pictures are complemented with decor.
The easiest crafts from matches
So, from simple wooden sticks with sulfur you can make original children's crafts, buildings and objects. To learn how to make a castle from matches, just stock up on the necessary elements and strictly follow the instructions. One of the easiest ways is to make a chair from matches without glue. Let's figure out how to do it:
- We cut off the heads with sulfur from the matches, and place the two resulting sticks parallel to each other.
- Take another one of the same kind and cut it in half.
- These two halves need to be glued to our parallel matches. This will give us a backrest for the future chair.
- We take another stick, cut it off so much that we get a fragment equal in width to the back of the chair.
- Glue this piece in the center to create the back base. The rear legs will be located slightly below this part.
- We cut off the exact same base and glue the chair legs to it. It is important that they are the same length as the back ones.
- We cut one stalk, cleared of sulfur, in half and make a side base out of it, gluing it to the back one. After this, we glue the structure with the front legs.
- We cut eight pieces of the match, the length of which will correspond to the width of the seat. We lay them side by side and connect them by gluing two crossbars.
- We glue one of the same matches on both sides of our seat, and then secure it to the chair.
And this is not all that you can create with your own hands. A variety of video tutorials on crafts made from matches for beginners on the Internet will help beginners understand the nuances of making them. The picture shows a simple series of actions that will help you make very realistic chairs.
Match well at home
A well made of matches is one of the simplest DIY crafts made from matches. It is done like this:
- We take four matches and use them to make a base for the well, laying it in a square. In the same way we create ten more rows.
- From the inside of the well we attach two matches to the two opposite sides, which will serve as supports for the roof.
- We increase them by gluing a couple more sticks.
- We assemble the roof from two separate parts, tightly gluing the matches together.
- We glue two more cuttings in a horizontal position to the inside of both parts to strengthen the roof.
- We connect both parts with glue, then with the support of the finished frame.
- Our well is ready. If you want to make a more colorful composition, make a handle for raising and lowering a bucket of water.
It is important that all sticks are very carefully lubricated with glue, otherwise the structure will be fragile. Wipe off excess glue without allowing it to dry. As you can see, it’s easy to make such a design; all you need is patience and endurance. To simplify the task, watch the video on how to make a well from matches step by step at home.
Sunshine for children
To make a children's craft in the shape of the sun, you will need to have matches, glue, and a medium plastic ring on hand as a base.
- A craft in the shape of a children's sun can be made on a cardboard base, which will make it light and mobile. To make a volumetric sun, you need to prepare two circle shapes by cutting them out of yellow cardboard.
- On the back of the plastic base you need to glue matches, following the shape of the sun.
- Then yellow cardboard circles should be glued on top of the round base so that they can cover the areas where the matches join the plastic.
- The sun will look better if you add a happy face to it.
You just have to look at the finished matchstick craft shown in the photo. What a funny sunshine it turned out for the children!
Church made of matches
One of the most difficult crafts to make is rightly considered a church made from matches without glue. Many craftsmen take it up only after they get the hang of it, creating simpler crafts. However, the final result is definitely worth all the effort and energy spent. It is important to stock up on a large number of matches; to make a shrine at home you will need at least 2000 units.
Assembling a match temple: step-by-step instructions
So, all the elements of the craft are prepared, let's start assembling the homemade shrine.
- We connect the structure by piercing them with cuttings. The back wall should be smooth, so we clean it with a blade.
- We create exactly the same design.
- We make a standard square, removing the sulfur from above. We level it by cutting the cuttings.
- We trim the area on one cube and on the plank.
- We insert eight sticks into the prepared cube, which will serve as attachments to the bar.
- We connect the parts in the prepared place.
- We create another leg and prepare another cube on the bar. In order for everything to be perfectly secured, we push the inserted matches through. A kind of arch is formed under the middle square, acting as a fortification. If desired, you can add additional sticks here.
- We repeat all these steps for the next plank.
- We prepare the middle bar, for which we build three cubes. We place the sticks horizontally in the two outermost parts in front. On other sides we place it in exactly the same way, only according to the vertical principle. We clean them to get a smooth surface.
- In the middle square we place vertical matches on the sides and also make them even. We lay them horizontally in the front and back parts.
- We connect the cubes and attach the resulting structure with the finished planks, placing the product between them.
- We create inclined surfaces by pushing the cuttings from the inside.
- We build low towers on the sides of our product. To do this, we make a five by five square, and fill it in the middle with horizontal halves of sticks. In total, four such towers need to be created.
- Make domes from foil. Design all the elements of the craft at your discretion, but do not forget to make windows and doors, and place symbolic crosses on the domes.
- If necessary, create a matchstick fence to enclose the temple.
These fifteen steps will create a strong and sustainable church. However, if you don’t want to spend so much time, build a temple from matches with one cube. To do this, we recommend watching the following video lesson:
Recommendations for Beginners
Beginners in any business should first familiarize themselves with the basics in order to avoid mistakes in the future.
Also here there are nuances and subtleties, the understanding of which comes with experience.