How can fearless ninjas, deftly mastering hand-to-hand combat techniques, leave any boy indifferent? Of course, each of them, in their dreams, defeated their enemies as brilliantly as these high-class Japanese samurai, using their trained body as a powerful weapon.
And if such skills are not yet available to your boy in real life (he may have all this ahead of him, after many years of hard training), then he can try on the costume of a courageous ninja right now. Your tomboy's dream can come true without significant costs and hassle on your part, since the ninja costume is quite simple and economical to make. Are you ready to bring joy to your boy? In this case, feel free to get to work, and our patterns and tips will help you successfully cope with the task.
DIY New Year's samurai costume for a boy
Usually, during holidays in kindergarten and school, teachers assign roles. These can be fairy-tale characters, animals, national costumes. But New Year's parties most often take place in the form of a carnival, that is, everyone puts on the costume of their favorite hero. Girls, of course, all want to be princesses: Cinderella, Thumbelina, the Little Mermaid, Snow White, etc. And boys now choose mainly some kind of superheroes. This is Batman, Spider-Man, Knight and Musketeer. A samurai costume will look very original.
This image of a real warrior will suit any boy; making the costume is not difficult, since it is not made of fabric. You don't need any sewing skills or a sewing machine. Therefore, any parent can make such an outfit; it would be nice to involve dad or grandfather.
Required tools and materials
We will immediately please those who are not particularly “friendly” with a needle and thread, since creating a mysterious ninja costume is a fairly simple and entertaining process. The most important thing is the right suit colors and eye-catching accessories.
Since the ninja suit is multi-component, we will need a wide variety of materials:
- a piece of fabric (pure cotton/velvet);
- black loose-fitting trousers (with elastic);
- sports gloves (optional, for older boys);
- black socks/knee socks;
- black Czech shoes/sneakers/flip-flops;
- fake edged weapons;
- spectacular emblem in the form of a dragon/symbol of opposites (ying-yang);
- foam;
- black threads;
- scissors;
- centimeter.
The costume can be made using trousers and a shirt from the child’s wardrobe
Before you start creating the details of the costume, it is important to decide what exactly it will be. There are several options. Firstly, you can use a sweatshirt and pants with an elastic band, then the hood will act as a headdress, and the mask needs to be made separately.
Secondly, you can use pieces of fabric to create a headdress and a mask, put pants on your legs, tuck them into knee socks, and separately sew something like shoulder pads. We will focus on the combined option. So, let's go!
Components of a samurai costume
A warrior's outfit from Japan consists of elements, each of which is made separately.
- Cape for chest and back. Serves the warrior as protection from a sword strike. Made from metal or thick leather. So that the warrior could move freely, the entire “chain mail” was presented in the form of separate strips, which were tied together with metal rings or belts.
- Shoulder protectors. They are attached to the “chain mail” on the sides of the samurai suit.
- Helmet on the head. Usually it was decorated with frightening elements - horns, a scary mask.
- Protective leg guards.
- Sleeves that protected hands from blows.
- Sword.
Necessary materials
We will make a samurai costume for a child’s New Year’s holiday from thick corrugated cardboard. You will need a lot of it, so prepare several boxes in advance or one that was left over after purchasing a large piece of equipment: a TV, washing machine or refrigerator.
To secure the elements together, you will need a beautiful bright rope. If you decide to paint the cardboard in some color, then you need to buy a rope in a contrasting shade so that all the connections look impressive.
You will also need to stock up on PVA glue. When purchasing, check that it is not liquid, then the thick cardboard will hold well. Also prepare a sharp awl and a wooden cutting board, a pencil, a ruler, scissors, and a hook.
Simplified version
If you categorically refuse to sew a suit or are not trained in this type of needlework, do it easier. Take your child's green tracksuit that you don't mind throwing away. Draw a light brown rectangle on the front of the T-shirt. Divide it with dark paint into about six parts. Let the child put a piece of cardboard under the T-shirt so that the “muscles” look more clearly. It is advisable to strengthen, as we described above, the muscles on the forearms and thighs.
All that remains is to go to the toy store and choose a weapon worthy of a Ninja Turtle so that the image is finally formed. If your child finds it uncomfortable to walk around with a mask over his eyes, you can simply draw it on your son’s face.
You will have to tinker with such a costume for more than one evening. But the result will be stunning, and the child will be happy, because he has been in the shoes of his favorite cartoon character.
Trendy lace-up boots. How to wear them correctly?
Do you wear tights under jeans with holes?
"Chain mail"
We begin making a samurai costume for a boy with the most important and central detail. This is a cape over the shoulders or “chain mail”. Outwardly, it resembles a vest, only it consists of separate strips. First, measurements are taken of the child from shoulder to waist, the length of the shoulder itself and chest circumference. If you don't have enough cardboard, don't worry. Protection can only be done from the front and back. And insert simple elastic bands or make ties on the sides.
Next, transfer the measurements onto the corrugated cardboard with a pencil. Adding a neckline. We make a large semicircle so that the cardboard does not touch the child’s body and does not rub. If you have a boy’s vest, then you can put it on paper and trace it approximately along the contour, as if using a template. It turns out to be a cardboard part. Then you need to draw horizontal stripes, approximately 10-15 cm each.
Our “vest” will be represented by several stripes that will need to be cut along the contour. But first you should consider the option of fastening the parts together. Therefore, before cutting, it is necessary to draw two vertical strips, descending down from the middle of each shoulder. The distance between them is 5 cm. Only then, using scissors, they finish the work with the stripes of the front and back of the “chain mail”.
Separately, cut out the elements that will hang on the upper part of the arms, from the shoulder to the middle of the forearm. Such protective devices can be of any shape. You can fasten a couple of squares together or make several thin strips attached to the shoulders with a rope or elastic band.
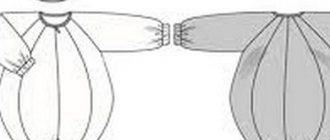
First option. We sew a kimono
The basis for the Ninjago costume is pants and a blouse. This could be a regular black sweater or turtleneck purchased in a store, or a beautiful kimono.
- First of all, you need to take measurements. We measure the height of the product from the bottom point to the collar, the length of the sleeves and the chest circumference.
- Using the measurements obtained, create a pattern. The simplest one is the one below.
- Carefully transfer the pattern onto the fabric and cut out.
- Next, you need to tuck and sew the cut edge of the kimono, and sew a piping along the top edge. To do this, a strip of fabric 10-12 cm is cut out, folded in the middle and attached to the upper edge of the kimono with the hem inward.
Connecting parts
In order for all the parts to be fastened together effectively, you need to punch holes on each strip using an awl. They should be located on vertical segments drawn on each element. You can make a square template (for example, 5x5 cm) and circle it. Then the holes will be at the same level, and the stitched structure of the samurai suit will be symmetrical.
Then, using a hook, we make lacing with a rope. You can “stitch” the holes with the letter “X”, as in the photo. When all the verticals are fastened together, you need to tie the rope on top of the shoulders. You can fasten the front and back of the “chain mail” on the sides and shoulders with wide elastic bands, matching them to the color of the New Year’s samurai costume for a boy. Several small rectangles are attached to the bottom strip at the front and back. They are attached only from above, and from below they open freely. It turns out something like a skirt. You don’t need to do such elements at the back, because the child will not be able to sit on the chair. Or make them short, not rectangular, but square.
Option 2
Jacket with long sleeves and a hood.
Stage 1
Take the same measurements from the child as in the first option. Transfer them to the fabric and draw the outline of the pattern.
Stage 2
Cut out the resulting parts and sew them together. First, the front part and the back are sewn, and then the sleeves are sewn into the holes. Then sew on the hood.
Stage 3
Tuck the cut edges of the bottom of the jacket, sleeves and hood and stitch, departing from the edge at least 0.5 cm. You can insert a thread with a length lock into the hood. To do this, cut holes in the folded edge of the hood near the collar at the same level. Insert the thread into one hole, pull it along the entire folded strip and remove it from the second hole. Place a thread lock on the thread.
Warrior Leg Guard
The parts that are cut out for the legs can be of any shape. The basis for them is the same - it is the shape of a narrow and high trapezoid. You can make a template by simply placing cardboard on your child's leg. Below is a narrow part that widens before reaching the knee. In order for the protective shield to have an original shape, you need to beautifully draw the upper part. It can be semicircular and sharp, triangular and square. At the back, holes are punched with an awl into which an elastic band is inserted to hold the protective shield on the leg.
Oversleeves
Hand protection elements are made in the same way, and the shape of the part is preserved. If you have sharp edges on the leg guards, then the arm guards should have the same sharp edges. The parts are also attached to the child’s hands using elastic bands or ties.
When the samurai costume for the New Year is ready, the most time-consuming task remains - making a helmet. This is done using tape. Manufacturing begins from the top. A polyhedron (pentagon or hexagon) is cut out.
A trapezoid is attached to each side of the figure, the upper side of which has the same edge length. This is the expanding part of the helmet. Next, rectangles are attached to the wide bottom edge of the trapezoid. The width of the side is measured on the child’s head. The helmet should drop more at the back than at the front. Then comes the expansion of the lower part of the headdress. This will protect your neck.
It is again represented by trapezoids, only the expansion goes downwards. The front of the helmet is made depending on its design. You can make a scary mask. But then the child will not be visible at the holiday. Sharp horns attached either to the front of the helmet or to the sides look beautiful. You can paint them in a bright, contrasting color.
The main attribute of the Japanese samurai costume, which all boys will definitely like, is the sword. It's easy to do. You need to cut the corrugated cardboard into thin strips, about 5 cm. Leave one, the longest one, unchanged. This will be the tip of the sword. And fold the others 4 times. This will be the handle of the weapon.
In the middle (after the 2nd layer) insert the tip and wrap it all together with tape. You can take a bright color option, for example, yellow or red. To separate the handle from the tip, you need to cut out an oval or square, in the center of which make a hole the size of the tip of the sword. Place the figure up to the handle and glue it with PVA to the thickened part of the handle.
Sword
The main attribute of the Japanese samurai costume, which all boys will definitely like, is the sword. It's easy to do. You need to cut the corrugated cardboard into thin strips, about 5 cm. Leave one, the longest one, unchanged. This will be the tip of the sword. And fold the others 4 times. This will be the handle of the weapon.
In the middle (after the 2nd layer) insert the tip and wrap it all together with tape. You can take a bright color option, for example, yellow or red. To separate the handle from the tip, you need to cut out an oval or square, in the center of which make a hole the size of the tip of the sword. Place the figure up to the handle and glue it with PVA to the thickened part of the handle.
Decorating the outfit
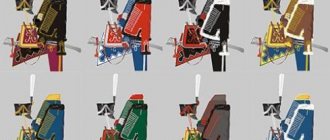
To make a samurai's New Year's costume beautiful, it needs to be made bright and colorful. You can cover each element with colored paper or paint it. The contrasting edging on the edges of the “chain mail” and each element of the costume looks beautiful. The same design should be present on all parts - arm sleeves, leg guards, belt and shoulder protection. Particular attention should be paid to the design of the helmet. This is the brightest and central detail of the entire samurai costume. In the photo you can see several types of decoration for such a New Year's outfit for a boy. So choose any one as a sample.
Cultivating fighting spirit and willpower among samurai
The training of future samurai began at the age of eight and ended at 16. Boys who were to become samurai in the future were raised very harshly. Education was based on the following principles:
- respect for parents;
- devotion to the emperor;
- respect for the teacher;
- Buddhist disregard for death.
The latter had a huge role in the life of the future warrior. The Japanese say: “A parent is the one who gave life, and a teacher is the one who raised him as a person.” The boys were raised to be fearless. The father could send the child to the cemetery at night. Children were taken to public executions and forced to look at severed heads.
To develop perseverance in a warrior, the guy was forced to do hard physical work, often stay awake at night, walk barefoot in the snow, and wake up before dawn. Future samurai might not be fed for days, considering a hunger strike to be very useful.
Children were raised to be reserved and emotionally cold. If a child hurt himself and cried, then the mother could only look at him reproachfully. At the age of 15–16, boys were considered full-fledged warriors and were given real weapons: a katana and a wakizashi. The guy was given a real samurai costume: wide hakama trousers and a kimono.
Final image
If a child goes to a festive event in a simplified version of the Teenage Mutant Ninja Turtles costume, then his face can be painted with bright, rich colors. In this case, a mask is not needed.
annkul.faceart
If the costume is completed with all the important elements, all that remains is to choose a safe toy weapon and comfortable shoes (sandals, sneakers, sneakers).
Features of kimono
Translated from Japanese, “kimono” means any type of clothing. Even a beginner can cut out this wardrobe item. Everyone in the land of the rising sun wears kimonos: men, women, children. According to tradition, this item required 9 meters of fabric with a width of 30 cm.
Kimono is loose clothing that does not have strict sizes. On the back, the robe is usually cut 60 cm wide. The fronts have an allowance for wrapping. In a modern stylized version, it is required. Historically, the costume has changed, and the smell may not have existed.
Kimonos can be worn in many different ways. As a rule, it was cut a little longer than the owner’s height required. A kimono can always be made visually shorter by folding it under the belt.
The collar in the original kimono is a very voluminous detail. It is cut out of a rectangle and reaches either the waist or the hem. When looking at an antique layered kimono, you may notice something resembling a shaped skirt cutout in the upper layers of the costume. This is the edge of the collar, which in the classic ancient kimono was huge.
Costume ideas
Since the Teenage Mutant Ninja Turtles look identical in appearance (other than the color of their masks and weapons), the general components of the costume will be identical in all cases. This is a green jacket, pants, a yellow belly insert and a brown shell. These characters have ribbons tied on their elbows and knees, which should ideally match the color of the mask, and the initial letter of the name is engraved on the belt buckle.
Full combat look
A full suit, complete with all the elements, is usually offered to boys 6-11 years old. Younger children may find it awkward to have fun at a party with a shell on their back. Even if such an attribute is made of soft fabric.
This costume consists of a green jacket and pants, a mask of the appropriate color and a shell.
Green pants and shirt
Soft mask
turtle shell
Orange Belly Suit
Brown belt
Partial reincarnation
The image of the Ninja Turtles is quite recognizable, so in some cases it is enough to simply complement everyday children's wardrobe items with a mask and shell. And the festive look for boys aged 3-5 is ready!
This costume consists of a mask and a soft, comfortable shell. If the child’s age allows, you can allow him to take the appropriate children’s “weapon” to the holiday.
Green One Piece with Hood
Yellow belly
Mask
Green sweater with hood
Carapace
Mask
Teenage Mutant Ninja Turtles Costume for Girls
Teenage Mutant Ninja Turtles are the heroes of boys' dreams, but in very rare cases, girls are also interested in them. There's nothing wrong with that! If girls don’t like playing “Daughter-Mother” and wearing fluffy skirts, then they have the right to try on the role of a brave defender.
This costume consists of green clothes, a belt, knee and elbow bandages, a yellow belly and a turtle shell.
One piece jumpsuit
Belt and bandages
Yellow belly
Jacket and pants
Mask
Knee and elbow pads
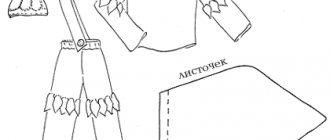
Cutting a kimono
In the photo below you see how to cut a kimono, saving fabric. The width of the fabric for the robe should be 110 cm. Cut the material along all solid lines. The pattern is given with all seam allowances, except for the bottom of the product. Add a few centimeters to the hem of the kimono yourself. First sew the back along the bottom seam, and then cut out the neckline.
The pattern shown here is a classic one because the back and flaps are two separate pieces. If you wish, you can make them one-piece.
Sewing a kimono
Finish the edges of the fabric with an overlocker. First of all, you need to connect the two back elements. Now you can cut out the neck. When marking, do not forget about the seam allowance.
Sew front and back along the shoulders. Don't forget to stitch the extensions to the right and left shelves.
Fold the sleeves in half. Focus on the dotted line. Sew the fabric from shoulder to wrist. You will get two pipes. Sew in the sleeves. To do this, you need to connect the middle to the shoulder seam. Sew the sides.
Place the kimono on the model. Spread the product over your shoulders and back. Wrap up a stylized robe. Now you need to bend the triangles for the collar on the shelves. It will start from the back of the neck to the bottom (set the level as you wish). Remove the suit from the model and secure the sewing elements with pins. Sew three parts of the gate into one strip. Roll it lengthwise and sew it. Next, you need to turn it out and iron it. You will receive a ribbon whose width is 5 cm.
Sew on the collar, cut off any excess. Now you need to hem the entire product at the bottom. Using this pattern, you can sew both a samurai suit for a boy and a beautiful kimono for a girl or woman. Mothers can make themselves a delicate, feminine robe using this template. A kimono can be used as a samurai New Year's costume for a children's party in kindergarten or a carnival at school.
Sewing hakama
If the material “crumbles”, then it should be overlocked. You need to sew together the elements of the front and back halves of the hakama in pairs. You should have four parts.
Take the front elements and stitch them together along the middle seam, departing 30 cm from the top edge. We process the outer top edge: on the wrong side you need to bend a triangle measuring 10 cm on one side and 20 cm on the other. Trim off excess material. Don't forget to leave a seam allowance.
Let's move on to laying out the folds. There should be 6 of them in front (you can make three). They should be turned towards the center. Press the folds firmly, there can be no soft drapery here. Now stitch the sides from the slits to the bottom edge and hem the trousers.
You can sew a samurai costume from cotton fabric or thick curtain material.
The kimono can be decorated with embroidery. A samurai costume for the New Year can be made from artificial silk.