| How can you replace a mixer at home? | Descriptions of analogues |
| Available means | Instead of a mixer, you can use:
The whisk and fork are used in the same way; you just need to beat the mixture with them until the desired consistency is formed. The principle of using a jar is somewhat different. It must be filled with ingredients, close the lid tightly, and shake vigorously and quickly. The main disadvantage of these analogues is that you need to make a lot of effort when whipping the ingredients. |
| Similar technique | If you need a mixer to whip the cream, but you don’t have one, you can use kitchen appliances with similar functions. This can be a culinary machine with a set of special attachments or an immersion blender with a whisk attachment. |
| Power tools | Instead of a mixer, use:
Instead of a drill, you need to insert a whisk from a mixer into the hole in the chuck and use it to beat the ingredients. If there is no whisk, then attach a couple of table forks to the drill. It is important that safety precautions are observed, so before use, be sure to check the reliability of the fixed devices, otherwise injury cannot be avoided. |
Today, almost every kitchen has a stationary or hand mixer. It helps in the process of preparing various dishes, especially for whipping cream and butter. However, sometimes situations arise when this tool is not at hand and then the question arises of what can replace the mixer at home.
There are several basic options for replacement, each of which can fully perform the functions of a mixer.
How to replace a mixer
| How can you replace a mixer at home? | Descriptions of analogues |
| Available means | Instead of a mixer, you can use: |
- whisk;
- large fork;
- glass jar with a lid.
The whisk and fork are used in the same way; you just need to beat the mixture with them until the desired consistency is formed. The principle of using a jar is somewhat different.
It must be filled with ingredients, close the lid tightly, and shake vigorously and quickly.
The main disadvantage of these analogues is that you need to make a lot of effort when whipping the ingredients.
Today, almost every kitchen has a stationary or hand mixer. It helps in the process of preparing various dishes, especially for whipping cream and butter. However, sometimes situations arise when this tool is not at hand and then the question arises of what can replace the mixer at home.
There are several basic options for replacement, each of which can fully perform the functions of a mixer.
Manual analogues
Hand whisking is the easiest way to replace the mixer. To obtain the desired consistency of the ingredients being prepared, use:
- an ordinary whisk;
- table fork;
- glass jar and a lid under it.
The principle of using a fork and a whisk is the same, you just need to beat the ingredients with your hands. The main disadvantage is that you cannot manually reach the mixer speed.
It is necessary to speed up your hand movements as much as possible. This method will be sufficient for whipping protein cream and butter.
Using a jar is slightly different.
- Place the ingredients in the jar.
- Close it tightly with the lid.
- Start shaking the contents as fast as possible.
- Within 5 minutes you can achieve the desired result.
Mechanical analogues of a mixer
You can use a blender with a whisk attachment at home. This is an affordable kitchen appliance that does not take up much space, allowing you to perform not only the functions of a mixer, but also be used as an immersion blender for making purees.
A kitchen machine such as Kitchenaid is ideal. It includes a different set of attachments, including a whisk, a hook for whipping cream and dough.
The disadvantage of the technology is its high cost. However, it carries out all the processes on its own; you just need to load the necessary products into it and continue to do household chores.
What to do if you don't have a mixer? Proven methods for whipping various products
To properly beat protein cream, biscuit dough or meringue (meringue), it is advisable to use a mixer. But if this is not possible, then you have to perform this procedure manually.
You need to beat the whites:
To whip cream manually, you should also follow a certain technology:
You can beat and knead the ingredients at home without a mixer. Various devices and cutlery cope well with the task.
Whisk cream by hand
But despite this, culinary equipment creates ease of use. Therefore, a broken device must be repaired as soon as possible or purchased a new one.
Lifehack with construction power tools
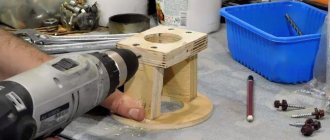
What can replace the mixer is a screwdriver, drill or hammer drill. The only drawback of the latter is its massive size and heavy weight. The replacement principle is simple.
- Insert a whisk into the hole for the drill and start whisking the products.
- If there is no whisk, firmly attach two forks to the drill.
It is only important to take into account that the whisk and forks must be firmly secured, otherwise there is a high probability of injury.
The presented options will be a good solution if you don’t have a mixer at hand. Each analogue will help achieve the desired result.
Source
Homemade mixer for mixing solution in small quantities
Modern construction methods often use quick-setting mortars, which are impractical to mix in large quantities. Industrially manufactured mixers are reliable but also expensive tools. It is unlikely that its use will be regular after construction is completed.
It is quite possible to make a mixer for mixing the solution with your own hands using a suitable drill or hammer drill. It is better to buy ready-made attachments for mixing, since in the process of their evolution, manufacturers have achieved an effective ratio of time to mixing quality.
A mixer for mixing concrete differs from a drill or hammer drill in that the worker has a more comfortable grip on two handles. The rotation speed and reliability of the gearbox do not play a key role in periodic non-professional use.
In order to make a mixer out of a powerful drill or hammer drill, we will need to solve the following problems:
- do not break the normal original instrument by temporary alteration;
- if a drill or hammer drill does not have a locking switch at the required speed, install an additional switch;
- without irreversible consequences of interfering with the design of the hammer or drill, make reliable and strong handles.
The selected hammer drill should ideally have:
- drilling mode (drill icon);
- changing the direction of rotation;
- fixation of the pressed button at various rotation speeds;
- manual switching of the gearbox to two rotation speeds;
- a handle screwed directly into the body, preferably on both sides into the standard threaded mounting points;
- a handle with a ring fastening around the base of the gearbox after the chuck;
- for rotary hammers of the SDS-plus system, you will need to install a standard chuck, or purchase an attachment with a suitable shank, or modify the attachment yourself (by welding a part cut off from a used drill to the mixing attachment).
If the hammer drill has standard threads for handles on both sides, then we look for bolts that match the threads and have the maximum possible length. Then we either weld or put a suitable pipe on them - straight or L-shaped. When welding a curved handle, you need to take into account the final position of the screw in the thread. Screw in until it stops, mark the required alignment. To achieve the required thickness and give the required elasticity, you can put scraps of rubber or garden hoses on the manufactured handles. You can secure them with plastic clamps and wrap them with electrical tape. In order not to do unnecessary work, be sure to check to see if the handles from the grinder are also suitable in thread and length.
If a drill or hammer drill only has a ring clamp for the handle, then the problem can be solved by using parts from two standard plumbing metal clamps with a rubber gasket of a suitable diameter. Instead of dowels, we screw in straight or curved handles with suitable M8 or M10 threads. You will definitely need to use bolts and nuts of size M8 as a tie, for which you need to drill out the corresponding holes with a diameter of 9 mm on the half-clamps. If the strength of a standard clamp is not enough, then in its likeness half clamps are made from thicker metal and with larger coupling bolts.
A homemade mixer for mixing solution in small quantities is fundamentally different from professional ones in the method of holding it during the working process. A simple modification of a hammer drill or a powerful drill will save your budget and add convenience to the construction process.
How to separate the yolk from the white without a separator
You can separate the yolk from the white by hand, but there is a risk of accidentally damaging its shell with the shell. To prevent this from happening, use some tricks; a plastic bottle or glass will help you with this.
Using a bottle: Break the required number of eggs into a deep bowl. Take a plastic bottle, squeeze it with your hand, bring it to the yolk and release its edges. The bottle will begin to fill with air, drawing the yolk inside.
Using a glass: Make a crescent-shaped cut on the bottom of a plastic glass, no more than 1 cm wide. Break the egg into the glass and hold it over the plate, the white will end up in the plate, and the yolk will remain in the glass.
Mixer manufacturing process
First, I straightened the wire with a hammer, and at the same time slightly strengthened it.
And then he began to make a stirrer, bending the wire from side to side with pliers.
This process took about 15 minutes, and along the way I had to make corrections several times, leveling the wire with pliers and a hammer, and, in the end, this is what I got.
Ideally, neither side should outweigh.
I rounded all the ends of the wire with a file.
And the lower part was slightly bent upward so that it would not touch the bottom of the paint cans.
To do this, I needed a piece of the top of a liter plastic bottle with a cap, as well as an electric drill with a drill with a diameter of 2.7 mm, and scissors.
In the center of the lid, I drilled a hole with a diameter of 2.7 mm.
And inserted the stirrer shank there. The lid should move quite tightly along the shank.
After this, all that remains is to cut out a casing of a suitable size from the top of the plastic bottle.
And screw it into the lid.
And now my mixer is ready!
Now you can clamp it into the drill.
After this, be sure to slide the casing onto the drill chuck.
And now you can mix the paint.
By the way, the length of this stirrer is ideal for both liter and 2-2.5 liter jars.
After work, you need to clean the paint from the mixer using a rag soaked in gasoline or solvent.
You can store this stirrer hanging, for example, by hanging it on a nail like this.
I must say that this mixer showed itself to work quite well, since it mixes the paint quite quickly and at the same time efficiently. However, such a mixer still has limitations. Since it is not so strong and rigid, it is suitable for mixing mostly liquid paints or varnishes. Also, when working with this stirrer, you should not use too high a rotation speed of the drill chuck, otherwise the stirrer may bend. But in principle, since I deal mainly with fairly liquid paints and varnishes, this stirrer is ideal for me.
Well, that's all for me! Bye everyone, good luck, and comfortable and productive work on homemade products!
How to replace a whisk
If you have a blender or mixer at home, then a hand whisk can be completely replaced with these devices. But if you don’t have all of the above, then two ordinary food forks will help you.
Two forks overlapped will do the job just as well as a whisk. For convenience, wrap the handles with a paper towel or a small thin cloth, laying several layers between the forks.
How to remove seeds from cherries without a machine
Removing pits from cherries is easier than you thought! And for this it is not necessary to have a special machine on the farm; a funnel or an ordinary wooden stick is enough.
Using a funnel: Take a funnel with a narrow neck and place it on a plate, wide side down. Press the berry against the hole of the funnel and press lightly - the seed will easily slide into the hole. With a little experience and dexterity, you can quickly and cost-effectively process your entire cherry harvest.
Using a wooden stick: if there is no funnel of the required size in the house, then a wooden stick will come to the rescue. Take the berry in your hand so that its center is between your fingers and press it into the center with a wooden stick, the seed will simply fall out on the other side into a pre-prepared container. This method is a little harder than with a funnel and messier, but with your favorite TV series you won’t even notice how all the cherries are finished.
Types of structures and their characteristics
The drill mixer is used for carrying out repair work in large volumes; When mixing the solution, the user usually holds it in his hands, so the device has ergonomic handles that make operating the tool less labor-intensive. If the device’s engine has a power of more than 1 kW, then a special gearbox is built into it: it is suitable for use not only at the very first speed, but also when transitioning from first to second.
The first is used to prepare thick, dense mixtures, for example, mastic, and the second is used for gypsum and cement. At the second speed, it is also possible to stir paints and other liquid substances with minimal torque.
To make work more comfortable, it is better to use tools that are equipped with a speed stabilizer or inrush current limiters.
These are very important options: thanks to them, when removing the device from the resulting mixture, the torque remains in its original position and no splashing of the finished mixture occurs, as happens with many other mixers.
Such drills, as a rule, have different configurations. Usually they come with several types of attachments, which can have several shapes.
- Right-hand spiral mixing nozzle - used for solutions that have a very viscous structure. These include cement, concrete, various types of plasters and glue. Such a nozzle mixes the solution, as if pushing it from the bottom up, mixes the composition at the top, and then lowers it back.
- The left-hand spiral nozzle is optimal for mixing paints and varnishes. Here the operating principle is reversed: the mixture is pushed from top to bottom, where it is stirred and rises back.
- Screw attachments allow you to mix light mixtures.
- The cross is a more specialized attachment; it is used in cases where it is very important to prevent air from getting inside the container with the mixture.
How to chop garlic without a press
A garlic press is a very useful thing, but washing it is real hard labor. And the price of a good press exceeds a thousand rubles. An ordinary kitchen knife will help replace the gadget.
Crush the unpeeled garlic clove with the flat side of a knife, pressing down with your hand, then remove the skin. Flat garlic will be very convenient to cut and you will chop it with a knife no worse than in a press. By the way, famous chefs use exactly this method of chopping garlic.
Methods for attaching attachments
There are four ways to attach attachments to your mixer, and they all have their own advantages and disadvantages.
- M14 . The most common type of fastening. On the vast majority of attachments you will see just such a mount. In fact, this is an ordinary clamping nut that completely copes with its task. I think that soon all manufacturers will produce attachments with just such a mount.
- Sds plus . Fastening for a quick-release chuck with a diameter of ten millimeters. It can usually be found on hammer drills. It should be noted that it accepts torque well, the nozzle is quickly inserted into the mixer. But many blame it for its unreliability and the difficulty of repairing it if it breaks down.
- Hex . Regular hex shank. Such cartridges are often found on drill mixers. With small amounts of work, he will cope with the assigned tasks.
- Morse cone . The fastening is in the form of a cone, the socket in the cartridge also resembles a cone. The most reliable fastening among all and at the same time it can only be found on expensive models of mixers. For example, the DeWALT DW 152 model costs about 22 thousand rubles; you are unlikely to consider this tool for purchase.
How to replace scissors for cutting greens
A fashionable kitchen gadget, which is an ordinary scissors with several parallel blades, easily and quickly chops greens. But is it really necessary on the farm?
Why waste money on something that is already available in every home. And these are ordinary scissors. Yes, they only have two blades, but they work just as well. Cutting greens with regular scissors will take a little longer than it would with a newfangled thing, but you're not going to cut a whole bag of grass.
How to easily cut an apple
An apple slicer will undoubtedly cut an apple into even pieces, while clearing it of seeds, with minimal time. But do we really need this gadget?
It also takes only a few moments to cut an apple with a knife and remove the core. And in order to use an apple slicer, you also need to make an effort, because an unpeeled apple is not so soft.
Advantages and disadvantages
The main advantage of the drill mixer is the possibility of its multifunctional use. On the one hand, the tool is classified as a drill, therefore, in addition to mixing mortars, it can be used to form holes in various types of surfaces, even the hardest and densest. On the other hand, a drill of this type belongs to the low-speed category, so it cannot replace a drill 100%, but at the same time, it is the low speeds that make it possible to mix even the densest mixtures.
Obviously, such a design cannot be used in industrial quantities; its power and design features are not enough to cope with intensive operation. But it can handle small household tasks such as minor repairs and finishing of an apartment or private house in full.
Such a drill weighs much more than a regular one: its mass is more than 3 kg, so frequent drilling with such a unit involves significant physical effort.
How to replace an avocado knife
Advertising for the gadget promises to cut avocados safely and effectively. If one cannot but agree with the first, then doubts arise about the effectiveness.
An ordinary kitchen knife will help you cut an avocado in the same way. Yes, and removing the pit from a ripe avocado is not difficult even with your hands. Oh, it’s better not to eat unripe avocados. But, if it happens that you bought an unripe avocado and were planning to eat it, then an ordinary teaspoon will help you remove the pit.
How to Easily Core a Pepper
At first glance, this gadget may seem useful, but it’s hardly worth taking it out if you need to peel 1-2 peppers for a salad. And even if you can a lot of peppers during the season, a knife will do the job just as well as a core remover. Moreover, if you peel peppers with a knife so often, you have already acquired sufficient dexterity, so such a gadget is unlikely to be useful to you.
Why do you need a cutlet press?
In those countries where barbecue is very popular, such a gadget is possible and useful. But it’s unlikely that housewives in their native lands need something like this. It will be cheaper and more effective to form a cutlet by hand. It’s easier to wash your hands later than this device, and it also takes up useful space in the kitchen.
On TV and on the Internet, advertisements are full of various gadgets that supposedly should make life easier for the housewife in the kitchen. In fact, everything does not always turn out to be as beautiful and simple as in advertising. More often than not, newfangled gadgets are just useless trinket that is doomed to gather dust on the shelf. Before buying newfangled inventions, take the time to read reviews from real people, and you will find out what the advertisement does not say.
Source
DIY whisk attachment for a construction mixer
It is not possible to prepare modern mortars efficiently without a mixer with various attachments. It happens that due to the lack of a certain attachment, a lot of time is lost. It is possible to solve this issue on your own by making a whisk from improvised means, with a minimum set of tools and minimal costs.
To make your own nozzle for heavy mixtures, you will need a welding machine. Let's consider both options.
Advantages of do-it-yourself puttying
By entrusting the work to professional builders, you will save yourself a lot of hassle. But demands on the quality of work and the financial aspect often force one to choose in favor of self-repair. You can putty yourself without resorting to the help of professionals, because:
The first thing you have to worry about before going to the store is choosing the type of putty mixture. Based on the composition of putty mixtures, they are divided into:
You choose the type of putty depending on the type of surface it will cover. They must be compatible and interact with each other as efficiently as possible to create reliable adhesion of the upper layers. You can putty on a base made of plasterboard, concrete, brick, wood, etc. If you plan to putty the walls yourself, how to dilute the dry mixture becomes a particularly pressing issue.
Nozzle in 5 minutes
To mix a small amount of solution, a whisk can be made by having the following on hand:
- Drill.
- Self-tapping screws
- Metal tube (hexagon, hairpin).
- Soft wire.
The thickness of the tube or hexagon must correspond to the dimensions of the cartridge. Length 50 - 60 cm. In the lower part, holes for self-tapping screws are drilled with a drill. The holes are drilled using a ladder, in a circle. Screws are screwed in, 5–6 cm long.
Important! The screws need to be screwed in the same number of turns.
A wire is screwed to the head of the lower self-tapping screw. Next, in a circle, it is screwed to all the screws, near the caps.
The most suitable wire thickness is 3 – 4 mm. It should bend easily. You can use ordinary aluminum. This attachment will not work for a long time, but it will help you out for a few days.
Homemade mixer
Making your own electric mixer is quite simple. To do this, you can use an ordinary household electric drill or hammer drill as a drive. For drills, devices with a shank in the form of a regular hexagon or HEX are suitable. Both are conveniently fixed in the drill chuck. The main thing is that the size of the hexagon (standard: 8, 10 and 12 mm) corresponds to the maximum size that can be inserted into the drill chuck.
Attention! To mix solutions, you can only use low-speed drills or devices with variable speed control.
If you use a hammer drill as a drive (naturally, in non-impact mode), then you need to buy attachments with a shank designed for mounting in an SDS-plus chuck.
However, it should be taken into account that the motors and gearboxes of both electric drills and rotary hammers (even powerful ones) are designed only for longitudinal load. Therefore, a homemade mixer based on them is quite suitable for mixing light solutions and in small volumes. When stirring solutions, the drive experiences significant radial and horizontal loads, which can lead to overheating and failure of the electric motor. Therefore, it is better not to make a concrete mixer with your own hands from a drill or hammer drill. Although their use is quite acceptable when mixing paints, thin putties and other light solutions.