If the need arises for milling work, it is not at all necessary to purchase expensive equipment for these purposes or seek help from a locksmith workshop. In this case, to solve simple problems, you can simultaneously use an ordinary milling attachment for a drill. It can be purchased at a specialized hardware store or made independently at home.
Modern innovations in individual production
In the home workshop, modern craftsmen, commissioned for large enterprises, process parts according to the attached drawings.
Such part-time work is also beneficial for enterprises: there is no need to use additional technological equipment in the workshop to perform routine operations. The home craftsman carries out work under a contract with the customer; he solves problems of delivery of blanks and parts independently. As a result, the overhead costs of the main production are reduced. The workplace is created by the contractor himself.
To organize the production of income, it is enough to create an individual enterprise (IE) in order to have official status (financial calculations are simplified). Currently, there are enough such organizations; they carry out significant volumes of orders.
Types of router
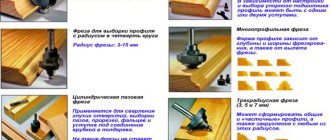
To choose which hand router is suitable for a given purpose or intended for universal use, you should familiarize yourself with the manufacturing options of this tool and what each of them is used for.
Types of attachments Source perego-shop.ru
Rod
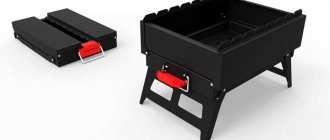
The submersible model has a body that is mounted on a special rod, along which it can move vertically. A support mechanism is attached to the bottom of the guide. The entire unit is placed on it and, using the side handles that need to be pressed, it is immersed in the material.
After finishing the work, release the handles and the router will rise up under the pressure of the springs. It can be used to make grooves, cutouts, holes or joints, as well as curly patterns. Due to its high functionality, this model is considered universal, but the increased weight does not allow it to work well in vertical areas. Working with a router for beginners with this tool will be simpler and more understandable.
Tool with immersion mechanism Source i.allo.ua
Edging
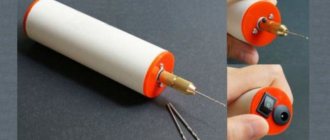
An edge tool (trimmer) is capable of working not only on horizontal surfaces, but also on vertical ones. Most often it is small in size, so it can be used with one hand. The body itself has a narrowing and a special rubberized coating. This is necessary to use it as a handle.
The bottom of the device has a sliding surface to prevent scratches and also for smoother movement. The immersion depth of the cutter is changed using a special scale. With this tool you can use additional attachments: a rip fence - for processing the edges of a part or corners, as well as a copying sleeve, which allows you to make cuts according to a template.
Using this tool, you can process laminated or veneered parts, select grooves, round corners, fit blanks, and make shallow cutouts for decoration. The trimmer is recommended for use in workshops that require daily edging work.
Edging router Source www.rucne-naradie.sk
Lamellar
The body of such a tool has a horizontal body and is similar in design to a grinder. At the bottom it has a mechanism for operation, and a wide handle is attached above it. This model is equipped with a disk cutter for cutting into wood. To work, you need to press the tool on the material to immerse the cutter inside. Thus, you can make a special groove for attaching oval parts (lamellas).
It is recommended to work with a manual router of this type for making grooves or trimming parts. This machine is not suitable for rare use, since its purchase will not pay for itself. Therefore, you should choose such a model for frequent use in workshops for which it is needed every day.
Lamellar router Source laukar.com
Additive
This type of milling tool is similar in shape and design to a lamellar one, but there is a significant difference in its mechanism. To operate, this model uses 2 spiral cutters that work on the principle of a drill. With their help, an accurate connection of parts is made, since they cut into the material at a certain distance from each other. When immersed, the tips cut grooves into which dowels can be installed.
This type of tool is used in furniture production to connect parts whose fastening areas need to be made invisible. The cutter for this tool can be dowel or dowel. With their help, you can make holes for detachable and non-demountable connections.
Filler milling machine Source harrer.at
Rotary
This type of tool is similar in operating principle to a rod tool, but has a smaller size and a narrowed body, like an edging tool. It can be used for woodworking or ceramic tile work. It is also capable of processing plasterboard floors, chipboard, plastic and soft types of metal. Its speed reaches 30 thousand per minute, which makes it possible to work with hard materials.
The small size of the device makes it possible to work with a manual wood router using one hand, since its weight is small. When replacing a cutter, you can install a diamond rod or a cutter for working with ceramics. Using this type of tool, if it is equipped with speed control, work is performed on materials of varying densities, for example, cutting holes or processing edges.
Rotary router Source allegroimg.com
CNC router
A machine with computer numerical control (CNC) is used mainly for engraving and figured wood carving. It is controlled using a computer, thanks to which very complex patterns can be cut out on workpieces with high precision. In China you can buy ready-made mini CNC machines for making souvenirs at a price of about 10,000 rubles.
Of course, you can purchase all the parts for the machine and assemble the CNC router yourself. But if you look at the cost of all the components, it will be much cheaper to purchase a finished product with already configured software.
Option 1. Instructions for making a table for a manual router
Materials for making a milling table
To build a milling table you will need:
- 4 square bars;
- chipboard and plywood scraps, the dimensions of which are determined when constructing the table drawing;
- hardware (nuts, bolts, screws, hinges, etc.);
- jack;
- metallic profile;
- six-millimeter steel plate;
- aluminum guides;
- movable carriage-support (guide from the saw);
- manual frezer.
Drawing of a homemade milling table (option 1)
In any case, before you start making any such table, the drawing must be completed indicating all dimensions and determining the location of the working elements relative to each other.
Step by step assembly
Let us consider in detail each step in the manufacture and fastening of each element of a homemade milling table.
1st step. To make a stationary base for the table, you will need bars and chipboard cuttings, from which we twist the legs and further strengthen the rigidity with the help of horizontal connecting panels made of plywood. In the right side part we cut a hole for the start button, which will be connected to the hand router.
2nd step. The table top is made of chipboard. We make it liftable together with a router, for which we install hinges and make an additional support base from 15 mm plywood.
3rd step. To move the workpiece smoothly along the table, for example, to cut a groove in it, a moving carriage-stop is used. We cut a groove in the tabletop for the guides of the movable stop and install a metal profile into it. You can use a guide from an old saw as a stop carriage.
4th step. We also make the longitudinal stop from chipboard and make it movable to adjust the gaps around the cutter. To ensure mobility, we cut perpendicular grooves in the upper part of the stop and fasten the stop to the tabletop with clamps. We cut a small groove in the middle to suck out chips and other milling waste.
5th step. From thin plywood we make a box with a hole for connecting a vacuum cleaner hose, which will remove dust and shavings formed during the milling process. We fasten the box behind the perpendicular stop.
6th step. We take a six-millimeter steel plate and screw it to the tabletop flush with the surface. During the fastening process, we make sure that its edges do not protrude above the tabletop, otherwise the parts being processed will cling to them. A manual router will be attached to the plate from below.
7th step. We attach the router by the aluminum base to the bottom of the plate using bolts, but do not forget to pre-drill holes for the bolts in the base. Attaching the hand tool to a removable plate rather than directly to the table saves routing depth and allows for easy cutter changes.
8th step. We are building a router lift. To do this, we use a car jack, which allows us to change the height of the cutter with maximum accuracy.
9th step. We remove the handles from the router and instead screw in aluminum guides, which we connect to the jack mechanism.
Design and video of a homemade milling table for a manual router
Before you start making a milling table, you need to accurately determine its design features. This article provides instructions on how to make a simple router table. For other details of the first assembly option, see the video below.
We check the reliability of fastening of all elements - and the milling table is ready with your own hands!
We offer several more models of wood milling machines made by yourself for your taste.
We make homemade equipment
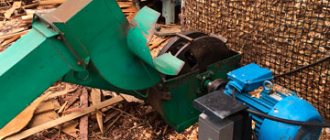
Despite the apparent complexity, making a homemade milling machine is not difficult. You just need to have on hand the appropriate diagram for the implementation of such a unit, and as a basis you can use an old unnecessary drill or an electric motor, which is connected to the working head and the router using a belt drive. When choosing an electric motor or a drill to use, preference should be given to models with a power of more than 2 kW. This drive provides high power and rotation speed of the cutter, which guarantees the quality of wood processing.
You will need to weld a strong supporting frame from metal or make it from wood, ensuring complete immobility and strength of the structure. A tabletop is fixed on top, which is used as a milling table. The tabletop must be made of strong, durable materials that are resistant to vibration and static loads. The main requirements for the frame are stability and rigidity of the structure. With a certain amount of skill and experience working with lumber, you can make an original version of a wood frame with numerous drawers for storing all kinds of tools and materials.
As a cutting tool, you can use a hand router, which should be secured strictly perpendicular to the mounted tabletop. You can also make special fixtures and adapters that minimize the effort when tilting and moving the depth of the router. To manufacture such additional devices you will need a durable metal profile, and all work is carried out according to existing drawings.
The router is attached to a bearing head, which can be made from an old drill. Such a drill will need to be secured to the frame bracket using a strong bolt connection. The working tool is fixed strictly parallel to the table, so when performing this work you will definitely need to use a level, regularly checking the correctness of the design.
If the design of the milling machine involves the use of an electric motor, the motor is usually mounted under the lower plane of the machine, bringing the drive to the working head through pulleys and belt drives. In this case, it will be necessary to provide the ability to adjust the rotation speed of the working head, for which they use a motor with several operating modes or install an additional PWM controller, which allows you to change the voltage power on the motor, thereby changing the spindle rotation speed for a wood milling machine.
At the final stage, a parallel stop is installed. The presence of such a parallel stop allows the parts to be correctly positioned and subsequently move at a given angle to the cutting edge of the router. The parallel stop device may be subject to increased load during operation and wood processing; accordingly, the stop must be made of durable materials, which will ensure the reliability of such equipment.
When milling and processing wood, a large amount of chips is released, for the removal of which a metalworker or drilling machine is additionally equipped with a vacuum cleaner, which allows you to quickly remove emerging chips from the working area, simplifying work on the equipment. It is necessary to plan the location of the vacuum cleaner nozzle so that it is located directly above the working area, but does not interfere with the movement of the cutter and the workpiece itself. The presence of a vacuum cleaner somewhat complicates the design of the machine, but significantly simplifies the work on homemade equipment.
For grinding and polishing
One of the most popular attachments are devices for grinding and polishing the surfaces of metal and wooden products. They differ markedly from each other in execution and purpose.
Plate
They are almost a complete analogue of the sanding pads that are used in electric sanders. The only difference is that instead of a connecting thread they have a pin that is clamped into the cartridge. Actually, if necessary, you can use the working part of a grinding machine for a drill, having first screwed a regular bolt into it.
The material from which this nozzle is made can be any. There are metal models, plastic ones, and rubber ones are often found. The latter accurately follow the contours of the workpiece, creating a perfectly flat surface. The cutting part of this attachment is sandpaper. It is sold in the form of ready-made discs that have a special coating that prevents slipping.
Cup
Cup-type attachments are used for roughing the workpiece. With their help, old paintwork is removed from wood, scale is removed from metal, and rust is removed. Structurally, it is a bowl-shaped body, inside of which hard bristles made of springy wire are laid. At the bottom of the cup there is a pin for fixing in the drill chuck.
Disc and fan
Disc nozzles have a structure similar to cup nozzles. The only difference is that the brush is not limited by the size of the body, but, on the contrary, comes out of it, forming a kind of prickly “sun”. The nozzle is convenient for processing large surfaces, but requires caution during operation - one ill-considered movement is enough to damage the product and possibly cause injury.
Fan nozzles have a similar design. Their working part is petals made of sandpaper on a fabric base. This attachment is convenient for working with aluminum parts and cleaning cast workpieces from slag.
Drum or cylindrical
Nozzles in the shape of a cylinder, on the outside of which an abrasive material (sandpaper) is fixed, are intended for processing the internal surfaces of cylindrical holes. Most often they are made of metal or rubber. By selecting the grain size of the skin with this device, you can process a wide variety of materials, from wood to metal and glass.
Polishing attachments
The final stage of product processing is its polishing. Polish parts that have been milled and varnished. This procedure is performed using special pastes that are applied to a soft moving surface. Felt, leather, foam rubber or fabric can be used as such. Structurally, this attachment is a disk made of soft material, in the center of which there is a pin for fastening in the cartridge.
Manufacturing of bed and table top
The bed of a homemade milling installation must be highly stable and reliable, since it will bear the main loads. Structurally, it consists of a frame with supports on which the tabletop is fixed. As a material for the manufacture of the frame of the bed, you can use metal profiles connected by welding, chipboard, MDF, wood. It is advisable to first prepare drawings of such a device. They must indicate all structural elements and their dimensions, depending on the dimensions of the parts that are planned to be processed on such milling equipment.
Processing options with different types of cutters
The lower part of the bed from the front side must be deepened by 100–200 mm so that nothing interferes with the feet of the milling machine operator. If you are going to process linings for doors and the ends of facades for them on your homemade machine, then the dimensions of the frame can be as follows: 900x500x1500 (height, depth, width).
One of the significant characteristics of the bed for a homemade milling machine is its height, on which the ease of working on such equipment depends. According to ergonomic requirements, the most suitable height for equipment used while standing is 850–900 mm. It is advisable to make the lower parts of the frame supports adjustable. This will make it possible not only to compensate for uneven floors, but also, if necessary, to change the height of the milling table. To make a turntable with your own hands, just fix special wheels on its legs.
The assembly of approximately such a table is discussed in option No. 2
You can make a low-price, highly reliable milling table from the top of an old kitchen table. Such countertops are usually made of chipboard sheets 26 or 36 mm thick, coated with wear-resistant plastic. Their surface ensures good sliding of the workpiece, and the chipboard base perfectly dampens vibrations that occur during operation of the equipment. If you make a desktop for a machine with your own hands, then MDF and chipboard (LDSP) boards with a thickness of 16 mm or more are suitable for these purposes.
What components and materials are needed for the work?
To create power components, steel angles and pipes with a minimum wall density of 2 mm are used. Their connection options are welding or screws. All metal components are coated with primer and paint to protect them from corrosion.
Durable grades of chipboard and plywood are suitable for the countertop and some other elements. They are resistant to moisture, temperature changes and other dangerous factors.
Electric motor
It is needed when you plan to create a small CNC router. Its most important parameter is power. It is better to use a 1100 W device. It will allow you to use a variety of cutters.
You can also use a motor from hand-held power tools: drill, hammer drill or grinder.
engine's type
For optimal operation, you can base the machine on an asynchronous unit with three phases. Then the router will connect to the network and follow a special circuit. It uses an algorithm. Due to this, the engine starts smoothly and allows the machine to operate at maximum power.
If such a motor is connected to a single-phase network, it will lose 50% of its efficiency. If the network does not allow this type of connection, then use a 1-2 phase motor.
Design options: making a milling machine from improvised means
The equipment can be constructed from a drill, an angle grinder, or a washing machine. These are the most popular household options. The devices are produced with less power and are of a manual type, but are suitable for minor work.
How to make a functional wood router from a regular drill
Here a stand is built and the equipment is changed. These are the main criteria for creating such a router option.
The cutter shank is fixed in the chuck. You can make a vertical and horizontal router (example 1 and 2). The stand is made from laminated chipboard.
Example 1:
Example 2:
Advantages and disadvantages of a drill router
The advantages of such a device:
- Easy to use.
- Little dust from work.
Minuses:
- Poor quality of the result due to low speed (3000 rpm).
- Very narrow range of functions.
How to make a router from a grinder
There are two ways:
- A collet is screwed onto the tool spindle. Work can be done with all accessories that have cylindrical shanks.
- A standard jaw-type chuck (from a drill) is attached to the spindle.
Milling cutter from a washing machine engine
A table is created using the described method. The motor shaft is placed on a collet. For this, a special adapter is ordered.
A lifting system is created to control the output of the tool: a motor and a threaded rod are mounted on two pipes.
One end of it goes into the nut fixed to the bottom of the table, and the other ends into the lower side of the engine. The rotating device – the wheel – is firmly fixed on it. The height is adjustable due to this.
Tool selection
The high efficiency of instruments of this type is determined by a number of specific parameters. Among the performance indicators, the most important are:
- the nature of the operation being performed;
- characteristics of the processed material;
- geometric dimensions of the part;
- head shape;
- type of cutting notches;
- properties of power tools.
When choosing a device, it is also recommended to take into account the power and number of revolutions of the equipment being equipped. The technical characteristics of the product must correspond to the metric indicators of the tool.
Metal emery with a fine, universal, ultra-fine notch and for working with soft metals can have a head of a specific shape. The effectiveness of the device depends on the shape and location of the cutting part; the tool may have:
- rare teeth for processing an alloy of aluminum and copper;
- standard size teeth for edge processing and deburring;
- multi-directional teeth for working with hard metals.
For processing products made of non-ferrous metals, experts recommend using corundum emery with reinforced sharpening. A diamond or abrasive cutter, as well as a tool with the main part of the double sharpening, will help to remove burrs. When grinding the surfaces of products, a conical burr with ultra-fine cutting is used.
Structure and purpose
In simple words, the structure of a milling machine can be described as follows: the electric motor of the unit imparts rotation to the shaft on which the cutter (specialized attachment) is located.
When installing a manual device, the cutter is placed in a special chuck, either a cam or a collet.
The key task of the device is the processing of plastic, iron, wood, glass, ceramics or organic glass.
An example is the preparation of technological holes for a door lock in a wooden panel.
In addition, this can be processing the edges of parts or cutting threads, milling cavities and grooves.
Rotation is provided by an electric motor operating from an alternating current network. A wide variety of attachments can be used depending on the material that needs to be processed.
The simplest material for milling processing is wood, therefore, in general, milling cutters for its processing will be especially common and inexpensive. For metals of different levels of strength and toughness, attachments must be used that differ in their properties depending on the characteristics of the material being milled.
Of course, cutters for metals or wood are not suitable for processing ceramics or glass; for such materials it is necessary to select a cutting tool with other parameters.
Vertical router from a drill
Diagram of the simplest vertical stand for a drill
Meanwhile, the simplest milling cutter, made from scrap materials at minimal financial cost, is capable of successfully coping with many technological tasks. To make your own router from an electric drill, you should find the following materials and tools:
- several pieces of chipboard or thick plywood;
- a clamp with which the drill will be fixed to the base of the device;
- bolts, screws and other fasteners;
- feather drill or drill bit with a diameter of 40 mm;
- standard set of locksmith tools.
Scraps of slats, pieces of plywood, metal corners - all this can be used to make a simple milling stand
The process of assembling a homemade router takes place according to the following algorithm.
- The base of the future router is assembled from sheets of chipboard or plywood, which includes a horizontal base and a vertical part on which the electric drill will be fixed. The dimensions of the sheets of chipboard or plywood from which such a structure will be made are calculated depending on the dimensions of the electric drill used as the basis of the homemade machine.
- A hole with a diameter of 40 mm is drilled in the horizontal base of the device, which is necessary to provide access for the tool to the processing area.
- A clamp is attached to the vertical stand of the device using a bolt, in which the electric drill is fixed. The drill should be positioned in such a way that the lower end of its chuck is a few millimeters from the horizontal base of the router.
- To make the position of the drill on a vertical stand more stable, you can fix a small wooden block in its upper part, which will act as a stop.
Drill mounting options (click on photo to enlarge)
Stand with height adjustment via lever
How to make a milling machine of the design described above more convenient and functional? To do this, it can be equipped with a simple microlift, which will be responsible for moving the electric drill in the vertical direction. To make such an elevator you will need the following consumables and components:
- two metal rods that will act as guide elements;
- a platform (carriage) for fixing an electric drill, made of chipboard or thick plywood;
- a threaded axis and a nut, which will be responsible for moving the electric drill in the vertical direction;
- elements that ensure the fixation of the electric drill in the required position.
Stand with height adjustment via threaded rod
The principle by which such a homemade router works is quite simple and is as follows.
- When the threaded axis rotates, the carriage with the drill attached to it moves in the vertical direction.
- After the electric drill and the tool secured in its chuck are set in the required position, the carriage is fixed using fasteners.
This is interesting: Do-it-yourself milling cutter from an angle grinder - manufacturing procedure and video
How to use a milling attachment
The purpose of a power tool such as a drill is to make holes of large and small diameters on the work surface being processed. It should be noted that such a tool is not intended for cutting or milling parts or products made of sheet metal.
However, thanks to the rapid development of modern technologies, you can often find a variety of milling attachments for electric drills in construction stores. Therefore, when using a drill as an analogue of a hand router, you need to adhere to several rules and remember that:
- it does not tolerate constant heavy loads, so it is not recommended to be used for long-term work;
- It is not recommended to use power tools that are equipped with a plastic gear;
- To prevent the milling attachment from flying out during operation, you need to remember that the electric drill chuck does not tolerate lateral loads well;
- The lower the power of the tool’s electric motor, the worse the quality of the cut will be.
When using a drill as an analogue of a hand router, you need to constantly monitor the operation of all its moving elements. If the instrument begins to get very hot, turn it off and allow time to cool completely.
Step-by-step instruction
Before the master begins the direct assembly of a homemade router, he will have to spend time making the components and parts of the frame. To do this, the wizard:
- cuts a steel sheet and cuts out a rectangular blank from one part - the sole is made from it. A central axis is outlined on it between the two lateral (short) sides. Then a semicircular hole with a diameter of 1-3 of the length of the side is drawn with the center of the circle located on the axial perpendicular, at a distance of 1.5 cm from the end of the side. Along a line parallel to the side side, from the points of the semicircle diametrically distant from the center, two segments of 1-1.5 cm are drawn to the sides. Then from them another segment is drawn at an angle of approximately 60o to the side. The result should be a figure resembling a dome resting on a flat trapezoid.
- The workpiece is clamped in a vice and, using a grinder, cut along the drawn lines. The sharp edges are then sanded down for safety. The sole is ready.
- Now a hanging “braid” for the grinder is being designed. Using a drill and a special ring attachment, a circle is drilled out of a metal blank based on the shape and size of the grinder - it will lie on this braid, fixed from below with a chuck with a cutter.
- Then, before cutting out the part, it is recommended to prepare a stencil from cardboard. In shape it resembles a “circle with triangular ears”, which are then ground off at the circle and along the edges. After this, the stencil is applied to the metal of the workpiece, so that the hole for the grinder cartridge is located in the center of the circle. After this, the metal is cut according to a stencil.
- From one profile (a section with a smaller height), supports of the same height are cut out, which are welded parallel to each other at an equal distance from the central axis of the sole.
- From the second profile (whose cross-sectional height is greater) “sled cubes” of equal size are cut out, which freely “slide” along “rails” welded to the sole.
- The “ears” of the workpiece are filed down and welded to the sliding cubes so that it can slide down and up along the guides on them.
- In the upper part of the workpiece circle, another 2-3 mm slot hole is sawed, after which it is welded onto it: on one side of the resulting arc there is a nut, and on the other, a screw. This is done in such a way that when screwed in, the circle decreases in diameter, and the grinder with the cartridge is tightly fixed horizontally in it.
- To fix the grinder on the “carriage” obtained from the blank, additional oval “ears” are cut out of metal, in the upper part of which holes are drilled, the same size as the side bolts on the grinder. The lower part is bent at an angle of 90 degrees in a vice. After this, the ears are welded to the carriage. For ease of use, instead of a bolt, you can screw a double-sided holder into one of the “ears”, onto which the handle from the grinder will be screwed.
- A hole is also drilled in each of the cube-sleds and a nut is welded onto it, which, in combination with the fasteners, will lock the carriage at the desired height.
- Making collets using a milling cutter. Take an old drill cartridge and, using a tap, cut a thread for the angle grinder axis in the hole along the shaft. The thread of the tap is selected according to the pattern of the nut that secures the grinding disc to the shaft.
- The parts of the resulting structure are polished and blown. It is recommended to paint the frame for aesthetics and to protect components from dust.
After the assembly is completed, the angle grinder is placed on the carriage and secured with a disk clamp. Then the chuck is installed, the cutter is mounted in it, and the installation is fixed in height with clamps on the “sled”.
Thus, having used this model and made a milling bed in a home workshop, the master has at his disposal a specialized attachment for an angle grinder, which will perform all the necessary work on wood and is in no way inferior to industrial, often expensive models.
What types of attachments are there?
Milling attachments come in several types.
- Mounted. Designed to work on a special stationary machine, they have a large diameter landing connector.
- End Such cutters are designed not only for working on bulky machines, but also for conventional electric drills.
In turn, end nozzles, and these are the ones you will need, are divided into several more types.
Moulded. Designed for processing wood products, giving them a more rounded shape.
Disk. Using such cutters, you can make neatly shaped grooves in objects, as well as grooves (can be used to create holes for hinges and locks).
Folded. They are a more advanced version of disk bits, used to create wider grooves in wood.
Fillet. Designed for cutting semicircular grooves in wood at the ends of various workpieces.
Spiked. Such attachments are produced in a somewhat non-standard form; they allow you to create simple and invisible connections for several fragments of the product at once.
Shaped. Such cutters make it possible to create complex-shaped indentations on the surface of wood, as well as to frame an object, for example, to make a pattern on a picture frame.
Conical. Designed for chamfering wood. Often this type of cutter for drills has a special limiter for selecting the depth of processing of the product.
Cylindrical. One of the most “classic” types of attachments, allowing you to process flat-shaped wood.
Each of the above types of cutters can help in performing one or another woodworking job with varying levels of complexity. For this reason, they are very often sold in sets of several pieces (to make it easier to assemble a complete set). It is worth noting that, in addition to divisions based on the principle of “purpose,” nozzles are also classified by size.
35 mm and less - for “jewelry” wood processing. These cutters help create neat grooves, grooves or patterns in small-sized products.
from 35 to 70 mm - used for easy correction of the shape of the product. They are easy to grind corners and edges, creating a more beautiful shape of the workpiece.
from 70 to 100 mm - intended for cutting wood, creating large grooves in it (for example, to create places for attaching several parts), serious processing and turning.
from 110 mm - they perform the same role as the previous type, only with the difference that they are designed for an even larger volume of work, and are also often equipped with special cooling grooves.
Features when working with a drill
When working with equipment for grinding metal surfaces, there may be two options for positioning the tool relative to the workpiece:
- Holding a drill in your hands. The most popular and convenient processing method. The master works only with the tool, and the workpiece remains motionless. However, when manually operating a drill, you need to take into account the angle of the equipment relative to the part. If it is chosen incorrectly, indentations, irregularities, and bumps will remain on the surface.
- Fixed instrument. This type of processing is similar to working with a machine. The quality and accuracy of grinding increases. However, it is inconvenient to move the workpiece, and it is difficult to get to hard-to-reach places.
Before you start working with the equipment, you need to check the integrity of the abrasive coating and how well it is clamped in the chuck. We must not forget about the duration of the grinding process. Some surfaces can take tens of hours to process
It is important to give the tool a rest every 10 minutes of active work. This reduces the risk of defects and failure of the moving elements of the drill.
To create a texture on the surface of the workpiece, it is necessary to treat it with a nozzle with metal bristles and coat the top with varnish.
Attachments for grinding metal surfaces are used when working with different materials. The type of equipment is selected depending on the type of surface being processed, the shape of the workpiece, and the required degree of grinding. Considering the power of the drill and the speed of rotation, you can avoid equipment breakdown and material damage.
What is a manual milling machine
Small wooden parts are processed at home using a manual milling machine. Let's look at what types of cutter sets there are and what they are used for.
Main Application:
- For installing doors
- For mounting window frames (frame cutters)
- When turning small bars and planks
- When creating holes for installing door and window locks
The router is used only for spot work on small wooden areas.
The power of the tool is:
Easy
The lightweight model has a power of up to 750 W. Suitable for small jobs at home.
Average
With a power of 750–900 W, the model is in demand. This is an indispensable assistant during the installation of furniture frames and the creation of shaped parts from wooden blocks.
Heavy
The heavy model is used to make professional products. It has a power of 900–1200 W.
How to choose a milling cutter for metal
Choosing a cutter for a drill is quite simple. To do this, during its selection, you need to pay attention to the following characteristics:
- The material that was used during the manufacture of the cutting part.
- Level of sharpening of teeth. It is worth noting that there should be no cracks or microscopic chips on the teeth.
- Diameter.
- Shank type. Some cutters are not always suitable for working with a power tool such as a drill.
To work with an electric drill, it is not recommended to purchase cutters that are designed for machine tools. In this case, if there is a need to process hard material, it is best to purchase cutters whose cutting parts were made using solid fuel plates.
Other functional parts
Their list is as follows:
- Base plate. Absorbs elasticity waves.
- Drive board for vibration damping.
- Comb stops (combs). Needed to neutralize vertical vibrations of the workpiece.
- Static side stop. Guarantees the correct feeding of the part and the depth of its horizontal processing.
- Dust catcher.
Drive unit
It is better to make the opening for placing the drive round, so the machine will have less vibration during operation. The motor must not come into contact with the plate.
Installation of the drive in this plate is as follows:
It is better to create the drive board from PCB or fiberglass with a density of at least 1.5 cm.
How to make a wood lathe with your own hands: drawings and technology
The easiest way to make a tool yourself at home is to construct a lathe or milling machine from a drill or electric motor removed from another tool. This process is not that complicated, so every master can handle it. To do this, you will need an electric motor, the power of which does not exceed 500 W, and available materials. A drill can also be used as a drive. Of course, making a lathe will require some skill.
The device of the tailstock of a homemade wood lathe
To build the machine, the following elements are required:
- metal frame;
- electric motor;
- handyman;
- tailstock.
It wouldn’t hurt to get a drawing that will help you navigate the dimensions and correctly manufacture all the structural elements for its subsequent assembly.
How to make a homemade drilling machine with your own hands with a motor
First you need to prepare the electric motor shaft. To do this, a faceplate is installed on it; a steel center with a thread is also suitable. Installation of the second center is carried out in the tailstock tube. To make the frame, you will need a pair of corners measuring 5x3 cm, their length is 15 cm. A motor is attached to the frame using a bolted connection.
An example of a homemade drilling machine
At the next stage of making a homemade machine, you assemble the headstock yourself. This element is formed from a pair of horizontal and a pair of vertical corners. A pipe intended for the spindle is attached to it. You need to insert a bolt into it, the diameter of which is 1.2 cm. First, its head is sharpened at a right angle. Thus, the central part of the spindle is designated. After this, the headstock is installed on the bed. On the top post, which connects to the horizontal corners, it is necessary to secure the tube by welding.
To make a tool rest, you need to take a steel rod with a chamfer. This element must also have a hole that will be used to secure the support ruler. It is necessary to vertically weld the tube with the locking screw to the long angle. Then the tool rest rod is inserted into it.
The motor rotor on which the faceplate is attached will be used as the headstock spindle. You need to make several holes in it. A fork will be inserted in the central part. The holes along the edges are intended for fixing the part with screws.
Even with the help of simple tools you can create interesting wooden products; for this you need to study the technology of working with the tool and practice
Application at work
The main problem limiting the use of a drill when milling is ergonomics. The entire design of the power tool is aimed at processing the material along the axis of rotation. When milling, movements directed perpendicularly are required. In most cases, it is impossible to ensure positioning of the drill, especially when holding it with one hand. Therefore, the lot of owners of only one tool remains drilling and light types of work, such as grinding edges.
A good way out of this situation is to use special devices similar to those used in woodworking routers. Today you can find various options for drill attachments in the form of a support table, a sliding base or a vertical bed. If these are not available, it is enough to secure the electric drill to the table using clamps. After this, all that remains is to install the cutter for the drill and you can start milling.
Household electrical appliances are not designed to perform heavy-duty operations, so using a drill for metalworking is unlikely to work. In some cases, it can be used to cut sheet material or correct an edge. A much wider range of work is provided when processing wood. If high productivity is not required, then almost all types of milling operations can be performed. The same can be said about plastic work. A certain disadvantage in both cases will be the difficulty of selecting modes, since not all drills will provide the required tool rotation speed. You should also pay attention to the engine power of the power tool. In budget models, this parameter can significantly limit the diameter of the equipment used.