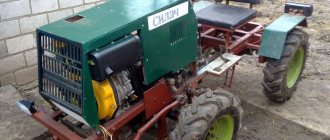
When solving various household and amateur radio problems, it is often convenient to use a mini-drill. This device allows you to significantly save time on drilling holes using an awl or other improvised means, with a much lower risk of breaking any part. And the result of the work is incomparably better - with a smooth cylindrical surface. The main stumbling block in working with such a device is the high cost of a high-quality model, so many people wonder how to make a mini drill with their own hands.
We make the collet chuck required for the engine shaft
- AliExpress
- Made by hands
- Goods for home and garden
In general, I needed a collet chuck for an excellent high-speed aircraft engine, with an electromagnetic brake. Its flange is also very convenient for creating a spindle on a small CNC machine for an electronics engineer. Well, the weight is 0.5 kg. To buy offline, it’s hard to find the right diameter so that it’s of high quality, and the price is reasonable. I remember a long time ago I took about 500 rubles at the radio market. Now it will probably be 2 times more expensive.
Instructions for making a drill
When making small things, decorative and other products, a compact drill, engraver and similar hand tools are very convenient, and therefore remain indispensable in the home workshop. Using such equipment, you can drill and process products made of wood, plastic, textolite and other durable materials. You will also need a micro drill when drilling printed circuit boards.
To manufacture drilling equipment, select a suitable chuck and a body of suitable dimensions (plastic container). To rotate the work surfaces, you need to select an electric motor and a power supply, for which you can disassemble an old hair dryer or other electrical equipment.
To learn how to make a mini-drill, just read the following list of recommendations:
- You first need to secure the cartridge to the electric motor shaft, for which you will need adhesive materials (“cold welding”), which ensure a reliable connection between the metals.
- You will have to work very carefully, since the adhesive materials set quickly, which eliminates the possibility of eliminating errors and correcting the connection.
- After fixing the cartridge, it is better to cover its surface with a special heat-resistant glue, which will ensure the density and strength of the connection.
- On the case you need to make a hole in advance for the switch (preferably a push-button one).
- The drill will be more functional with a reverse mechanism, which is implemented using a six-pin switch.
- When connecting to the power supply, you will need a 12 V power supply or a battery (2-3 pieces) with a similar voltage.
Having assembled a mini-drill into a single structure from individual parts with your own hands, you can turn on the power and do test drilling.
Complete analogue of the factory “Dremel”
To make it, you will need a motor with a 5V or 12V power supply, which can be removed from a broken children's toy, a miniature fan, a printer, a tape recorder, or simply bought on Aliexpress. If you plan to use the drill for more than just drilling printed circuit boards, you can make a convenient housing from a polypropylene water pipe. We select the diameter so that the motor holds tightly to the walls. Ventilation usually runs along the shaft. You can use an empty tube of construction sealant.
End caps can be cut from any material: for example, PVC or acrylic. If the engine is powerful enough, a charger from an old mobile phone will not work. You need a current reserve of at least 3A (for 5 volts). A good option is an old computer power supply (you can buy it for pennies on the radio market).
The collet chuck can be purchased in the store: the department of components for engravers and Dremels. If there is a need to adjust the speed, you can make the circuit yourself, or purchase a ready-made unit.
The illustration shows a Chinese regulator and a power supply from an Internet router (12V, 1.2A).
With this homemade “Dremel” you can not only drill miniature holes. By installing the appropriate attachment, you can work with a milling cutter, cutter, or cutting disc.
How to choose a collet chuck
The first thing to consider when choosing such a chuck is its attachment to the spindle. You can install it directly on the spindle, using a suitable adapter or by screwing it onto the thread.
Then we look at the dimensions of the flange. The diameter of the connection band or the parameters of the Morse taper will help here. If you do not know these indicators, then you will not be able to select the required cartridge, and therefore, there will be no opportunity for high-quality operation of your tools
And, finally, the number of jaws in the tool. Depending on the purpose of the tools, they can have from two to six jaws in a set. You can also choose a tool made of hard or soft alloy, for certain types of work, with different technical characteristics.
Method No. – Idea with antiperspirant
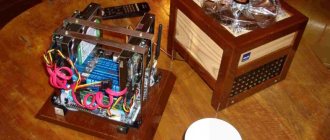
Well, the last version of a homemade mini drill that we would like to provide to readers is using a cassette motor and an antiperspirant container. The advantage of this model is that it is controlled by a separate on/off button and has a convenient housing. Such a homemade product will be powered by a conventional power supply, which must be selected based on the characteristics of the motor.
So, first you will need to prepare the following materials:
- motor from a tape recorder;
- suitable collet with drill;
- used antiperspirant;
- RCA socket for connecting power and a mating part for it;
- power unit;
- switch from an old carrier.
The first step is to make a mini drill according to the instructions provided at the very beginning: place the collet on the shaft and secure it with bolts. Next, the motor housing is installed in the antiperspirant. As you can see from the photo, the dimensions are ideal for installing the part. If the motor has free movement inside the housing, secure it with electrical tape and hot glue.
After this, you need to drill a hole in the top cover for the exit of the collet or the drill itself. At the same time, you need to make a hole in the bottom for the power connector. Using a utility knife, you also need to cut out a window for the switch, then solder all the elements of the circuit in series and install them in a place convenient for you.
Review of various creation ideas
Scope of application
The mini drill is widely used to perform various tasks.
- Creating holes in plastic, circuit boards and other objects. Of course, the device will not be able to drill through thick iron, but it will be strong enough to make a hole in a sheet up to one millimeter thick.
- Screwing and unscrewing small head and thread screws. Such fasteners are found mainly on automatic machines (switches), electrical wiring panels, office equipment, as well as in small, low-power electric motors.
- Equipped with special attachments, it can be used as an engraver or grinder; for this purpose, spherical attachments with a rough working surface are placed in its cartridge. During rotation, the nozzle processes the part or applies the required pattern.
These are the main areas where a mini-drill is used, but, in addition to them, it has found extensive use in everyday life, for example, for processing (cleaning) two objects made of plastic or glass that are being glued together. When preparing the joints, both products are cleaned, after which the surfaces are adjusted so that the pieces are closely adjacent to each other.
AlfFisher. My work: Homemade lathe chuck
Hi all. Today I will tell you how to make a 4-jaw lathe chuck, which allows you to reliably and safely
hold workpieces.
Moreover, you don’t need
complex equipment
to make it A drill and a jigsaw are enough.
This cartridge is an analogue of my metal cartridge: = only it is made of plywood. The only metal parts in this chuck are the bolts (jams), nuts and fasteners. Of course, a plywood chuck will be inferior in rigidity to a metal chuck, however, the clamping force of such a chuck is quite sufficient. The basis of the cartridge is a plywood faceplate 30 mm thick, glued together from 3 layers of 10 mm plywood. Plywood fasteners 3 are mounted on the faceplate 4, which hold nuts 5, and cam bolts are screwed into them.
The nuts are held in their sockets using plates 2, tightened with M8 - M10 bolts.
| Rice. 1 Chuck with plywood faceplate. |
I chose exactly this method of fixation (without additional keys, pins, etc.) since I do not use extreme forces when tightening the bolts,
in this case, the nuts will simply come out of the clamps. But if you wish, you can make 2 cuts on the nut and move the fastening bolts closer to the thread axis:
| Rice. 2 Nut with cutouts. |
Cams (bolts) shown in Fig. 1 made using a metal lathe. Of course, cams of this shape (with two protrusions and a center) hold the part better. But you can make cams using improvised means, using only a drill and an angle grinder. To do this, you will need to fix the drill on the table and clamp the bolt into the chuck.
Next, turn on the drill and install a small-diameter circle on the angle grinder to make a sample at the end of the head Fig. 3. Then, using a drill clamped in a screwdriver or in a hand vice, drill a hole for the center.
| Rice. 3 Radius sampling |
Now all that remains is to make a center from a suitable rod, gluing it into the cam using a “thread locker” (Loctite)
| Rice. 4 Center in cam bore. |
Well, that’s actually all the technology is. Like and ask questions :).
alfisher.blogspot.com
Designation of collet chucks
The designation of a collet chuck with an outer cone, intended for fixing a tool with a cylindrical shank, in the drawing is as follows.
Image No. 2: Collet for a universal machine with a cone number 50, diameter under the shank (d) 12 mm, length 90 mm
The table below shows the standard dimensions of collet chucks, which are important to take into account in the calculations:
| Cone designation | D | d | l, no more |
| 30 | 31,75 | from 2 to 12 | 90 |
| 40 | 44,45 | ||
| 50 | 69,85 | ||
| 30 | 31,75 | from 10 to 25 | 100 |
| 40 | 44,45 | ||
| 50 | 69,85 | ||
| 30 | 31,75 | from 15 to 40 | 110 |
| 40 | 44,45 | ||
| 50 | 69,85 |
Current GOSTs
The main current standard related to this type of equipment is GOST 26539-85. It introduces the characteristics and markings of the 7:24 external taper collet chuck. And the Resolution of the USSR State Committee on Standards No. 5943 gives the following recommendations:
- graphic designations of supports, clamps and installation devices (including collet chucks) used in technical documentation;
- To display supports and clamps, solid thin lines are used (GOST 2.303-68).
Design
Inside any mini drill there is a grinding machine, that is, a device for direct grinding. All of the above functions are performed thanks to attachments and cutting tools installed in the chuck.
A significant difference between the design and a standard size drill is the rotation speed of the spindle sleeve. Popular models of mini hand drills maintain speeds from 10 to 30 thousand per minute. Due to the high speeds, there is no need to secure the workpiece being processed, because it will not be pulled out of your hands. This feature is very convenient when working with engraving and grinding.
Interestingly, the Hammer mini drill is equipped with a flexible shaft, which allows you to use attachments in the most difficult to reach places without unnecessary discomfort. It is very convenient to use a flexible shaft when you do not need to hold the drill in your hand. To do this, the electrical appliance is suspended on a special stand. This approach will free your hands, reduce vibration and overall noise levels.
General information
The chucks are divided into two main groups according to the method of mounting on the machine:
- threaded connection with the machine;
- using a cone that matches the mounting hole for cone fasteners in the machine.
These features also determine the differences in their internal structure. The outer Morse cone indicates that there is a conical structure inside. The self-clamping chuck must comply with the standards in the regulatory documents in terms of the size of the internal cone. The marking has instructions on GOST, taking into account which the cartridge is made. The main parameters are indicated in the 1979 document; further parameters may have minor deviations in the tolerances of the lower limit of the drill clamp and radial runout.
Their choice is determined taking into account the need for different types of holes, the holder itself and ease of use with quick tool replacement. Morse taper, types of sizes for possible clamping from the smallest drill diameter to the largest , the presence of a key or locking and fixing ring in the design for each standard size are indicated in GOST 8522−79.
The design is:
- with or without a nut fixing ring;
- with clamping nut;
- with a key.
Regulatory documents do not limit the improvement and modification of external forms; the most important thing is that the main parameters correspond. This makes it possible, when choosing a replacement sleeve or drill, to achieve the most precise fastening of the drilling tool. This is the only way to avoid violating the permissible radial runout . A discrepancy between the chuck and the drill cone leads to an increase in error, which negatively affects the final result of the work.
Drilling chucks are:
- precision;
- quick-clamping (self-clamping);
- quick-change;
- three-jaw.
From a ballpoint pen
To make a drilling device from a ballpoint pen, no electrical elements are needed, and no skills in working with power tools are required.
You will need a ballpoint pen with an automatic mechanism, hot-melt adhesive, a stick with jumpers at the end that rotates the drill, and a drill of the required size. The main load falls on the body, so you need to choose samples made of metal or thick plastic.
Build process
The ballpoint pen is completely disassembled. A drill is inserted into the lower part of the body, from which the rod usually comes out. The shank is fixed into the hole on the stick. To ensure that the entire working structure of the tool becomes a single mechanism, the parts are fixed to the inner walls of the body with hot-melt adhesive. The drilling process will be performed through mechanical action on the stick, which serves as the handle of the device.
Jaw chuck for micro drills as an alternative to collet chucks
In order not to think about how to make a collet chuck or clamp with your own hands, you can purchase a jaw chuck to equip your microdrill. This clamp is an analogue of the jaw chucks used to complete conventional electric drills, and works on a similar principle. When the movable holder on the body of such a device rotates, the cams with which it is equipped move and thereby ensure reliable fixation of the tool.
Miniature jaw chuck ensures rigid fixation of working attachments
A wide variety of inexpensive jaw clamps are available today to equip micro drills. The vast majority of their models are fixed on the drive motor shaft using a threaded hole on the side of the mounting part, into which a screw is screwed. Rotation of the cam clamp cage, depending on the specific model, can be done either manually or using a special key, which is necessarily present in the factory kit of this device.
Purchasing a jaw chuck is a good opportunity for little money to equip your power tool with a universal clamping device that is easy to use and provides reliable fixation of working attachments. The main thing you should pay attention to when choosing is the material from which the main working elements of the clamp are made. If you choose a chuck whose jaws are made of durable high-carbon steel, it will last much longer and will provide precise fixation of the tool being used.
Complete analogue of the factory “Dremel”
Drill example
The original housing is also made independently in such a way that the engine is tightly fixed inside, while leaving a gap or an open part in the heating area.
The body of the mini-drill can be any plastic tube.
There are models that used a tube of sealant, a syringe, a plastic tube of toothpaste or children's candy.
A piece of plumbing plastic pipe cut to the required length will also work, but in this case the open ends will need to be sealed with some kind of movable “plug”, for example, acrylic or cut out of plastic.
You can make a mini-drill chuck or clamp yourself, for example, from a regular connecting terminal, or buy it on the market or in a store. For collets, you can contact engraving workshops, as well as modeling departments or sections of components for household power tools.
The resulting tool is a universal option; Depending on the type of repair, various attachments are fixed with such a clamping chuck: drills, cutters, discs with a cutting edge or screwdriver heads.
How to make your own cartridge
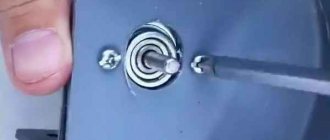
For work on wood, soft metals and plastics, and home production of printed circuit boards, a low-power mini-drill made by yourself is suitable. The easiest way is to equip it with a ready-made mini-self-clamping mount made from a pen or pencil. But if you don’t have any at hand, it’s not at all difficult to make a mini-collet with your own hands. Required: soldering iron, 1 mm thick steel wire, solder.
- a spiral is rolled from the wire with a diameter equal to the diameter of the electric motor shaft and the drill with which to work;
- the spiral is soldered, high quality connections are ensured by soldering flux or KFET;
- the spiral is put on the shaft and the mini-collet is ready.
Video about how a qualified metal turner made a self-clamping chuck with his own hands:
A collet chuck is a special device used for clamping a tool when performing turning, milling, drilling and other operations related to the processing of metal workpieces based on the technical specifications (sequence of operations, processing technology, attached sketch of the product).
If the blender stops
It happened that the device refuses to work. The situation is resolved more easily than in the case when the blender is too lazy to cut and does not chop.
First, we strain our ears by turning on the device. If a buzzing sound is discernible, then the problem is probably a jammed knife. Remove the bowl and gently press the power lock button with your finger (pencil, pin). It worked - the matter is limited to a bowl, a knife. They told me how to fix the problem. The atypical case is much more interesting: a buzzing sound is heard, the blender stiffens even with the lock released. Surely the cause is the motor - the winding burned out. Here the result is determined by the price of the issue; if there is a way to get a new engine at a reasonable price, it is worth replacing. Cheap models make you throw away the idea of fixing a blender yourself.
When no buzzing sound is detected with the button turned on, we examine the power supply path:
- First of all, check the presence of voltage at the outlet. Practice shows that most problems are resolved at this stage. A blender, like other household appliances, breaks down relatively rarely. Plug in a known working table lamp or something stronger. If it works properly, we move on to the second procedure.
- To check the cord, we disassemble the blender body. We turn off the device from the network, take a screwdriver. Rare foreign models will require special heads. Throw away the cross and slotted screwdriver. Inside the blender there is a power block carrying a soldered or screwed cord. We check the voltage with a voltmeter, or take a known-good cord, connect it, and try the assembly. The location of the breakdown is localized. In some severe cases, the voltage cannot be measured. Less suitable contacts are covered with plastic and are not removable. Those who avoid cutting the device take a needle and solder a wire to the tip. You will need two homemade gizmos. We turn off the blender from the network, pierce both wires of the cable with needles, and connect the tester terminals. We make sure that the lines do not overlap each other, keep our hands off, and plug into the network. We look at the result on the tester display.
- The above actions are simplified if a fuse is inserted into the blender. We take it out and call. The breakdown is identified - we visit the store and purchase a new one. Parameters (power, current) are inscribed on the glass (ceramic) case. We use numbers when choosing the right product in the store. Avoid attempts to make a makeshift fuse; a rash step will most likely cause a fire. A new one is inexpensive. In the open circuit, measure the supplied voltage with a tester (multimeter). When there is nowhere else to measure the mains voltage (230 volts), the fuse slot will do.
- It happens that the new fuse instantly fails. There is a short circuit inside the blender. The problem affects the integrity of the motor windings and electronic circuits. We try to connect energy consumers one by one to the source, and observe the result. Experts recommend using a homemade bug that can withstand the resulting electric current. We connect a multimeter and measure the amperes. The operation is done extremely quickly, otherwise there is a chance that traffic jams will break out at home. We use the measured value to calculate the power. If the figure obviously exceeds that indicated in the passport, the faulty unit has been found. As mentioned above, problem blocks: blender motor, circuit boards.
- If the described operations lead to the belief that power is present, we undertake to inspect the printed circuit boards. We examine the capacitors for swelling, and the resistors for traces of burning. The tracks should not be torn or peel off from the substrate. A defect from the listed symptoms has been found - the cause of the blender malfunction is limited to the electronic filling. If the engine short circuits, the equipment cannot be restored. Winding insulation failure.
Do-it-yourself drill for small jobs
The drill has long ceased to be an exclusively professional dental instrument. Today, a drill with a flexible shaft is actively used to perform small decorative work, grinding, polishing, and cutting various products.
You can make a rotary drill with your own hands, similar to a mini-drill.
At the same time, it should be taken into account that for high-quality work of the homemade product you will need a fairly powerful motor. So, an 18V motor from a screwdriver is perfect for powering drills. The easiest way would be to make an engraver from an old blender.
To make a drill you will need:
- Disconnect the top part of the blender from the working part;
- Using a utility knife, remove the rubber cover on the button and use a screwdriver to unscrew the bolts located under it;
- Using a screwdriver, from the side of the power cable, pry up the top cover of the case and carefully remove it;
- Remove the circuit connected to the power cable from the blender body;
- Remove the plastic part located above the rotator from the housing;
- Remove the plastic tip from the electric motor shaft;
- Measure the diameter of the shaft with a caliper (if you don’t have one, a ruler will also work for this purpose);
- Clean the electric motor housing from oil and degrease its surface using an alcohol wipe;
- Place a collet chuck of the appropriate size onto the shaft;
- Replace the power button with a push mechanism that controls both turning the device on and off;
- Assemble the blender.
The hand drill is ready! Such a tool will be powered via a power cable with a plug. You can power the tool with batteries, but then the batteries will have to be changed or charged from time to time.
Toothbrush device
All parts of the brush need to be cut off, leaving only the body. Then you need to connect the shaft of the miniature motor with the drill using a collet mount. The collet clamp is purchased separately, taking into account the diameter of the engine shaft.
The chuck is suitable for shafts with a diameter of 2 mm. The brush motor has a smaller diameter. It is first necessary to grind each fastener to a cone-shaped shape. This will allow you to adjust the diameter of the engine shaft to the size of the cartridge mount.
The drilling machine can be made from a blender, electric manicure tool and other devices.
A mini-drill is sometimes equipped with a speed controller and other options.
The video shows how to make the equipment.
DIY mini drill
To carry out drilling work on miniature workpieces, engraving machines, the so-called “dremels,” are usually used. The name comes from the name of the most popular manufacturer. This is a convenient hand tool, but its cost is usually high (especially for high-quality branded products).
The most common area of application is amateur modeling and production of printed circuit boards. As a rule, an industrial design is redundant for such work: some of its capabilities are not in demand. Therefore, home craftsmen often create instruments with their own hands.
Types of chucks
Lathes, drilling and milling machines for metal use chucks with mechanical or manual clamping with 2, 3 or 4 jaws. Self-centering 2-jaw machines are used in the manufacture of shaped castings. In 3-jaws, hexagonal and round blanks with a Morse taper are attached. And when processing asymmetrical, rectangular or rods, 4-jaw sets are more convenient.
All clamps are divided into the following categories:
- lever;
- collet;
- drilling (quick-clamping, BZP);
- wedge;
- hydraulic chucks;
- membrane;
- thermal cartridges;
- 3-jaw;
- 4-jaw.
Self-clamping drill chuck is used on universal or special lathes. Their design allows for a stronger transfer of clamping force with a torque significantly lower than spiral chucks. The structure is made of hardened steel and the set of cams is made of the same metal.
The delivery set includes a set of mounting bolts and cams. Often the cartridges that come with a drilling or milling machine break quite quickly, as they are made of low-quality metal. A qualified turner can make a new one with his own hands.
Materials
What materials are needed to create a mini drill with your own hands? To make a mini drill with your own hands, you first select two important parts: a motor from some old electrical device and a collet chuck.
Important! The advantage of buying a chuck online is that the delivery package includes a set of different attachments for a mini drill. Having assembled a homemade device, you do not need to select drills, grinding and saw blades according to the diameter of the shaft
As for the body, there are many possibilities to make it from any auxiliary materials. Be sure to stock up on shrink film for reliable insulation of current-carrying parts.
In order for the tool to use household power, you need a rectifier with a voltage regulator. You will also need a microswitch, power cord, and soldering iron. A hot glue gun is a must. For rigid fixation of parts, a composite composition is used instead - cold welding.
Special jaw: a modern replacement for any collet chuck
Today, anyone can easily purchase a special cam for any type of drill. This can be done both in construction boutiques that offer equipment for sale, and on the Internet (at auctions such as Ebay or Amazon).
Such a cam will be screwed onto the threaded connection of the shaft of the rotating device. The more tightly the cam is twisted, the more firmly it compresses the drill placed in it.
The price of such a device does not exceed sixty rubles. Purchasing a cam will forever save you from searching for suitable collets for using various drills.
Of course, it is better to purchase a cam made of high-carbon, durable steel. To tighten it, it is recommended to use a special wrench, which is included in the kit.
- Find out how to connect a photo relay to lighting fixtures in an apartment.
- Recommendations regarding the choice of a construction lamp, without which an electrician will not be able to carry out effective work on site - https:///kak-vyibrat-stroitelnyiy-fonar/
Technical consultant Anton Pankratov will demonstrate the technique described above for making a homemade collet chuck in a video:
The main advantage that a self-assembled mini-drill differs from standard products is its compact size and the ability to obtain electrical equipment without significant expenditure of money, effort and time. It is easy to make such a homemade instrument at home, since it does not require special skills or highly complex devices. To get a high-speed drill or other devices for making crafts, a home craftsman only needs to be comfortable with a screwdriver and pliers and be able to perform simple technical operations.
Economical option without housing
Let's move on to creating a mini drill at minimal cost. We don’t buy anything except the motor itself (although it can be found for free in old equipment). Most compact electric motors are rated at 12 volts DC. We create a power supply for it.
Since there will be no additional options (speed controller, voltage stabilizer), the power supply is stabilized by a constant load. A typical 12 volt micromotor operates with a current of no more than 2 amps. A simple calculation shows that the output power should be 24 W. Add 25% for rectification losses, we get a 30 W transformer.
To get 12 volts under load, 16 volts must be removed from the secondary winding. You can make such a transformer in an hour, from any unnecessary power supply. Next is a rectifier bridge using any diodes: for example, 1N1007.
Our motor does not need rectified voltage ripple, so we connect a 25-volt electrolytic capacitor with a capacity of about 1000 μF at the output. It will smooth the output current. Despite its simplicity, such a tandem works stably, with only one drawback: as the load increases, the voltage drops. That is, with uniform rotation, the power supply produces 12 volts. And if you are drilling “heavy” material, you need to monitor the speed, not letting it drop. Otherwise the shaft will simply stop.
You can slightly complicate the power supply circuit by adding a suitable voltage regulator. For example, KR142EN8B or L7812CV.
In this case, there will be no voltage drop when the drill is loaded.
Next, you need to make a fairly accurate structural element - a drill chuck. If you don't want to spend money on a factory collet clamp, any bushing will do. It all depends on the scope of application of the mini drill:
If you only drill PCB textolite, you will not need to change the drill. So we attach it permanently. The adapter sleeve can be made from anything: a tube from a telescopic antenna, a needle from a medical syringe, a refill from a gel pen.
Given the miniature design, no clamps are needed. Everything can be secured with glue or tape.
When using a drill for universal use, which involves changing a drill or installing other attachments, it would be better to purchase a universal collet chuck.
You can use a standard jaw chuck and install it on the shaft using an adapter sleeve.
The execution of the case depends only on your imagination. Most craftsmen leave a “bare” utilitarian design: the supply voltage is safe, the dimensions of the motor allow it to be held in hands without a housing.
If you want basic aesthetics, there are many options: and they are all free.
A homemade tool doesn’t just save money. It can be made exactly to suit your needs, unlike universal factory options.
Do-it-yourself flexible shaft for a drill
If you need to transfer the rotation of the motor of an engraver, drill or bur to an attachment, then you will need a flexible shaft. This device consists of a wire enclosed in flexible armor, twisted in several layers, and
can significantly expand the functionality of a rotary instrument. You can assemble the flexible shaft yourself.
For this you will need:
- Brass tube;
- Two M4 threaded bushings;
- Electrode shaft (diameter 5 mm) with M5 thread;
- Adapter from internal thread M5 and external thread M8 to 0.75;
- Mini quick-release chuck;
- Clamp made from an M12 bolt drilled along the axis;
- Protection for connection.
Assembling the flexible shaft. To do this, insert an electrode shaft into the brass tube and put M4 bushings on both sides of the tube. On one side of the tube we screw an adapter onto the sleeve, and onto it a mini-cartridge. On the back side of the tube we place a clamp, with which we connect the shaft from the electrode to the flexible one. For convenience, you can sand down the heads of the screws on the clamp. We put a special brass protection on the clamp and secure it with fasteners. We isolate the connection. The flexible shaft is ready! For convenience, a clamp with a plastic handle can be placed on the cartridge side.
Screwdriver attachment
With a little thought, you can make an attachment for a screwdriver.
Such a simple nozzle in its design can be created without unnecessary complications.
The good idea is that there is no need to spend money on additional parts. Everything you need is already in the drill design. All you need is a lathe, an angle grinder, a welding machine and, of course, a screwdriver, which we will now attach to:
- Remove the two covers from the drill body. Unscrew the thrust part.
- We knock out the cotter pin from the small gear and remove it from the shaft on which the drill chuck is mounted.
- Using a sharpening machine, we bore the conical tip of the shaft to 10 mm.
- We insert the shaft back into the drill body, put on the gear and cotter it.
- On the right side, use a grinder to cut off the threaded shaft.
- We screw the rubber handle (improved version) into the body on the right.
- Cut off the threaded part of the large gear shaft.
- The head must be welded to the large gear shaft.
- Screw the two covers back to the body and lubricate the gears with special graphite lubricant.
- The nozzle is ready to use!
The DIY mechanism allows you to screw in and unscrew bolts and nuts in hard-to-reach places. Increases torque by 6-7 times. Since the attachment is longer than a simple screwdriver, the tool can be used around the house, for assembling furniture, or for car repairs, if the nut connection cannot be reached in any other way.
How to make a dynamo from an old printer motor
A dynamo is a device that converts mechanical energy into electrical energy. The operation of the dynamo is based on the principle of electromagnetic induction. That is, an electric current arises in a closed circuit of a device when the flux of the magnetic induction vector penetrating the circuit changes over time.
In other words, a dynamo is the simplest direct current generator.
In everyday life, a dynamo can be used to charge audio and video equipment, a smartphone and other low-power gadgets (for example, fitness bracelets, tablets, a toy robot, etc.). In addition, the device is perfect for powering bicycle headlights, LED strips, hand-held flashlights and other devices powered by single-phase networks.
To assemble the homemade product you will need:
- Motor (electric motor) from an inkjet printer;
- Belt and gear from the same device;
- Handle with comfortable, non-slip grip;
- Two small wooden bases;
- Four 10,000 µF capacitors;
- Diode;
- Metal corners and fasteners;
- Wires and solder.
Making a dynamo is quite simple. To do this, you need to connect the capacitors in parallel, output the phase from the capacitors through a diode to the electric motor, and connect the zero of the capacitor through a jumper to the zero of the electric motor. Wires for connecting electrical appliances should be routed from the capacitor connected to the diode, observing the polarity. After this, you should place the entire structure on the base, fastening the electric motor to a second wooden plank so that the pulley sticks out of it. On the pulley side, place the gear with the handle and cover them with a belt.
Attaching the collet chuck to the machine and hand tools
The collet chuck is mounted and centered on the lathe spindle. Note that the diameters of the cartridges and methods of their installation are standardized. The most common spindle end designs include Type C and Type D (cam-lock) fasteners. Also, to install collet chucks, flanges and faceplates are often used, which are placed on the spindle.
Now we will tell you how to center a collet chuck on the motor shaft of a hand tool (electric drill). The adjustment is carried out in two planes, and first the runout is eliminated in one plane, then in the other. Work progress:
- Fix the drill on the table (in a lying position).
- Rotate the chuck until the desired pair of bolts is parallel to the table.
- Rotate the chuck 180 degrees and note the deflection of the chuck.
- Eliminate wobble by tightening and loosening a couple of screws.
Do the same with the second pair of screws. To make the deviation in two planes more noticeable, use a long drill.
Self-production
For working on wood, metal and plastics and for making a variety of printed circuit boards, a small drill is best. It should be equipped with a ready-made mini-clamp- type mount. But if you don’t have one at hand, you can easily make it yourself. Here you will need a soldering iron, millimeter-thick steel wire and solder. Next, the manufacturing process proceeds according to the following scheme:
- We roll the wire into a spiral. Its diameter must be equal to the diameter of the electric motor shaft and the drill with which it will be necessary to work;
- Solder the spiral. High quality is ensured by soldering flux or similar options;
- Then we put the spiral on the shaft - and the mini-chuck for our drill is completely ready.
Homemade collet chucks are perfect if there are no ready-made clamps for drills and if you have the appropriate skills to make such mechanisms yourself. They will also become indispensable in the household, when work with specific parts is required, and ready-made clamps may not be suitable for any specifications.
The collet is an important element in lathes of various modifications. With its help, you can carry out work on processing and milling metal and plastic parts. In addition, you can easily make it yourself using available materials . The variety of such mechanisms available today allows you to choose the optimal clamp model for your personal needs. It is also very important to take into account the method of attaching it to the spindle and the dimensions of the flange, since without them it will be impossible to select a collet. Have fun working with different types of clamps!
What to make it from
On the Internet you can find a lot of video materials on making homemade models of mini devices. The most popular designs of mini drills are represented by the following list:
- MD from an electric cartridge.
- A complete analogue of the factory “Dremel”.
- Drill made from a toothbrush.
- MD from the printer drive.
- Economical option without housing.
- Second life for an old tape recorder.
- Antiperspirant idea.
MD from an electric cartridge
Every home has an electric light bulb socket. The body can be made from it. There are standard sockets and housings for minion bulbs. Both of them are suitable for homemade products. It all depends on the outer diameter of the electric motor.
Manufacturing proceeds as follows:
- The core of the fittings is removed.
- Unscrew the back cover.
- A motor is inserted inside the housing, the side surface of which is covered with hot glue or cold welding.
- Adjust the shaft thickness to the size of the collet clamp hole.
- A polymer lid from a plastic container is glued to the front of the case. A hole is first cut in the cover to allow the motor rod to pass through.
- The cartridge is secured to the shaft with a transverse locking screw.
- The motor wires are threaded through a hole in the screwed cover, which are then connected to the output terminals of the rectifier.
- If you can place a microswitch in the back cover of the electric chuck, then using the drill will be convenient.
Note! The rectifier regulator changes the current and voltage, thereby increasing or decreasing the rotation speed of the functional attachment. At the same time, we must not forget that if the permissible current is exceeded, there is a risk of “burning” the motor
Complete analogue of the factory “Dremel”
A mini drill is often called a Dremel by name - the leading manufacturer of this type of power tool. It is almost impossible to make a homemade product completely similar to the Dremel model.
It all depends on the master in terms of selecting spare parts. Making homemade products in a home workshop can never compare with professional MD production. Although, with some effort, you can achieve some success in this direction.
Advice. There is no need to blindly copy an industrial production model. It is better to purchase a ready-made tool.
Drill made from a toothbrush
Those who have used electric toothbrushes know how quickly the cleaning heads become unusable, and new brushes are impossible to find on sale. If you have one lying around the household, then this is a suitable option to make a mini drill.
The difficulty of manufacturing is to remove the vibrator and install the cartridge on the engine shaft. The device is powered by a battery or an 18650 battery. Such a device will not have a large number of motor shaft revolutions. But the MD will serve well as an engraving tool.
Dynamo from printer drive
An old printer is an excellent “supplier” of parts for making a mini drill. The electric motor and power supply are removed from the device. If the electric motor shaft is too thick, it is ground on a grinder. The engine is turned on and brought to the abrasive. Regularly measuring the diameter, the turned rod is adjusted to fit the opening of the collet chuck. After completing all the work on installing the housing, attaching the cartridge, and installing the limit switch, the device is connected to the power supply. After this, all that remains is to install the desired functional attachment and get to work.
Engine from an old printer
Economical option without housing
In order not to search for a suitable product for the drill body, the motor is wrapped in 2 layers of shrink film. The heated coating tightly covers the side surface of the motor, thereby creating reliable insulation of the power tool.
Mini drill without housing
Second life for an old tape recorder
A thrifty owner can find an old tape recorder or player. If the sound reproducing device is made in a stationary form, then use a power supply, as in the previous case.
The engine from the player is also adapted to rotate the cartridge with the nozzle. The device will be mobile, since powerful AA batteries are placed in the power supply instead of batteries.
Electric motor from a tape recorder
Antiperspirant idea
The body of a used roll-on deodorant is quite suitable for making a mini drill. The advantage of this option is the shape of the plastic bottle. It is made so that it is comfortable and firmly held in your hand.
Roll-on deodorant body
Additional Information. When manufacturing the MD case, you should try to install the power button within the reach of the worker’s thumb. This will create an additional comfortable option for controlling the device.
Additional accessories
When turning thin-walled products or working with fragile wood, metal fastening rings are used. Having the skill of handling metal, you can make them yourself. Also paired with type C cams, screw inserts can be used that screw into a hole pre-drilled in the part. Chucks designed to solve specific woodworking problems:
- cam with independent adjustment - for eccentric turning;
- collet - clamps round workpieces when tightening the petals of a conical collet with a coupling nut. Has a small capture range;
- cylindrical - a tube with three or more threaded fasteners around its circumference; vice - for gripping rectangular workpieces. The parallel jaws are compressed by a screw;
- vacuum – for finishing. It works due to the difference in air pressure created by the pump;
- drilling – for fixing drills. Attached to the tailstock quill.
Set of driving cartridges MK2