Bed linen is always in demand. Not a single home can do without it. Any novice seamstress can sew bed linen on her own. Despite the apparent complexity, sewing skills are not required at all.
A pillowcase is the smallest item in a bedding set. It’s worth starting with sewing it.
Only pillowcases with standard sizes are available for sale. If your pillows are non-standard, you will have to sew pillowcases yourself or to order.
What is a pillowcase
Every pillow requires a pillowcase. It serves as both protection and a decorative element. They are needed for bedding and sofa cushions.
The type of pillowcase is a different story. He can tell you about the owners’ hobbies and the order in the house. At first glance, this is just a cover, but in fact it is a way to distinguish various thoughts from each other.
How to decorate decorative pillows, ideas and tips?
You can decorate an interior pillow:
- embroidery or braid with embroidery;
- decorative sewing;
- bows and flowers made from ribbons;
- lace and openwork inserts:
- elegant draperies, decorative ruffles, puffs;
- applications made of foamiran, velvet or other suitable fabric;
- ornaments made of beads, buttons, rhinestones;
- decorative silk cords, tassels, fringe;
- inserts made of gabardine fabrics, etc.
Some ideas for beautiful design of decorative pillows:
How to make it yourself
Pillowcases purchased in a store do not always meet the needs of the housewife. Unfortunately, not everyone knows how to sew a pillowcase for a pillow. It's actually quite simple.
Take a piece of fabric you like, decide on the design and prepare the materials.
For bedding, you don’t need extra patterns from cardboard or paper; everything is drawn immediately on the fabric. To prepare the pattern, you need to measure the pillow itself. To prevent the pillowcase from being small, you need to add 1-1.5 centimeters to the resulting dimensions.
To ensure an even seam, you must first baste the edges with thread or pin them together.
If you want to decorate your pillowcase with additional elements, prepare them in advance.
How to calculate the amount of fabric needed
In order not to encounter a shortage of material or, conversely, an excess of it, it is important to initially decide how much material you need to purchase.
When choosing, it is important to consider such criteria as:
- The presence or absence of a linen seam.
- The amount of smell.
- Type of fabric (some varieties shrink immediately after the first wash).
Necessary materials
To sew a pillowcase you will need:
- Textile,
- Matching threads
- Pencil for a pattern (you can use chalk),
- Centimeter,
- Sewing machine or needle,
- Decorative elements if you want to add them.
When purchasing fabric, keep in mind that the fabric measured in the store may be uneven or have unraveled edges. Therefore, be sure to add 5 to 15 centimeters to the required dimensions. It is better to purchase threads together with the fabric so that the color matches exactly.
Decorative pillow-cushion, step-by-step instructions
What to prepare:
- fabric for the outer cover of the pillow;
- fabric for sealing the side ribs (doublerin);
- medium density padding polyester;
- foam rubber, holofiber, other filler;
- large decorative buttons - 2 pcs.;
- zipper lock or Velcro fastener;
- wax pencil or chalk;
- cutting knife, scissors;
- cord for tying the side edges;
- strong threads.
How to sew an interior bolster pillow:
Step one. Prepare patterns. Cut out the following elements of the cushion cushion: 2 fabric circles (diameter - 67 cm); 2 circles of dublerin (diameter - 67 cm); a rectangle made of main fabric (its width is 74, length is 50 cm); rectangle made of padding polyester (width - 74 cm, length - 50 cm), a piece of Velcro tape.
Step two. Circles of dublerin and fabric are folded in pairs. Sew along the contour. Marks are made in the center of both circles. Here, upon completion of sewing the pillow, a cord is pulled through to prevent deformation of the side ribs and large buttons are attached.
In the same way, rectangles from the main decorative fabric and padding polyester are connected and sewn together. This part of the roller can be additionally quilted if desired.
Step three. Pieces of Velcro tape are sewn along the length of the rectangle (with an indent of 1 cm). One part of the fastener is placed with the front side up, the other - with the wrong side. The firmware is done on both sides. At the end, the Velcro is fastened so that during further work it does not interfere or cling to the fabric.
Step four. Attach the side ribs of the bolster pillow. The parts are placed face to face. If desired, the side edges of the roller can be decorated with a voluminous twisted cord.
Step five. The finished roller is filled halfway with filler. A strong cord is then pulled through the center points of the side ribs. It is secured on one side with a decorative button.
Add the rest of the filler. The roller should be quite dense, without voids. Pull the cord and secure it with a button on the other side.
Two more lessons on making original interior pillows from You Tube video bloggers:
Sizes and shapes
The size of the pillowcase always depends on the size of the pillow itself. For bedding, the most popular ones are 50 by 50 cm, 70 by 70 cm, 40 by 60 cm. Pillowcases for sofa cushions are usually smaller, for example, 40 by 40 cm, 30 by 40 cm, 20 by 50 cm. and so on.
The shape of the pillowcase can be round, rectangular, square and also depends on the product that you want to place in it. If desired, you can partially change the shape of the pillow using a pillowcase, for example, by combining two thoughts at once or hiding a square pillow in a round pillowcase.
Pattern
In order to sew any bedding, be it a pillowcase or a sheet, you do not need complex patterns on paper. The drawing can be immediately made on the canvas itself, using a bar of soap, chalk or a special washable marker. To cut the fabric correctly, it is more convenient to spread it on the floor or bed. The modern standard width for most fabrics used for bedding is 220 cm. From a cut of 170 cm you can make 3 pillowcases measuring 70x70, even taking into account the flap and seam allowance. The pattern process itself is simple: the width of the fabric is divided into 3 equal parts and carefully cut. The same method is also suitable for rectangular covers, only you can divide a piece with a length of 170 cm and a width of 220 cm into 4 parts, ultimately obtaining the same number of finished products.
The cutting of fabric with a pattern has its own nuances. If it is small, there will be no special problems, but in the case of large pictures you need to be careful. In order not to divide them into parts by cutting the material, it is better to leave the entire image on one side of the cover.
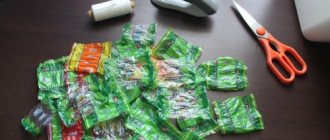
Scented pillowcases
One of the most common types of pillowcases and, perhaps, the simplest. The smell does not allow the pillow to fall out of the product and does not require additional accessories and materials.
How to sew a pillowcase for a scented pillow:
- Measure the width and length of the pillow,
- Calculate the length of the scent (on average 10 - 20 cm, depending on the size of the pillowcase and the thickness of the pillow),
- Add centimeters to the main dimensions for hem and wrap,
- You should end up with a regular rectangle. Its length corresponds to double the length of the pillow itself + centimeters for the hem + length of the wrap,
- Fold the pattern to the size of the finished product,
- Sew (having previously basted) the smell to the main part,
- Then stitch the two halves so that the smell is on the wrong side.
The pillowcase for the scented pillow is ready.
Beautiful classic decorative pillow, step by step
What to prepare:
- fabric for the inner cover with filling;
- fabric for the outer cover (two similar colors);
- fabric for a decorative frame (contrasting tone to the main colors);
- holofiber, padding polyester or other padding;
- paper for patterns;
- wax pencil or chalk;
- cutting knife;
- scissors;
- threads;
- adhesive mesh for attaching “hearts”.
How to sew a decorative pillow with applique using the patchwork technique:
Step one. Make a heart template (it is more convenient to decorate the outer cover before sewing the pillow). The optimal heart size for a standard interior pillow is 12 x 12 cm. The template is placed on a paper base of the adhesive mesh and four hearts are outlined. A strip of adhesive mesh with a pattern is attached to the fabric using an iron, after which it is cut out along the contour. It is necessary to make two blanks of each color.
Step two. A vertical line is drawn along the central axis of the hearts and each piece is divided into two parts. Connect halves of hearts of different colors.
Step three . Cut four squares - side 15 cm. You should get two squares of each color. They, like hearts, are cut in half.
Step four. The protective paper layer is removed from the heart blanks with the adhesive mesh attached. Place the heart halves on the square halves and attach with an iron. Then strips of different colors are sewn and ironed from the inside out. You should end up with four squares. They are also sewn together.
Step five. Make a decorative pillow frame. Four strips, 5 cm wide, are cut from light fabric. The frame elements are basted to the blank of the front part of the pillow, sewn on, and ironed. You can make a beautiful relief stitch along the contour of the hearts.
Step six. They cut the back side of the pillow - cut out two rectangles and place them overlapping on the front side. Connect both elements of the pillowcase along the perimeter, turn it inside out, iron it. There should be a “pocket” in the center for the inner cover with filling.
Step seven. The inner cover is made. Cut out a 14 x 28 cm rectangle and fold it in half. Sew all sides, leaving a hole for stuffing on one side. Turn the cover inside out and iron it. Filled with holofiber. Sew up the hole. The finished pillow is inserted into a decorative pillowcase with “hearts”.
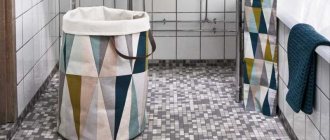
Decorative models
When decorating rooms, elements such as decorative pillows are now very popular. They are often located on sofas and armchairs and create additional comfort.
Their shapes and designs can be very diverse. These are standard square, rectangular, round. And the original shape: in the form of a flower, an egg, a star.
To sew pillowcases for sofa cushions with your own hands, you need to start with a standard operation: measuring the dimensions. The more complex the shape, the more parameters will be needed for manufacturing.
After measuring, you need to determine how to fix the pillow. The usual scent for a pillowcase on a sofa cushion is not very suitable, since it is used more often. It is better to choose a zipper, buttons or Velcro.
Depending on the chosen method of fixation, the required amount of fabric is left for fastening.
If the pillow has an unusual shape, then the desired pattern is cut out.
Afterwards the fastening elements are sewn or basted.
Then the seams are processed and the product is turned right side out.
Afterwards, you can decorate the decorative pillowcase on the pillow in a way convenient for you.
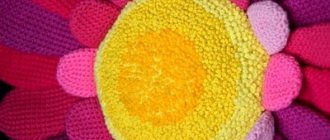
Delightful rose pillow: a master class for connoisseurs of beauty
At the request of many needlewomen, I am publishing a rose pillow master class. Elena Kravchenko from the city of Novomoskovsk is the author of this luxurious pillow. A rose pillow carefully made according to her advice will decorate the interior and arouse the genuine admiration of friends and family.
The result should be a charming pillow in the shape of a lush rose.
1. First you need to make patterns for the rose pillow. Since this is not just a pillow, but a pillow in the shape of a gorgeous flower, the petals should be voluminous. Therefore, each petal is cut out in two copies: one from beige fabric, the second from pink.
Patterns of the upper petals (small and large) with a fold
Patterns of the lower petals (small and large) with a fold
The result should be 8 upper petals and 8 lower ones, 4 from each fabric (beige and pink).
2. You will also need two strips of fabric 7 cm wide and 1 m long.
3. Along the edge of the front side of the upper and lower petals of a smaller size, an edging is attached, aligning the cuts.
4. Then their second halves are carefully adjusted onto the prepared petals with edging.
5. The petals are turned onto the face, the seams are aligned and all irregularities are removed.
6. The petals are bent in half and notches are made (to determine the center of the parts).
7. The finished petals are filled with padding polyester or other filler. A stitch is laid along the bottom edge. The rose pillow will turn out more magnificent if a counter fold is placed on the top part to match the central notches.
8. From the cut strips (7 cm x 1 m), 2 strips are sewn together with the edging, turned inside out, filled with padding polyester and also sewn along the bottom edge.
9. The resulting long padding polyester tape is rolled into a roll and a small rose is obtained. The bottom edge is hand stitched. This way, a DIY rose pillow will be very neat.
10. From fabric of 2 colors you need to cut out 2 more circles, with a diameter proportional to the size of the petals. In this case it is 32 cm.
11. The circles are connected right sides together, laid on padding polyester and stitched together with it, but not all the way.
12. A small hole is left in order to turn the base of the rose inside out and then sew it up by hand.
13. On the resulting circle, you must first find the center, and then secure the two lower petals at the same distance from it, collecting their bases into neat small folds.
14. Petals are attached for strength.
15. Then two more lower petals with the same folds are attached to the base.
16. And these petals are sewn on with machine stitching.
17. The upper petals are sewn in the same way. Thanks to this, the rose pillow turns out to be very similar to the real one.
18. A small rose made from twisted ribbon is sewn directly into the center by hand.
As a result of following the fairly simple steps of the master class, the rose pillow turned out to be lush and elegant! I don’t want to use it as a pillow, because it’s very beautiful.
SHARE! "Cross" will not give bad advice! 
Decoration methods
Decorative pillowcases are often decorated with additional elements, such as embroidery or appliqué, frills or lace, beads and other elements. Elements can be fixed before the product is manufactured or after. Markings for decorations are applied to the outside of the product, then hidden or washed off after decoration is completed.
If you wish, you can also decorate pillowcases purchased at the store.
In addition to standard decoration methods, pillowcases for sofa cushions can initially be sewn from scraps of fabric, which will replace the appliqué effect. This method is more complex, but also economical. You can use unnecessary pieces of fabric or swatches from other products.
To make such a pillowcase, you need to make a pattern, attach scraps of fabric to it, and baste them. You can sew them together either by hand or by machine.
Decorative pillowcases can also be made from any old material, such as a torn shirt or jeans. This will also allow you to create a unique product design.
In the photo of pillowcases you can see different decoration options.
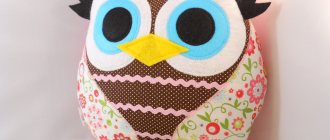
Pillow-toy “Owl”
A funny and bright owl is a win-win gift option for both adults and children. When such a cute bird settles in your baby’s bedroom, he will be happy not only to sleep with it, but also to play with it.
* photo by Svetlana Vovk
To work you will need:
- cotton in two colors;
- felt for eyes and beak;
- black buttons or beads for the pupils;
- ribbon for bow;
- chalk;
- threads;
- needle and pins for sewing;
- scissors;
- lace;
- filler.
Transfer the owl pattern to paper in the desired size (click on the picture to enlarge and download).
How to sew a lace pillowcase
Sewing such a product is not much different from sewing an ordinary pillowcase. It is only carried out in two stages.
The set of materials is standard. The differences are that you need two types of fabric: for the background and with lace.
First, a pattern is made from the background fabric according to the size of the pillow (so it is necessary to leave the edges for seams and hems).
Then the same pattern is made from lace fabric, but with an addition of 1-2 centimeters, since it will be on top of the background, and folded with right sides facing each other.
When applying the background part, you need to make sure that the edges exactly match the lace.
The folded parts are stitched along the wrong side and the edges are processed.
You can insert a pillow into the finished product.
When making pillowcases for pillows with your own hands, you can always show your imagination and design skills by decorating them the way you want.
Fabric selection
When choosing fabric for sewing bed linen, you should consider the following criteria:
- Fabric structure. The fabric can be made from natural fibers (linen, cotton, viscose), synthetic or mixed (contain both natural and synthetic fibers).
- Fabric color or pattern. Fabrics can be plain, with a chaotic pattern on the surface; the pattern can be arranged in coupons (when a composition (picture) is depicted on the fabric or repeated throughout the entire fabric. The disadvantage of coupon fabric is that it needs to be selected so that the coupons are intact, and also in on pillowcases, large compositions will be cut and it will not look aesthetically pleasing. Bright fabrics with an abundance of colors can fade. It is better to choose a fabric with a medium-sized pattern that will look good on the pillowcase. After all, the fabric will have to be cut and the pattern that looks good on a roll may not be cut at all lose your attractiveness.
- Fabric width. Fabrics for bed linen come in widths of 1.45 m, 2.2 m and 2.4 m. The width of the fabric determines how the patterns will be placed on the canvas and whether there will be waste from sewing (lunges).
- Fabric thickness.
The most suitable fabrics for sewing bedding, in particular pillowcases: chintz, calico, poplin, satin, linen, ecocotton, microfiber, silk, percale.
Their composition can be 100% natural or contain admixtures of synthetic fibers. Synthetic fiber increases the wear resistance of the fabric, the resistance of the fabric to shedding, this fabric shrinks less (decreases in size after washing or heat treatment:
- Chintz is a thin cotton fabric, inexpensive, and there are many color options on sale. The width of the chintz is 0.8 m, 1.45 m. The fabric has low wear resistance. Products made from such fabric will last no more than 5 years. After just 2-3 washes, the fabric will look significantly worse than when purchased. The colors will become paler, the fabric itself will look “worn”.
- Calico is a natural cotton fabric, slightly thicker and more expensive than chintz. The width of calico is 1.4 m, 2.2 m or 2.4 m. Calico is available for sale in a wide variety of colors and patterns. Will last a little longer than chintz.
- Poplin is a denser and thicker cotton fabric compared to chintz and calico. Retains its appearance for a long time. Poplin products can last up to 10 years, but such fabric is also more expensive.
- Satin is a more expensive cotton fabric. Has a dense weave of threads. The fabric looks glossy and feels smooth to the touch. This effect is achieved due to the satin weave of threads in the fabric. Service life - more than 10 years. The appearance of the fabric is preserved for a long time.
- Linen is a natural fabric made from flax fiber. The thickness of linen fabrics can vary. Linen fabric is a bit stiff, but gets softer with every wash. The fabric is expensive. During use, it wrinkles quickly, and you will have to put in a lot of effort to smooth it out. The service life is 8-10 years, but high quality linen can last for decades.
Important! Satin and silk are difficult fabrics to work with. It is better not to choose such fabrics for beginners. The fabric slips and because of this it will be difficult to make beautiful, even seams. The product may be warped.