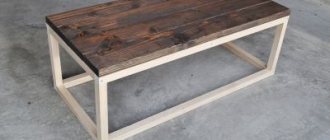
For several years I dreamed of purchasing a light table for sand painting. The finished tables I saw were quite large in size and at a decent price. In addition, I didn’t want to overwhelm an already small apartment with oversized furniture.
In this article I will tell and show how I made a sand painting table with my own hands.
We take the LACK table from IKEA as a basis. It has a very small size: 55 cm x 55 cm and a height of 45 cm, there are many different colors, I chose green. At that time it cost 600 rubles.
Stage 1: Choosing the right acrylic (glass)
Ideally, I wanted to make the top of the table from one thick piece of acrylic with a step around the perimeter. However, acrylic must be milky (white) for uniform light dispersion, but it is quite expensive and generally difficult to find with a thickness of more than 5 mm. In addition, in order to make a step you need a router or something similar. My friends in the advertising workshop (where I bought glass) did not have such equipment. Instead, I ordered two sheets of acrylic from them. One transparent, 8 mm thick and one milky, 3 mm thick.
Glass sizes
- transparent acrylic 480mm x 480mm
- milky acrylic 550 mm x 550 mm (table size)
*in the photo the thick acrylic is also white, in fact it is transparent, just the protective film on it is white
What will you need to make a sand painting table?
The materials and tools needed to make a glowing table with your own hands are inexpensive.
Necessary materials
- Boards.
- A sheet of plywood 10 mm thick or furniture board.
- Glazing bead.
- Plexiglas.
- Ribbon with light bulbs.
- Fork
- Switch.
- Nails.
- Self-tapping screws.
- Water based varnish.
Required Tools
- Thicknessing machine for processing boards.
- Hacksaw for cutting boards and plywood.
- A hex key for driving screws or a hammer when using nails.
Step 2: Measure twice, cut once
- Carefully mark the top of the table. Check your markings, you can attach a sheet of thick acrylic to make sure that it will fit the cutout in the table. The sheet may not be cut out in exactly the right shape, so it is important to control this point.
- I recommend using only new blades for the mounting knife. To make an even cut, use a ruler as a guide. The ruler should not slide on the surface. Don't rush, because... It's very easy for the knife to jump off the cutting line.
- Remove the cut outer surface of the table. There we will see the honeycomb filling, it also needs to be completely removed.
- Make sure the cutout matches our acrylic.
Sand animation: master class
Let's try to learn how to draw a simple sand animation - a tree - this drawing is just right for beginners.
- Before you start drawing, prepare the background: take sand into your palm and “salt” the glass, scattering it evenly over the surface.
- Let's remember what a tree looks like - it starts with a wide trunk. It must be drawn using the thumb, using the entire pad.
- Further, the tree trunk becomes thinner, so you no longer need to draw with the entire pad of your thumb, but with about half of it.
- The upper part of the tree is practically painted with a fingernail.
- Draw the remaining branches of the tree: both large and small. We draw thin branches with a fingernail. Do not forget that all branches cannot be straight; add some curvature to them.
- We ended up with a bare winter tree.
- Now you need to reward the tree with foliage and draw a crown for it. To do this, take a handful of sand in your fist and, gently unclenching it, pour the sand onto the drawing in a circular motion, following the shape of the crown.
- Add a little sand and below, near the tree trunk, in the form of grass. This will give us a succulent maypole.
- Now we need to turn the tree into a truly summer one. Draw fruits of different sizes for him using fingerprints, using all your fingers at once.
- To make the tree fall, use the same movements to add more “fallen” fruits to the ground under the tree.
- After this, outline the crown of the tree even more - start tracing it with your thumb, adding curves to the lines.
- Next, remove any excess using a few fingers or the palm of your hand, giving the tree its true shape.
- This is how our autumn fruit tree turned out.
Sand painting is a short-lived art, but this can be corrected if you record the sand animation on camera, edit the video, put beautiful music on the video, and create an interesting video.
There are many tutorials on the Internet to help you master sand painting. We suggest you look at one of them below:
Stage 3: Trim the corners
Each corner of our table is reinforced with chipboard blocks. They prevent us from installing thick acrylic. If you trim them, they will serve as a good support for the glass. It is necessary to trim to the thickness of the acrylic; this can be done with a regular mounting knife. Be careful, the main thing is not to cut yourself, if you cut off more than necessary, then it’s okay, with the help of scraps and PVA glue you can increase the required height.
Once we are sure that the thick sheet of acrylic fits perfectly into the bed prepared for it, we can begin painting the inside of the table. It may seem that this is not necessary, but it is not. The white color will help diffuse the light more evenly and increase the brightness of our light table.
Tabletop dimensions
Professional and children's sand tables are produced; they have different shapes and sizes. A full-fledged version of the light table for adults 130x70 cm, for children 70x50 cm.
You can choose any size
For a child over 5 years old, they buy rectangular and square products; the best size is considered to be 50x50/75 cm. A light table with a compartment for sand usually has a square screen format.
Why a square table is not the best option for creativity:
- the square causes concentration on the correct form;
- limits the dynamics of thought;
- Suitable for creating symmetrical images.
A rectangle allows you to arrange a picture in a vertical or horizontal format; it makes it easier to determine the centering of the composition. A small screen (30x40 cm) does not make it possible to make wide lines and draw small details. The picture turns out primitive and blurry.
Rectangular tabletop with square screen
The edge around the perimeter of the screen prevents sand from spilling onto the floor. Its minimum height is 4 cm; it is more convenient to use when the edging rises 5–6 cm above the screen. The total height of the tabletop is within 10 cm.
A box with a 5 cm side is the best option
It is convenient to draw when the tabletop has a compartment/container for sand and a large rectangular screen.
Stage 4: Electrical
Here I had to turn to specialists (familiar advertisers).
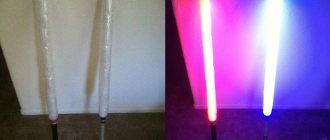
- We took 5 meters of self-adhesive LED strip. This tape is powered by 12 volts, so a power supply is required in order for the sand painting table to be plugged into an outlet. The ribbon comes in a variety of colors, but the color chosen was cool white. Because it feels like the brightest.
- We wanted to make a switch, but we didn’t have one at hand
- A hole was drilled in the bottom of the table through which the plug was passed. At the opposite end of the plug, several clamps were tightened so that it did not fall into the hole.
How to choose sand for a children's sandbox with a lid
Traditionally, the sandbox is filled with any sand that is freely available. However, if given a choice, preference is given to fine-grained filler. Large fractions of sand create invisible scratches on the skin. Over time, the body begins to peel off, causing discomfort to the child.
If there is a choice of color, then yellow river sand is preferred. The filler contains little dust and clay impurities. It is advisable to wash quarry sand before backfilling.
It is better to fill plastic play complexes with purchased sand. The special filler is sold with machined edges. This sand does not scratch plastic and is comfortable for a child’s body.
Stage 5: Lighting Installation
Place the tape on the table, but do not secure/glue it. Make sure that the chosen laying pattern is ideal and the entire tape fits. It is better to start gluing from the end that is close to the connection cable, so that in the end you do not have to drill a new hole. The adhesive tape is quite strong, although I did add a few strips of double-sided tape on the folds and corners just to be safe.
We connect the tape to the power source. Tests show that everything works.
Stage 6: Installation of acrylic
Mark and drill holes in the first sheet of transparent acrylic. Next, we use this sheet as a template for drilling milky acrylic. The holes must be larger than the screws, otherwise the acrylic may crack when screwed.
The corners of milky acrylic can be rounded.
Select fasteners that are the right size for you. There are self-tapping screws of different colors and with different heads; I liked the shiny ones with a round head, which I chose.
Roll it all together and you're done! Try to keep the glass clean, otherwise dust and dirt on the inside of the acrylic or between two sheets will be very noticeable when you turn on the light table.
Types of sandboxes with a lid by design
The ease of use of a sandbox depends on its design. The lid plays a significant, and even the main role here.
Classic sandbox with lid
A simple version of the lid is a shield. Because they have to reschedule it several times every day, many parents don’t like this idea. The wooden shield for women or teenagers is heavy. The lid takes up free space in the area, causing children and adults to trip over it.
Sandbox with lid-bench
The ideal option is a transformer. The lid is assembled from separate segments rotating on hinges. After transformation, the shield turns into a table or comfortable benches.
The transformer can be easily unfolded by one person. Sometimes 2 children aged 6 years can handle the lid.
Finishing
After manufacturing and assembling the drawing table, it needs to be given an attractive appearance. Before painting the product, it should be sanded . Once you are sure that there are no nicks, chips or other defects on the table, you can begin painting.
Attention : finishing will not only improve the aesthetic qualities of the drawing table, but will also extend its service life.
The table can be painted any color . The legs of the product can be made colorful and multi-colored. In other words, use your imagination and create exclusive and unique sand painting tables with your own hands.
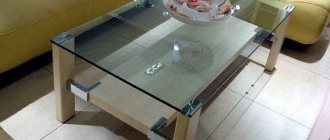
Tip : a coffee table, a children's table, or even a glass table can also become a bright decoration for your home.
Making a sandbox out of wood with your own hands: step-by-step instructions
The most optimal model for a children's playground is a playground made of wood. Due to the fact that this building material is environmentally friendly and widespread, it is most often used in the manufacture of sandboxes. The assembly process itself takes minimal time. drawing at hand , it can be made in just a few hours.
Step-by-step instruction
In terms of assembly, this design is more than simple. A detailed diagram will make it possible to calculate the required amount of building material. The process of its manufacture itself consists of several successive steps:
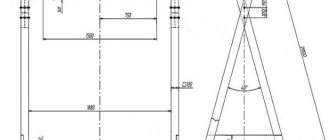
- Stage one. Construction drawing.
The best option is to choose the simplest model for manufacturing, and later add all kinds of additions to it in the form of a bench , canopy, etc. Below is a drawing of such a design.
Drawing of a wooden model
As a rule, almost all sandboxes are square in shape, with a certain height. Round designs are less common. In addition to the square shape, it can be made in the form of a car , a truck, a small house, ship , etc. Regardless of its configuration, its functional purpose will be the same - to hold sand.
Important: before planning a sandbox, you need to decide how many children will play in it.
- Stage two. Quantity of material.
Having decided on the type of its execution, you can begin to prepare the required amount of building materials. Below is a table that contains a list of everything necessary that may be needed during its construction.
| Material name | Purpose of use | Required amount | Note |
| Lumber in the form of boards 30 mm thick | For making side walls | 8 pieces | Must be carefully sanded and coated with wood primer |
| Lumber in the form of boards 30 mm thick | For making seat bumpers, toy storage compartments, etc. | 4 pieces | Can be sanded and primed |
| Beam 50 mm | For corner structural elements | 4 pieces | Can be sanded and primed |
| Agrofibre or geotextile | To arrange the bottom of the sandbox | 2 rolls | If desired, you can replace it with thick film |
| Wood fasteners (bolts or self-tapping screws) | To assemble the structure | 50 pieces | |
| Special antiseptic for wood | To pre-process all sandbox parts | ||
| Liquid composition in the form of a primer for wood | To provide wood with protection from insects and moisture | ||
| Wood enamel | For painting all structural elements | 1 liter | Can use different colors |
In this case, the length of the beam will depend on the height of the structure, which is determined based on the age category of the children. It is better to choose boards with a thickness of 30 mm. This will give the sandbox strength and protect the wood from cracking.
- Stage three. Marking the place.
At this stage you will need several pegs and a long rope. They are necessary to mark the outer perimeter of the future site. Inside the resulting square:
- 3-4 cm of soil is selected.
- Drainage is installed, which is a tightly compacted cushion consisting of a mixture of gravel and sand.
Important: If a film is used instead of agrofibre or geotextile when arranging a structure, it will be necessary to drill a couple of holes in it for water drainage.
To prevent puddles from remaining around the structure after rain, you can also install a cushion around its perimeter - drainage laid around the sandbox.
- Stage four. Making a sandbox.
The process is simple to perform if you have all the necessary materials and workpieces at hand. Execution technology:
- They make a support for the future model. Having marked the perimeter, pegs are driven into its corners.
- Next, on each side of the perimeter, a board is installed, previously opened with an antiseptic, secured with self-tapping screws or bolts.
- Then the next tier of boards is attached.
The finished structure is opened with paint, dried, and filled with sand. Below we will talk about what type of sand is best suited for filling.
We make an addition in the form of a lid and a table
A rational, practical solution that protects the playing space from getting wet and debris is a design model with a transforming lid, which, when opened, folds into a bench and table.
Sandbox-transfer with a table and bench
Taking into account the dimensions of the sandbox, to assemble a transforming lid with a table you will need several boards, two door hinges, screws or bolts for fastening.
Table technology:
- One board is taken and attached to the sandbox box using self-tapping screws.
- Using two door hinges, the second board is attached to the first, well-fixed board. This will make it possible, if necessary, to adjust the width of the table.
To make a bench you will need approximately six boards of the same size (it all depends on the dimensions of the structure). They will be used to make the backrest, seat, and as an attachment to the frame.
The diagram below shows what the bench of the future design will look like.
Bench diagram
Bench technology:
- The hinges are screwed to the outside of the lid. This must be done in such a way that when it opens upward, the internal slats bend.
- To fasten the backrest, a beam is attached to its two edges. Its length must be designed so that it can guarantee the stability of the backrest.
Important: to prevent the hinges from becoming rusty, they must be painted before installation.
Tools
Tools for making a table you will need :
jigsaw;- drill;
- screwdriver;
- self-tapping screws;
- ruler;
- assembly knife and new blades for it;
- building level.
From the materials you need to prepare:
- a plywood box with high sides (you can buy it in a store or make it yourself);
- acrylic glass;
- whatman;
- Double-sided tape;
- special glue;
- 4 bars for legs;
- lamp or LED lamp.
Help : with a competent approach to making a drawing table, it will take you several days. You can assemble the product in a day, but for it to completely dry and stick together properly, you will need to wait a couple more days.
Drawing
As for the drawing, here you can show your imagination. It is necessary to make it more convenient for you to manufacture and assemble the product, and to avoid mistakes during the work process. Typically, a sand painting table is rectangular or square in shape. Its height and length can be any .
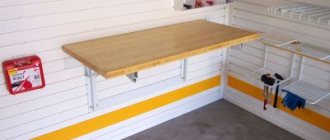
Light tablet - also known as UPTABLE copy table
I first read about the light tablet in a book by Miu Mau - “The Diary of a Maniac Designer” by Yana Frank. There is a whole chapter dedicated to copying tables and what a convenient device they are for artists and sympathizers. But the description of the table for illuminating the image from below in the book created the impression that it was something bulky and heavy, and seemed to be necessary only for artists who draw a bunch of pictures in ink or in a continuous stream. For example, for comics artists - because it makes it easy to outline a pencil sketch with a black outline. Now, while working on articles about creative and unusual gifts, I found a modern version of light tables - UPTABLE - lightweight, space-saving and comfortable. The possibilities for their use by Second Street residents are almost limitless:
Still, probably in childhood, we did this kind of thing - you put a piece of paper with a drawing on the window, a blank sheet of paper on top and, sticking out your tongue, carefully trace the contours - then all that remains is to outline the edges with a brighter marker and color the finished picture. True, in the process of such sketching, my hands became numb, it was possible to draw only with a pencil, and it was very difficult to redraw something from the book - holding it, completely open on a separate sheet, with one hand, which also holds a sheet of paper, is quite difficult.
Product Features
A table for drawing with sand is a structure with a transparent, illuminated tabletop, which is surrounded by additional sides so that when manipulating with sand it does not spill out. Some models are equipped with special compartments for storing tools and sand. The luminous screen is made of acrylic, glass, plexiglass. Light elements are placed inside that will not heat up during operation. Lighting helps make sand paintings more impressive and expressive. In this case, it is necessary to observe the intensity of illumination.
The light should not strain the eyes, but it should be bright enough to provide contrast to the designs.
Making a table for sand painting with your own hands is not a complicated procedure, but it will require carefully following the steps of the instructions. In addition, you need to think about what materials to choose, decide on the model, dimensions and shape of the future product. Making your own equipment for creating sand paintings will significantly save money.