What is plastic chocolate for?
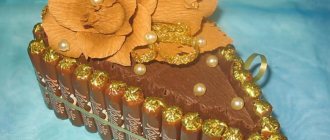
Decor for a cake made of plastic chocolate.
A mass in the form of elastic dough is used to make decor for cakes, pastries and other sweets. Plastic modeling chocolate is harmless and pleasant to the taste. This is its advantage over mastic.
Plastic is a good material for modeling various decorative elements. Small themed figurines, flowers, coverings and much more are made from it.
The resulting chocolate masterpieces are used to decorate confectionery products. The mass is prepared according to different recipes.
Mastic is made from dry or condensed milk. Plastic chocolate is more difficult to prepare. Working with mastic is easy and convenient. But nowadays many chefs prefer chocolate plastic. It is elastic, easy to sculpt, and retains moisture for a long time.
What is it and what is it for?
Chocolate in the form of a plastic mass is intended for modeling, creating sculptures for decorating desserts.
From the molding composition you can make flowers, openwork friezes, compact sculptures for confectionery products. Using a plastic material, the surface of cakes, truffles, and cupcakes is coated with glaze.
The benefits of elastic chocolate are as follows:
- environmental friendliness of the composition;
- many design options;
- pleasant taste and aroma;
- the material is convenient to use;
- possibility of coloring chocolate mass;
- decorations are edible;
- the presence of different methods of preparing the mass according to consistency and texture;
- possibility of long-term storage of products.
What kind of chocolate can I use?
For special occasions and children's parties, you want the table to look attractive. Beautiful edible figures will help you do this.
For chocolate modeling, any chocolate that is prepared with the addition of cocoa butter is suitable. For example, milky, dark or bitter. It's a matter of taste. But it is better to choose a quality product.
Instead of chocolate, if desired, use industrial glaze. It is sold in confectionery departments in the form of thick tiles and figures.
Glaze
White chocolate dyes well into other colors. The dough can be given the desired color in different ways. Dry food coloring is the cheapest. They need to be diluted in water and then added to the dough. The color saturation will depend on the amount of dry matter.
The gel dye is very easy to use. Just add a few drops to the dough and you will get the desired color. Cooks also use fat-soluble dyes in granular or liquid form.
Water-soluble dyes should not be used. If a child is prone to allergies, then the best option is to paint the product with carrot, beet and other juices.
The white sweet confectionery product is the most capricious. At high temperatures it “floats”. Therefore, it is better for novice cooks to use dark chocolate.
It is convenient to wipe dirty hands with a dry cloth. Experienced cooks also advise using thin medical gloves.
How can you paint figures?
There are natural dyes (berry, vegetable juices) and gel-based food dyes, sold in stores. It is enough, at the end of the melting process of the white delicacy, to add three drops of the chosen color and mix thoroughly. The coloring matter can be applied to the inner surface of the mold.
Kandurin is widely known. This food coloring helps achieve golden, silver or bronze tones.
There are two ways to apply it:
- Dip the brush into a container with kandurin and brush it over the sculpture several times.
- Mix kandurin with vodka in a ratio of 3 to 1. Paint the figures using a sprayer.
Is it possible to eat plastic chocolate?
It happens that the figures on a cake or other sweet products are made of inedible material. Plastic chocolate is eaten with great pleasure, as it is delicious.
Plastic chocolate decorations
Food colorings are used to make mastic, but sculpted chocolate does not contain them.
Of course, if a person is allergic to some components, then he should not harm his health. There are different recipes for making such a product. For example, if you have an allergic reaction to honey, it is replaced with syrup.
Necessary tools for work
To make the figures you will need not only chocolate, but also some culinary tools.
- To create voluminous decorations, prepare molds with various recesses (flowers, butterflies, bunnies). They can be silicone, plastic or metal. It will not be difficult to remove cooled chocolate products from them.
- Pastry syringe or bag.
- Pyrometer is a thermometer designed to determine the temperature of chocolate mass.
- Cling film, tracing paper, parchment.
- Knife with a sharp blade.
- Food colorings.
- Pencil for tracing the contours of figures.
Recipes for making plastic chocolate
To prepare plastic chocolate for modeling, use recipes with different ingredients. The process of preparing the mass is short, but it should sit for a day at home or in the refrigerator. The molded mass should not be kept in the sun.
The classic recipe for plastic chocolate is this:
- white chocolate or chocolate icing – 455 g;
- glucose – 120 ml.
Melt the chocolate and warm the syrup a little. Mix everything quickly and wrap in film. Don't get the plastic too hot, as hot chocolate is not good for the job.
Chocolate plasticine is made quite quickly. It will take no more than half an hour to prepare. But the resulting mass should be kept at room temperature or in the refrigerator for 24 hours. You can't keep her in the sun.
You should not sculpt from such material in a hot room, otherwise the figures will not retain the desired shape. The best temperature is below 20 °C.
Properly prepared mixture molds well, does not crumble, and dries quickly.
Tips for beginners
- It is best to choose Belgian chocolate. It has excellent taste.
- You can add a little honey or glucose syrup to the melted chocolate.
- Chocolate glaze is inferior in quality, but nevertheless suitable for creating decorative elements. It can be used to write words and draw patterns.
- If you don’t have tracing paper, you can put the paper with the designated pattern in a file, circle it with the mixture and put it in the cold.
- For work, you can use silicone ice cube trays.
- Cool and heat the chocolate mixture gradually. A white coating may appear from rapid freezing, and lumps and layering from rapid heating.
- Before removing the figures from the mold, you need to lay down fabric in 3 layers so that cracks do not appear on the crafts. The molds should not be raised to a great height.
- In order to connect two parts of the product, one half is spread with chocolate, applied to the other and held for 2-3 seconds.
- In order to get a beautiful shade, add a little more vodka to kandurin.
A simple cake will become an exquisite dessert if you decorate it with chocolate products. Let your imagination and patience be inexhaustible!
Molding chocolate paste
You can make paste at home.
It requires the following ingredients:
- chocolate – 500 g;
- glucose syrup – 250 g;
- water – 15 ml.
It is better to weigh the ingredients on an electronic scale. If the proportions are observed, the modeling mass will have the desired consistency.
The chocolate needs to be melted and the syrup heated at a temperature of approximately 40 °C. Mix these two ingredients until hardened. Mash a small part of the mixture until the cocoa butter separates - it should drip.
The mass in a special container is placed in the microwave. It needs to be checked every half minute until it softens. Add water to the hot mixture and stir. Leave the paste in a plastic bag until it cools completely. Plastic chocolate is ready for making shaped products. The decorations made will delight you with both taste and harmless composition.
The syrup is easy to make yourself. To get 100 g of syrup, you need to boil glucose in tablets or powder in the amount of 64 g with 36 g of water until dissolved. Towards the end of boiling, add 1 tsp. glycerin. This syrup can be stored in the refrigerator for several months.
Ingredients for molding chocolate paste
Chocolate molding paste
To prepare the pasta you will need:
- black and white chocolate – 50 g each;
- liquid glucose – 30 ml;
- pink food coloring.
Another recipe from French confectioners:
- chocolate – 340 g;
- glucose – 125 g;
- syrup from sugar and water – 25 g;
- cocoa butter – 25 g.
Take water and sugar for the syrup in equal proportions and heat until completely dissolved. Melt chocolate with cocoa butter and cool.
Mix all ingredients thoroughly. Wrap the modeling mixture in cling film for 60 minutes and then leave in the refrigerator or cool place for 24 hours.
The chocolate mass turns out to be plastic, and it is very convenient to sculpt products from it. It’s better to take it in small portions so that it doesn’t get too windy.
Dyes for colorful flowers
As you already understood, only white chocolate lends itself best to coloring. For this, natural or non-toxic dyes are used - gel, powder or fat-soluble.
Powder dyes are dissolved in water and added to the plastic mixture after mixing. Gel - into the dough and knead it. Fat soluble - during cooking.
Recipe for plastic chocolate with honey
Honey and chocolate
For the recipe for plastic chocolate with honey you will need the following ingredients:
- chocolate – 100 g;
- honey – 30 g.
Melt the main product, mix with honey until smooth and leave for a day. Any honey will work for white chocolate. Many housewives recommend mixing dark chocolate only with liquid honey.
Any figures are made from the molded mass, after first kneading it to the consistency of plasticine. For example, rose petals, cartoon figures, cars and much more.
Rules for storing modeling chocolate
At home, it is recommended to store plastic chocolate for modeling in the refrigerator, wrapped in cling film. It should not be placed in the freezer, as at very low temperatures the structure of the product changes.
If it is not possible to put the mass in the refrigerator, then choose the coolest place in the apartment. Vacuum packaging is required, otherwise the molded mass will become hard. Long-term storage in a warm room will cause the product to age and change its taste.
During modeling, the chocolate mass should only be in a dry container.
Step-by-step instructions for sculpting
The photo below shows different sculpting options.
Step-by-step instruction:
- Take the dough out of the refrigerator and leave for half an hour.
- Cut off the desired piece and knead it.
- We separate smaller pieces from it and roll them into balls.
- Take one ball and make a petal.
- Wrap it around a toothpick or wire on top. We do the same with the second ball, placing it in a second circle. Repeat the procedure until a full rose is formed. Usually you need to make 7 petals for this.
How to make flowers using molds, watch the video.
How to soften sculpted chocolate after refrigeration
Heat the sculptured chocolate in a water bath
Preparing sculpted chocolate for use after storage is quite simple. The necessary pieces of mass are separated and crushed by hand. The bulk mass can be briefly placed in the microwave. However, it is best to do this in a water bath. The container with the mass is placed in a larger container with hot water. Heating continues until the desired consistency of the mass. Steam, rather than water, is considered more professional for melting.
If the mass is very frozen, then let it lie at room temperature for half an hour in its packaged form.
So, in order to make decorative products from plastic chocolate, you need to choose your own recipe and enjoy the process and the result.