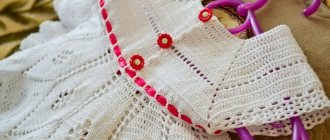
You can knit an interesting product yourself - crocheted bunny slippers. These slippers can be knitted by an amateur because they are crocheted. Crocheting is easier for a beginner to master, so you will definitely get these slippers.
When choosing threads, pay attention to those threads that contain a large amount of wool. Or on threads made entirely of wool. Then the slippers will be very warm. For the sole, thinner threads are suitable, you can use synthetic ones. Then there will be tight knitting. The sole will look like an insole, so the slippers will last longer and their shape will be preserved for a long time. But for the rest of the slippers, you should not use synthetic threads, as they may cause allergies.
You can wash the slippers in a washing machine. However, you should not squeeze them too hard, otherwise they will stretch.
Top part
For slippers we need:
- 50 grams of white thread;
- 50 grams of pink threads;
- cardboard;
- scissors;
- needle;
- hook 2.5 mm.
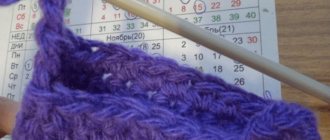
The following tutorial will help you easily knit the top of the slippers. First, let's look at how to crochet. We put loops on the hook. If you are counting loops, then we do not count the first one. Let's make a single crochet. Next we make a loop to lift the column. We insert the hook into the loop of chain stitches, and thread a new loop into these loops.
For double crochets, you need to cast on stitches in the first stitch. There are as many stitches as high row you need. The more stitches you cast on, the larger the holes in your knitting will be.
Let's start with the slippers. It is necessary to make holes in the felt sole. And we start knitting slippers by tying the soles with threads. Then we continue to knit the side parts of the slippers.
We knit 5-7 rows. Do not tighten the thread too much.
Related article: Do-it-yourself doll stand: master class with photos
We close each circle with a connecting column. Before each row we make an air loop.
The toe is knitted according to the following pattern.
Crochet Bunnies slippers: diagrams and description
The description is given for the size of slippers with a foot length of 14 cm and a height of 4 cm.
Knitting pattern and binding
We need 50 grams of yarn.
To knit larger slippers, use thicker yarn.
Let's start knitting a foot of bunny slippers: cast on 20 chain stitches.
We tie the loops on both sides with single crochets. We get an oval-shaped product.
We knit 3 tbsp into the first and last loops. without a crochet.
Rows 1-2: single crochet.
We make an extension for the heel and toes, making additions: we knit stitches with one and two crochets. The number of yarn overs is indicated in the pattern by perpendicular stripes.
The harness is considered an extension of the slipper.
We knit the ears
The ears are knitted very simply. We make 11 air loops and knit 9 single crochets. In the 10th loop you need to knit 5 single crochets and then knit the second side.
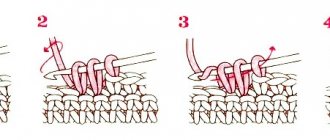
Next we tie the resulting part. We make 9 double crochets, then in 5 loops we make 2 double crochets, then again 9 double crochets.
This diagram shows how to make a double crochet.
Sew the ears to the toe. Can be sewn on using thread and needle.
What you need for fleece slippers
Having decided to start sewing fleece slippers, you first need to stock up on consumables. The main consumable for this process will be fabric - fleece.
Important! Fleece is a synthetic non-woven material that absorbs moisture well and retains heat. It costs much less than natural wool or cotton. In fabric stores, fleece is presented in several types, differing in the method of production and the density of the fabric.
The advantages of the fabric include the following:
- hypoallergenic;
- ability to pass air;
- lightness and wrinkle-resistance;
- strength and wear resistance.
Disadvantages include susceptibility to electrification and the fact that fleece attracts dust, wool and other small debris. The use of special products that remove static electricity for washing and caring for various types of fabrics will help to cope with these disadvantages.
Interesting! Fleece is used for sewing home and casual clothing for adults and children. It is used to make toys, towels, blankets and is used for upholstery of upholstered furniture.
You can purchase fabric at any store that sells handicraft supplies. A large assortment of plain and multi-colored fabrics allows you to choose something suitable for any purpose.
In addition to fabric, to work on sewing slippers, you will need material for the sole. In order for the product to be fully suitable for permanent use, and not serve as a substitute for socks, it is necessary to find the optimal material that would not slip on the surface of linoleum or tiles. It is especially important to have non-slip soles on children's indoor shoes. Experienced needlewomen advise using raincoat fabric, leatherette, thick denim and other fabrics of this kind as fabric for the sole.
In addition, you will need:
- insulation (sintepon);
- graph paper for patterns;
- dry soap or pencil;
- needles, threads, pins;
- scissors;
- sewing machine.
You may also need ribbons, beads, decorative rhinestones and more to decorate the finished product. If slippers are being sewn for children, you can cut out animal faces from leftover multi-colored felt and sew them onto the toes or heels.
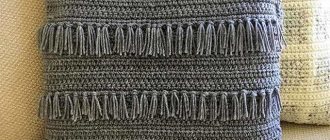
Let's move on to the tail
Cut out 2 circles from cardboard with a hole in the center, 4 cm in diameter.
We wrap the circle with knitting threads in several layers.
Then you need to cut the threads in a circle.
Next you need to connect two circles. To do this, we thread the thread and tie the parts tightly.
The result is a tail like this.
Sew it to the back of the slippers. If the pompom turns out uneven, then trim it.
All that remains is to make the muzzle. They sell ready-made eyes that just need to be glued on. But you can embroider the eyes and mouth yourself.
Dragon slippers
Not all kids like to wear regular socks, but even the pickiest child will like these funny little dragons.
Constructing a pattern
You only need to take three measurements: the circumference of the lower leg, the height of the product, and the child’s footprint.
- When constructing the sole, the child's foot or insole is outlined on paper. Round off the area where the fingers are located with a smooth line. Add an additional 1 cm along the edge for freedom of fit.
- Measure the circumference of the sole. This measurement allows you to determine the length of the lower part of the main part of the sneaker.
- Measure the circumference of the shin, divide by two, add 1.5 - 2 cm - this is the width of the boot.
- Design a pattern as in the photo. The height of the slipper is optional.
Assembly sequence
Prepare all the necessary materials for work: fleece in two colors - for the outer layer and lining, braid - this will be a comb, buttons, a piece of linen elastic. Fur is used as a trace in this master class.
- Cut out the necessary parts, attach the tape between the front elements.
- Sew the sides.
- Connect the top sections of the products, machine stitch them, then fold them.
- Make two parallel seams on the boot, this will be a drawstring for threading the elastic.
- Thread the elastic band.
- Sew on the tongue.
- Use pins to attach or baste the sole. Then stitch using a machine stitch or overlocker. The seam is made inside the product.
- Turn the dragons inside out and sew on the eyes.
Product assembly
The main fabric of this model is fleece with a brown pattern, the lining is the same, only gray. Insulation – thin padding polyester. The sole is anti-slip “foot” fabric.
Sole assembly
Fold the layers of the sole in the following order: fleece, insulation, leather or anti-slip fabric. Stitch them together.
There are two ways to connect the sole to the main product: with seams outward or seams inward.
Processing with seams inside
The advantage of this treatment is a very neat appearance. Nothing is visible from the outside.
Negative aspects: due to the fact that thick seams are located on the inside, there is a decrease in space in the shoes and their size decreases. They can interfere with the foot when walking if the boot is not large enough.
The parts are connected as follows:
Important: the thickness of the sole layer is quite significant, so it is advisable to stitch this area manually or using an industrial sewing machine. A household machine may not be able to handle it.
Processing with seams facing out
The advantage of this treatment is that the foot in the boot is very comfortable, the thickness of the seams does not interfere with it.