How to make a saber out of paper? Many parents of boys have thought about this question. You can use it to decorate the belt of a carnival costume of a pirate or hussar, or let your child play “robbers” with other children. This is safer and more reliable, since the child will not injure anyone in the heat of the game. A saber differs from a sword and a dagger by the presence of a handle that protects the warrior’s fingers from an enemy’s blow. The blade of such a weapon can be straight or slightly curved.
In this article we will look at how to make a saber out of paper in different ways. For decorative purposes, the blade can be rolled from several layers of thin A4 paper using the origami technique. A saber cut from corrugated packaging cardboard will be more durable. The surface of the blade is additionally decorated with silver colored paper or covered with foil to imitate metal. The handle can be made brighter, choose a color that harmoniously matches with the carnival costume. For active games, you can leave the craft without decoration, since for the next attack mom will have to make a new blade.
Features of paper weapons
Making a sword out of paper is not difficult if you choose a clear algorithm with an accurate description. There are several different ways to make a sword of a certain shape and size out of paper. The easiest way to make a weapon is using the origami technique, but the appliqué technique is also suitable.
Required materials and tools
To make a craft, you need to prepare the following tools and materials:
- It is more advisable to make a solid base from cardboard, but in some models it is still preferable to use paper.
- Scissors or a utility knife for cutting out parts.
- PVA glue or double-sided tape for fixing individual parts.
- A simple pencil and ruler for preparing a template and sketch.
Additionally, decorative elements can be used - satin ribbons, plastic stones, decorative chains. To make the craft more realistic, paints are used - silver for painting the blade and gold (bronze) for the handle.
Where are they useful?
The use of cellulose swords is very widespread. There are many options for using such unusual weapons:
- A sword made from money can be an excellent gift for a friend’s birthday if you put the craft in a postcard or gift envelope.
- A paper sword is an interesting and safe attribute of a story game for boys.
- A beautifully crafted weapon made from cellulose can become the basis of a themed party for a bachelor party or birthday.
- Large swords or sabers are useful in school theater productions as props.
You can find many more ways to use it, the main thing is to get into the theme of a holiday, event or party.
Paper crafts are a useful and exciting hobby
Paper crafts are a useful hobby for adults and children - it's fun and interesting.
A sword can be made from paper in different ways, using the origami technique, or simply cutting it out of thick cardboard using a stencil, and then decorating your resulting craft, the main desire is all in your hands. And in order to make your product more realistic, you can wrap the sword with foil. This way it will look more like the real thing. In our article we will look at several ways to make a sword out of paper. We have selected some interesting instructions and videos for you.
Methods for making a sword from paper
There are quite a large number of options for how to make a sword out of paper. It can be a flat or three-dimensional model, made using various techniques of working with paper.
To make weapons you will need paper, scissors, glue, cardboard and additional materials for decoration.
Tags
thick paper and thick paper thick paper or thick paper or If the paper is not enough If the paper is not enough newsprint and thick paper and paper from paper paper sword Sword from a pirate sword from a Spartan sword creating a sword blade of a sword finished sword. cut out the sword.
creating photo views diagram comment become the most use what step by step best topideas and similar we will paper reply add easy
A simple sword made from a sheet of paper
One of the simplest options is a sword made from A4 paper
To make the model you will need:
- A4 sheets – 4 pcs.;
- Scissors;
- Stationery glue;
- A piece of cardboard 5 cm wide, 12 cm long;
- Thin tape.
Operating procedure:
- The two sheets are glued lengthwise using glue or tape. The workpiece is rolled up to form a tube.
- To prevent the pipe from unwinding, the edge is secured with glue.
- A hole is cut in the center of the cardboard blank in accordance with the diameter of the base.
- The tube is threaded into the workpiece and secured at a distance of 3 cm from the edge.
- The third sheet of paper is for the pen. A blank is made from it the width of the sheet, which is secured with tape above the cardboard guard.
- From the last sheet, a workpiece with a slightly smaller diameter than the base is rolled up. It is inserted inside the base.
- This way the sword will be stronger and will break in battle. The tip of the blade is cut at an acute angle, the end is secured with tape.
To make a sword, you can use colored paper or paint the model with paints. You will get a real ninja weapon.
Tsuba
Tsuba is the main decorative element of any katana. Under no circumstances should a tsuba be confused with a guard! The guard is intended to block a blow and counterattack, and the tsuba is intended solely as an element of support for a piercing blow and as a decorative component. There were dozens of different versions of tsuba, but we take the round cross-shaped one - mocha. This is exactly the option that adorns Kusabimaru.
I copied a real tsuba from the monitor. Its diameter is 8.5 cm. The wedge-shaped cutout is intended for the blade, and the smaller one is needed for attaching accessories - kogai or kogatana. We cut out 22 of these blanks from cardboard or 66 from paper.
We glue all the cuttings together, put them under a press and give them 24 hours.
Sword for a pirate
Making a crooked pirate sword out of paper with your own hands is also not difficult. For the model you will need thick cardboard and metal foil.
- First you need to make a pattern. You can draw it yourself or find a ready-made version.
- The pattern is placed on a sheet of cardboard and outlined with a pencil. The sword and hilt are cut out as one piece.
- To make the model look like the real thing, the blade is wrapped in foil.
- It is preferable to apply an outline to the foil and cut out two blanks. They are then glued onto the sword. For gluing it is better to use PVA glue.
- A crosshair and hilt are cut out of thick dark-colored paper and strung onto the handle. For strength, the elements are secured with tape.
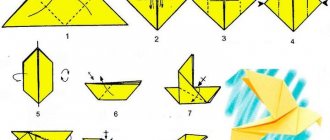
Master class No. 2: curved pirate sword made of thick paper
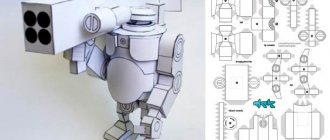
Another interesting and unusual lesson that is quite simple to implement - print out the diagram and do everything strictly according to the instructions.
- and print it to the desired scale. Glue or redraw all the details onto a sheet of thick paper (60-100 g) or thin cardboard.
- Cut out all the details along the bold contour lines. Make slits where necessary.
- Glue the rectangle folded along the dotted lines with the drawn handle.
- Fold the rectangle with the drawn blade in half along the dotted line.
- Insert a rectangle with a drawn handle between the two sides, fit the contours to each other, and glue the sides of the rectangle with the blade on top of the inserted part.
- Once the paper is dry, cut out the blade and handle along the outer contour lines.
- Place the crosshair and hilt on the handle.
Musketeer's sword
If you need to make a sword very quickly, then a sword made from ordinary newspaper is the best option.
You will need an old newspaper, tape, a piece of cardboard and scissors.
- Newspaper sheets are placed on top of each other and rolled diagonally into a tube.
- The edges are secured with tape.
- One end of the tube must be bent, slightly pressed, and a handle for the blade must be bent out of it. The handle is secured with tape.
- An oval with a hole in the center is cut out of cardboard. The blade is threaded into the hole.
- To prevent the hilt from slipping, you need to wrap the tube with a strip of paper and secure it with tape.
- All that remains is to color the finished product with felt-tip pens or markers.
All products are made quite simply. If you watch a video where swords made from paper are presented, you can find many other options and interesting ideas. The main advantage of this weapon is safety.
Pirate knife
A pirate knife for a children's game or theatrical performance is best made from cardboard.
On a cardboard sheet of the required size, draw with a pencil the shape of a pirate's bladed weapon and cut it out. Then attach the cut out sample, trace it on the cardboard and cut it out again. Make sure all edges match.
After the 2 parts are ready, you need to glue them and paint them. Or you can wrap the blade with shiny foil and cover the handle with colored paper.
Serrated Spartan Sword
Another option for creating a sword using a ready-made template.
Here's what you'll need to get started:
- At least three strips of thick paper or cardboard 20x100 cm, as well as an additional strip of cardboard 20x3cm
- PVA glue or hot melt glue
- Scissors or a utility knife for cutting out parts
- Paints (we use black, brown and silver)
- Two pieces of wire equal in length to a sword blade
- Sample: .
Procedure:
1. Print the template and cut out all the parts. Glue them together as shown in the diagram to get patterns in the shape of a finished sword.
2. Place the patterns on a sheet of thick paper or cardboard, trace and cut out the sword. Repeat this step three times to get three identical shapes. If the paper is not thick enough, you can make more layers.
3. Do the same with the handle parts - transfer the template to cardboard and cut out 4 identical shapes. If the paper is not thick enough, there may be more figures, but their number must be even.
4. Next, place 3 sword-shaped blanks on top of each other and fasten them with glue. This is done in order to give the final product the necessary rigidity.
5. Glue 2 additional handle parts on the top and bottom of the sword handle, as shown in the following photo.
6. All that remains is to make a characteristic bulge on the blade. To do this, take the wire and glue it exactly in the center of the blade, starting from its tip towards the handle. Do the same with the other side of the blade.
You can do without this detail, but with it the sword will look more similar to its prototype.
7. Wait until the glue has completely dried and paint the sword. Proceed one by one, painting one detail after another. When working on one area, wrap the rest with paper to prevent paint from bleeding.
Sword made of newsprint and cardboard
And finally, a quick project for which you don’t need templates or patterns. It is enough to have a newspaper, a piece of cardboard, scissors, markers and tape on hand.
1. Place two or three sheets of newspaper on top of each other and roll them into a tube diagonally, as shown in the figure:
Secure the edge of the tube with tape.
2. Roll the bottom end of the tube as follows:
Secure the edge with tape.
3. From a sheet of thin cardboard, cut out an oval with a hole in the middle and a rectangular strip. The hole should be large enough to fit your newspaper tube through. Color both parts with regular markers.
4. Insert the tube into the oval. After lowering it all the way to the handle, wrap and glue a rectangular strip of cardboard around the tube to keep it in place.
Finished swords:
Painting
We paint absolutely all parts black using any black paint.
We paint the blade itself with nickel-plated spray paint in 3 layers at intervals of 5 minutes.
We paint tsuba, kashira, fuchi and habaki with golden paint. One layer is enough.
Kusabimaru is the ancestral sword. He managed to attend many battles. That’s why we deliberately “age” all the details. To do this, use three fingers on the paint that has not yet dried, around the drawings, marks, etc. You can make scratches with your fingernails. Don't overdo it!