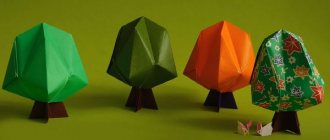
Even a paper craft can be a great gift if it is made with love. Do you want to know, how to make a vase out of paper with your own hands? Here are some examples for you to get creative.
Origami vases or handmade crafts are not just acceptable home decor options but also suitable gifts for your friends or family. But first, you have to do something, and one of the first things you need is an idea. Many ideas. That's why this article was written and why you're here. The article presents different models of paper vases that anyone can make, regardless of skill level.
Step-by-step execution of topiary of complex shape
Topiary of complex shape requires care and preliminary preparation. Ideally, make yourself a sketch so that you can do the work step by step and not miss important steps. The principle is similar, but it is important not to overdo it with rounding the shapes.
- Draw a circle on the ground under the crown.
- Install guide stakes.
- Then form the crown into a cylinder.
- Next, cut the top so that you get a truncated or regular cone.
Regularly monitor the growth of the crop; it is highly undesirable to leave excess stems. Over time, the entire structure will be overgrown with them. The haircut will need to start all over again.
Bracelet made of fresh flowers
You will need: a bead bracelet, glue, flowers, wire, satin ribbon, wire cutters, green tape, matches, floral spray.
Master Class
- Burn the edges of the satin ribbon.
- Fold the ribbon to make a bow and thread a wire through the center.
- Wrap the wire with green tape. Leave 3 cm of stem.
- Pass the wire through the sepal and add leaves of geranium or other flowers.
- Take the bracelet and use tape to glue the flower arrangement.
- Spray the bracelet with floral spray.
Bracelet made of fresh flowers using glue technique
What plants are used to make
To come up with a beautiful landscape object in the topiary style, you need to decide which plants are most suitable for this purpose. They must meet the following list of conditions:
- be frost-resistant;
- not demanding on growing conditions (light, soil fertility and acidity);
- capable of replacing shoots;
- have a specific crown shape (it is selected depending on what design should be made);
- characterized by slow growth.
Various 3D shapes can be created using plants that meet other requirements as a base. But, you need to be prepared to regularly care for and trim them. Otherwise, the product will be permanently deformed.
Topiary figure in the shape of a mushroom near a gazebo in a private courtyard Source zgorod-nn.ru
DIY glass vase
- braid with sequins
1. Start applying a little glue to the jar and sticking the tape on little by little. This must be done from below. Since the glue dries quickly, it should be applied to a small area of the container.
Cake
It's good when a child has a birthday soon. Friends come to him, give him gifts, and his grandmother bakes an extraordinary cake. But if the holiday is still far away, you can make a cake from scrap materials.
Necessary materials:
- kitchen sponges - 2 pcs.;
- scissors,
- gouache,
- ruler;
- PVA glue;
- wide brush;
- black marker;
- cigarette paper.
Step by step execution:
- Step 1. Draw a triangle on the sponge.
- Step 2. Using sharp scissors, cut out the drawn figure. The work is quite difficult for a young child. Therefore, adults can help him.
- Step 3. Draw a triangle on the second sponge and cut it out. This way you get two blanks for the future toy cake.
- Step 4. Next, the cake pieces need to be coated with cream and jam, which will be used as gouache. The edges of the first triangle are painted with red, and the edges of the second with white paint. If the paint spreads a little during work, this will make the craft look much more natural.
- Step 5. Using a wide brush, apply glue to the toy piece with jam and apply a triangle with cream to it.
- Step 6. Make icing from light tissue paper. The paper strip is rolled into a thin tube and bent into three parts. The resulting part is glued to the back wall of the cake.
- Step 7. As a decoration for a piece of cake, you need to make a rose from cream. It is also made from thin tissue paper. A strip of the required width is cut out and rolled into a tube. Next, it is crumpled and wound around a pencil in the form of a spiral, removed and a beautiful flower is formed. Select an area to place on a piece of confectionery and glue on the decoration.
- Step 8. The cake is covered with white icing on the sides. To do this, you will need thick white gouache so that it is not completely absorbed into the foam. Leave the product to dry.
- Step 9. You can decorate the resulting dessert with strawberries. To do this, you need to crumple a piece of red tissue paper in your palms, roll it into a ball in the shape of a berry and decorate the toy sweet product.
The cake is ready. If desired, you can make brown glaze instead of white. Get a chocolate version of the dessert.
Options for children's crafts on the theme of spring
To create crafts, you can take various materials, it could be:
- colored paper;
- plasticine;
- yarn;
- salty dough;
- corrugated paper
- cardboard
- plastic bottles;
- natural material.
The theme for a spring craft can be anything. You can do:
- bouquets of flowers;
- baskets for Easter;
- figurines of birds and animals made of salt dough;
- holiday cards;
- still life.
This is only a part of the crafts that can be made, and if you delve into your imagination and look at the awakening nature, you can come up with many ideas for creating various compositions.
Bouquet of fresh flowers
If you found previous crafts made from fresh flowers difficult, don’t despair! Try to beautifully arrange a bouquet with your own hands using this master class.
You will need: bright flowers - roses, chrysanthemums, daisies, thistles, limonimum, pittosporum and others..., green leaves, satin ribbon, scissors, fabric, pins, tape.
Master Class
- Place bright, large flowers in the center of the bouquet.
- Secure with tape.
- Add flowers of a different color.
- Repeat point #2.
- Add green leaves.
- Repeat point #2.
- Use scissors to even out the length of the stems.
- Wrap the bouquet's handle with fabric.
- Decorate with a satin ribbon.
I recommend watching this video!
DIY: Letter, box of fresh flowers
All options will make an excellent gift. Make crafts from fresh flowers with love and make your loved ones happy!
When bottles come into play
If glass material is taken from a bottle as the basis for a future vase craft, it will need to be prepared first:
- Remove labels using hot water and a brush;
- Remove glue residues using any solvent;
- Degrease the surface with alcohol.
Only after this treatment will varnish, gel, paint, glue, etc. fit perfectly onto the glass. Gouache and watercolor do not adhere well to glass, forming streaks. Therefore, it is better to stock up on acrylic paints and aerosols in cans that ensure smooth and high-quality application.
Here you can completely paint over the base, and then paint it with abstract patterns, hearts, inscriptions, whatever. Or you can simply use ready-made stencils, applying them to the surface and carefully spraying with paint.
When pieces of fabric, lace and any textile products are used to decorate a container, it is better to use a glue gun or mounting adhesive.
Important! While working, you need to press the materials as tightly as possible to the surface so that they do not slide off after drying.
General tips for decorating topiary for beginners
If you are just starting to try your hand at creating landscape design, we recommend that you consider a few useful tips.
- Use only wire frames. They are more flexible and easier to fill with vegetation.
- Start practicing on climbing type plants with large leaves. These are easier to make corrections in case of an incorrect haircut.
- If the area allows, make several identical topiary figures, thereby highlighting the garden area.
A few words about art
Art translated from Latin “topiaria” means gardener or gardener.
At first, bushes and ornamental trees were trimmed in the shape of geometric shapes, then gradually they began to create designer designs. After a while they became curly and unusual. Today, shrubs are often created in the form of wild animals and human silhouettes.
Topiary received a big leap in development during the Renaissance. From that moment on, interesting figures not only complemented the yard, but also began to be actively used to form a whole range of green garden systems.
Beautiful topiary figure in the shape of a giraffe Source murmansk1.sletat.ru3
A distinctive feature of the landscape direction is the implementation of not only strict geometric figures, but also more serious structures. Topiary developed very actively in Versailles. This design solution was used a little less in large cities in Holland.
The art was also present in the Netherlands, after which it entered England, where it continues to be used today.
The role of adults in maintaining interest in crafts
Young children take their creative work as seriously as adults take their work, business, and hobbies. They want attention, encouragement and help.
Ignoring the interests of children and their microscopic (by adult standards) creative efforts is a big mistake. It is during this period that the prerequisites are laid for what the child will become in the future: an active, creative person or a dependent.
Parental behavior requires subtlety and delicacy. On the one hand, it is necessary to notice and support the child’s creative efforts, create conditions for development; on the other hand, one cannot exaggerate, extol, or idealize.
It is completely unacceptable to pass off your work as a child’s work. Organizing a small exhibition in the yard, in kindergarten, or at school helps the little talent compare their achievements with the achievements of their peers and develop adequate self-esteem.