how to make a vase out of paper
Even a paper craft can be an excellent gift if it is made with love. Do you want to know how to make a paper vase with your own hands? Here are some examples for you to get creative.
Origami vases or handmade crafts are not just acceptable home decor options but also suitable gifts for your friends or family. But first, you have to do something, and one of the first things you need is an idea. Many ideas. That's why this article was written and why you're here. The article presents different models of paper vases that anyone can make, regardless of skill level.
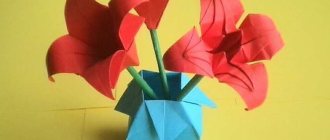
Vase on a postcard with 3D flowers
A very simple, but very beautiful applique that can make any interior festive. You can also design this craft as a greeting card. It will take very little time and a minimum of material.
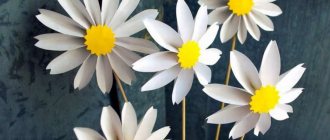
First you need to draw the flower templates. It will be voluminous, so you will need four five-petal flowers of different sizes.
Using a ruler, add volume to the edges of the petals.
The flower is assembled using glue or tape. If desired, you can decorate it with beads or sequins.
You can make three or five to seven such flowers. It all depends on the size of the vase and the size of the application itself.
Now you can start creating a paper vase. To do this, fold the colored sheet in half. Draw with a pencil any shape of the future vase, taking into account that the fold line of the sheet will become its middle. The finished form is glued onto a thick sheet of the required size.
All that remains is to decorate the picture with leaves. They can be made, for example, from thin paper tape. The craft is ready, you can hang it on the wall or give it to someone for a festive mood.
Tips for extending the life of cut flowers
Agree that cut flowers do not stay fresh as long as we would like. How to slow down the withering of flowers? To do this, it is important to minimize the growth of bacteria in the water, as well as to give the flowers the missing nutrition, replacing what they would have received if they had not been cut.
Learn how to extend the shelf life of cut flowers with these simple tips.
Trimming
Trim the ends of the stems at a 45-degree angle, at least 1.5 cm, to ensure better water absorption. It is best to trim them with sharp scissors, a serrated knife or pruning shears so as not to flatten the stem. It is best to trim the stems under cold running water. Thanks to this method, air will not be able to get into the veins and clog the “vessels” of the plant.
If you find that the flowers are starting to wilt, quickly prune them again.
Trim off any leaves or flower parts that fall below the rim of the vase. The only things that should be inside the vase are the stems and water.
Thanks to these actions, you can prevent the appearance of cloudy water and slimy stems, which cause flowers to spoil.
Preparing the vase
Bacteria and other microorganisms that may be on the surface of your vase can quickly cause your flowers to wilt. Be sure to thoroughly clean the vase beforehand with hot water, a little dish soap, and a little vinegar to kill any bacteria—even if it looks clean! Change the water frequently and re-wash the vase if the water becomes dark or has an unpleasant odor.
Location
When displaying flowers, look for a cool place, away from direct sunlight, to preserve the bouquets as long as possible. Beware of other heat sources, such as appliances or radiators, which can quickly cause flowers to wilt. For the most part, fruits and flowers don't go well together either. Many fruits, including bananas, avocados, apples and kiwis, produce a gas called ethylene. This gas can shorten the lifespan of any flowers stored nearby (as well as increase the rotting of any other fruits that do not contain ethylene), so try to keep these fruits and flowers separate from each other!
Adding a special solution for feeding
To extend the life of flowers, you can prepare a simple solution. It consists of just three main ingredients: citric acid, sugar and bleach. The solution is formulated to help flowers stay fresh longer, and each element has properties that are said to keep flowers longer than their normal lifespan with plain water.
Citric acid lowers the pH of the water, making it more suitable for freshly cut flowers.
Sugar acts as an actual "food" because flowers produce and consume sugar through the process of photosynthesis, and when they are cut they can no longer produce sugar. By adding sugar to the water, the flowers think they are still eating, which makes them perky.
Bleach acts as a water disinfectant and helps get rid of potentially harmful bacteria that may interfere with long-lasting blooms.
You can make your own flower food by following a few simple steps. It is made from ingredients that you most likely have in your home.
Fruit bowl
These vases can be used to store practical and decorative items. To increase strength, the vases are glued during assembly.
To make a fruit bowl, you will need 1717 1/16 modules, where 483 are yellow, 658 are white, 420 are red and 56 are blue.
Vase “Golden Autumn”
For this craft, you will need a small glass jar of a shape you like. You need double-sided tape, paper, pencil, scissors, and a piece of foam rubber. An important component will be matte and transparent paint for stained glass, a gold outline on the glass and melange threads like “Iris”. By strictly following the recommendations of the master class, the result will exceed all expectations.
- According to the name of the product, draw various leaves on paper.
- Place decorative elements on tape and cut them out.
- We place the cut-out decor over the entire surface of the jar and, using foam rubber, cover it, as well as the bottom, with a continuous layer of stained glass paint. Choose the tone to your liking.
- After the paint has dried thoroughly, remove the glued elements. In front of you will be a painted plain base of a vase with transparent curly leaf windows.
- Carefully outline all the edges with a gold outline for glass; some parts of the design can be completed on the jar itself (leaf stalk).
- We paint the “glass” leaves with transparent stained glass paint in autumn tones. Draw veins on the dried leaves using an outline.
- Finally, decorate the top of the vase (neck of the jar) and the bend at the base with melange threads, carefully laying them in even and tight turns. Make the rows small in width.
Select the melange according to the color scheme of the finished product.
You can make four vases by analogy, but in a spring, summer and winter direction. At any time of the year you will have a new decorative element in your interior.
Method No. 1: Painting with glitter
A very simple and straightforward method is to apply glitter or glitter to glue or hairspray. This method is great if you need a holiday vase or for the New Year. A detailed technique of non-application with a photo is in this article “How to paint champagne with gold for a wedding.”
Festive vase with glitter
Great for wedding
Origami care
Origami vases are fragile products and must be secured with glue. It is prohibited to store wet or heavy things in them. If silting occurs, remove dust using a hairdryer.
You can store jewelry or pencils in them, but it is better to leave origami as a decorative decoration.
From a can
Do-it-yourself floor vases are made from the following materials:
- 2 glass jars with a volume of 3-10 l;
- tea saucer;
- tin;
- glue;
- chicken egg carton;
- acrylic paints;
- hot glue;
- sparkles, rhinestones, large beads.
Make a flowerpot from a jar with your own hands as follows:
- First, prepare the base: 2 containers are glued together with hot glue. The saucer is used as a support: it is attached to the neck with the reverse side. The joints are additionally treated with hot adhesive and left for 24 hours.
- Then soak the egg carton in heated water for 2 hours. The resulting mass is applied to glass with glue. Due to this, the designer creates a special texture.
- When everything is dry, start painting. The workpiece is coated with a thick brush and white acrylic paints of a white shade. Before painting, the jar vase must be completely dry.
The drawing will look clearer if you first draw a sketch with a pencil. Small details are drawn with a thin brush. A day later, the image is decorated with beads and glitter gel.
From the deck
To make a wooden container with your own hands, part of the deck is cut to the required size. The bark can be removed or left, it all depends on what effect the master wants to achieve. An electric drill is used to create a recess.
After this, the blind hole is treated with sandpaper. The outside of the wood is treated with stain. Next, place a container of water inside and place a bouquet of flowers in it. The vase-deck will look good in the garden or as a floor decoration in a country cottage.
Made of glass with shiny decor
How to make a vase from a glass bottle or jar? To do this, thoroughly clean the selected container with mild detergents containing alcohol so that no traces of grease or dirt remain.
- How to prepare essays on physical education
How to crochet beautiful napkins: tips with video lessons and patterns
How to make a doll from nylon tights and padding polyester with your own hands
Then abstract stripes (even or asymmetrical) are applied with construction tape (diameter 3-5 cm). Meanwhile, the modeling gel is mixed with glitter and spread over the surface with a sponge using light pats. After staining, remove the tape before the gel has dried, otherwise it will be difficult to separate it later.
Original DIY vase ideas
The creative process for creating unusual items is different for each person, but it helps people make unusual things from ordinary objects. Therefore, craftsmen use a variety of ingredients to create a vase from scrap materials.
Decorating a glass container with pine cones
When you wander through a forest or planting with plantations of fir trees and pine trees, you involuntarily want to pick up the cones that are lying under your feet. From this natural material you can make various crafts for school and kindergarten. But they can also be used to create an unusually beautiful vase. To work you will need:
- gun glue;
- cones;
- glass container.
Progress:
- Wash the cones and separate each cell.
- Degrease the glass with acetone.
- Using hot glue, glue the parts of the cone onto the glass so that it is not visible.
- Let the product dry.
- Cover the pine cones with colorless varnish.
This vase looks great and you would never think that it is made from natural material that can be found under your feet while walking through a pine or spruce forest.
Vase made from a tin can and clothespins
An unusual vase is made from a tin can and disassembled clothespins. It is done very simply. The wooden clothespins need to be separated and the springs removed.
The flat side of the parts is glued with hot or wood glue to the surface of the jar over the entire area. They stick tightly to each other.
You can varnish the clothespins or paint them with multi-colored paints and then open them with varnish. In the middle, the parts of the clothespins are pulled together with a beautiful ribbon, and it is tied with a bow.
Decorating a glass jar with branches
You can make an original vase from any glass jar if you glue dry twigs to the surface of the container and cover them with varnish or apply a design on them in the form of an ornament.
Such a vase will last a long time and will decorate a home dominated by Japanese or Mediterranean style, as well as country style.
Important! A beautiful vase can be bought in a store, but if it is made with your own hands and according to your imagination, then it will delight the creator’s eye for a long time.
Any decor can be removed at any time and a new design can be invented again. This is useful for the development of imagination and for spending time together in the family, where the work of making a masterpiece can be entrusted to children.
From paper
How to make a vase out of paper? It will look unusual and original in the interior. First of all, you should print out a sheet with the outlines of leaves or flowers and carefully cut them out.
You can take a tall glass, measure its parameters and cut them, transfer them to colored paper and cut them. The sheet is wrapped around the glass and secured with double-sided tape. Then fold each leaf or flower in half and glue them with the fold to the workpiece.
You can use a base of different shades and textures. Your DIY paper vase is ready.