Home » Decor
DIY decor
Alyona
152033 Views 1 comment
Quilling
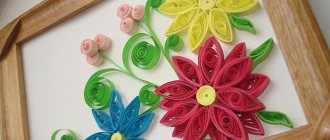
Quilling is a word that few people are familiar with. This means making figures from strips of paper twisted into spirals. Is it really that simple and easy to do? The variety of options will surprise you.
Next, I will tell you how to create beautiful things from ordinary paper. This type of activity will help you brighten up long winter evenings or make a beautiful thing with your own hands and give it to your loved one. Or maybe after my lessons, it will become a hobby for you and will even bring in a small income.
But to understand what it is, to find out who invented it, let's plunge into the history of quilling.
How to make beautiful flowers in quilling style
You should start making quilling fakes for beginners (flowers) only after the idea of such a decor has been thought through. Only after this can you start creating a sketch.
The sequence of steps for making a beautiful paper flower is as follows:
- Selection of a flower, accompanied by a study of its structure and a search for photographs of the original. It is worth carefully counting the number of leaves and petals, as well as finding the size of the stem.
- Preparation of the necessary tools and materials. For a novice craftsman, it is important to buy a special stencil that will help obtain even shapes for the flower.
- Preparing the work area. Care should be taken not to allow any glue to get on the backing or paper strips.
- Preparing the exact number of parts.
Regarding the last point, it is important not to rush and do everything in advance. Quilling should allow the master to enjoy the process, and not irritate a person over trifles.
Essential elements
Now let's look at what parts quilling creations consist of. Any work begins with a tight spiral. This is the first element in quilling when preparing a product.
Above, when we made the roll, we essentially used this element. But then we did not yet know its true name. Now we know this.
Let's repeat the process of creating a tight spiral once again. A rod is taken and a strip of narrow paper is wound onto it. And the tip of the latter is carefully glued to the spiral.
beautiful heart
FYI
- If you are right-handed, you should hold the strip with your left hand and the rod with your right.
- If the strip is double-sided, then the back of it should face the direction of the rod.
- The rod must be rotated clockwise.
The next element is the “free spiral”. It is manufactured in the same way as a “tight spiral”. But after we have finished winding it, we need to remove the spiral from the rod and let it unwind a little.
Now we have learned how to create various kinds of spirals. The same technology is used to create the “curl” figure. But at the end of the work, the tip of the paper tape does not stick and hangs freely in the air.
Any name can be done in this technique
In order to make a drop, you need to squeeze one part of the “free spiral” shape with your fingers and hold for a few seconds. This is done so that the figure takes the shape of a drop. You can also bend the tip of the “drop” shape, getting a slightly different “curved drop” element.
Advice If you are just starting to learn quilling, never rush!
Well, we looked at simple quilling forms. Now it's time to move on to more complex ones. Such shapes are obtained from two or more folded together.
Materials and tools
Quilling fakes for beginners (flowers) involve the use of the following materials and tools:
| Special quilling tool | These devices can be purchased at an office supply store or specialty department. In appearance, the tool resembles a long ballpoint pen with a forked metal tip located at the end. |
| Paper strips | This material can be purchased or made on your own. It is important to remember that the process will require paper of different widths - from 3 to 10 mm. |
| PVA glue | You can buy the simplest option. You don't need a huge amount of glue to work. Therefore, at the initial stage it is worth taking a small tube |
| Ruler-stencil or backing | The tool is a simple ruler with cutouts of various diameters in the shape of circles. The stencil helps novice craftsmen cut out elements of the same size |
| Safety pins with colorful ears | They are used when decorating a large flower arrangement. |
| Cork base for gluing parts | Paper elements will not stick to such a base, and the master does not have to worry about the risks of ruining his work |
| Sharp scissors for cutting fine fringes | |
| Tweezers for compositions with a large number of small parts |
All of the listed quilling components can be purchased immediately in a kit. This will allow the craftsman to save time in searching for missing parts and reduce the cost of a set of quilling items.
Video: How to make a large picture out of paper
In order to please your loved ones or friends with an original gift, you need to make it with your own hands. The ideal option would be a painting in the quilling style, the creation process of which will bring pleasure to the master, and the result will delight the recipient of the gift and fit perfectly into any interior. To create a panel you will need classic tools (paper, glue, scissors, a base where the main details of the composition will be glued, an awl), a little imagination and inspiration. Watch the video to learn how to make a picture with rowan in the quilling style with your own hands:
Sources:
https://dekormyhome.ru/rukodelie/kvilling-kartiny-cvetov-byketov-master-klass-s-foto-i-video.html https://dekormyhome.ru/rukodelie/cvety-v-tehnike-kvilling-dlia -nachinaushih-shemy-s-foto-i-video.html https://sovets.net/6031-kvilling-kartiny.html
simple flower
To work on making an ordinary flower using the quilling technique, the master will need to arm himself with the following materials:
- Double-sided colored stripes 0.5 cm wide.
- Special device for twisting.
- PVA.
- Cardboard, pencil, sharp scissors.
Quilling fakes for beginners (flowers) are made in the following sequence:
- A colored square paper sheet with approximate parameters of 10x10 cm is prepared.
- A spiral appears in the middle of the sheet.
- Using sharp scissors, the design is cut out along the drawn lines.
- The cut spiral is twisted using a special device or an awl.
Using this technique, the master will be able to make a simple rose. Next, you can make 4 more flowers and create a beautiful composition.
Volumetric flower
For a voluminous flower you will need:
- 22 strips of paper at least 65 cm long.
- Special tool.
- PVA.
- Sharp scissors.
- Colored paper.
First of all, the master chooses the color of the future flower. You can even make a two-color composition. In this case, paper strips should be used in several colors (11 pieces of each color).
The work process itself looks like this:
- Paper strips prepared in advance are rolled with a special tool into tight rolls.
- Each roll fluffs up to a diameter of 2 cm.
- Circles are cut from colored paper (if quilling skills are not yet sufficient, you can use a stencil).
- A rhombus is made from round parts. To do this, the element is flattened on both sides and then stretched.
The combination of the resulting parts will allow the master to create a large number of beautiful three-dimensional flowers.
Making a sheet
Made from basic shapes or loop quilling style. To get neat airy leaves, you need an additional tool - a special comb. If it is not available, it is recommended to use a regular comb with large teeth.
The sheet is made simply:
- Bend over the teeth and glue the tip of the paper tape.
- Start winding a strip around the teeth (you can do it on each one or every 1-2).
- Having reached the desired length, seal the end of the strip, trim off the excess and remove from the comb.
- If necessary, bend the sheet.
- All that remains is to glue the resulting elements together and decorate the cards with flowers.
Video: Leaves created using the quilling technique
Carnations
A quilling fake for beginners, such as carnation flowers, can be made armed with the following tools:
- Wide red stripe.
- Green paper.
- Cutting tool.
- Toothpicks.
- Glue.
The work sequence looks like this:
- Cuts are made on the red strip in a vertical direction.
- The toothpick is wrapped in green paper and secured with PVA.
- The beginning of the red strip is glued to the finished stem. Next, you need to screw it on and secure the end with glue.
The last step will be straightening the finished flower.
Option No. 2
Not only flowers, but also fruits and small things in a vase can decorate and diversify the atmosphere. Therefore, those who love beautiful and original products will undoubtedly love this unique vase.
To create a craft, you will need:
- • Strips of paper in two colors (eg red and white).
- • PVA glue.
- • Quilling tool.
- • Substrate (this can be a small wooden or cork board, a rubber mat, a piece of foam plastic, or even just a paper disk of the required diameter). Markings will need to be applied to this substrate so that the product is smooth, symmetrical and neat.
- • Ruler – template.
It will also take a little time and patience.
Dandelions
To get started, you should prepare:
- Dense yellow stripes.
- Green stripes (used for leaves).
- Crumpled paper from which the bud and stem are made.
- Sharp scissors.
- Tweezers.
- PVA.
To make a dandelion, the width of any piece is taken at the rate of 3.5 cm. 1 flower will take several strips, the length of which will be equal to a landscape-size sheet.
The manufacturing process itself is carried out in the following sequence:
- 3 strips are prepared for subsequent cutting of petals. Each workpiece is folded in the middle, and petals are cut, the size of which is 0.5 mm.
- Using a special tool, one yellow strip is twisted, and its tip is secured with PVA. Next, orange ones are screwed onto the yellow strip, pre-glued into one long strip.
- The petals gently unbend.
- A green paper rectangle is prepared for the leaves. This part is folded in the middle and a sheet is cut out.
- The resulting fragment is compressed into an accordion to give it realism.
- Bud. For it you need to prepare 1/3 of the strips and cut the petals. Then roll the roll from the strip and secure it with PVA.
All that remains is to cut a strip 2cm wide from the header. The edges of the part are glued, the bud is placed and wrapped in paper. The remaining part of the stem is curled.
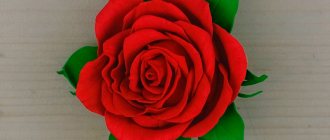
Roses
Quilling fakes for beginners (rose flowers) will require the master to have standard tools and material:
- paper;
- stencil;
- PVA;
- wax paper;
- safety pins.
Rose Flower is a simple quilling craft for beginners
The manufacturing sequence includes the following steps:
- First of all, a teardrop-shaped bud of the future flower is made from a pre-prepared blank.
- For the flower itself, it is worth gluing 5 petals.
- The second layer involves an identical flower, but with smaller petals. You can get them by slightly twisting the paper.
- For the flower stems, you should take green and yellow strips and roll them into an accordion shape.
- The stems are glued to the composite base.
All that remains is to collect all the details into the composition.
Twisting a scarlet flower
Performance:
- transfer the template to the base;
- put several strips together, glue them at one edge;
- roll the glued end into a spiral;
- fan out the un-glued strips and bend them according to the pattern;
- glue and wrap the other end and stick the element to the base;
- repeat steps 2–5 for other parts until the entire drawing is filled.
You can first paste over the contours with strips, and then, bending them individually, insert and glue paper pieces inside the drawing.
Asters
To work, the master should prepare:
- colored paper (double-sided);
- sharp scissors;
- 20 rhinestones;
- a special quilling tool for twisting paper strips;
- PVA.
Astra is made using quilling technology as follows:
- A paper strip is cut out with a length of 30 cm and a width of 3 cm. The part is folded in half lengthwise.
- Using sharp scissors, several small cuts are made on the workpiece.
- Using a tool or an awl, the strip is twisted.
- On the finished roll, the fringe should be unscrewed from the outside.
To make flowers of different sizes, you should vary the parameters of the paper strips.
Daisies
To work you will need:
- White stripes with a width of 2 mm.
- Light green and yellow stripes with a width of 7 mm.
- PVA.
- Sharp cutting tool.
- Special device for twisting.
The flower is made in several stages.
Petals
To make the petals, you should use white paper strips.
The process then looks like this:
- One piece is taken and several windings are made with the tool. The device is removed, and a strip with a twisted end remains.
- The part is brought to the state of the finished roll.
- The element unwinds carefully. It is important to hold the part with two fingers of your right hand. Next, with your left hand, the middle is stretched to the sides. At the opposite edge the spiral contracts. Such manipulations are performed along the entire length.
- PVA is applied to the end of the strip and the part is glued. The size of the resulting droplet cannot exceed 1.5-1.7 cm.
The number of petals depends on the volume of the finished flower. Often at least 15 petals are required per flower.
Flower core
When making a chamomile core, the master must adhere to the following sequence of actions:
- Light green and yellow stripes are prepared. They are cut into fringes. The thinner the cutting becomes, the more beautiful the flower will turn out. To avoid a through cut, it is worth attaching a cardboard stopper.
- Each finished element is cut into 2 identical halves.
- Next, you should glue the strips of different colors together. To do this, make an indent of about 1 cm on the yellow piece and apply PVA (you can use a toothpick). A light green stripe is glued on top.
- The resulting two-color pair is twisted several turns using a quilling tool.
- Then the strip is rolled by hand until it forms a tight roll. It is important to twist tightly, otherwise during bending the part will become unusable for subsequent use.
- At the very end of the twist, you need to trim the end of the light green strip, making its length shorter than the yellow one.
- PVA is applied to the cut edges and fixed.
- The roll is bent outward and coated with glue.
All you have to do is wait for the parts to dry (you can tell by the appearance of a transparent layer resembling a glass film) and bend back the fringe at the edges. If you don't wait enough time to dry, the part will flatten.
Chamomile assembly
This process involves a certain sequence of actions. It looks like this:
- A small amount of glue is applied from the sharp end of the petal and the element is fixed to the core of the chamomile.
- Each subsequent petal is glued in an identical way. It is worth remembering that to add individuality, you can place the petals at an angle, or one higher than the other.
The main thing is to achieve a result that will please the master himself. And it is important not to forget that after the glue dries, glue threads may remain in the core. They spoil the appearance of chamomile. Therefore, they should be removed.
Master classes on more complex paintings with step-by-step photos
It is possible to master the skills of creating paintings in the quilling style in several ways: by enrolling in a special club, where professional craftsmen will teach the secrets of the technique; by purchasing a book with basic diagrams and operating rules; by checking out the master classes online. Creativity should begin with simple elements: single flowers or plants (daisies, gerberas, rowan berries), light crafts, postcards, gradually complicating the technique, increasing the number of elements, creating three-dimensional panels. The master classes with photos presented below will help you create your first quilling paintings.
Painting from a bouquet of flowers
Pictures made from twisted paper elements with correctly selected shades and types of elements look quite realistic and very beautiful. Of particular delight are panels depicting bouquets of flowers, and they can be different - from simple daisies or forget-me-nots, to more complex works, for example, with gerberas, lilacs, asters, peonies. For additional decoration, various beads, sparkles and other decorative elements can be used.
Necessary tools for creativity:
- The base for the panel (this can be glossy paper, thick or starched fabric, or simple cardboard). Sometimes the background is painted over to create realism.
- Cut paper elements for quilling (width can vary from 0.3 cm to 1 cm). The choice of color depends on personal preference; in this master class, pink, orange, green and light green shades are used.
- Scissors, stationery knife.
- PVA glue.
- Toothpick, orange stick or awl.
- Silicone glue.
- Decorative elements.
Step-by-step instructions for creating a painting:
- At the heart of the picture there are eleven large flowers, for each of which it is necessary to make a center. To make the core, you need to cut paper of soft pink and green colors one centimeter wide into fringes. Using a toothpick, you need to make tight spirals. The center should be pink with a green edge.
- The remaining sections intended for flowers must be twisted into a loose spiral so that in the future it will be possible to give them the required shape.
- We begin to prepare the flowers: compress the orange elements, giving them the shape of a “leaf” and glue the 3 parts together at the very base.
- Give the pink spirals the shape of a “drop”, two of which need to be glued between the orange elements, and the remaining 2 on top of them, the result should be a blank for the flower. Look at the example of a petal in the photo:
- Glue together the required number of petals and cover each one with orange paper to give them a finished look.
- A silicone glue gun is used to assemble the flowers. Initially, all the petals are glued together, and then the middle is attached to the top.
- To create a bud, you need to make a roll and push it out slightly until you get a cone. Lubricate the middle with glue and attach the petals there.
- To create leaves, you need to give the green spirals the shape of an “eye” and glue them together to make a branch of greenery.
- Assemble the composition by gluing all the elements with silicone glue, add decorative elements, sparkles to make it more realistic, and frame the panel.
- The amazing delicate painting is ready, look at the photo for an example of the design:
Tulips
To make tulips using the quilling technique you will need:
- A flat wooden stick or a special fork (you can use a manicure stick instead of a fork).
- White sheet of paper and gray cardboard.
- Green and pink paper for stripes.
- Zigzag scissors.
- PVA.
The process of making a tulip follows the following sequence:
- The end of one pink strip is wound around a stick until a ring shape appears.
- An indentation is made from the folded edge. The element is bent in half.
- Next, you should twist the bend in the opposite direction from the bent tip. The master should end up with a figure similar to the letter “S”.
- The strip is twisted further at the fold in both directions. So you should make several figures and set them aside.
- Next, take 3 more pink strips and turn them into droplets by gluing the ends together.
- On a white sheet used as a base, the edges are trimmed with scissors. Drops are fixed in the middle of the paper with glue, and S-shaped curls are attached to them.
- 2 drops are glued together, and the third is fixed on them.
- The remaining petal is filled with an S-shaped element. The flower head is ready.
- A light green stripe is attached to the tulip head, symbolizing the stem.
- Several green stripes stick together and become curls. Depending on the artist’s imagination, the curls can be shaped into rings, pointed at both ends, and glued to one another. The finished tulip leaf is glued to the stem.
- Another 3-4 strips turn into S-shaped blanks placed inside the sheet.
To create a complete picture of the flower, it is worth making more leaves in an identical way.
Work algorithm
Just like the previous craft, we start making a fruit bowl using the quilling technique from the bottom. To do this, we first apply markings to the substrate: having determined the central point, we draw a circle with a diameter of 44 mm. Then we draw 6 rays from the center of the circle, which should divide the circle into equal parts.
For the base, we form six “eye” elements and twist 24 small tight rolls. We arrange them as in the picture and glue them together.
We begin further work only after the bottom is thoroughly dry.
The first row of “walls” of a quilling vase is made from “drop” elements. In total you will need 18 such elements. One piece at a time, glue them with their sharp tip down to the base (between the washers). Let the layer dry.
The 2nd row also consists of 18 “drops”. Turning the blanks over with the sharp side down, we glue them between two adjacent “bricks” the 1st row.
the 3rd row from round elements (simply roll the quilling strip into a ring). To ensure that the diameter of the workpieces is the same, we use a template ruler). 18 such elements .
For beauty, white tightly twisted spirals can be glued inside these rings.
The 4th row consists of scallops. To make each such part you will need 2 red “eyes” or “leaflets” and 1 white “drop”. We glue all three elements together and attach them to the product. In total you will need 18 such festoons.
5The th row is also white. To form it, we make “drops” and combine them, getting beautiful hearts.
Lilies
To make a lily, a craftsman should arm himself with:
- a set of stripes of pink, white, yellow and black;
- diagram or sketch;
- PVA;
- a special tool for twisting strips;
- a tube of acrylic glossy varnish;
- wires;
- rings with a diameter of 0.7 cm for connection;
- a base for rings that can be expanded to any diameter;
- transparent glue.
The list of actions looks like this:
- First of all, you should make earrings and a pendant.
- Next, you should take pink strips with a width of 3 mm, a length of 95 mm and glue them to white strips with an identical width size, but the length will be 100 mm longer. The edges are glued together. In total, you will need to make 18 stripes for the flower.
- Paper ribbons are wound onto a special quilling tool or toothpick until spirals are obtained. You should start with pink so that these ribbons end up in the middle of the flower.
- The rolls are stretched to form an oval shape and bent at the tips on each side.
- Then a flower is formed by gluing 6 petals.
- To form the core of the lily, you need to take black and yellow strips, 0.15 cm wide and 40 mm long, and twist them into tight spirals (6 pieces yellow and 3 pieces black).
- 1 dark and 2 light spirals are glued together to form the middle of the flower. It should be glued to the center of the future lily.
Using the steps listed above, you can make a flower for a ring. The difference will be the size of the stripes. So, pink ones will be only 40 mm, and white ones will be 95 mm. For the middle, it is necessary to use smaller spirals (the length of the black and yellow stripes will be reduced to 30 mm).
To make jewelry with flowers, all the resulting lilies are coated on both sides with acrylic varnish, and the flower is set aside until completely dry. A smaller flower is fixed to the ring base with polymer glue.
When making earrings, you need to take earrings and, using a connecting ring, attach 2 large flowers to them.
Daffodils
When making a daffodil using the quilling technique, it is important to have the following tools and materials:
- Strips of paper 3 and 7 mm wide and 20 cm long.
- Wire for working with the stem.
- Glue gun and sticks for it.
It is worth remembering that stripes will be required for both the flower and the leaves. Therefore, green must be present in the color palette of stripes.
The sequence of actions is as follows:
- For the petals of the future flower, you need to twist the roll using a narrow strip. When unrolled, the diameter of the roll will be 1.2 cm. For accurate measurements, you can use a special stencil with cut holes. The edge of the tape is fixed with glue.
- Next, you should pinch the roll with your fingers. To make one petal, the craftsman should make 3 similar parts. All of them will be connected to each other using a glue gun. One daffodil needs at least 6 petals. It is worth joining the petals into a finished daffodil so that there is a small hole in the center.
- Using yellow stripes, a cup with a diameter of no more than 1 cm is made, and the inside is filled with glue.
- A fringe is made along the edges of the wide ribbon and wound around the cups. The tape must be fixed with glue.
- The finished flower core is inserted into the center and secured. A green strip is wound onto a wire coated with glue.
- Another cup is made from green ribbons and glued to the stem. The base of the daffodil will be glued to this part.
- The leaves are formed using a comb, and they are secured to the base using a glue gun.
It will take a master no more than 1 hour to make a real bouquet of daffodils using this technology.
Making quilling fakes for beginners, especially bright, beautiful and delicate colors, will bring pleasure and will help you turn ordinary paper into a real miracle from the world of art.
Article design: Vladimir the Great
A little history
This art form was invented by monks in Europe during the Middle Ages. When they trimmed the edges of gilded books and twisted them around the ends of birds' feathers. Thus, it turned out something similar to a golden miniature.
This is where the name quilling comes from. From the English word “quill”, which translates as “bird feather”. At the very beginning, this was done in poor churches, especially in the 19th century, quilling was a favorite pastime of noble ladies.
In the twentieth century they forgot about him. And at the end of the last century, quilling began to return to people's homes as a hobby.
As a result of his wandering around the world, their own schools began to be formed in each country. And each nation brought something of its own to this type of art. For example, eastern schools differ from European ones in the complexity of patterns, which allows eastern people to create masterpieces of art.
And the Korean school differs from the European one in that when winding the paper, a rod is not used, and everything is done by hand. The works of the Korean school are very complex. In our country this art became popular at the end of the twentieth century.
Therefore, few of us know this type of art thoroughly. I will introduce you to the basics of this art form, give advice, give examples and try to give you all my knowledge. Let's start with the basics.
But before you start doing this type of creativity, you need to prepare. That is, purchase the necessary tools for the job.