To decorate clothes or just as a souvenir, you can crochet original butterflies.
We offer you knitting patterns for three cute butterflies. Knitting them is not at all difficult and very exciting.
Start knitting a butterfly with its body and head.
When knitting the butterfly antennae, make spirals of 10-12 chain loops at the ends, knitting 2 single crochets into each loop.
The wings of the butterflies shown in the photo are knitted in rotating rows from the black dot in the knitting pattern.
The sequence of making butterflies was shown in detail in the diagrams of the directions of knitting the upper and lower wings. Start by knitting the top wing, and when completed, knit several connecting stitches to go to the starting point of the bottom wing.
Knit the bottom wing, joining the stitches of the penultimate row of the top wing with connecting stitches.
When decorating the tight contour of the butterflies shown in the photo with “crawfish” loops, grab only the front half-loops of the single crochets of the previous row, this will slightly raise the edge and make it more voluminous.
In butterfly 2, the inner part of the upper wing, formed by an oblique mesh, is tied along the contour with “crawfish” loops, which should be knitted on the upper half-loops of the columns of the previous row.
Use the lower half loops to continue the main pattern.
A similar technique was used when knitting both wings of butterfly 3.
The usual jagged edge, usually formed when knitting “crawfish” loops, thanks to the tightly knitted columns of the previous row, has the appearance of a rope laid along the edge of the wings.
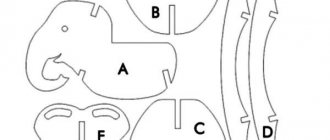
Knitting pattern for the front and back wings of a butterfly 1.
Pattern for the direction of knitting the front and rear wings of the butterfly 1.
Knitting pattern for the front and back wings of a butterfly 2.
Knitting direction pattern for the front and rear wings of a butterfly 2.
Knitting pattern for the front and back wings of a butterfly 3.
Pattern for the direction of knitting the front and rear wings of the butterfly 3.
Pictures with diagrams are enlarged.
Materials from the magazine “Duplet” were used
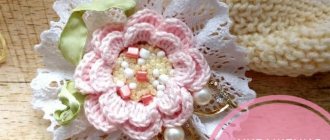
Crochet decor “Butterfly”
Bright multi-colored light-winged will guarantee a summer mood and rosy weather in the house. The knitting technique is suitable for both beginners and experienced needlewomen.
The size of the finished product is 19 cm by 19 cm. It can be used to decorate both clothing and the interior.
To work you need to prepare: 50g of cotton thread in yellow, orange, green and fuchsia, as well as a corresponding hook.
We will knit in parts - separately the wings and the middle. And then we’ll sew everything together into a single product.
Description
We start knitting from the middle. We take yellow yarn, cast on a chain of 10 chain stitches and knit further as the diagram shows. We make the first row yellow, the second – green, and then tie it with single crochets, two stitches in each previous loop.
Scheme
For the upper part of the wing, we cast on 6 air loops from yellow thread. Then we connect them into a ring, and then knit according to the diagram. The first and third rows should be yellow, and the second, fourth and fifth rows should be orange.
We also start the lower part of the wing with 6 air loops, but in fuchsia color. We close the chain into a ring and continue knitting according to the pattern. In the third row, change the color to yellow.
Both parts of the wing need to be sewn, and then tie each with its own color, 2 single crochets in each loop of the previous row. The second wing is done in the same way. Connect all the elements of the butterfly.
Make antennae from the wire, which you then wrap with green thread. Cut the working thread and then hide it on the wrong side.
The winged flower is ready and will now always please the eye.
Bright "pouch"
The finished handbag is small in size 14 cm by 16 cm. Different colors of yarn create an elegant look. Take the domestic one, for example, “Violet” - 70 g should be enough.
Prepare the threads: take any colors, the brighter the better!
3 mm hook and 9 large beads.
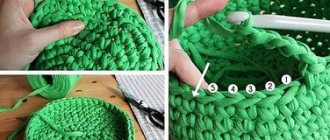
We start crocheting a baby handbag from the bottom. The bottom will be round, it is knitted according to the pattern of the “African flower” motif with six petals.
In the seventh row we continue in yellow with 3 dcs under each arch, alternating them with 2 dcs. loops (VP). The result was 24 rapports from 3 CCHs and 2 VPs.
Next, we continue using the granny square method until the 24th row, changing the color of the yarn every 2.
Now we will make the ties for the purse and the belt.
To tie, dial 160 air. loops We stretch along the twenty-third row using a pin, put on several beads on each side and tie a knot.
For the belt, tie 80 air. loops, tie it with 2 rows of connecting posts. Carefully sew the strap on the inside.
Another crocheted handbag is ready, and children's gratitude is guaranteed!
Fire crochet butterfly
This type of butterfly will perfectly complement your autumn wardrobe or add color to any other item. The color of the butterflies is bright, contrasting, it is impossible to take your eyes off it.
To work, you need to prepare cotton yarn “Iris” of different colors, as well as a hook number 1.25.
We start knitting from the central part. We cast on a chain of 17 air loops with gray thread, the last of which is a lifting loop. Next, knit the middle and mustache, as the diagram shows.
Let's move on to knitting a small wing. We attach a thread of a different color to the body. We cast on 12 air loops, make a connecting stitch in the 6th air loop of the chain from the hook.
We collect 7 more air loops, and then connect the chain with the next half-column of the body. We continue knitting according to the pattern until the third row. In the fourth row we change the color of the thread. We knit the wing further.
For the large wing, we again attach the thread to the body, cast on 14 chain loops and make a connecting stitch in the 6th loop from the hook. Then we knit 9 air loops, which we connect to the next half-column of the body. Next we knit according to the pattern until the third row, after which we change the color of the thread.
We continue to work according to the scheme. When the product is ready, cut the thread and then hide it on the wrong side.
First experience
A beginning craftswoman should choose the simplest example for her first work. How to quickly and easily crochet a butterfly will be discussed further in the crochet butterfly master class. To work you will need a hook and threads of two or three colors:
- The cast-on chain of five loops closes in a circle.
- 3 loops are picked up, after which 2 stitches are knitted 7 times. p. and 2 tbsp. With. n. At the end of the row there is one connecting post and 3 loops for lifting.
- In the next row, the hook is inserted under the chain loops of the previous row and until the end of the row, 3 tbsp are knitted 7 times. With. n. 3rd century clause 3 art. With. n. Close the ring and make one loop in the rise.
- For every 3 loops of the previous row you need to perform 6 tbsp. With. n. 1st century clause 6 art. With. n. 1 tbsp is made between the fans. b. n. In this row, the pattern is repeated 8 times, the ring is connected. On top of this row the usual binding is performed.
- The result is a flower with eight petals. It needs to be folded in half, placing the petals on top of each other. This is how the butterfly turned out.
- Now you need to tie the body and antennae. The length of the body and antennae will be approximately the same. They are knitted on an air chain in half columns.
- The finished body is sewn between the wings of a small insect.
Crocheted openwork butterfly
A delicate, openwork butterfly can be not only a decoration for clothing, interior design or a product. It can be used as a motif in making tablecloths, napkins, bedspreads, etc.
It is often knitted from cotton or other thin thread. The hook for the yarn should be selected according to the number.
We start knitting from the central part of the butterfly. On the diagram this place is indicated by an arrow.
We dial 1 air loop. + 3 initial air loops. and knit up to the 15th row according to the pattern. In each row, the first loop must be replaced with the same amount of air. lifting loops, which is indicated in the diagram.
In the fifteenth row we knit the antennae using air and other loops. Then we move on to knitting the wings. To do this, we fasten the thread in those places that are marked with a double arrow in the diagram, after which we knit according to the pattern from row 1A to 5A.
Row 6A should end before the wavy line. We turn the product, knit rows of the upper part of the wing (7A-17A).
Now let's move on to the bottom of the wing. We fasten the thread at the end of row 6A and knit rows 1B-7B. We make the second pair of wings in a similar way.
When the product is ready, cut the thread and then hide it on the wrong side.
Crocheted butterflies - Best Description Schemes and Master Classes
Do you want butterflies to fly around your home, and some even land on your clothes? Everything is real and you can feel like a creator simply by crocheting them. In this post I have collected the best master classes, diagrams and descriptions of crocheted butterflies. There is a lot of material, I chose only the most beautiful and worthy options that can be suitable even for beginners. I hope you enjoy it and choose the butterfly that is closest to you!
Classic crochet butterfly
Classic crocheted butterfly
To begin with, I offer a description and knitting pattern for a classic butterfly. This pattern is crocheted, all dimensions correspond to a butterfly from nature, its wings are especially beautiful. Most likely, as my husband says, it is a swallowtail. But for me, it doesn’t matter what kind of butterfly it is, the main thing is that it looks charming!
Crochet butterfly pattern
Another version of the butterfly knitting pattern
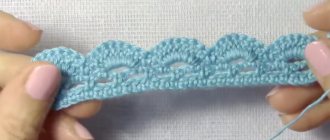
Also a very simple and at the same time popular crocheted butterfly pattern. Knits up quickly, and according to the description, it’s generally done in one flap of the wings