A pincushion is the most indispensable item for sewing and various types of needlework. This is the first thing a tailor buys or makes himself. How can we manage without it? Where to put needles and pins so that they can always be easily found without getting pricked.
Can you crochet? Publish your work on kru4ok.ru
In ancient centuries, needle beds were made of fabric and paper, and only wealthy citizens could afford such a luxury. Many peoples were sure that this small miracle should be treated with trepidation.
Since our site is dedicated to crocheting, we have collected interesting descriptions on crocheting needle beds.
Shapes of knitted needle beds
Crocheted needle beds, as well as sewn ones, can be very different:
- The simplest ones are round or rectangular. During labor lessons at school, the first thing we did was sew a pincushion of a simple rectangular shape. Great experience for beginner needlewomen.
- In the form of a wardrobe item: hat, handbag, dress, etc.
- In the form of a toy and a plant, in theory, any soft toy that can stand on its own can be used as a pincushion. Crocheted cacti, flowers with filling in a pot.
- Complex author's creations, for example, an interior doll.
What you will need
- Yarn, or rather the remains of any yarn, is suitable for crocheting a needle bed. It is advisable that it is not fluffy, because... It will be difficult to find small needles among the very fleecy structure.
- Filling: cotton wool, padding polyester, holofiber, any other soft filler. It was paper that was used in ancient times, but now our capabilities are much wider.
- Beads, beads, border, whatever you want to decorate a crocheted needle bed. Or maybe none of this is needed if your pincushion is designed as a minimalist item.
- Ideas and schemes. You have to think about how you will use your pincushion, where to store it during and after work.
We have collected almost 20 different patterns of interesting crocheted needle beds, and believe me, there are dozens of times more ideas. They are so simple that experienced craftswomen can knit them from photos, so no one really bothers to write a detailed description. Good luck in choosing patterns and ideas!
How to crochet a simple pincushion: master class for beginners
Let's start with the simplest square crochet needle bed.
As a motif, you can use any regular square, or a granny square pattern in my case.
I’m not presenting the diagram here, I think it won’t be difficult to follow the link to the publication dedicated to this tune, where there is also a video tutorial.
Absolutely any yarn will do; you don’t have to buy a new one; small leftover yarn will be enough.
Hook – corresponding to the thickness of the thread.
So, we crochet a needle bed.
- Depending on the thickness of the yarn, you will need to knit a square of 4–7 rows.
- It is better to knit the second square for the wrong side more densely; I simply knitted it with single crochets. I tried to make it with the same pattern as the face, but still the holofiber sticks out of the “holes” in a rather unattractive way; from the front side it’s somehow not very noticeable.
- We fold both squares together and sew along the edge with single crochets, crocheting both walls of the loops. Leave one side unstitched.
- We fill our pillow with cotton wool, holofiber or padding polyester.
- Sew up the fourth side.
- If desired, you can decorate the needle bed with ribbons and flowers.
You can, of course, first sew a fabric cover, and sew a knitted openwork motif on top of it, as in the title photo, it will also be beautiful.
You can find diagrams of different square motifs here>>.
Where to place your creative corner
Before embarking on such a serious task as organizing a needlewoman’s workplace, it is worth deciding how much time will be devoted to your favorite hobby. If you usually spend no more than an hour a week, or even a month, on needlework, there is no point in spending a lot of time arranging your work corner. It's easier to store tools and craft fabrics in several boxes in a closet, pulling them out as needed.
If you devote almost all your free time to embroidery, scrapbooking, sewing, knitting, painting and the like, it is simply necessary to arrange a corner for yourself to work.
Having started planning the future workplace of a needlewoman, you should immediately decide how much space in the house you can allocate for this. It would be better if there is a separate room for this. Unfortunately, most domestic craftswomen live in apartments, where devoting an entire office to needlework is an unaffordable luxury. The most you can count on is a separate corner or closet. However, if you carefully consider the location of everything, even such a small space will be better used than an entire design studio.
Where to begin? From the choice of location. Since any needlework, in addition to talent and skillful hands, requires acute vision, the needlewoman’s workplace should always be well lit.
The best option is to place it near a window. If this is not possible, you will have to use artificial lighting. Today there are a lot of convenient and bright llamas for needlewomen on sale. As a last resort, you can use LED strip
At the same time, it is important that the light bulbs do not change the light perception of color, as often happens with such devices
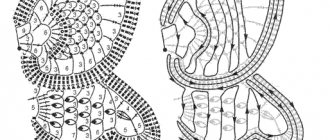
Scheme and description of knitting a biscornu pincushion
Now let’s complicate the task and crochet an unusual pincushion.
Let's take this diagram as a basis:
Description
The beginning is, as usual, from VPs closed to a ring.
In the first row - 12 C1H.
In the second row we double the number of loops, knitting two double crochets from one loop.
In the third row, above each column of the previous row, we knit a single crochet, and between them a single crochet, inserting the hook lower into the first row.
In the fourth row - single crochets in each column of the 3rd row.
I skipped row 5 so that there were no big holes.
In the next one, over every three loops of the previous row, I knitted toes: 1 sc, 1 hdc (half double crochet), 3 dc, 1 hdc, 1 sc.
And in the last row, above the two “petals” I knitted single crochets, and above the third - 6 C1H to form the corner of the square.
I did not knit the row with the arches.
The second motif is exactly the same, but with yarn of the same color.
You can knit any other pattern, that’s not the point.
And now the most interesting part: when stitching, we fold the blanks as follows: we place the corner of one motif in the middle of the side of the other and connect it sequentially loop to loop with a crochet hook.
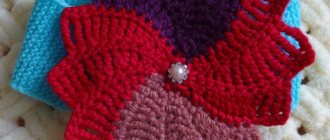
The result is a needle bed of an incomprehensible shape, which is called biscornu.
As a bad photographer, it seems that I could not convey the real picture in the photo, in fact, it seems to me that it turned out very nice.
A few more ideas that everyone loves.
Flowers, twigs, leaves
The simplest flower can be knitted according to the pattern shown in the figure below.
6:1589 6:4
If you want a larger flower, then instead of two lifting loops, knit three loops, and for the petals, knit stitches with not one, but two crochets.
6:279 6:284
The flower will be even larger if you knit four lifting loops, and for the petals you knit stitches with three crochets.
6:521 6:526
The leaves are also very easy to knit. If you want to make a larger leaf, then increase the number of loops in the initial chain and, accordingly, the number of double crochets in the middle of the leaf.
6:894 6:899
The diagram shows a fragment of a branch. You can tie a branch of the length you need by simply adding the required number of leaves. You can also reduce or increase the distance between the leaves by tying more air loops between them.
6:1381 6:1386
7:1892 7:4
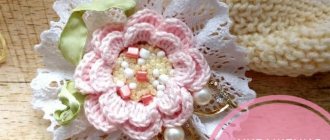
Beautiful crochet flower pincushion
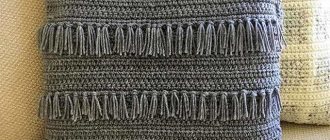
You can knit not only a square, but also a round needle bed with any pattern, even with simple colored tracks, double crochet or single crochet.
We connect two circles, fill them with holofiber and get a pretty decent simple pincushion.
But we will make it more beautiful and original.
We take a needle with a large eye, insert a strong thread and use it to pull our round needle bed from the center to the edge in five places at an equal distance from each other.
We pull it tighter and get flower petals.
Sew a button in the middle part.
Additionally, decorate with a bow if desired.
I liked this pincushion the most, it’s beautiful and easy to knit, oh-so easy!
Cabinet for storing materials
Having figured out the light and location, you need to choose furniture that will serve as a workplace. Whatever the needlewoman specializes in, she will certainly need a cabinet to store materials and equipment. That is why closets with built-in folding tables are becoming increasingly popular among craftswomen. They are ordered according to individual drawings, and sometimes they are made by hand.
As a rule, such a cabinet in the center is equipped with a small work table, which can be expanded if desired. On the sides of the central workplace and on the doors, there are many shelves and drawers for equipment, fittings and work materials. Also in such a cabinet there is a lamp or even several.
A huge advantage of such furniture is the ability to close it after use, so that dust and sunlight will not fall on the equipment and fittings.
Knitted pincushion in the shape of a heart
I found this heart, knitted a long time ago, which can also be used as a pincushion.
Everything is just as simple here: we knit two hearts according to any pattern and connect them together.
The pattern and description of the knitting of my work is in the post “Pillows - Crochet Hearts”.
You can also sew a small pillow from fabric and decorate it with crocheted openwork. We have diagrams of such hearts.
Needlewoman equipment
Although the specializations of craftswomen vary, there is a basic set of equipment, without which needlework for beginners will become not a pleasure, but a real torment, and a very costly one at that.
So, the first tool in the arsenal is a computer. It is with its help that every needlewoman will find information, exchange experiences with colleagues, order the necessary materials, sell her products and develop the design of some of them. In addition, many modern handicraft devices, such as embroidery machines and plotters, require programs that are created on a computer.
In addition, every needlewoman cannot do without a sewing machine, no matter what her hobby is. Handicrafts today are directly related to this device, be it embroidery, knitting or scrapbooking. As for the sewing machine model, if your favorite pastime is not sewing, you can use the simplest machine like your grandmother’s “Podolka” or “Chaika”.
It is advisable that every needlewoman have a printer in her arsenal. Optimally - black and white laser. It will be possible to print details, patterns, layouts and articles from the Internet.
Another device you can’t do without is an iron. With its help, you can not only smooth and steam parts for sewing, embroidery or knitting, but also transfer certain types of pictures and stickers onto fabric, process foamiran products and much more.
In addition to the three items listed above, any needlewoman should have a glue gun in her arsenal, and ideally several, for different types of glue.
The rest of the equipment is selected depending on the specialization of the craftswoman. For example, scrapbooking specialists purchase plotters and machines for cutting and embossing. Amateur seamstresses are sure to equip their workplace with an overlocker and a steam station.
Pattern for knitting a hat pincushion
Crocheting a pincushion in the form of a hat starts from the bottom - this is a regular circle with increments of loops in each row (in each loop, through one, through two, etc.).
This is how a circle is knitted to the required diameter, say 3-4 centimeters.
Next you need to knit 2 cm without adding loops - with a crown.
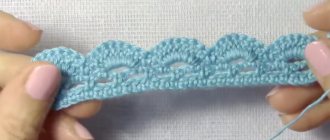
For the brim of the hat, we knit a circle with a diameter of 9-10 cm and tie the edges with some simple border.
This diagram of a hat-pincushion with a beautiful openwork brim will come in handy.
Now let's connect the parts. To do this, you may also need to cut a circle out of cardboard to fit the bottom, but you can do without it. We fill the bottom with filler, cover it with cardboard, put a circle on top and sew it to the bottom with hidden stitches using a needle and thread.
To decorate the hat we knit flowers. As an example, this diagram:
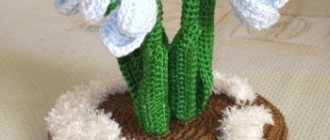
Cactus
You can knit a pincushion of any size, ours is small and compact, but you can even make a Mexican cactus (by the way, it’s interesting, if it works, send a photo).
For knitting you need:
- Yarn in green, pomegranate, yellow and brown colors;
- Scissors;
- Hook;
- Synthetic fluff;
- Needle.
Let's make 2 loops. After this, we will make 6 single crochets in the 2nd loop from the hook. Now we need to complete 1 row, making additions to each of the loops.
We will continue to make increases in the new series. Only this time we knit 2 stitches through a loop.
We should have 18 loops. Next we add again, but now after 2 loops. As a result, the number of loops will increase to 24.
Let's connect the last row with additions. Increases should be made in every 4th stitch. That is, after 3. As a result, we will knit 30 loops on the circle.
Photo 1
We will knit the next 4 rows simply without any additions. 30 columns in each row.
Photo 2
Then we round off the part, so we knit with decreases. First we decrease through 3 loops. In the new row we already decrease after 2 loops. And we will knit a row with a decrease through the loop.
We are left with a hole of 12 loops. We fill the part with synthetic fluff.
Now we will knit the shoot on the cactus. We knit 1 row of 12 stitches.
Photo 3
Then add after 1. We perform 4 rows of 18 columns. Filling in the detail. The next rows will all be with decreases. First, through a loop, and then we knit decreases in each loop until the part is closed.
Take the green thread and drag the process. This way it will stand out better.
Photo 4
So, the plants themselves were tied. Next, let's move on to knitting a pot. Cast on 2 loops from Garnet color yarn. Then we make 6 stitches in the very first loop (from the hook this is the 2nd).
Then double each stitch. We knit the next row without increments behind the back wall of the loops.
Then we will tie the increase through a loop. And we can complete the new row without adding.
Now we will perform increases in every 3rd loop. And then we knit 1 row without adding anything.
Then we knit 2 more rows without increases. That is, 24 columns.
Photo 5
We fill this pot with filler.
We begin to knit the earth. To do this, you just need to knit an amigurumi ring of 24 stitches. We start in the same way with 6, then add to all loops, then after 1 loop. And we knit 1 row, adding through 2 loops.
Photo 6
We sew a cactus to the resulting part. Then we insert it into the pot and sew it on.
Photo 7
Let's tie a flower onto a cactus. Let's make it yellow. We cast on 7 air loops and perform a connecting stitch in the very first loop. And again we cast on 7 more loops. We place the connecting column in the same place. Repeat 3 more times.
Photo 8
Sew the flower into the center of the cactus shoot.
Photo 9
This is how you can very quickly and easily crochet a pincushion in the shape of a cactus!
Practical pincushion on a jar
If you crochet a lid on a jar, you will get not only a pincushion, but also a very practical thing in which you can put various little things.
The manufacturing technology is as follows:
- Crochet a circle slightly larger than the lid of the jar.
- We sew a wide stitch along the edge with a thread and a needle and tighten it a little.
- We fill this part with holofiber or cotton wool.
- Glue the resulting pincushion to the lid of the jar. Sometimes it may be more convenient to place a cardboard circle between the lid and the knitted part.
- We decorate the edges of the lid with braid.
Boxes for storing threads, needles, improvised tools
Threads, threads, threads...
So many things have been tried to store them - boards with nails, large boxes, jars, etc.
This often happens with threads - no matter how you store them - they become unraveled, tangled, intertwined and it is not clear where the edge of the desired spool is...
Cloves and individual jars are good, but the boards (and jars) also need to be stored somewhere. If there is enough space, this option is perfect for those who love order.
Large boxes, in my opinion, are inconvenient - you don’t immediately find the right spool and the threads get tangled at an incredible speed...
For myself, at this stage of life, I chose this option for storing threads and “related” sewing accessories - one flat box, divided into many compartments. Large boxes easily fit into a desk drawer, designed by me specifically for creative and handicraft needs.
Boxes for storing threads, tools, materials
What is the advantage of low boxes? The boxes are small enough to fit spools of thread. I often lay out the threads immediately by color, you can easily find the ones you need without going through (and therefore, without confusing them) the rest - pull out a large box, everything is “at a glance”, take it and sew.
Cool crochet pincushions
Crafty craftsmen are coming up with more and more interesting options, such as, for example, cool crocheted needle beds.
Pincushion cup of tea
A detailed master class on knitting needle beds and cups can be seen in this video (it is in the language of needlework and more or less everything is clear).
Let me briefly explain what the essence of knitting is. Yarn for hook number 5.
Cup. First, we knit 7 rows of a circle with a light thread in single crochets (with increments of loops), then another 7 rows - without increments.
Tea. You need to knit 6 rows of the RLS circle with a thread of the appropriate tone.
Pen. The tube is knitted on 5 loops in a circle; at the same time, during the knitting process, it must be filled with filler.
Tea bag. Consists of two parts knitted with 5 sc stitches in three rows and a 4th row with decreases at the edges.
Assembly. Fill the cup tightly with some material, sew on the edges of the “tea”, a handle and a bag on a thread.
Fungus - box
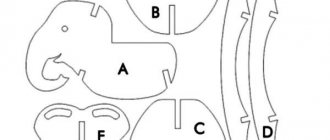
Mushroom pincushions can be crocheted not only in the form of fly agarics, which is very simple. Pay attention to such cute boxes in the form of mushrooms for boys and girls.
I am attaching the diagrams.
girl's box diagram
girl's hat diagram
boy's box diagram
boy's hat diagram
Knitting begins from the bottom of the box. On the “face” they embroider eyes, a mouth, blush – knitted circles. Pompoms or a “tail” are attached to the caps.
Sewing thread and yarn storage ideas
Threads are a special topic for needlewomen. If we are talking about sewing items, then the easiest way is to store them in craft boxes. However, if the threads are not in spools, but in bobbins, it is best to use special hangers with rods for them. In this form they will always be at hand. At the same time, they also need to be protected from dust, moisture and sun.
Knitting yarn is stored slightly differently due to its larger dimensions. It is best that each skein or set of threads is wrapped in cellophane. Plastic drawers are well suited for storing them - they are inexpensive and very practical.
Storage without bags is impractical, since in addition to the usual enemies (such as sun, moisture and dust), wool is afraid of moths.