Cats are favorite pets for many of us. Fluffy, wayward animals easily conquer the hearts of their owners. Children are especially partial to these pets. Every child would like to make a cat out of plasticine. This wonderful wish can be easily realized thanks to a simple master class. You can also make a beautiful pet figurine from other materials. For example, from clay or mastic. Let's look at all the options on how you can make a wide variety of kittens.
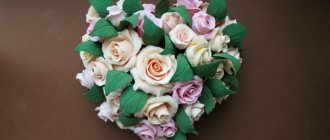
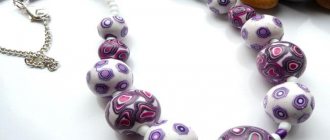
Quilling technique
As an example, let's look at how to make a small panel with a floral pattern.
- Take paper strips of several colors, for example, pink for the flower petals, green for the leaves, yellow for the center of the flower and curls.
- First we will make the petals. To do this, you need 5 “drop” elements made of pink stripes. To ensure they are the same size and shape, use a stencil.
- For leaves, take green strips, preferably short ones. Roll them into diamond-shaped rolls. It is not necessary to sharpen the corners. If the elements turn out to be different in size, it’s okay: such “leaves” look more natural. Make five large leaves and five smaller ones.
- Roll one yellow strip into a tight roll. From the rest, make any scrolls to your liking.
Now that all the elements are ready, it's time to glue them onto the base. You can mark the approximate location of the parts on it in advance with a thin, hard pencil. This will make the job easier.
- Apply a thin layer of glue to the center of the flower on one side and press it tightly to the base.
- Attach the petals and leaves in the same way. Arrange the curls as your imagination tells you.
Place the work on a flat horizontal surface and let the glue dry thoroughly. That's all.
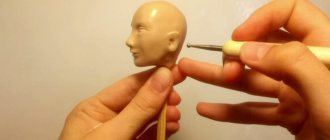
Cheshire Cat: stages of work
Take a piece of white clay, add a small piece of black and mix thoroughly to get a gray color for the base of the cat. Roll out the gray clay into a layer 2 mm thick.
READ How to make a self-leveling floor in an apartment
Place the paper face of the Cheshire Cat on the layer and carefully trace it along the contour with a stationery knife to cut out the desired shape from clay. Using a needle, pierce the place on the template where you will need to place the eyes and mouth of your clay cat being created.
Remove the template from the clay layer, place the eyes on the workpiece and press them in a little. After this, you need to add volume to the cat’s face. To do this, first roll pieces of polymer clay into a “sausage” and attach them around the eyes. Then the clay needs to be smoothed using a modeling tool.
We take another strip of clay and apply it to the lower jaw of the craft and smooth it too. Between the eye and the lower jaw of the Cheshire Cat, made from clay, there should be a depression.
You also need to put polymer clay above the eyes to make the bridge of the nose and add volume to the eyes. Then we again roll out the pieces of clay into “sausages”, flatten them and, using such elements, make a cut for the eyes.
Place a little more polymer clay in the center of the muzzle and form the bridge of the nose and forehead. We smooth the clay onto the workpiece with modeling tools to give the craft its final look.
Roll out a black piece of clay and use a template to cut out the cat’s smile. We place it in the recess between the lower jaw and the eyes.
We make teeth from white polymer clay. To do this, roll it up so as to get a sharp tip and cut it off. We repeat this action until we have made a sufficient number of teeth. We attach the teeth to the craft and form the cat’s lips from gray clay. The upper lip should consist of two parts, and the lower lip should consist of one.
We cut the turquoise clay into several small pieces and roll them into small droplets, which we then place all over the cat’s face.
Mix red and white clay to get a pink color. We make small droplets from the resulting pink clay and place them on the cat’s ears. After this, we draw the “fur” with a needle.
Make a triangular nose from a piece of pink clay and place it on the cat's face.
Crumble some black pastel onto a piece of paper and use a thin brush to apply the resulting dust to the area under your nose and in the corners of your eyes. We also add some shadows with dry pastel.
Now we send the craft to bake for 30 minutes. After baking, coat it with varnish.
Drying products
To preserve the crafts for a long time, the sculptures must be dried in the oven at the temperature indicated on the package. It will be different for each type of clay, so it is impossible to give advice to all readers at once. Place the parchment on a baking sheet, and after drying, be sure to ventilate the kitchen area and wash the baking sheet thoroughly. Then the product can be coated with acrylic varnish to give a glossy surface.
Try using polymer clay in crafts and bring your ideas to life! Good luck!
Paws and body
Take a piece of plastic, knead it well, roll it into a cone and bend it slightly, as in the picture.
From another small piece we roll out a small rope, divide it into two equal parts, round the ends - we get paws.
We press our paws to the body.
Using a stack and fingers, smooth out the junction of the legs and body.
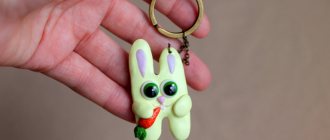
Cat made of polymer clay - step-by-step instructions
Polymer clay is an excellent material for creativity that has the properties of plasticine. This is a plastic mass that hardens at high temperatures, which is achieved by the presence of plasticizers.
Craftsmen love this material for its ease of use and durability.
It is interesting to use it to make both small figures for a keychain and pendants for a bag, give it to a child to play with, or make a voluminous decorative figurine for a shelf.
In this article we will look at how to make a cat from polymer clay, how to connect individual parts to each other, and at what temperature to bake crafts using a conventional oven.
A cat figurine can be molded from polymer clay of different colors or painted in a single color.
If you like to sculpt animal figures from plasticine and want to perpetuate the result of your efforts, then make a craft from polymer clay.
Head
To do this, roll a ball out of polymer clay.
Use a stack to create indentations for the eyes. We insert a pin into the head.
We use small parts to make a cat’s face (flattened small balls and sausages).
We make ears from two triangles. We press them to the head.
We insert the head with the pin into the body.
Then we roll up the rope, shape it and attach it to the body - we get a tail.
We make a bow on the back of the neck. To do this, we will make two triangles and a small ball and connect them together. Use a toothpick to make folds on the bow.
Next, we bake our cat in the oven (see your manufacturer’s packaging for temperature and baking time).
After baking, cool and admire the result.
The finished result.
Source
Modeling a cat family from clay
If you want to make a real figurine, then instead of plasticine, take another material. For example, clay. This is a popular mass for sculpting souvenirs; it is very easy to work with. Polymer clay (plastic) for crafts is sold in handicraft, art and online stores.
This material has its own characteristics:
- Self-hardening clay hardens in air. This may take 2 days.
- Baking clay hardens when heated. It is kept in the oven for 10-30 minutes.
- Clay can be tinted, that is, mixed with paint to obtain all kinds of colors.
- To reliably fasten clay fragments, you need to moisten them with water.
Clay cat
First, make the simplest figurine . For the master class you will need:
- clay;
- modeling board;
- toothpick;
- water in a bowl;
- brush and paints (acrylic or watercolor).
Take the amount of clay with the expectation that you will get a craft of the required size. Let's get started with some fun sculpting:
- Divide a piece of clay in two. One segment will make a body. From the second part, sculpt the paws, tail, ears and cheeks.
- The body should be shaped like a rounded cone. Press the bottom of the shape onto a flat surface to make it stable.
- Break off fragments from a smaller piece of clay to form ears. These will be two pointed triangles. Moisten these parts with water and connect them to the body.
- In a similar way, mold the remaining elements for the muzzle: voluminous cheeks, eyes, nose. Don't forget also about the last important detail - the tail. Moisten all this in water and secure it to the body.
- Add details to the finished figurine using a sharp toothpick. You can make pupils, a charming smile and dots on the cheeks. The mustache will be made from wire or fishing line.
- Wait for the craft to dry for a couple of days and paint the cat to your taste.
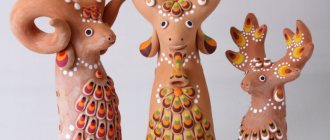
Cat Maneki-neko
Animal figurines often serve as a talisman in the home. The Maneki-neko cat figurine is common in Japan. It is believed that it gives wealth and great luck to its owners. This figure looks like this: the cat is waving friendly with one paw, and in the other she is holding a shiny gold coin. The figurine is made of porcelain, ceramics or glass. Its colors come in a variety of colors. But the most admired cat was a white cat with bright yellow and black spots on its fur. We will work with clay, which will perfectly replace porcelain. Gather all important materials and tools:
- baked white clay;
- stack;
- food foil;
- toothpicks or matches;
- glue "Moment";
- brush and paints for ceramics;
- golden acrylic paint;
- colorless varnish for plastic.
During the process of sculpting with white clay, you need to wash your hands periodically. This material can get very dirty during operation.
How to make a cat from clay:
- Divide the clay into parts: 4 large fragments (body, head, hind legs), 3 smaller segments (forelimbs and tail), 3 tiny parts (ears, coin).
- Try to give all the elements of the figure an initial shape, and then try to connect them. If the body parts look proportional, start working on them in detail.
- Stick your ears to your head. It is necessary to create a convex nose on the face. Make folds on the paws. Make a flat coin. Connect the hind legs to the body, but do not fasten the remaining parts yet.
- Use a toothpick to make holes to connect the head, body and tail.
- Prepare everything for baking. Fold the foil in several layers. Place our clay parts on it. Preheat the oven for up to 20 minutes, and then place the pieces with foil on a mesh baking sheet. Bake for about half an hour at 100 degrees. After this, turn off the oven and, without removing the figures, wait until the oven has cooled completely.
- Connect all the parts with toothpicks and glue.
- Paint the craft: draw ears, mouth, nose and claws. Make yellow and black spots on the legs and tail. Paint the coin with gold acrylic and draw hieroglyphs on it. After the paints have dried, coat the figure with varnish.
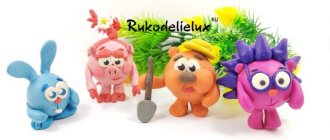
Kittens
Let's make figurines of small colorful animals. The cats will be successfully made from self-hardening polymer clay. In addition to this mandatory component, you need:
- foil;
- copper wire;
- spoke;
- a set of acrylic paints and a thin brush;
- beads.
Self-hardening clay is recommended to be stored in airtight containers. Do not leave it in the open air for a long time so that the plastic does not dry out.
Detailed instructions:
- At the first stage, prepare a frame for the kitten. Roll the foil into a circle (head) and a cone (torso).
- Wrap a piece of wire with foil so that a long tail remains.
- Place a second layer of foil on the workpiece. Make a beautiful transition from head to body. The neck should stand out, but not be too thin. Achieve stability in your figure. Use beads to make indentations in the places for the eyes.
- To obtain brownish-gray wool, mix plastic with brown and black dyes.
- Mash the clay into a layer of 2-3 mm. They need to tightly adhere to the foil figure. Don't touch the tail yet. Glue beads into the dimples for the eyes and draw pupils.
- Wait for the previous layer to dry. Blend different colors of wool and apply texture to it. To do this, scratch stripes on a piece of clay moistened with water using a knitting needle.
- Make the kitten's face: forehead and cheekbones. Create the famous cat eye shape. Make a triangular nose and white “pads” for the mustache. Then smooth out the contours of your cheekbones and also add texture to them. You need to pierce your nostrils with the same tool.
- Now start sculpting the top layer. Attach alternate strips of different shades to the entire body. At the same time, use a sharp knitting needle to create a wool texture on them.
- Make the front legs with pads. Form the hind limbs in a semicircle. Attach them to the body, and also cover the tail with plastic. Make ears by connecting wool-colored triangles with pink ones.
- After the product has dried, decorate the kitten's face. Draw the nose, eyes and cheeks.
Simple master classes with plasticine
Plasticine is ideal for a modeling lesson with children. With this material it is convenient to learn the basics of sculpture. Ordinary plasticine does not harden, so you can change and adjust its shape as much as you like. Another advantage of this modeling mass is the wide range of colors.
Let's start working on the plasticine figure of a cat. When sculpting with plasticine, you need to thoroughly knead the material and warm it up in your hands. This will make the mass more flexible, making it easier to work with.
Ginger cat
Try to create a charming domestic cat with a fiery coat color.
What to take:
- plasticine (orange, white, green and pink);
- match;
- stack - a special spatula for working with plastic material.
How to make a cat step by step:
There are many ways to sculpt, let's look at another easy example. To do this, prepare black plasticine and a stack. It is most convenient to work on a modeling board.
Sphinx made of plasticine
You can sculpt cats of various colors and breeds: Siamese, Persian, tabby, long-haired and even hairless. Let's try to make the most unusual animal - a sphinx from plasticine. These cats come in solid colors, spotted or striped, with white, gray and black colors. Therefore, we will need the corresponding colors of plasticine. But you can safely choose another original color, giving free rein to your imagination.
The pattern for sculpting a sphinx is no different from making an ordinary cat. You need to fasten together the body, head, paws, tail, ears and all the elements of the face. The difference is to make the figure thin and the ears large. Using a stack you need to draw many characteristic folds of skin throughout the body and on the face.
Miniature cats
Small colorful cats can be made from light self-hardening polymer clay. These are small figurines the size of a matchbox.
To work you will need:
- Self-hardening polymer clay (velvet plastic), 20 grams.
- Copper wire.
- Food foil.
- Acrylic paints.
- Beads for eyes.
- The brush is thin.
- The knitting needle is thin for working with structure.
Self-hardening clay is stored in a hermetically sealed bag or in several layers of plastic film. Keep excess clay in a container while you work, otherwise the plastic will dry out. We will make a frame for one cat from wire and foil. Since the craft is small, the frame is quite simple, it consists of a head, body and tail. Take two identical pieces of foil. The cat's head will be in the shape of a ball, and the body will be in the shape of a cone.
We cover a piece of wire with foil, try to do it as tightly as possible. There are 2 options, choose any:
Next, we cover the frame with another layer of foil. Press down the foil to prevent the neck from being too thin. It is necessary to ensure that the figure is stable and does not fall to one side. Leave the wire for the tail long. We press down with beads and mark the places for the eyes. The distance between the eyes is small.
To make a tabby cat, we get a gray-brown fur color. Add a little brown and black paint to the plastic and knead.
Knead the clay with your fingers to a thickness of 2-3 mm. We will stick to the frame in two stages.
Cover the foil with the resulting plastic. Leave the tail open. Before the plastic dries, press the beads into the head. The eyes should not protrude too much. Any glue will help, just drop it on the ends of the beads.
Paint the eyes with acrylic paint. You can use yellow and green paints. We are waiting for this layer of clay to dry. We make other colors of cat fur and texture it. To do this, slightly moisten a piece of plastic and scratch out the grooves with a knitting needle.
We sculpt the forehead with a “swallow” shape and stripes on the cheekbones. While we are not puzzled by the required volume, the main thing is to position the eyelids. We use a knitting needle to remove excess plastic from the muzzle and make a typical cat slanted eye shape.
We make a small triangle nose, pads for the mustache and cheekbones. Depending on the breed, the nose may be voluminous or, conversely, flatter. We don’t touch the bridge of the nose yet, the main thing is to position the nose. Then we shade the cheekbones, at the same time giving them the texture of wool with a knitting needle. Adding a chin. We make the shape of the nostrils, pressing the nostrils with a knitting needle, we get something like a heart.
We sculpt stripes of dark and light tones and place them on the forehead. We take only large areas; if necessary, we will complete small ones after sculpting. Lightly moisten the surface and knit the wool texture, simultaneously smoothing the seams between strips of different colors.
Next, we sculpt the back of the head and back. Apply the stripes on top of the main figure.
Let it dry.
We sculpt the neck and chest of the cat. To ensure that the new layer adheres well, you can moisten the old one a little with water.
Then we sculpt the paws using the main tone. If the paws are striped, then it is better to stick stripes on top.
Press the slits between the fingers.
We sculpt small mug-pillows onto the paws.
We attach the paws to the body. We sculpt the lower ones in a semicircle.
We sculpt the tail at the very end, giving it the desired shape. We sculpt the ears by connecting triangles of pink and primary colors and squeezing them with our fingers. Slightly round, moisten the bottom and press the ears to the head.
We are waiting for the product to dry. Let's start painting. Using a thin brush, draw the pupil. We draw the eyes, nose, contour of the bridge of the nose. As a rule, you also need to tint your eyebrows, cheekbones, and mustache pads.
Add spots and stripes where necessary.
(3 votes. 2.67 out of 5)