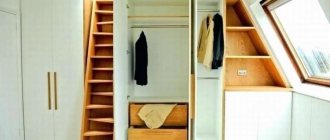
How to make a house model with your own hands
A house model and its architectural model - how do they differ from each other? You can make the first one from all available materials - cardboard, paper or wood. It does not necessarily have to repeat the shapes of any particular type of building.
The architecture of your house can be as different as you wish, as long as you like the result of your creativity first of all, and only then to those around you. An architectural model of a house, which is not so difficult to make with your own hands, is an exact copy of a building with a repetition of all the secondary and main features.
It is built from expensive materials, and the creation process can take up to several months of hard work. For this reason, we offer you a starting point on how to build a home layout from scrap materials. If you don’t know how, then in this article you can find recommendations and detailed instructions on how to make a model of a house with your own hands from cardboard, paper and wood.
Main materials used
The capabilities of modern specialists are significantly expanding due to the active introduction of industrial and even household 3D printers. The list of various synthetic materials for 3D printing is quite wide and is limited only by the goals and capabilities of a particular device.
Of course, in some cases traditional paper and cardboard are used. However, polystyrene and plastic are considered to be the most relevant materials. Prototypes of gift and artistic models, future architectural and industrial objects are often made of metal and wood. Other common materials for prototyping are clay, gypsum, plexiglass and plasticine.
Materials and technologies
Today, mock-ups are made from paper, plain cardboard and foam board, foam plastic, various types of plastics, including plexiglass and PVC. Recently, solid or veneered wooden layouts have become popular: they are more conventional in nature, but are visually perceived as lively and warm. In addition, sometimes they order works made of metal, real glass and even concrete; gypsum is used for individual parts. The choice of material depends on the purpose of the layout, the target audience, scale, aesthetic preferences of the author and the features of the project. Naturally, buildings with a lot of glass are rarely made of wood, and small typical cottages on a large urban layout are easier to cast from plaster and paint.
It is clear that making an architectural model from plastic, which is used only once, is not financially profitable. But for models that will be displayed for several years, transported from exhibition to exhibition, it is better to order them in more durable materials. And it is also necessary to take into account that plastic is a rather fragile material, and transparent one also tends to turn yellow over time. At the same time, however, it is plastic of different colors and textures that best allows simulating various construction and finishing materials. Moreover, the above-mentioned sheets with a tiled roof are far from the only prototype “semi-finished products” that can now be purchased. Brick plates with pressed seams, facade tiles, and other modular materials are also on sale.
If the layout of piece materials is non-standard, it is created on site, for example, by engraving on the same plastic. There are special machines for this, both small manual ones and huge programmable giants, which not every organization can boast of. The size of cutting and other machines is especially important when making large models, especially geodetic bases for them. Some modern machines are capable of solving not only planar problems, but also creating three-dimensional parts.
In the absence of a desire for complete plausibility, the mesh of seams is made of self-adhesive film, which is then “rolled” onto the workpiece by hand. The film is also used in other cases, since any design can be printed on it. At the same time, despite the emergence of high-tech methods for manufacturing individual elements, the work of modelers did not decrease - they began to be required to provide more detail and more complex devices.
Bird
Kirigami pictures like this bird are not that difficult to cut out, but to keep the lines smooth, you should use all available tools.
- Print or draw a bird on a branch on construction paper.
- Cut out all the white parts that do not belong to the design.
- Glue the picture onto the background sheet. Flowers and leaves can be bent to give the design volume.
Types of layouts
Layouts of paper houses can be very different. Several options for diverse schemes:
1. the simplest house in terms of making a model and further assembly. Even a child can cope with the work.
2. A more complex type of sketch, the diagram of which contains separate parts for fastening.
3. A beautiful two-story house with a compact facade and its parts. Homogeneous diagram without individual parts.
4. Vertical layout for creating a simple house. Thanks to this scheme, the strength of the product improves.
5. Option for a layout made from separate parts. All parts will have to be glued together step by step, but the shape of the body will be unique.
6. A complex layout of a one-story house and a two-story house, where there is an integrated part in the form of a roof.
Using any ready-made option as a basis, you can create a unique building. Originality can manifest itself in the form of improvements to the layout itself or the finishing decor of the paper home.
Pueblo
Pueblos are built by Indian tribes of the same name in the southwestern United States. These are modular, two- to three-story dwellings made of adobe (strong bricks made from baked clay mixed with straw) or large stones held together with adobe.
The complex of pueblo buildings can accommodate an entire clan, each family living in its own adobe compartment, like in modern apartment buildings. These homes can last for dozens of generations in a warm, dry climate.
Not mini prices
Representatives of model workshops like to compare the cost of a modern architectural model with the prices of cars, saying that they range from the cost of a domestic car to the cost of a foreign car. The range of the most common amounts is: $7–12 thousand, but there are models for $70 thousand and $500 thousand. The price depends on the cost of the parts. The cheapest way to make a model is from paper, the more expensive is from cardboard, while a plastic model costs about $15 thousand. A model of a house with columns, cornices and statues is more expensive than a model of a panel house made from the same materials. Although everything is not so simple here, since in a modernist project the precision of each joint is very important.
This places increased demands on craftsmen. In addition, the cost depends on the number of standard parts. On average, the creation of collapsible layouts with a layout increases the total price by 15–20%, but sometimes by 50%. The final cost of a miniature house is influenced by the presence of electronics in it. For example, built-in lighting will cost 10% more. Not the least factor in pricing is what materials the client provides to the layout designers. The ideal option is drawings, with all the details.
For complex facade solutions, even floor plans are important, but most workshops have their own architects who are ready to prepare the necessary sources based on photographs, 3D graphics and even hand sketches. By the way, the quality of the source materials also affects the speed of execution - on average, layouts are completed from two weeks to a month. In addition to making a model for a fee, the workshop offers: providing it with a protective transparent cap, maintenance, repair
When planning to order an architectural model, it is important to consider that at least a third of its cost will have to be paid as an advance on materials
Liana supports
It is difficult to imagine a garden without upward-facing “green walls”.
When creating them, it is difficult to do without vines, especially in small areas, because they successfully play their role, but take up very little space on the ground! Special structures help climbing or climbing plants to “get back on their feet” - arches and garden screens (lattices, trellises or trellises). At the same time, spectacular vines benefit only “paired” with beautiful and well-placed supports - an unsuccessful design will compromise even the most luxurious plant. Where to put it? The lattice will help to distract the eye from unsightly or boring places - for example, from the vegetable garden (photo 1).
Arches and garden screens serve not only to support vines, but also to divide the area into functional zones. Photo 2 shows how a “curtain” of virgin grapes and Coignier grapes visually separates the garden from the house. This living screen always looks wonderful, and in the fall its beauty is striking.
(Photo 2). Photo: Tatyana Shikanyan
Using a series of arches, you can create a transition from one part of the garden to another.
How to choose? The supports should not only match the house and the general idea of the garden, but also suit the vine physically and visually. That is, an arch or screen for a large and heavy plant should be strong and solid, while an elegant plant “lace” needs a light openwork “wall”. Among other things, you should consider the method of attaching the vine to the support.
Standards
The dimensions of the arch should be such that people can easily walk and stand under it. Its minimum width is 1.2–1.5 m, height is at least 2.1–2.2 m. In addition, the arch must have a “thickness” of 50 cm or more - a side wall, around which, in fact, and vines will grow. The shape of the arch arch can be very diverse - round, rectangular, triangular, etc.
Making a simple house model from paper with your own hands
What will you need to start modeling your dream home with your own hands?
Purchase the following materials for work:
- Glue that dries very quickly
- Sheets of paper and cardboard
- Stationery knife
- Scotch
- Pencil
- Drawing set
- Thick board
For modeling work, use thick paper or cardboard. A structure made of such dense material will be much stronger and more reliable. Therefore, be very careful when choosing high-quality paper for your layout. The beginning of modeling is the creation of a drawing or diagram of your future structure. At the same stage, decide on the desired scale of the building. Most often, when modeling, a scale of one to one hundred is used.
Next, they draw a detailed layout of the future house - this is a detailed image of your layout unfolded on cardboard or paper. Start drawing the scan from any corner of the building. Don't forget to place all windows on the same level. Be sure to leave small spaces on the sides and bottom of the walls, as in the diagram in the photo below. In the future, with their help, it will be possible to easily connect all the parts of the structure with each other.
You can make a model of a house from the simplest paper in two simple ways with your own hands.
The first method of making a model.
The finished diagram of the future house is cut out and folded along the dotted lines. Next, use a stationery or construction knife to cut through the windows. It will be convenient to use thick cardboard or a modeling board at this stage: cutting and gluing parts on it will be much easier and more convenient.
If desired, you can complicate the design a little and make the windows and doors openable. With this kind of work done, you can even make a dollhouse.
The second method of making a model.
This modeling method is perfect for creating complex structures and structures. How to make a layout in this way?
Fold a sheet of thick paper like an accordion. The number of folds determines the number of walls of the future building. On one resulting fold you can draw half the facade of the building. Draw very well, use bold lines. Using thinner lines, outline the places where the paper will bend.
After this, cut out the layout along the bold lines on the paper and unfold the accordion. You should end up with a building façade that is proportional and mirrored. Bend the holders and cut through the windows with a utility knife.
Then assemble all the components of the structure together and glue them with glue. Make the base for the layout from thick cardboard. Paint the finished structure and decorate it.
For a more realistic display of your building, as well as for a better spatial perception of the layout, add grass, trees and bushes. To make these items, you can use colored paints, grass, children's toys, dry branches of trees and shrubs.
Trees, for example, can be made from dry tree branches covered with painted foam rubber. You can easily depict grass using foam rubber crumbs. All that remains is to paint it with green paint.
A paper house model is less durable and less detailed than a wood or plastic house model. However, this type of modeling is very economical and easy to perform. Which gives him a big advantage. After all, even a child can make a model out of paper.
Frog
Adults who are passionate about kirigami crafts often wonder how to make kirigami for children. There are simple patterns on the Internet with cute characters. The little frog will not leave anyone indifferent. This simple pattern will use applique, and the only three-dimensional detail of the design will be the frog's mouth.
- Fold the green paper in half with the colored side facing inward.
- Draw a frog.
- Cut out the resulting outline.
- Add a horizontal section of the mouth.
- Bend the corners of the mouth in opposite directions.
- Straighten the workpiece.
- Turn out the corners of the mouth, making them voluminous.
- Glue or draw eyes, glue a tongue.
- Choose the background of the composition.
- Glue the frog onto the base, connecting the center lines of the workpiece and the base.
About functionality and planning
It is very important that the interior is not only stylish, but also functional. Therefore, it is important to place all pieces of furniture and household appliances rationally
Especially if the room is divided into several separate zones. The most difficult thing is when you need to combine the kitchen with the living room. The problem is that food odors are absorbed into the furniture and spoil the feeling of comfort. To solve this problem, you can enclose the kitchen using a sliding partition. If we are talking about the functioning of the living room, then here you need to correctly arrange the upholstered furniture, having decided on its dimensions. Sometimes a dining area is created in the living room and this nuance also needs to be taken into account. But the design of a children's room is created taking into account the age of the child and his further maturation.
When the interior of the room is zoned, you can begin to draw up a plan for the arrangement of furniture in the room. The plan is drawn up on a scale of 1:100. At the same time, it is advisable to perform it in several versions so that you can better understand how to place the furniture. This can be done using a special computer program or manually. In the latter case, you can cut out rectangles from cardboard that will serve as pieces of furniture and other interior elements. The cardboards should simply be pasted onto the plan. When drawing up a plan, we must not forget about the passages between the furniture and the walls.
You can also resort to color appliqué or simply paint the drawing with colored pencils.
Snowflake
Photos of kirigami snowflakes are familiar to everyone from childhood. Below is a diagram for creating a six-pointed snowflake.
- Fold a rectangular sheet into a square, then fold it diagonally to form a triangle. Cut off the unnecessary part of the sheet.
- Combine the sharp corners of the figure to create a smaller triangle.
- Fold the workpiece again in the same way.
- Carefully smooth out the workpiece.
- Draw a snowflake pattern to suit your taste.
- Cut out the design along the outline.
- Unfold the craft and use it in interior decor.
Corrugation as the main material
It is better to take two types of cardboard for making a model: smooth and three-layer corrugated. The second will be used for load-bearing walls, floors and ceilings, and the first will be used to make a corner for connecting individual parts of the structure, small parts of external and internal design. A cardboard house model needs a base. This can be a plate glued together from two layers of corrugation or cut from plywood. The base or base of the layout is drawn out according to the dimensions of the future house and can be filled with decorative miniature flower beds, garden vases, and benches.
Next, you need to draw a diagram of the location of the walls, porch and extensions on the base. After this, you can begin making the main parts: walls with cut out door and window openings, the ceiling and floor of the second floor (if the house is two-story). To assemble the structure, you need to prepare corners from thin, smooth cardboard. The longer the corner, the stronger the connection. Optimally, its length should be at least 70% of the connection length. The width of the cardboard corner is 1.5-2.0 cm.
Castle architecture
- Lines of defense. The fortification system consisted of two concentric circles of thick walls. The defense of the outer walls was carried out from the territory of the lower courtyard, and the defenders of the internal fortifications fought off the enemy from the towers and from the upper courtyard. The castle was surrounded by a moat with water, and supplies of drinking water in case of a siege were stored in special containers in the lower courtyard. In 1271, the troops of the Egyptian Sultan Baybars managed to break through the outer fortification and penetrate into the lower courtyard, but they were unable to go further. The siege lasted many months before the defenders of the fortress surrendered.
- Support towers. The massive walls were reinforced with support towers, which served as a reliable shelter for the sentinels.
- External wall. A beveled thickening at the base of the wall protected it from being undermined or undermined.
- Loopholes. The narrow slits of the loopholes, almost invulnerable to shells, usually widened inward, forming a niche in the wall. The archers watched the enemy from there and, taking aim, fired.
- Internal communication. To communicate between fortifications located at a considerable distance from each other, the crusaders used pigeon mail, which they borrowed from the Arabs.
- Aqueduct. Water entered the castle through an aqueduct. In case of a siege, the castle had reserves of water, stored in closed containers in the dungeons.
- Square tower. During the siege of 1271, the square tower was badly damaged and was rebuilt 14 years later. However, round towers were considered more reliable - it was more convenient to conduct all-round defense from them.
- Vaulted galleries. A vaulted gallery stretches along the walls of the refectory - in it you can hide from the scorching sun. In the courtyard, the most beautiful and comfortable rooms of the castle are located - the chambers of the knights. The courtyard serves as a refuge for the inhabitants of the castle in the event of an attack by mercenaries guarding the outer wall of the fortress.
- Outbuildings. A windmill was installed on the tower - reserves of flour helped withstand long sieges. In the dungeons of the upper courtyard there were spacious storerooms.
- Upper tier. The defense of the upper tier of the fortifications was carried out from high towers and from the courtyard, where the dormitory (bedrooms), refectory, warehouses, chapel, as well as the chambers of the knights were located.
- Additional insurance. The walls of the upper tier were reinforced with a powerful thickening in the form of a slope, the width of which at the base reached 24.3 meters and was almost equal to the height of the wall. This massive structure, built in the 13th century, in addition to its defensive purpose, served as a giant buttress, withstanding even earthquakes.
- Defense tricks. From the eastern gate tower, ramps leading to the donjon replaced flights of stairs. The winding, narrow passage made it difficult to fire battering guns. Even the sudden change of light and shadow was confusing.
Model for assembly
If the building model is to be displayed in a sales office, then it can be made collapsible, with an internal layout. True, model designers often dissuade from such a decision, since an architectural model is still not a designer, and over time, constant manipulations can greatly spoil the presentation of the product. A solution to this problem could be the manufacture of one additional floor with a standard layout, which will exist separately. The layout looks interesting, the halves of which are fastened on vertical hinges: one can demonstrate the layout, and the other a structural section.
Layouts with built-in light have already become commonplace. However, there are some subtleties here. For example, a common light box with fluorescent or other gas-discharge light sources can be organized inside, but you can also install LEDs exactly in those places where the light will actually come from. Everyone is greatly delighted by the automated models, which are relevant when demonstrating the capabilities of a “smart home”. These models come with a remote control that turns on the lights, opens the doors, and raises the blinds. Naturally, the cost of such a product increases.
Where to build a residential building
The main building on the dacha plot is a house. Subsequently, it cannot be moved in one direction or another, therefore, when choosing a place for its construction, the proverb “measure twice, cut once” is true. First of all, you need to know where exactly you can’t build it. In the practice of constructing residential buildings, there are restrictions of a purely practical nature, as well as building codes and regulations (SNiP).
Basic rules in simple language:
- at least 1 m from the base of the house to the fence ;
- For fire safety purposes, all houses on the street are located on one side, that is, either closer to the left border of the land plot, or to the right. If the neighboring plots are already built up, you need to do as the neighbors do or, as an option, build a dacha in the middle;
- at least 6 m away from other buildings ;
- It is mandatory to maintain distances to the red lines: roadway, power lines, central water supply, sewerage and gas pipelines. These regulations can be obtained from your local land office.
After taking into account all the restrictions determined by various types of technical regulations, there remains a part of the land available for the legal construction of a house. Now we need to consider the location of the site from the point of view of ease of use.
It is not recommended to locate the house in the depths of the plot , since its usable area will not be used rationally: the length of the path leading to the gate and the access roads to the utility yard and the house will increase. And it’s not very convenient to travel the long way to the front door every time, especially in winter.
What do you need for work?
To make a house model, you will need the following tools: • thick white/colored A4 paper (several sheets); • cardboard of the same size; • a sharp construction knife (it is convenient for cutting out the walls of a building, and then cutting small windows and doors into them); • glue brush; • PVA glue; • wooden or plastic board for modeling (it is convenient to cut out parts on it so as not to damage the table); • scissors; • pencil; • ruler.
You can also use a regular household hair dryer to speed up drying of glued parts. You can cut out a building from either paper or cardboard. The last option is more reliable, but it is a little more difficult to work with. You can cut out the entire layout from paper, and then mount it on several “load-bearing” cardboard walls (photo). This will strengthen the entire structure and give it more stability.
Hogan
The hogan is the main traditional home of the Navajo tribe. It can be round, cone-shaped, polyhedral or rectangular. It may or may not have interior posts, log or stone walls, and is covered with dirt with a variety of bark roof options. Everything fits.
The Old Hogans can be considered the founders of the idea of an energy-efficient home. “Using a thick layer of clay on top of the wooden structure allows the house to remain cool in the summer due to natural air circulation and a damp floor. In winter, the hearth retains internal heat for a long time. This approach is called thermal mass.”
In 2001, the hogan began its revival through a joint venture involving the Navajo Nation, Northern Arizona University, the US Forest Service and other private and public partners.
Making trees and grass
To make the layout look more authentic and to be able to visually assess its scale, it is advisable to decorate the cardboard stand with greenery: grass and trees. To do this you will need: a can of green paint; acrylic paint of several green shades; dried twigs (dead wood); a piece of foam rubber; glue; awl; paint brush.
First, in any unnecessary container, you should mix several tones of green acrylic paint (dark and light to achieve the maximum effect of authenticity). After this, you need to cut the foam rubber into small pieces and properly saturate them with this paint. When the foam rubber is colored, we leave it to dry for a day.
We cut the dried foam rubber into such small pieces that they literally resemble crumbs. This will be our grass. After this, paint the cardboard stand well with greenery several times, and when the paint dries, cover it with a thick layer of glue. Pour green foam rubber crumbs onto the wet glue in random order. The grass is ready.
When the glue is completely dry, you need to make several holes in the cardboard base with an awl. Be very careful not to damage the entire layout. We paint dry twigs with green spray paint and stick them into the holes in the stand. Now the trees have taken their place. All this vegetation makes our paper building model look more realistic.
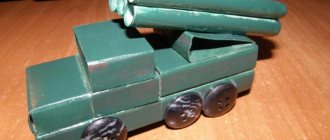
Miniature buildings can give the client a complete impression of the future construction. The ArchLine model workshop creates models of residential buildings, specialized equipment, and military buildings for professional or industry exhibitions in Moscow and the Russian Federation. Large-scale structures reproduce in detail the development projects of neighborhoods or complexes.
Practical advice
And in conclusion, here are some more practical tips.
When the foam hardens, it is very important to press the edges of the towers against the walls along the entire length of the tower. To do this, you can use vertical boards supported by other boards. Otherwise, dents or, conversely, bulges may remain, as happened with our two towers. If you make round towers from polyurethane foam shells, and not from soft foam, such problems should not arise. Because covering small parts with plaster on all sides is not an easy task; you can not cover the battlements on the towers with plaster, but paint them with paint - either to match the plaster, or, conversely, in a contrasting color - red, burgundy, brick or black, like we did did it on the third wall.
But in this case, it is advisable to paint the remaining battlements located on the walls the same color as the battlements on the round towers. We covered the first two walls with plaster, and the third with contrasting acrylic spray paint. It took 20 minutes to paint the teeth, and 8 days to cover them with plaster, because... each of the four sides took 2 days to dry. We finished the upper part of the teeth with plaster on the finished castle.
If after applying the plaster the parts of the castle dry in the open air, during rain it is necessary to cover them with film. Otherwise, the resin from the plaster is washed out and leaks out. After the final painting we forgot to cover the lock. It rained during the night and white resin fell into the water. We had to clean the pond unscheduled. Do not strive for perfect smoothness and evenness when covering walls and turrets with plaster. On the contrary, irregularities and “potholes” will give your castle a natural look. The main thing is that the white or pink foam does not show through in the potholes. For a greater effect of “aging” the walls, you can paint the walls and towers dark gray or dark brown before applying plaster. Most importantly, before painting, do not forget to make sure that the paint does not corrode the foam! When working with plaster, use a spatula and thin paint brushes. Don't skimp on brushes. It is extremely inconvenient to work with a brush with adhering plaster, and it is almost impossible to wash it off the plaster. That's why we didn't use the same brush more than twice. Roofs for towers can be made from any bendable material in the form of cones or pyramids. We decided not to bother and use plastic flower pots of suitable size. Don't get carried away by the abundance of small details. From a distance they are still not visible, and require considerable labor costs. And do not forget to maintain proportions when making small parts. A disproportionately large window or flag can visually reduce the entire structure.
We hope that our advice will help you, and that the castle you built with your own hands will become the center of attention and leisure for your entire family and will not leave your guests indifferent.
Volumetric paper house
First of all, stock up on imagination, which will help you create a unique masterpiece, sharp scissors, good glue and, of course, paper. You can choose paper not only white, but also multi-colored and different in density - it could even be a notebook or sheets from an album, paper for drawings (its price, of course, differs from plain paper, but it is convenient to work with, it sticks well ).
Also:
- ruler
- sharp pencil
- stationery knife
- masking tape
To decorate the house you need to take:
- paints
- colorful pencils
- medical cotton wool
- lace
- beads
Prepare a surface to work on; it can be a table or any other flat surface.
Making a sketch of the house
Before starting work, you need to prepare a sketch of the future house. It will depend on the size, volume, complexity or simplicity of the design. If you have the opportunity, purchase a large sheet of paper on which you can immediately draw a house. If this is not possible, then take smaller sheets and draw each detail of the house on a separate sheet.
When cutting out the resulting drawing, you should not forget that the right side remains unbent for subsequent application of glue, and it should be completed. Whether a floor is needed is up to you, but your child will do just fine without it if you place the finished house on a flat surface.
Connecting house parts, decoration
- Before gluing the house together, use a knife to make windows and a door. The paper needs to be removed from the windows, but do not cut the paper on one side of the door so that they come out ajar.
- It is better to start the decorating stage before assembling the parts of the house, otherwise it will be much more difficult to do later. Give your child a chance to show his imagination; let him decorate the walls of the house himself using paints or pencils.
Let the child color
- To make a latch on the door, cut out a rectangle from cardboard and glue it to the edge of the door with double-sided masking tape. The roof can be decorated with tiles, made from brown or green squares.
- You need to start gluing the tiles from the bottom in a checkerboard pattern. Apply glue to only half of the square and overlap each row - until the very top. The roof can be decorated with cotton wool snow by gluing it with PVA glue.
Cut and assemble
- Let's start cutting out the house, make bends at the corners of the walls and apply glue to the bend that we left earlier. Let it dry. If you have paper that is too thin to stabilize the house, glue its base to thick cardboard.
- If time allows, make a second floor, balcony, porch.
Snowman
Kirigami patterns like the snowman will definitely appeal to children. It’s easy to make such a craft, but it will bring so much joy.
- Cut out all the small details from the middle of the picture.
- Cut out the outline of the figure and the base on which the snowman stands.
- Fold the dotted lines.
- Choose a background and glue a snowman to it.
Note!
- Kinusaiga technique - TOP-140 photos of the best ways to create crafts using the Kinusaiga technique with your own hands + instructions for beginners
- Do-it-yourself passe-partout - a master class with step-by-step do-it-yourself schemes. Making tips + photos of the best examples
- Decoupage with napkins: TOP-150 photos of ways to decorate with napkins. Simple instructions for beginners at home
How to make a city out of paper
This is not just a craft, but real magic. Watch how to make your own paper city and decorate it with holiday lights.
To create such beauty, you only need whatman paper, a New Year's garland and a little imagination. Detailed step-by-step instructions can be found on the website.
Photo source: www.livemaster.ru/topic/2118259-sozdaem-volshebnyj-gorod-iz-bumagi
Paper haunted houses
This tutorial will show you how to make paper haunted houses for Halloween! You can fill them with candy and make them illuminated (but without candles) and use them as lamps! To make them, you will need templates that you can download on the website, paper of your choice, glue, pencil, scissors, Xacto knife (model knife, great thing for needlework). Look at the master class in step-by-step photos.
Photo source: www.instructables.com/id/Paper-Haunted-Houses/
Gingerbread house made of paper
Check out how to make a Halloween themed paper gingerbread house! Install an LED light in the middle and the house will become a great light fixture! First print and cut out the patterns, then the window panes. Save the door template for later. Then fold along the fold lines. Trace all the fold lines and tabs, fold one side of the door. Then cut out all the pieces and fold along the fold lines. Cut window panes along the top and one side of the door (the one that is not folded over). Fold the door along the line. Then simply assemble the paper house by applying hot glue to all the tabs. How to decorate a paper house can be found in the instructions on the website.
See the master class below in the step-by-step photos.
Photo source: www.instructables.com/id/Halloween-Paper-Gingerbread-House/
Here are two more examples of how to make a gingerbread house out of paper with your own hands. First, be sure to draw in the fold lines, pressing firmly with the pencil as you draw. Fold all the fold lines. Cut out the windows using sharp-tipped scissors or an Xacto knife. Glue the walls. To attach the roof, start by applying hot glue to the lip of one of the side walls, then push the roof into place. Lift the other side of the roof, then quickly apply glue to the remaining tabs and press the roof down. That's all, in short.
Photo source: www.instructables.com/id/Paper-Gingerbread-House/
The second example is also a great project that kids can decorate with stickers, gel paper, patterned paper, pom poms, glitter—whatever their heart desires! You can cover the paper gingerbread house with felt and add cute candies. But pruning is definitely an adult's job. The main material for this project is corrugated cardboard. This project is very simple if done so that the cardboard bends in the direction of the corrugation. Make the cut lines so that they are in the same corrugation direction (parallel ribs or grooves). How to make a paper house with your own hands is shown in detail in step-by-step photos.
Photo source: www.instructables.com/id/Gingerbread-House-Tissue-Box/
Igloo
Igloos are snow houses used by the Inuit people of northern Canada. They are dome-shaped shelters built from blocks of ice installed in a spiral pattern and compacted with snow.
You'll be surprised how warm it can be inside when it's freezing outside! “The temperature outside may be -45C, but inside the air can heat up from +7C to +16C, only due to the heat of human bodies,” Cornell University, 2003.
Required dimensions
During the modeling process, it is important to immediately determine the dimensions. It is worth considering that when making a tall or large house you should not use whole scans
This assembly pattern will make the building unstable, weak or uneven. In order to avoid such shortcomings, you need to think about making supports for the frame. A similarly effective solution would be to choose a more durable paper – cardboard.
In order not to complicate the craft, it is better to initially prepare a small-sized model. The standard version of the basis for the layout in terms of parameters will be a regular A4 sheet. Starting from the boundaries of the base, you can create diverse houses of a certain design. An excellent example would be the simplest layout with the following parameters:
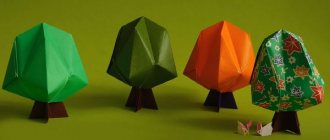
Spruce
During the New Year holidays, many people want to decorate their home in an original way. A DIY kirigami Christmas tree will be a wonderful decoration for your interior or holiday table.
- Transfer the image of the Christmas tree onto paper.
- Cut entire lines of the template.
- Cut the shape of the Christmas tree according to the outline.
- Fold the figure along the dotted lines.
- The outer part of the figure will be the support for the Christmas tree.
- Fasten the Christmas trees together with hooks.
- Decorate with beads and rhinestones.
Additional Templates
If your hand is more “stuffed”, then you can try to make a more complex version of the product. At the same time, the work will become more complicated only in terms of increasing sequential actions. An example of assembling another template:
This craft can be an excellent New Year's decoration or toy for a child. An important stage in the manufacture of such crafts is decor. The finished base does not necessarily need to be painted only. Decorate the base by gluing various parts from other materials. For example, the roof is made from “tiles”, which in turn were cut from a disposable plate.
Process Features
First of all, the parameters and nuances during development depend on the area within which the layout is being created. However, there are a number of general features that are suitable for each type of layout. The designer will certainly consider the following questions before starting design:
- Determination of the typology of the object or objects of prototyping.
- Calculation of all stages of design, setting work tasks.
- Selection of the most suitable material and technology for making the model.
- Approximate assessment of the complexity and actual labor intensity of the project.
- Finding design features of the layout. Determining a sufficient level of detail for each object.
- Finding a suitable production area for assembly. Describing the nuances during transportation and long-term storage of the finished layout.
- Comparison of your own established traditions, preferences and personal experience with current methodological recommendations and current production standards.
The layout basics listed above allow the designer to decide on the correct scale. It is worth noting that this moment is one of the key ones and affects all further work.
To better understand the features of such activities, we should consider several basic types of layouts. There is no unambiguous classification, because each development can be classified as several types depending on the field of activity, as well as the methods and technologies used.
PLASTIC
This material is very often used in prototyping. It has a huge number of advantages, but no less disadvantages. Pros:
- The plastic is durable, lightweight, and has good rigidity.
- There are adhesives that heat the plastic and melt it, and two parts can be glued together tightly.
- The plastic is easy to work with and cuts well. The edge can be made up to 45 degrees and there will be no thickness of material in the corners.
- If you use plastic of different thicknesses it is easy to create the desired volume in the layout.
Minuses:
- The main disadvantage is the texture, or rather the lack thereof. If this is the goal, then the layout can be as neutral as possible.
- Plastic has few colors. White and Gray most often. To get beige, or any other color, plastic needs to be painted. Painting plastic is not easy, as everything drips off it. They paint plastic with an airbrush, and it is very difficult.
- If you need to create the texture of a brick, this is also a whole story with plastic. In general, in order to obtain an artistically rich appearance of the layout, plastic requires further processing. Either they are painted, or other textures are glued onto the plastic, and it is used only as a base.
Cake
Kirigami cards made especially for the birthday boy will be remembered by the hero of the occasion for a long time. This unusual craft will most likely take place on a shelf in the apartment of the person who receives such a postcard as a gift.
- Take a colored sheet, one side of which should be white.
- Draw the outline of the dessert.
- Cut through the solid black lines.
- Moving from the center of the picture, bend the blue lines outward and the red lines inward.
- Sign the card and decorate it.
Making a layout: method 1
After the entire diagram is drawn on paper, all that remains is to cut out the future building, bend the lines marked with a blue dotted line and cut the windows with a construction knife. Use a modeling board. It allows you to cut out parts from cardboard and then glue them together much more conveniently. The scheme presented in the photo above is suitable for the production of the simplest houses. A more complex structure will literally have to be made up of several parts. By the way, the layout can also be made to open (so you can see the interior of the house). It is on this principle that children's doll houses are made, which can be purchased in the store.
To make such a layout (photo), it is advisable to use the thickest cardboard you can find. In order for part of the wall to open, an appropriate fastener is used (this can be found in old Soviet-made boxes) or simply a piece of cardboard bent in half. Doors can be made to open in the same way.
Ladder
The staircase template seems quite simple, but will require special care and precision. Carving a kirigami staircase is considered a more painstaking task than carving the previous designs.
- Make vertical cuts. A ruler will help make all the lines straight.
- Bend all broken lines in the desired direction. It will be more convenient to do this using a spatula.
Making complex designs from paper
The process of manufacturing complex multi-component house models is not much different from that described above. It’s just that similar sweeps are performed for individual elements of composite layouts. A group photo of the assembly of such a layout shows its individual elements and assembly order.
Having mastered the simple technique of making simple houses out of paper, you can create entire paper towns with landscape design elements, plants, car models and small architectural forms.
The easiest way to make building models from round paper is to apply the formula for determining the circumference (2πr) to their calculation, adding a gluing strip to it.
You can also add realism to your layout by simply lighting the house from the inside.
To do this, you can mark the connection points for the LEDs and the battery on the scanner, and then install them during the process of gluing the layout.
Such a house can also serve as a night lamp, but in this case it is better to use a switching power supply connected to the mains.
A cell phone charger will do. You can also use inexpensive Christmas tree garland:
Layout of non-standard shaped areas
As a rule, there are no particular difficulties with planning areas of irregular configuration. On the contrary, they can be used to create unusual, exclusive landscapes. The main thing is not to be afraid to stand out from standard solutions.
If the area is elongated
A long plot of land only at first glance seems difficult to plan.
In fact, such a site has an important advantage: it is easier to divide it into zones. They are divided one after another according to the degree of importance or aesthetic indicators: residential area, children's and sports grounds, barbecue area, garden, vegetable garden, bathhouse, and at the very end the economic part. The house is not being built immediately behind the entrance gate. It is recommended to leave enough space between the façade and the fence to create a front garden, covered shed or paved patio. Since there is not much space left for a garage, it is better to include it in the house design, placing it in the basement, and arrange parking on the area in front of the gate.
All zones are connected by one path, laid along the edge or in the center of the estate. It is desirable that the path have a winding trajectory - this will help to visually expand the boundaries of the site and make it visually more spacious.
Important. It is better to make the fence between neighbors low and not continuous. Firstly, it provides less shade, and secondly, a lightweight enclosing structure will hide the cramped area.
If the area is sloping
The big disadvantage of areas with a slope is the labor intensity of their arrangement, the additional costs of strengthening the slopes and creating level areas. But if you are not afraid of all this, elevation changes open up the possibility of creating an exclusive landscape with terraces. The already existing mountainous terrain makes it possible to create a waterfall with a cascade and an alpine slide in conditions that are closest to natural.
The house is being built at the highest point. This location will protect the structure from spring floods and landslides. In addition, the entire site and the surrounding areas closest to the estate are clearly visible from the height. The exception is the slope that slopes down to the north: it is recommended to build a house on it approximately in the middle so that the building does not completely shade the land plot.
Practical tips for arranging a site on a slope:
- For ease of movement, stair steps made of concrete, natural stone or brick are installed on the steepest slopes;
- Willows, lilacs, and rose hips planted on the land will strengthen it with intertwined roots and prevent soil from being washed away;
- A drainage system is used to remove melt and rain water. It includes open and closed drainage channels;
- Drainage holes are installed at the bottom of the retaining walls through which excess moisture is removed;
- To prevent landslides, the steepest slopes are covered with agrofibre or mesh. A layer of soil is poured on top, after which creeping plants are planted or the lawn is sown.
If the plot is square
Oddly enough, a plot shaped like a regular square is quite difficult to plan. You can ruin everything by building a house in the center. With this arrangement, there remains a distance between the fence and the building that is not sufficient for its rational use. Of course, this does not apply to large areas.
It is best to visually divide the territory into 2 equal parts, and divide the one closer to the street in half again. A house is being built on one of them, and the second is allocated for a yard, parking and garage. The remaining half of the plot is distributed between the garden and vegetable garden. In this case, garden beds are laid out on the south or east side so that fruit trees do not block sunlight.
Housing for gnomes
The task can be simplified if you use existing blanks, for example, cylinders from toilet paper rolls. In order for the composition to be original and attractive, as in the photo of a cardboard house, you need to be patient. You can take 2-3 cylinders and cut them into two parts so that you get parts of different lengths.
Then you should cut out the paper strips. Their length will be about 150 mm, and their width will be 15-30 mm greater than the height of the cylinder used as a house. Windows and doors are cut out of colored paper and glued to a white strip.
The cardboard cylinder should be wrapped in paper with windows, after applying an adhesive mass to the surface. The edges of the paper extending beyond the cardboard are folded inward. You need to make cones out of colored paper that will serve as a roof. They are attached to the cylinders with glue. The village for the gnomes is ready.
Butterflies – painting on stones
You can paint any natural stones, both small and large. “Cave paintings look more impressive if the painting area is large - in this case, several images can be made on the stone. The butterflies in the photo above are an example of this. We first wash and dry the stone surface, then apply a primer to it. When the coating is dry, paint it with a light background paint. And then - creative work. If suitable stones cannot be found, we will make stones of the desired texture from cement.