how to make a paper lily
A little about the flower... Lily means admiration, which is why it is so good for a wedding, birthday, or just to tell someone how much you love them. Making a paper lily is easier than many types of other flowers because the lily has a simple and expressive petal shape.
Here you will find ten wonderful examples of how to make a paper lily flower with your own hands . Various materials can be used for manufacturing. Lilies made from corrugated paper look very beautiful . If you are interested in origami or just want to learn this wonderful art, in the article you will find several examples of how to make an origami lily . Check out the master classes below and choose an option to suit your taste.
DIY metal flower
Metal is a rough material. To turn it into a delicate flower requires a special talent of the master who works with it. In this master class we will show you how to make a flower out of metal with your own hands. The result of your work will be a beautiful and elegant feces.
Materials
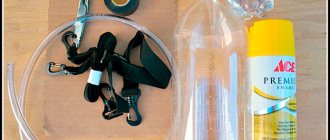
To work you will need:
- thin sheets of metal;
- metal rods or rods with a diameter of 6 mm;
- white, green and yellow paint;
- primer for metal;
- marker;
- paper;
- metal scissors;
- stationery scissors;
- welding machine;
- hammer;
- anvil;
- nozzle for grinding metal;
- grinder or hacksaw;
- vice.
Step 1
. You will need to transfer the template of the stool leaf onto the metal sheet. First, you can draw it on a sheet of paper yourself or print the outline by downloading and scaling the outline picture from the Internet. Use a marker to redraw.
Cut the blanks with metal scissors. Sand edges if necessary.
Step 2
. The steel rods will need to be cut into small pieces, approximately 45 cm long. Use a grinder as a cutting tool. Don't forget about protective gloves and a mask.
Step 3
. The rod will act as both a pistil and a stem at the same time. To give it a realistic look, one of the ends will have to be processed. Using a hammer, vice and anvil, make several bends on it.
Step 4
. Next, using a hammer and a sanding disc, narrow and slightly round the same end of the future stem. The photo shows how they should ultimately look.
Step 5
. Start forming the flower. To do this, thoroughly heat the cut piece of metal sheet with a blowtorch.
Under the influence of temperature, the metal will soften, and it will be possible to work with it. Ideally, it is better to heat it in an oven; if you do not have such equipment, make do with available tools.
Use pliers to bend the sheet. Try to bring the diameter of the lower part of the flower closer to the parameters of the rod.
Step 6
. Place the rod in a vice and place the flower on it so that the rounded part is inside.
Step 7
. Weld the elements together.
Step 8
. While the flower blank is in a vice, use a blowtorch and pliers to give its petal a realistic shape.
Step 9
. Using a sanding disc, sand down the welds on the flower. Additionally, you can go over the resulting workpiece with a metal brush or just sandpaper.
Step 10
. Apply metal primer to the flower.
Step 11
. After the primer has dried, paint the flower with white paint. Apply it in 2 layers. Take spray paint.
Step 12
. You will have to paint the stem and pistil in appropriate colors using brushes.
After the paint has dried, your metal kala is ready!
4 / 5 ( 45 votes)
Similar articles:
- DIY soap – Blue windows
- DIY papier-mâché maracas
- DIY funny children's backpack "Minion"
- DIY drawing on a T-shirt