The table in the gazebo is one of its most used parts. It must be smooth, durable and beautiful, otherwise you will not experience any pleasure from eating and ordinary “get-togethers”.
On the Internet I found more than ten ways to make a wooden table, using boards, bars and even old half-rotten scraps. However, it is the method proposed below that I consider the most interesting for making it yourself.
The proposed instructions use the most common available building material - board . It is quite possible that you have it on your site or you have access to a place where you can get it.
No complex design solutions are used as fastenings; ordinary galvanized self-tapping screws will be enough.
Drawing with dimensions
The finished product will have the following dimensions:
- Length - 200 cm.
- Width - 75 cm (5 boards of 15 cm each, not indicated on the drawing).
- Height to tabletop - 70 cm.
- The protrusion behind the leg is 30 cm.
Depending on the size of your gazebo, you can proportionally reduce or increase the size of this table. In general, it is suitable for both small and medium-sized gazebos. In larger structures it will be necessary to use heavier and longer material.
Construction material and tools
To make a wooden garden table you will need:
- Dry board 150mm by 50mm (about 20 meters).
- Galvanized wood screws.
- Grinder with a grinding wheel or plane.
- Screwdriver/drill.
- Jigsaw/saw.
The main task is to find 20 meters of board, and the rest is not a problem at all. Self-tapping screws cost pennies, and in a pinch you can take the tool for the job for the weekend. If you have these resources, then you can start working.
Step by step construction process
At the end there will be attached a video from the channel “ Through ZhPU ”, in which this method was described (the name they chose is amazing, can’t you say anything??).
Below you will find instructions, after going through the steps of which, at the exit you will receive a ready-made table for the gazebo. The quality of the photos is not the best, but they are enough to understand the process.
Preparing the boards
First of all, the boards need to be marked and cut. Based on the dimensions of the drawing, you will need to make 18 separate parts, which will later be folded into the finished table.
After you have prepared the boards, they need to be dried in the sun. This is done in order to then sand them properly. If they are wet, the grinder circle will become clogged and you will not be able to process them properly.
There are no such problems with an electric planer, but still make sure that the wood is dry in advance.
Making a countertop
The table top consists of 5 parallel boards, fastened together with four 50 mm by 50 mm slats (to which the legs will be attached in the future). The space between the edge of the table and the slats is 30 cm. The tabletop looks like this from the back side (photo below).
If your boards are smooth and straight, then there will be no gaps or unevenness on the front side of the table. In the future, the tabletop will be additionally sanded and processed, so for now you can ignore it.
Making and attaching legs to the tabletop
Having prepared the boards in advance, you need to assemble the legs. The lower part of the legs on which the entire table structure will stand looks like this:
The finished version of the legs looks like this.
The table, like the legs, turns out to be quite massive, but it will withstand both a pot of potatoes and dancing guests. After attaching the legs, it will be necessary to additionally sand the bottom part so that the structure stands stable.
Strengthening the legs with an additional board
For greater stability, an additional board is installed between the legs, which is also attached with self-tapping screws. Its dimensions are about 165-170 cm, the edges of the board should protrude slightly beyond the legs (in the drawing they are flush with them).
Final finishing and sanding
After assembling the entire structure, it is necessary to process the corners and surface of the tabletop. Having achieved a smooth and even surface, you can bring the finished product inside the gazebo (I hope the table will fit through the front door, otherwise you will have to disassemble it) and enjoy your work.
Video
The proposed option for manufacturing the table was discussed in a video on the Youtube channel “ Through ZhPU ”. Despite the provocative name, the quality and thoroughness of the finished product did not raise any questions, and besides, the video is quite short and intuitive.
I directly recommend that you watch it, and also support the channel owners with a subscription or likes, the guy did a really good job.
Table mount
The installation procedure for the product depends on the design of the ceiling. For example, to work with concrete ceilings, you will additionally need a hammer drill. But you don’t have to worry about the reliability of the fasteners, even if the table turns out to be heavy.
Important! For suspended and suspended ceilings, such a product may not be suitable at all.
The point for mounting the table is found using a plumb line and level. After installing the fasteners, hang the table in its proper place and adjust the length of the cords.
The original table can be used immediately, and it will be ready in just an hour. In addition, creating furniture does not require special knowledge and professionalism.
Examples of gazebo tables
In addition to the proposed option, there are many more ways to make a table yourself. Below is a selection of ideas that you can implement in your gazebo. In addition to the standard rectangular shape, it can be made round, hexagonal, large and so on.
Don't forget about other materials - metal structures also have their place.
Made of wood
I would still like to give priority to classic wooden tables and provide more photographs of possible designs. More non-standard solutions will follow, but for now let's look at simple examples.
In addition to the table, you will also need to make or buy a wooden bench. This issue is discussed in more detail in the article - Do-it-yourself bench for a gazebo: photos, videos, options and ideas.
Round
A square or rectangular table in a round gazebo will look unnatural. Therefore, for this type of room it is better to choose a round shape; fortunately, you can also make it yourself, although it is noticeably more difficult.
Hexagonal (hexagonal)
Ideal for a round gazebo. Each person at the table gets his own personal space, which is not disturbed by people sitting next to him.
Big
It is quite difficult to make a table of large sizes, since it is necessary to work with massive and heavy material, and also to achieve compliance in technical terms on a larger scope of work.
This creates some difficulties for those who like to build on their own, however, with a strong desire and availability of materials, this option is also feasible.
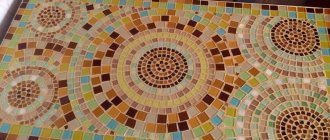
Mosaic
A table with mosaic pieces on the tabletop looks interesting and unusual. There are many options for making this type, including using live leaves. Introducing this style in your dacha is not a problem at all.
With metal structure
An original solution would be to install a metal table in the gazebo. This material is less susceptible to environmental influences, including spilled drinks and fallen pieces of food, and also looks more impressive.
It’s not difficult to make a table for a gazebo with your own hands from wood. Not only a master can handle the job, but also a person who rarely uses carpentry tools. A homemade design has a number of advantages over a factory one. Factory products are produced in certain standard sizes. Their shape is not always suitable for round or polygonal walls. They look good in the photo in the catalog, but in practice they turn out to be too small or too massive. The only way to solve the problem is to do everything according to your own drawings. Only this solution will allow you to achieve maximum comfort. It becomes possible to set the necessary technical parameters yourself - height from the floor, distance to opposite benches, shape. You can choose a material with an unusual color and texture, or develop a unique design that has no analogues.
Expanding opportunities
If you want to have a hanging table on chains attached to the ceiling, then you can reduce the risk of it tipping over or tilting, in which everything from the surface will fall onto the floor. There are several solutions:
- You can simply weld together the chain links on which everything hangs, providing them with sufficient rigidity. The fastening element will be monolithic and the surface will not wobble. At the same time, it is quite difficult to externally distinguish between welded links and freely hanging ones, which means that the impression will remain that the plane is hanging.
- The second way is to increase mass. Usually, large planes are made very massive so that they sway less. With a total weight of about fifty kilograms, the furniture is quite stable and is quite suitable for use as a dining area.
- The third option is to secure the plane with guy wires from the same chains from below. It will look like suspensions passed through the surface, and the stability of the structure is guaranteed. This solution will be one of the most durable and less prone to swaying.
- The last option is similar to the previous one and is suitable only for the largest options. Here, in the lower central part, an additional support element is installed, which will not be visible from the outside. The plane is rigidly fixed - there will be no swaying or other troubles, and externally, the product will appear to be hanging on hangers.
Using one of these techniques, you can significantly increase the strength of the entire structure and eliminate the possibility of overturning what will lie on it. At the same time, there are different ways to solve the problem - from simple ones, using a support, to the most difficult to implement, like suspension links welded together. This is important in cases where everything is assembled by hand, and not made to order.
Selection of shape and size
You should start by measuring the floor area, as well as the distance between opposite walls and benches. Even if a large room requires a miniature tabletop, its location and dimensions must be thought out.
To make your task easier, you need to draw a diagram indicating the length and width of all elements. The more accurate the visualization, the less chance there is of making a mistake. It is advisable to depict all details to scale. On paper you will also need to draw the legs and their fastenings, taking into account its features. When planning, choose a material for the base - metal or wood.
If the countertop occupies a small part of the space, the configuration of the walls is taken into account not only when it is closely adjacent to them. With a large distance between them, the repetition of shapes helps create a feeling of symmetry in the interior.
It is easier to fit into a circle another smaller circle or a polygon whose edges are equally distant from the center. An inscribed elongated rectangle will take up a lot of usable space. Round tabletops are often used in rectangular spaces because they are comfortable and look colorful. To save usable space, it is better to install a square or rectangular tabletop in an elongated gazebo.
The legs are placed in the center or along the edges. The central support at the bottom expands to provide stability. The legs are vertical and cross-shaped, intersecting in the center. They are made flat or voluminous - square and round in cross-section. The closer they are to the edges, the more they interfere with the legs. The closer the supports are to the center, the less stable they are. When designing, you need to choose the “golden mean”.
Peculiarities
Wall-mounted table models have their own special qualities that distinguish them from stationary models. These models are easy to use and take up little space, especially in small office spaces. This design will help you visually expand the space. The main advantage is its practicality, modern design and combination with various styles of room decoration.
With a hanging desk, your workplace will not take up a lot of space, which will provide maximum comfort when working at the computer. However, the dimensions of your technical device may vary. After all, the table accommodates all the items necessary for work due to drawers and additional shelves. You can independently adjust the distance between the shelves and their height.
Installing such a table will not take you much time. The surface on which the table is mounted can be absolutely any. However, the place should not be too sunny, as bright light will interfere with work.
Wall tables are made from modern, high-quality materials and environmentally friendly raw materials. The color palette is distinguished by its diversity, which allows the product to fit into any interior, and high quality contributes to long-term use.
Zeus
The Zeus furniture workshop has been occupying a leading position in the domestic market for several years, and its main trend remains the production of custom-made products, which will not cost more than branded furniture. According to your orders, models with an original design are created, including the design of individual furniture parts. The material with which the Zeus workshop works is exclusively natural and modern. The technologies used in the manufacture of furniture are in no way inferior to their competitors and guarantee high quality of manufactured products.
When choosing furniture, you should pay special attention to tables from this manufacturer. This will be a good idea when creating a comfortable and stylish workplace.
The material from which the furniture is made is of very high quality and environmentally friendly. The kit is delivered unassembled and has all the necessary fasteners. The table takes up very little space, is universal in use, and can be installed at the height and wall you need. Withstands loads up to 120 kg.
Ikea
Ikea will help you choose the right table, which will become an important interior detail. This famous Swedish company is becoming increasingly famous and in demand in the furniture market.
After all, the quality and price of the Swedish company's products have an equal ratio. Buyers find the furniture to be of very high quality, durable, stylish and leave only positive reviews about it.
Wall mounting tables from the Norberg, Norbu and Bjursta series are distinguished by their easy assembly, installation, durability, practicality and reasonable price. They have no legs and can be folded and installed at any level convenient for you. The furniture is presented in two classic colors - dark and light wood. Can withstand quite a large load.
"Naya"
If you decide to opt for a comfortable and stylish modern product, we advise you to pay attention to furniture produced by. Unique hanging tables from the “Lotus” series will allow you to easily create and decorate the interior of an office or apartment, making your workplace comfortable and convenient
Such a table will appeal not only to adults, but also to children, which indicates such an important quality as versatility. There will always be a working mood in your room, which will help you to completely immerse yourself in work and not be distracted by trifles.
On the wide and light surface of the table you can place computer equipment and any necessary items or decorative elements.
Material selection
On the Internet you often see photos of wooden tables and benches for a gazebo made from waste. This solution allows you to reduce the time spent searching for blanks and the costs of purchasing them, but it is impossible to achieve good quality when using this method. Its disadvantages are not only low strength and short service life, but also the appearance of the product, which leaves much to be desired.
The work will require high-quality materials. The most commonly used conifers are spruce and pine. Deciduous trees, especially oak, have high strength. They are more difficult to process, but will last longer. In addition, hardwoods contain less resin.
The workpieces must not be damaged. Boards with falling knots and resin stains are not suitable for work. Gray spots on the surface must be cleaned off. These are traces of mold, which will gradually destroy the array.
The material is treated with antiseptics to prevent mold and fire retardants to retard combustion.
Products must be straight. It is quite difficult to straighten curvatures at home. The workpieces must be dried, otherwise they will change their size and shape. As a result, the connections between the parts will have to be constantly updated so that they do not fall apart. It is better to dry the products in the sun, laying them out in stacks and separating the tiers with even spacers necessary for ventilation. At night, the stacks are moved to a shed or covered with film to prevent dew from settling on them.
We suggest discussing the topic: “a table for a gazebo - we make it ourselves.” Basic information is collected here and presented in a convenient form.
Tensegrity from designers
Before Alexey’s table appeared on the Internet, there was no such excitement for tension-connected structures. Now, if you Google them, you will find them in different formats and sizes.
So, someone else, three months before the appearance of the table, hesitantly experimented with a tensegrity stool.
Levitating stool from Junkerfunker https://pikabu.ru/story/levitiruyushchiy_taburet_7199022
And now new products have appeared. It's only begining.
Tensegrity table from YAflash https://www.yaplakal.com/forum2/st/50/topic2109615.html
Tensegrity table from xylafoxlin https://www.instagram.com/p/CAG76kVHNKy/
Tensegrity table from xylafoxlin https://www.instagram.com/p/CAG76kVHNKy/
Tensegrity table from xylafoxlin https://www.instagram.com/p/CAG76kVHNKy/
Tensegrity table from xylafoxlin https://www.instagram.com/p/CAYzOZUHMJ2/
Tensegrity stand from jo.it.yourself https://www.instagram.com/p/CAk7D74nt1l/
Tensegrity stand from jo.it.yourself https://www.instagram.com/p/CAk7D74nt1l/
Tensegrity stand from jo.it.yourself https://www.instagram.com/p/CAk7D74nt1l/
Tensegrity stand from jo.it.yourself https://www.instagram.com/p/CAk7D74nt1l/
See also:
- Tensegrity table from a Russian programmer