How to make an office cannon with your own hands
How to Make a Simple Office Slingshot Cannon from a Bottle with Your Own Hands
Office gun
A simple gun design invented to carry out “office wars”. A projectile is a sheet of paper or a light ball crumpled into a ball. The gun does not allow firing in a straight line, but it shoots well with a canopy, which allows you to bypass obstacles in the form of office partitions ;). The gun can be easily made with your own hands from a plastic bottle and rubber bands. See the video and website page for details.
We make a simple machine for cutting foam plastic
I'm Anatoly Medvedev and this is a master class on making a simple foam cutter!
Polystyrene foam is an excellent material, suitable for making bases for countless types of beautiful products.
It is quite easy to cut with a regular stationery knife. But this method has disadvantages: an unpleasant creak, low accuracy, and a large amount of debris. It is much more convenient to cut foam plastic with a “string”. The string is a wire made of materials called canthal or nichrome, to which a current is applied, due to which it heats up and easily cuts foam of any thickness.
You can assemble a simple foam cutter in a home workshop within half an hour. We need: - some timber and a piece of plywood; - wire 0.3-1 mm thick, you can buy it at your nearest vape shop; - any 12V DC power supply with a power of 200 W or more (in my case it’s a power supply from an old computer); — consumables: screws, spring, crocodiles and wire. We assemble an art object “gallows” from timber and plywood. The sizes are arbitrary, depending on your tasks and the size of the workpiece.
We stretch the wire from the top of the gallows through the plywood to the base, securing it to a self-tapping screw with tension through a spring to compensate for the effect of expansion of the material from heating, i.e. so that the thread does not sag when heated.
We connect the power supply from different ends of the wire using crocodiles and voila: our cutter is ready! 
Important: - the thicker the wire, the more durable it is, but more power from the power supply is needed to warm it up; - by changing the distance between the crocodiles (for example, lowering the top one down the wire) - we can regulate the temperature; the closer the crocodiles are to each other, the higher the temperature. The optimal temperature can be determined by eye: the wire should turn slightly red when heated. We don’t try to determine the temperature by touch, it will be painful and offensive :).
As for the cutting process itself: - If you need to cut off even pieces, we attach a block to the base of the gallows and carry the workpiece along it;
— If you need to get a circle, we attach a square blank to the base of the gallows with a self-tapping screw so that between the string and the screw there is a distance equal to the radius of the required circle, after which we simply rotate the blank around the screw;
- Well, if you need to get a more complex shape, we must be patient, draw a layout based on the workpiece and slowly cut off everything unnecessary. If you hurry, the quality of the product will be as in the photo.
Important: This method must be used in a well-ventilated area and preferably in a respirator, because When exposed to high temperatures, foam releases toxic substances. Given the volume of work of a home craftsman, their concentration will not reach a critical value, but it is better to be safe.
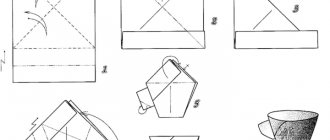
How to make a rubber gun with your own hands
Rubber shooter pistol
A simple wooden automatic three-shot pistol. The pistol fits comfortably in the hand. It is cut out of plywood with a hand jigsaw; you only need to cut out 4 parts. The gun fires rubber bands. With such a pistol it is easy to organize a small airsoft game in an apartment or on the street. See drawings of the gun stencil here (link at the end of the blog). Load your homemade pistol carefully according to the instructions. For safety reasons, wear safety glasses.
Useful tips
- The more realistic the model, the more labor-intensive the work ahead; it will require patience, accuracy and time from you. Often, parents try so hard that the copies are on a 1:1 scale, like works of art; they are not suitable for playing with children.
- To make crafts, it is recommended to use thick Whatman paper or thin cardboard (in all options except origami, it is better to use office paper for this technique).
- When working, carefully iron the folds and follow the markings.
- You should devote a sufficient amount of time to details and color design. An ordinary pistol made using the origami technique will look more impressive when it has inscriptions on it.
- If you are making a gun using a template, print it on thick paper, fold the sheet in half and cut out the model along the contour.
How to make a pneumatic machine gun with your own hands
Rowan Launcher
If you have an air compressor with a receiver on your farm, then you have every opportunity to make a game console for the compressor. The weapon was adapted to the available ammunition - rowan and pea, and accordingly the machine guns were called rowan launcher and pea launcher. The design of a homemade machine gun is simple. It is based on manual blowing, which makes it easy to control the weapon. See manufacturing details here and in the video.
Incomplete disassembly
You can disassemble both a combat and non-combat pistol. Partial disassembly is carried out in order to “practice” in handling the weapon. The time for incomplete disassembly in the field can be reduced, since there is no need to check the loaded cartridge.
In practice, to service and care for the weapon, it is sufficient to carry out partial disassembly. Complete “dismemberment” must be done every 5 thousand shots to eliminate accumulated dirt.
Be sure to check the instructions for disassembling the weapon.
What should be done:
- Press the latch at the bottom of the handle and pull out the magazine.
- Remove the safety from the weapon.
- Lower the trigger guard down.
- Lift the back of the bolt up and pull it back.
- Remove the shutter from the frame.
- Remove the return spring.
Partial disassembly completed.
How to make a gas gun with your own hands
When repeating this design, strictly follow the safety rules. You build a gas gun at your own peril and risk and take ALL responsibility for the construction, use, consequences of using this device, as well as for any damage caused. The authors summarized the accumulated experience in building potato cannons and tried to use ready-made elements in the design. In total, three types of guns of different calibers were designed.
Mini gun 32 mm caliber
Mini gun
The gun is made by hand in the form of a pistol and shoots small balls. A reliable piezo spark source will not create problems. The gun is used for target shooting competitions. Requires some experience when loading. See production details here.
Gas apple potato gun 50 mm caliber
Gas gun
This is a serious design in terms of sound and projectile. The main application is to imitate the sound of a hunting rifle shot to scare away birds. A reliable budget gun, but only if used correctly and sparingly. Strictly follow safety rules and assembly recommendations. See how to make an Apple Gun here.
Gas mortar 100 mm caliber
Homemade mortar
An experimental design for firing bulky light projectiles with electronic filling. Some results are shown in the video. When repeating, do not forget that this is not a real mortar, but just a thin-walled plastic pipe. Not all planned experiments have been carried out with this gun and will be published as the results are obtained. The record height of the shot is 80 meters. The mortar in its repetition is the simplest design, see the blog and video for details.
The topic of designing guns is not closed and will be continued.
Don’t forget to subscribe to updates on the Sekret-mastera.ru website, share the link to the Secret Master website with a friend, and we also invite you to visit the Sekretmastera video channel on YouTube and also become its subscriber.
Foam weapons
You can buy decorative weapons (machine gun, pistol, sword, etc.) made of foam, stone, wood and other materials at. We create strong, durable and unique foam products at the lowest price in Moscow.
Foam weapons: any configuration, size and style
Flat and voluminous foam weapons are lightweight and affordable decor, which are widely used as stage decorations for theatrical productions, themed concerts, and military parades. This is an integral attribute of such state celebrations as Victory Day and Defender of the Fatherland Day.
To buy foam weapons at the lowest cost in Moscow, use the service. If you find a similar product cheaper, we will discount it.
To buy foam weapons, use one of the ordering methods:
In our workshop you can purchase both standard and unique custom-made foam weapons: a pistol, dirk, sword, machine gun and other similar paraphernalia.
Foam weapons: color and design options
Modern machines for shaped cutting of foam plastic (expanded polystyrene), 10 years of experience of sculptors and the creativity of designers and artists allow us to create foam products of any configuration and style, and the size of the products is limited to only 7-10 meters.
In you can buy weapons not only from foam plastic, but also from fiberglass, ice, wood, stone and plaster.
For example, we will be happy to produce for you:
- A foam sword, stylized as an antique item, will be a wonderful addition to various productions and will accurately convey the traditions of the era being recreated.
- A foam gun, which we can make a copy of any brand, in the desired size and color (the proposed RAL palette includes 250 colors).
- A machine gun made of foam plastic in one color or simulating a real weapon.
At the request of the client, our talented craftsmen will detail each element of the product as much as possible, thanks to which the model of the weapon will become extremely realistic.
Foam weapons are suitable for decorating all kinds of rooms, and can be used as a gift or stage model.
The cost of foam weapons is calculated individually and depends on the complexity of production, the presence of a protective coating, and the paints used.
Additional features of "Russian Penoplast"
To order from the buyer, we reinforce flat and three-dimensional 3D models of weapons made of foam plastic (pistol, machine gun, sword, etc.) with high-quality putty, treat them with a unique patented solution, and apply a layer of anti-vandal coating.
Therefore, our foam masterpieces are strong, durable, resistant to external mechanical and natural influences.
Why is it profitable to shop with us?
Advantages over other manufacturers:
- Sale of foam weapons at the lowest price on the Moscow market. If you find it cheaper, we will provide an additional discount.
- Use only proven materials and the latest technologies in the manufacture of foam products.
- Production of both flat and three-dimensional 3D models of various weapons from foam plastic: swords, pistols, machine guns and other military paraphernalia.
- Guaranteed discount from the second order.
For all questions about how to order, buy, pay, and arrange delivery of foam weapons, please contact our online consultants daily from 09:00 to 03:00.
Some types of products and their features
Let us note right away that not all products are legal; plywood brass knuckles are weapons that can cause injury, and you may be held accountable for wearing them. We will only talk about those options that can be done without any restrictions.
Constructors
This option is suitable for those who like to collect 3D models or want to make an unusual and interesting gift for their child.
Let's look at the example of a pistol:
First you need to find all the necessary circuits
As you know, such products consist of many components, so it is very important to find a very high-quality drawing that will consist of patterns of all the required elements. The more detailed it is, the better the final result will be;
Next, using carbon paper, you need to transfer the contours of all elements onto the plywood; do this carefully using a pen or a sharp pointer
The lines can be made more distinct with a pencil, it is important to ensure their good visibility;
Cutting is best done using a stationary device; a jigsaw is suitable for rough processing and is inconvenient to work with when cutting out small elements. Try to do everything as carefully as possible;
All photos from the article
Very often it is necessary to make replicas of weapons or toys for children, and plywood as a material is excellent for these purposes. In this review we will talk about some types of products and figure out how to make them with your own hands. There are simpler and more complex models, but with some perseverance you can master any of the options described below.
How to draw a T-34 tank with a pencil
This lesson is not very difficult, but requires precise adherence to proportions. So, here is an example of how to draw a T-34 tank with a pencil for beginner artists.
We hope this lesson will not be difficult for you. Step-by-step photos and instructions are at your disposal.
How to draw a T-34 tank by cells
February 23 is approaching, it's time to teach children how to draw a T-34 tank step by step.
The easiest way to do this is to pre-graph the sheet into rectangles, as shown in the figure. Then just read the step-by-step instructions.
Photo source: myris.jesima.com/article/611
Or here are a few more examples of pencil drawings of T-34 tanks that can be used for coloring.
How to draw a tank for children step by step
Tank is a very popular theme for children's drawings; they like to put on paper what they see in movies and cartoons. Check out the easy way to draw a tank for kids step by step. First draw a rectangle and an arc. Draw the body, trunk, then the tracks. Add wheels. After that draw the top part. Add a star and individual details.
Photo source: www.drawingtutorials101.com/how-to-draw-a-tank-for-kids
How to draw a tank for children with a pencil step by step
A tank, one of the main weapons in modern ground warfare, used primarily against enemy tanks and other armored vehicles. Step by step tutorial will show you how to draw a tank with a pencil for kids, it's very easy. If you like tanks, follow these steps just to give it a try!
Photo source: www.cuteeasydrawings.com/pictures/How-to-Draw-a-Tank-Step-by-Step-for-Kids-340.html
How to draw a tank for beginners
The tank consists of many different parts, so it can be difficult for a beginner to draw all the details the first time. You might find this lesson on how to draw a tank for beginners useful.
These four step-by-step photos will suffice, although if you need a text description, there is a link below.
Or try drawing a light tank like this for children.
It will be simple and interesting for children.
Children's drawing of a tank with pencils
Here are simple instructions on how to draw a children's tank with colored pencils step by step on a sheet of A4 paper. The drawing is done freehand so it looks realistic, although you can use a ruler if you want sharper lines. It's easy, just follow the step-by-step photos as in the master class.
Photo source: winx-fan.ru/karandashom/kak-poetapno-narisovat-btr-karandashom-oj.html
Look at 25 tank designs for February 23 and May 9
Do you want to draw a cartoon tank? Here are two simple examples if children want to draw a tank after watching a cartoon.
How to draw a light tank for kids
Start with the caterpillars. Draw a simple square. Then draw two quarters of a circle - to the left and to the right of the square. This will be a sketch of the tracks. After this, round the corners. Draw a similar line inside so that they are more or less parallel. It's time to make the drive wheels. Draw two circles with smaller ones inside, on the left and on the right. Draw two more wheels below. Then erase all the guides and the tracks are ready.
After that, draw the body of the tank so that it is slightly curved at the front and back. Then draw something like a dome. This will be the tank turret. Now let's draw the gun barrel, it's quite simple - a long rectangle and another smaller one on top, with rounded corners (optional). You can add some details like an exhaust pipe if you want... and you're done. Now add colors, shadows and a background (like a battlefield) or draw a soldier looking out from a tower. We hope this lesson was easy and enjoyable.
Photo source: dragoart.com/tut/how-to-draw-a-tank-for-kids-9329
Homemade budget air rifle of the Polulyakha design
Introducing the homemade budget air rifle “Plumber’s Dream”, created by Alexander Polulyakh. According to the author of the air rifle, it can be assembled in a relatively short period of time without the use of complex equipment. The final product, again, according to the creator, is able to compete with expensive crossbows.
So, a brief description of the design of an air rifle.
The main elements of the rifle are: 1. Valve 2. Receiver in which compressed air is stored 3. Half-turn valve
4. Thin-walled stainless steel barrel with a diameter of 9mm
The principle of operation of the rifle is as follows: air is pumped into the receiver through a valve using a pump (“pumping”). At the moment of the shot, a sharp press is made on the lever of the half-turn tap. As a result, compressed air enters the barrel through the bypass and pushes the charge out of the barrel.
Due to the fact that the rifle's barrel diameter is 9mm, a wide range of bullets can be used. Starting from steel balls from bearings, small arrows and ending with bullets for classic pneumatics.
The author himself considers the only disadvantage of the rifle to be the need to load it using a pump, which takes some time. However, here it is worth disagreeing with the author of the rifle.
Thus, the disadvantages include muzzle loading of the rifle, which, moreover, probably occurs when the receiver is full, and careless opening of the half-turn valve at this moment can lead to serious injuries. The author also believes that the manufacture of a rifle does not require complex equipment, but judging by the video frames, welding was used to connect various elements of the rifle
However, not everyone who wants to make a rifle has welding skills and a welding machine, so the help of a third-party welder will be required
The author also believes that the manufacture of a rifle does not require complex equipment, but judging by the video frames, welding was used to connect the various elements of the rifle. However, not everyone who wants to make a rifle has welding skills and a welding machine, so the help of a third-party welder will be required.
But in general, we have to agree with the author of the air rifle that it is a good budget option for pneumatics.
Why should you be creative with your child?
Some parents don't spend enough time working with their children. And this is their big mistake. Of course, nowadays you can buy any toy, but it will never become as valuable as one that you made with your own hands. Moreover, purchased toys will not be able to teach a child and develop his creative abilities.
https://youtube.com/watch?v=3XOhQNl-VGc
To make a shooting pistol you will need a minimum of investments, only paper, scissors, glue, felt-tip pens and pencils for coloring the product. In a little time, the child will have a pistol that you cannot buy in any store. If you wish, you can make a modern model or opt for an ancient weapon.
If parents and their child decide to make a pistol that shoots, they need to choose a suitable design and then strictly adhere to it. The work will not be the easiest, but the time the family will spend together doing this work will definitely be memorable. If you have little experience working with paper products, you should opt for the simplest method of making a shooting pistol.