Master class “Carriage for Cinderella” (pasta craft)
Natalya Vafina
Master class “Carriage for Cinderella” (pasta craft)
In order to make a carriage , you will need pasta of different shapes ,
PVA glue, balloon, spray paint.
1. Prepare wheels from long pasta tubes , vermicelli, stars.
2. Use noodles to connect the wheels. We've got a stand.
3. Take a balloon and cover it with flowers. You don’t have to cover the whole ball, leave the bottom open. This the carriage onto the stand. Let the glue dry (1 day)
.
4. Take a needle, pierce the ball and remove it. the carriage onto the stand
5. Prepare a door from a square, bows, horns, stars, shells.
6. Prepare a crown from the halves of bows, and around the crown we make a decoration from scallops.
7. We decorate the carriage with leaves , flowers and paint.
The carriage for Cinderella is ready!
Use your imagination and enjoy creativity!
“Beads for Mommy” So March 8th is approaching, what should we give our dear mothers? And we decided to make a colorful, bright, exclusive decoration - this.
Source
Every child begins their acquaintance with the world with fairy tales. Those told by mom or dad, grandpa or grandma, brother or older sister. And when the child grows up, together with his parents he tries to demonstrate his vision to the world through crafts and drawings on the theme of his favorite fairy tale.
Of course, there are not enough skills. And parents, with a huge variety of types of work and materials, simply do not know what to give preference to. Therefore, you need to slowly master various performance techniques together with your baby, learning new ones and working on old ones.
Painstaking work
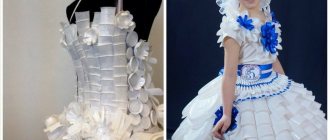
The 2015 Disney film set new standards for dressing one of its most popular princesses. in delicate shades of blue and purple - this is what a modern Cinderella costume looks like. Photo of a luxurious outfit that will help you better navigate when creating your masterpiece:
Obviously, it won the hearts of many girls, so this particular version of the dress - with a fluffy multi-layered skirt with complex tints of color and a collar with butterflies - became especially widespread and popular.
If you have basic cutting and sewing skills, then you will get a beautiful Cinderella carnival costume that will look no worse than one from the store.
To work you will need:
- 2.3 m of thick blue fabric;
- 0.5 m of white cotton fabric;
- 0.5 m of adhesive interlining;
- 6.5 m of blue tulle;
- 1 m of light lilac tulle;
- 0.5 m sew-on Velcro fastener;
- 2 m wide elastic band;
- ready-made butterflies or beautiful paper for making them;
- sewing machine and others (threads, scissors, needles, etc.).
Natural materials
“Pine cones make the best bears!”
Mental development involves the process of influencing the fingertips. They contain receptors associated with all organs in the human body. It turns out that by fingering the lump with our fingers, we have a positive effect on the entire body. Including the brain. This is what benefits ordinary pine cones bring!
Cones serve as the basis for many fairy-tale crafts.
“Different leaves are circling over fairy tales...”
They are thin. Used more for appliqué. But raw leaves are not suitable for work. They need to be dried. Often the leaves are laid out in albums. So they dry for 2 weeks. The desire to get started is great? Just put the leaves in a pile with paper. This method allows you to dry the leaves in 3-4 days.
We are looking for a photo or drawing necessary for a future craft. Are mom or dad good at drawing? They can help the child create blanks for a beautiful craft.
We create a sketch by selecting leaves. Leaves can be painted. We use a combination of colors, giving the leaves a new, unique, original shade. It is better to use transparent glue. This way the harmony of the color scheme will not be disturbed.
Is your work dry? We put it in the frame. We use colored paper as a background. Or you can draw. But the leaves will stick worse to the paint. In the process of applique with leaves, children's imagination is limitless: the Firebird, Goldfish, chickens, Wise Owl, and, of course, the Magic Tree.
“A fairy tale calls us to the distant seas...”
After a summer holiday at the seaside, shells undoubtedly appear at home. Then, naturally, they lie and gather dust at home, but you don’t get around to throwing them away. And here it is urgently necessary to make a craft for a child in kindergarten or school. It’s night outside, and he just remembered. Don’t worry, but rather go to the shelf (box) with shells and take them out.
Sort clean ones separately, and dirty ones (with black coating and remains of shellfish) separately. Place the second ones in boiling water, removing dirt with tongs. Then place the shells in a chlorine-containing solution for thirty minutes. Then lay it out on a clean towel. We are waiting for them to dry.
Seashells are durable material. You can attach twigs, leaves, pine cones and even acorns to them using glue or plasticine. They simply have no equal when it comes to creating marine compositions.
How long will it take us to make one water lily out of paper or plasticine for a craft for Andersen’s fairy tale “Thumbelina”? And here we simply cut out a green sheet of cardboard, and attach with plasticine an incomparably beautiful water lily made of shells. Frogs can be made from shells. And even a goldfish. First, take PVA glue and mix it with yellow gouache. We paint the shells on the outside. We wait for it to dry and then glue it together. We take varnish with glitter (there is quite a large assortment of it on sale now) and, varying the distance, apply it to the craft.
If you have bronze powder, you can use it to give a golden tint. First coat the sink with acrylic varnish, then sprinkle it with powder. It fits perfectly on the surface of the sink and gives a unique golden hue. We glue the eyes with eyelashes with colorless glue and the fish is ready.
The good thing about shells is that they can be used in appliqué. The work turns out to be voluminous and very original. If there are still a lot of shells left at home, you can take them to school and arrange a master class on making crafts on fairy-tale themes from shells during a technology lesson. Classmates will be delighted. After all, there are a lot of ideas for crafts made from shells.
Paper and cardboard
“We will create a fairy tale from magical curls...”
The original process of creating crafts by rolling paper (from thin strips of paper) called quilling came from England. Since paper was a very scarce material at that time, the remains were not thrown away, but wound around the pen. This is where the name “bird feather” quilling comes from.
The basis of any craft of this technique is a module. But the modules here are different. Each one reflects its own form. They can be in the form of a drop, a star, an arrow, a bird’s paw, a petal, or even an eye.
To give the craft additional volume, fringe is used. To do this, a strip of paper is cut on both sides and then curled.
The technique is different. In the first case, we create a shape-contour for a future craft from a strip of paper of the same width as the blanks - modules. Then it is filled inside.
The second option is simpler. We simply outline the outline of the future craft on a sheet of paper with a pencil, and then glue the modules together so that we get the desired image.
In the process of work, paper tapes of various colors are used. It turns out quite original.
Using this method, various compositions are created. From a garden with magic apples and a firebird to the blue sea with a goldfish. Here you can make at least all the characters from Winnie the Pooh. As for Karabas-Barabas’s beard and Malvina’s blue hair, there is simply room for creativity. If you want to put a spiral on your beard, please do. Maybe try a curl?
The method is so simple and inexpensive that compositions are made in various formats, from regular landscape to Whatman paper.
The magical art of Origami calls us to the fabulous distances
The Japanese art of paper folding has taken root in our country so much that even kids in kindergarten can do simple jobs just fine. For crafts, it’s good to use double-sided paper.
The fairy tale “Kolobok” can be illustrated beautifully using this technique. To prevent the Kolobok from turning out angular, you can simply make it round by cutting it out of paper.
Origami is also ideal for creating crafts for “The Tale of Tsar Saltan” by A. S. Pushkin. And with elements of quilling (sea) and appliqué (Swan Princess), the composition will take a prize at any competition.
With a magical applique we will enter a fairy tale
This method is used everywhere and always. We start working with them in kindergarten and up to elementary school. And even at the middle level, when we urgently need to make a craft for a competition, we can’t do without it. It is clear that the work of a 1st grader will be very different from that of a 7th grader in quality and level of performance.
But fairy tales are fairy tales. They are eternal. Therefore, the main characters of any fairy tale are best made using this technique. Yes, and you can additionally add various decorative materials - sequins, beads, feathers.
The famous prologue to “Ruslan and Lyudmila” can also be made using applique. Cat applique. We will weave a chain from rings. Oak can be made using quilling. Or you can use applique using paper of different colors. Koschey, stupa, Baba Yaga will also turn out better using the appliqué method.
Cinderella costume for adults
Carnivals are loved not only by children, but also by adults. Therefore, the Cinderella costume will be an excellent option for girls. It can be made in the same way as for children, but there are several differences. For example, instead of a T-shirt to create a dress, you can use a corset or simply wrap the body with fabric, leaving the shoulders bare. In addition, you need to pay attention to your makeup: it should never be too bright. An excellent option would be the now popular natural make-up: ideal skin tone with a neat blush, soft pink lips, light beige, smoky gray or pale pink shadows, tinted eyelashes and natural eyebrows.
Available materials
A fairy tale is created from the world one button at a time
Everyone has them at home. If you collect all the old unnecessary things, cut off the buttons from them (preferably flat ones), and use the material for crafts, then everyone will be happy. The child will receive creative material (free of charge). And mom has a free place in the house.
The method of working with buttons is similar to the quilling technique. We also create a template outline and fill it with buttons. Here you can use different diameters together. This is especially true for the original tail of the Rooster, the hero of many Russian folk tales. The crown of Chukovsky’s “Miracle Tree” can also be created using buttons. This is where your imagination can run wild. It is possible that buttons on the legs would also work here. Then you need to take stronger glue, or sew buttons onto cardboard.
"White-maned horse clouds"
Moms always buy cotton pads. They're pretty cheap. And any mother will be happy to share a couple or three with her baby to create a unique composition. “Snowman-postman”, the same Princess - Swan, framed by feathers - beauty! And clouds in the sky!
“Let’s assemble a fairy tale from fabric”
The simplest technique of this style is called "well". The base is a square, which is covered with fabric in the form of stripes. If the square in the center is red, then such a block is called a “hut”. If blue, then “well”. But this is a classic option.
All craftswomen have been experimenting with color however they want for a long time. Here are “Zayushkina’s hut”, and “Winter quarters of animals”, and “Teremok”.
There is also the “Triangles” technique. With its help you can make a Hedgehog with a magic wand. “Mill” is a little more complicated. Well, here “Puss in Boots” simply suggests itself by association.
There are a great many variations of techniques. The main thing is to apply them. Remember, the best creative craft is made by the hands of a child together with his parents! It doesn’t matter how complex or simple it will be. The main thing is a joint idea and interesting creative family interaction!
Source
In Polina's kindergarten they announced an exhibition dedicated to fairy tales of the peoples of the world. For a week we puzzled over what to do and in what technique. First they wanted the Frog Princess, the teacher grudgingly agreed that Russia could be classified as one of the nations of the world, they had already made a swamp on SD, and then the concierge gave me a large cardboard gift box. The frog was put in the back drawer; I wanted something more monumental. And Disney’s “Cinderella” is my daughters’ favorite cartoon. Almost the entire house is covered in coloring books downloaded from the Internet. I turned them over in my hands, placed them on top of each other, and an IDEA was born.
We ended up with a three-dimensional applique made from coloring books. The general idea is to put together a scene, “Cinderella is going to the ball.” So you need a castle with fireworks, a forest, a road, a carriage, pumpkins, Cinderella and glass slippers.
Of course, I am an artist, so I took the simple route. We printed out the necessary elements from Disney coloring books on office paper, glued them onto thick cover cardboard and I began to torment the volumetric contours. The castle, all the lines were outlined with a bronze outline, Polina filled the white space with gold glitter, she is quite capable of this.
Carriage, gold outline and black on wheels and multi-colored glitters. Silver horses, raspberry curtains, silver horses, gold carriage. Only I printed out Cinderella in color; I certainly wouldn’t have drawn her, even along the outline. Beauty is out!
And I began to compose shoes. The base is plastic from the packaging, on it I drew a shoe with silver outlines, cut it out and stuck this pair into foamed double-sided tape, and so that it would not be visible, we disguised it with leaves.
One corner of the box was filled, the second remained empty, they decided that Cinderella needed roses - the romanticism of the situation after all. My roses are paper plastic.
We assembled the picture using foam tape. Castle, directly on a sheet of paper for pastels, along the road, trees made by Polina, then on a carriage with tape, the next Cinderella, tape for her, so that there was volume, I glued three pads together. Added fireworks and moon outlines
I'll add a few more photos. Close-up with Cinderella
And when finished, slightly angled so that the volume of the painting is visible
This is the picture we got! The details constantly changed as the work progressed, but together it seemed like a fairly organic plot: “We’re going to the ball, fully equipped to charm the prince”! It’s a pity that we couldn’t figure out where to shove the fairy in, but we decided that everything would be clear without her. The fairy did its job and disappeared.
They wanted to put a lid on the box, but then they decided on cellophane, and I just painted the box with copper paint from a can.
I hope you liked our joint work, dear viewers, everyone in the garden is very happy, Cinderella is an international character, so it fully corresponds to the theme of the exhibition.
Thank you for your attention and patience
Come visit us!
just smart. Your imagination is 5+. I’ll take it to my piggy bank, please. I really liked it
Of course, take it, you can’t have too many ideas! I'm very glad that you liked it
, I myself looked through a bunch of crafts in SM and now another one was born. Oksana picture is a sight for sore eyes. I couldn't stop watching, it was so cool. Both the idea and execution are CLASS. I can imagine what it was like in kindergarten.
Thank you Lena for your kind words, I’m glad you liked it
And in the garden. Envy is the engine of progress, everyone says what they will do as Snow White, having seen enough of our Cinderella. The teacher is happy
What a wonderful job. GREAT.
Thank you Tatiana!
Glad to see you on my page
Source
What else should we make?
Cinderella: we play theater for real: no matter what the characters are, it’s interesting to stage a fairy tale with them, if there is, for example, a palace, other characters and a carriage. The latter plays an important role in the fairy tale: she is the one who takes her beloved heroine to the ball to meet her fabulous happiness, and also turns into a pumpkin when the clock strikes twelve.
Let's make a carriage:
- We prepare tools, consumables and prepare parts, as shown in Fig. 19.
- We wrap the carriage parts with special corrugated paper for beauty and secure everything with glue (Fig. 20). You can come up with a unique design for the wheels, for example, use beads, sequins, beads.
- We finish making the wheel with knitting needles from toothpicks (Fig. 21);
- We bend the wire so that we get elegant curls - the basis for the carriage itself (Fig. 22).
- We prepare and decorate the arcs - the components for the upper part of the carriage (Fig. 23). Their design is also an opportunity to show your imagination: wrap them in colored paper, tape, New Year's rain, foil, velvet or satin ribbons.
- We fasten them as shown in Fig. 24.
- Let's put all the details together. We get a product very similar to a carriage (Fig. 25). The top can be decorated with felt flowers. In front we place horse figurines (created from construction kit parts or taken from a set of animals).
The presence of such an element in a theatrical play will give it a resemblance to reality, and there will be the possibility of changing the scenery. Children will definitely be delighted with this.
Making characters for a children's puppet theater at home is a process no less interesting and creative than the improvised performance itself. In addition to Cinderella, you can make a stepmother, her daughters, a good fairy - the aunt of the main character and, of course, a prince. It is possible to make female characters according to the same patterns as for Cinderella. However, you need to come up with details that bring their characteristic features into the image of each character.
Clothes, hairstyles, and accessories will be individual. Evil traits in character are emphasized by facial expression, figure, poses, and jewelry used.
The effort spent will be more than compensated by the pleasure and positive emotions the children will receive during the game. Let their imagination be limitless. This is the beauty of children's ventures.
Many of us at least once in our lives wanted to come to the carnival in our own, unique and inimitable costume, an exact copy of which you would never see in the crowd. You can't buy one like this in a store. But what to do if you don’t know how to sew at all and get confused in patterns, threads and pins? Of course, you can order a suit from a master, or you can create it yourself, without even touching a sewing machine. Let's consider one of the simplest and most popular options - the costume of Cinderella, the charming Disney princess.
How to make a carriage?
Place these two sheets of cardboard next to each other and glue a small rectangle of the same material at the top and bottom where they join.
Paint the exterior parts. If you want the carriage to have an aged look, then use gold and brown acrylic paint. After it is completely dry, glue the crew elements together. On each window, stick a piece of transparent rectangular plastic, which is 5 mm larger than the given gaps. Attach them between the outer and inner cardboard sides.
Connect the sides of the carriage by gluing to them the rectangular cardboard pieces that you previously cut out. Once the glue is dry, paint the sides with gold acrylic paint.
While it's drying, look at how to make the carriage next. We will make wheels for it. Each consists of two identical round pieces, cut them out of cardboard using a compass or suitable round objects. To make the wheel axles, cut out small circles and glue 8 wooden sticks evenly onto them. Along the edges, place 1 and 2 sides of your wheel blanks on them, glue them together. To ensure that these parts are even, use glue to attach pieces of rope between adjacent axles.
From wooden sticks of larger size and diameter, which also need to be pre-painted brown, assemble the base for the wheel system. Sharpen two parallel ones at both ends. To better secure these elements, use a small drill to make a hole where they connect. Lubricate the wooden tenon with glue and insert it here.
Put the wheels in place, secure the axles on the outside with beads set on glue.
Paint the assembled structure, while the solution dries, apply paint to the carriage.
After 2 hours, after the paint has dried, take a sponge or fine sandpaper and rub the carriage where you lubricated it with a candle. You will get an aging effect. But you need to rub only until the previous golden layer, making sure not to accidentally remove it.
After you have admired how wonderful the carriage turns out, you can and should decorate it inside. Make a bench from strips of cardboard, roll them up as in the photo, and glue on a red drapery.
Attach a small rectangle of fabric in the center, which will become a rug. To make cushions for the sofa, cut out rectangles of the same size from soft red fabric and cardboard and stick one on top of the other. Roll this blank into a tube and glue it on the side. Determine the size of the resulting holes, cut out a circle from cardboard, cover it with fabric, and glue such round parts on both sides of the roller.
This carriage does not open, so you need to make the roof removable so that the child can put a toy princess, prince or other small dolls here. Make the cover 2 cm larger on all sides than the hole in the carriage ceiling. Cut out decorations in the form of monograms, glue them to the lid, and cover the whole thing with acrylic paint.
The photo clearly demonstrates how the carriage will turn out. If you wish, you can make a bench for the coachman, covering it with the same red fabric as the sofa for passengers.
DIY candy crafts for beginners
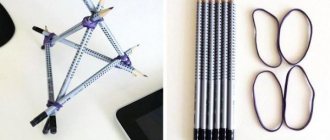
The next carriage, which is even easier to make than the first, belongs to this category.
Cut out 6 ribbons 3 cm wide from cardboard, glue them to the base of the carriage on one side (to the edges of the triangles), and connect them at the top on the other, covering everything with a circle of cardboard. To make these elements stronger, you can make each part from two identical ones, gluing them in pairs.
Also make wheels and axles from double thick cardboard. Glue three wooden skewers together, cut off the excess so that the length of such parts is 13 cm. Make holes in the middle of the wheels, attach the pre-painted skewers here using golden glue. Glue candy onto the wheels.
Connect the side parts of the carriage together using wooden skewers.
Cover the carriage itself with candies.
Secure it between the runners and you can send Cinderella to the ball.
But for this you need to make it yourself.
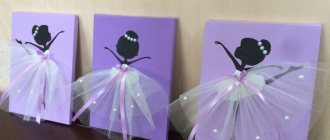
How to make Cinderella?
We will create a heroine using a very interesting technique. This is a shapeshifting doll. When necessary, she will be Cinderella, and at other times, a princess. To do this, her skirt must be straightened in one direction or the other. At this time, the second doll will be hidden under it.
This is what Cinderella and the princess will be like.
Cast on 40 stitches using red yarn.
This is the preparation of Cinderella's head, shoulders, and waist before transformation. Now let's create the image of a girl when she has already become a princess.
Knit using the same technology, only first cast on 45 loops using blue threads, then knit with nude yarn.
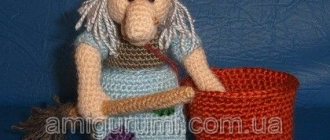
To give the Princess Cinderella doll volume, sew the halves of the girls along the edge loops, placing this seam at the back. Turn the blanks right side out and fill them with filling. In this case, the head will have a diameter of about 21 cm. Connect the girls at the waist, sew them in this place. Add filler here to create a waist circumference of approximately 20 cm.
Separate the head from the neck by stitching here with flesh-colored thread and tighten it.
Using pins, mark the location of the eyes, one from the other will be at a distance of 4 loops, 11 rows from the top. Embroider them with black thread, mark the location of the mouth with a pin. Cinderella's may be a little sad, while the princess's may be smiling. Sew it with red thread.
Sew the fabric along the edge loops, tuck the skirt at the bottom so that beautiful teeth form in this place. Turn it right out. Also, using yarn of different colors, make patches for the skirt and sew them to it.
The belt consists of 44 loops, made with black threads in stockinette stitch. Sew the belt to the skirt. Here's how to make Cinderella.
We need to create a princess too. Knit using the same technology, but using different colors. 129 loops are cast on with white yarn, then you will knit from the 11th row with a blue thread, from the 15th with a white thread, from the 19th with a blue thread, and from the 29th with a white thread.
To make flowers for the princess, let's start with the first one. Cast on 14 loops with pink thread. Work the first row with knit stitches, in the next row you need to knit 2 loops with purl stitches. Thread a thread through the remaining loops, pull it off, and tie it. Sew edge loops, sew flowers onto the skirt, and stitch it to the princess figurine.
To make a princess's hair, cast on 12 stitches with white yarn, knit 10 stitches in the first row, turn the work, make 8 stitches in the second row, turn again, knit the third and fourth rows. Repeat this combination of four rows 12 times, then bind off all the loops and sew the edge. Stuff the workpiece with holofiber and pin it on the top of the head with pins.
At the back of the head, the hairstyle should be separated with a twisted cord. To do this, take green yarn, measure two pieces of 120 cm each. Tie their ends, attach to the door handle, twist clockwise. Fold them in half again in the middle and sew them into a white princess hairstyle, forming a bow at the back.
Make four identical curls, let's see how they are created using one as an example. Cast on 7 loops with white thread and work 11 rows in garter stitch. Gather onto a thread, tighten tightly, and roll into a tight roll. Do the same for the remaining three curls. Sew 2 pieces on both sides of the main hairstyle.
Make flowers to decorate your hair using the same principle as for your skirt.
If you need to quickly make a Cinderella doll to send her to the ball in a beautiful dress and carriage, then check out the next idea.
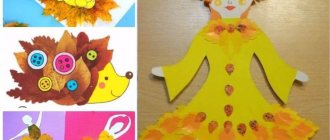
The paper version is most similar
It’s easy and quick to make a Cinderella paper doll. Using cardboard to make a doll makes it sustainable and practical. To do this, print out the proposed templates, cut out individual parts and carefully fold them along the proposed lines.
The dotted line is for the fold, the straight line around the perimeter is for the cut. By cutting out and assembling the top and bottom of Cinderella separately, we give the product volume and the ability to “change outfits” depending on the plot. Clothing for minor scenes can be dealt with in a similar way.