Pictures made from beads (it’s as easy as pie to make them with your own hands) serve as decoration for any interior. If you take on bead work, you should not skimp on its quality, because this will fully affect the naturalness of the material’s finish. Only the even texture of the beads, the shape of which is more or less identical to a square when viewed “in profile,” is capable of bringing life into the picture and showing what is depicted without being distorted or spoiled.
Preparing for work
In order to create bead paintings with your own hands, it is not necessary to have experience in this, but anyone can learn this business. Various photo and video lessons will help you understand the technique and train your own approach to work. Step-by-step pictures with comments and videos with explanations are the best friends of beginners working with beads.
In order to be ready for work, you should acquire the following items:
- A needle with a small eye.
- Canvas is fabric with special holes.
- Thin lavsan thread.
- Any convenient scissors.
- Beads with the required color.
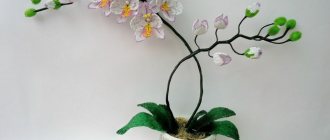
Beautiful lilies
In this case, a diagram is not needed; here it is enough to use a regular printed drawing.
To create a painting with glue, the necessary tools are:
- picture frame;
- PVA glue;
- scissors;
- black yarn;
- green, red and black beads;
- toothpick.
The first step is to disassemble the frame and remove the glass.
The contours of the frame are marked on the base of the picture.
The drawing is placed under glass. The outline of the design is outlined with glue and a piece of yarn is placed on top.
In this way the outline of the drawing is made. If necessary, use a toothpick.
The work remains until completely dry.
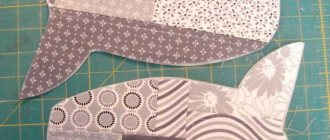
Filling leaves with beads. If the design does not have small details, then the beads are usually filled in by hand, but if there are small details in the design, it will be more convenient to “draw” them with a toothpick.
Related article: Autumn craft hat for kindergarten with photo
Filling flowers with beads.
After drying for a long time, the painting is mounted vertically on the glue for a short period of time.
This must be done so that beads that are not glued well enough fall off and can be glued back.
Here is the result of the work:
The picture is mounted in a frame and placed in a place where you can show off your creation.
Here are a few photos of finished works that will help “awaken” inspiration:
Basics
For a person who has just become interested in beadwork, it is mysterious and mysterious. Initially it seems that these are the same type of materials, but later it turns out that the beads have different sizes and hole widths, like needles. They also have different calibrations and shapes. However, gradually, immersing yourself more and more in the world of beadwork, all these points become clear.
You should choose a small size and with the least number of colors for your first bead embroidery picture. It can be considered a training session, after which you will want to learn more and more about working with beads.
A design is applied to the fabric, on top of which embroidery will be done. This type of embroidery pattern is ideal for beginners. Besides this, there are many other ways to create works with beads.
My neighbor Totoro
The charming and kind anime cartoon “My Neighbor Totoro” is one of those that excites the imagination and makes you even worry about its characters in a childish way, rejoice and be sad with them. These patterns for bracelets with Totoro and catbus will definitely cheer you up!
Embroidery technique
After preparing the materials necessary for embroidery, you can get down to business. One cell on the canvas means one bead of the corresponding color, which should be sewn onto this place.
When working, you should start from the upper left corner and go horizontally, filling the field with beads of the required shades. It is worth initially purchasing more beads than indicated in the instructions, since they often come across defective ones - of irregular shape or with a hole that is too thin. Such consumables are not suitable for work; they have to be put aside, which means the number of beads consumed is reduced.
At the beginning of the work, the thread is secured to the workspace with two stitches, and then the first bead is threaded onto it. When about 10 centimeters remain of the thread, it is pulled under the finished stitches and tied into a knot, then a new thread 50 centimeters long is taken.
Kitten Woof
Everyone's favorite kitten named Woof can be made using the same technique, if you just need a kitten figurine. You can use the entire diagram to create, for example, a case for a mobile phone.
And the last cat, suitable as a pendant, pendant, brooch. We weave with a square stitch.
When the muzzle is ready, we make the ears - we bring the thread along the beads to the desired place, we collect 18 beads, pass the needle along the beads to the second eye, again 18 beads, we take the thread into the rows of beads, fasten and cut.
Doing part of the embroidery
The simplest option for making large paintings with beads would be to buy partial embroidery, because it is much easier to do part of the work than completely from scratch. The canvas already has some beaded elements made; all that remains is to complete the work with the patterns required according to the instructions.
You should start at one corner of the workspace and move down or to the right. The stitch is directed from the left corner to the right. Once completed, the thread is hidden and tied into a knot.
Two cats
For each portrait, two diagrams were made - one using the weaving technique, and the other using the mosaic technique. Which performance technique will you choose? Threads and fishing line are suitable for work.
There are also many options with a tiger, from a tabletop picture to a wallet.
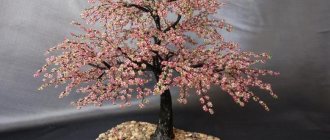
Volumetric embroidery
For large-scale work, it is necessary to prepare the following materials:
- Needles of different diameters.
- Fishing line.
- Beads of different colors.
- Canvas.
- Photo frame.
- Glue.
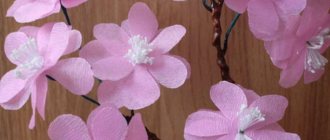
One large diameter bead and 7 small ones are put on a thread 50-60 centimeters long with a knot at the end using a needle. Then the needle is passed in the middle of the threads, under the knot.
A loop is formed that needs to be tightened. The next 7 beads are threaded, the needle is passed through the larger bead. This design should be fixed by passing the needle through all the beads.
Next, 14 beads are threaded into the needle, the needle passes through the last attached bead. This is how petals are formed.
By repeating the last step the required number of times, you can obtain the required number of flower petals, the core of which is a large bead. The end result must be secured with a knot.
The only thing left to do is to place the flowers being created on the canvas in the desired location. For example, such embroidery will look beneficial if placed in the shape of a heart. Add a few small beads around, and place the finished work in a frame.
Puss in Boots
This is the most popular cartoon cat around the world. The embodiment of masculinity and honor, temperamental and passionate. Do not deny yourself the pleasure of mastering products with the image of the famous Cat.
Photos of bead paintings
The final stage: choosing a frame
Once the image is ready, you will have to think about choosing a suitable frame. After all, it must be placed in a frame, regardless of whether the image is presented to someone or not. If it becomes a gift for someone, then it’s better not to skimp on the frame.
You can use a frame made of natural wood. Depending on the size of the painting, it can be thin or massive. The color also depends on the palette that was used in the process of creating the painting. Once the wizard decides which frame he will use, the workflow will end.
Weaving methods
Let's look at ways to weave pictures:
Weaving
If you prefer to weave on a loom, you will need a lot more line than other methods and will have problems after finishing the work. After all, you need to put all the tails of the fishing line somewhere. But the simplicity of weaving and the ease of finding patterns are the undoubted advantages of weaving. In order to weave a picture, you can use almost any pattern, even for cross stitch.
Mosaic or brickwork
Somewhat more problematic weaving methods are mosaic and brickwork, because their even and odd rows are sort of between each other, and this complicates weaving. however, nowadays a huge number of schemes have been developed for these techniques. This certainly makes the task easier.
Types of seams
In the photo - bead embroidery you can see how neatly the rows of beads are laid. You can achieve the same result by performing the work using one of the proposed seam options.
Errors when gluing
The most common mistake is working without a sketch. This applies to mosaics. Beginner needlewomen start working without thinking about how the product should look in the end. At the end of the process, they may not be happy with the outcome. But nothing can be changed; the beads are very difficult to peel off from the surface. Even if this is successful, the surface will need to be further processed.
DIY Wall Panels – 175+ (Photos) Beautiful Crafts
Wall panels are an opportunity to create an individual interior by decorating walls using available materials. If we talk about panels as a product, then it is always an original, handmade work, which has a fairly high cost. Decorating an apartment with such fakes is not always relevant, because the product is selected according to the existing interior and if renovations are done, the panel becomes unnecessary, and it’s a pity for the money spent. But it’s a completely different matter when the panel is made independently. This makes it possible to choose the theme, size, texture, material, color, but at the same time the cost of money is minimal.
Content:
In fact, there is nothing difficult about making a panel yourself; no special skills or knowledge are required. The first thing that is necessary is to choose the place where it will be placed, choose a thematic direction and prepare the necessary materials, which most often are available to any housewife.
Wall panels are an opportunity to create an individual interior
- If the room is small, you should not use large panels, they will not look harmonious and will make the room visually smaller.
- When the room is large and a bare wall is being decorated, you can use a large panel or several small ones of the same theme.
- If the room is colorful and has many decorative elements, the panels should be chosen in soothing colors, with a minimal combination of colors.
- When using several panels on one wall, they need to be perfectly combined with each other, support the same theme, or be perfectly harmonized in color.
In small rooms you should not use large panels
Materials that are suitable for making panels are, as a rule, what is at hand. You don’t need to purchase anything special, and the technique is reminiscent of the handmade forgeries that many people made in schools.
Of course, stores offer a variety of products where they are used:
- glass;
- ceramics;
- metal;
- photo printing is used.
But our panels, which we will learn to make today, have nothing in common with decorated tiles and photo wallpapers. Unless they have one goal - to make everything beautiful and unique.
DIY painted panel
You can use:
- threads;
- fabrics;
- buttons;
- ear cancer;
- flowers;
- leaves;
- cereals;
- coffee beans.
You can consider the features of thematic products.
Use food for decoration
This is perhaps the only place where the use of food for decoration purposes will be completely justified. Appropriate here:
- cereals;
- grains;
- vegetables;
- fruits.
But, by the way, coffee beans are a universal material and can be used in any room. They are easy to work with, and during use they do not lose their appearance and color.
With their help, you can lay out any pictures, for example, a cup of coffee, which already matches the theme. You can cut out photographs of beautiful fruits and vegetables, complementing them with cereals.
Coffee beans are a universal material
In this case, the brighter the better. Such a picture should speak of celebration, fun and good mood. Here it is permissible to combine any materials and surrender completely to your imagination. And if you are invited to visit, a hand-made panel will be an excellent gift.
Such a picture should speak of a holiday
Suitable use:
- spruce branches;
- cones;
- rowan berries.
As a background, you can use a New Year's picture, for example, printed on a printer, and decorate it. Snow-white snow can replace crumbled polystyrene foam, cotton wool and even semolina.
When choosing a theme for a children's room, consider the interests and tastes of the child. We must not forget about age; it is unlikely that a ten-year-old child will be interested in just a bear or a dog. And if he plays football, for example, he will be very happy with panels on this topic.
Consider the interests and tastes of the child
If a girl is into dancing, you can make a painting of a ballerina. This kind of work on a fake will definitely interest your child, so you can make a joint fake.
When making such products, you need knowledge of weaving techniques. If you have made macrame, you can create incredibly beautiful decor. The advantage of the products is that everything will depend on desire and imagination. They can be:
- large;
- small;
- round;
- square.
You can decorate them:
- beads;
- stones;
- ribbons.
Depends on desire and imagination
Knowing about the main points, you can consider in more detail how to make panels using this or that material.
Wood has always been popular when creating decor. Nowadays, eco-friendly, natural materials are among fashion trends; they are used in almost all interiors.
If your husband is not involved in the woodworking industry, then it is unlikely that you will find a variety of blanks at home. But if you have a hacksaw, then it’s easy to make them yourself. To do this, you will need a branch, the diameter is not important, from which the nickels are cut.
Wood popular when creating decor
Additionally, you need wire, thin tree branches, and glue. You can use wooden planks for the frame if you want a square or rectangular picture. For an oval or round frame, you can also use thick wire, and for decoration, wrap it tightly with thread.
For the background you can use plywood, white cardboard, burlap, or leave it empty. In the latter version, all elements are attached to each other and secured to the frame.
Advice
To give wood a glossy surface, it is coated with varnish.
Eco-friendly, natural materials are fashion trends
Design ideas:
- You can place spots on the branches that are attached with glue. To prevent the bottom from looking empty, you can fill it with the same blanks.
- A composition of patches laid out in the shape of a flower will look beautiful; if this is a large product, you can use cones or dried flowers.
- It could be a laid out heart or a star.
In order not to spoil the impression, it is better not to use synthetic materials in the composition.
Option made from tree trunks, looks very stylish
The fabric is easy to work with, and its variety allows you to create amazing pictures. With its help you can create:
- abstract drawings;
- sew animals;
- nature;
- create whole pictures.
Fabric is a material that is easy to work with
- Absolutely any fabric is suitable for work; the more different fabrics there are, the wider the choice when implementing ideas.
- You will need threads, frames, cardboard, elements.
- As in the previous version, you can make the frame yourself. The panels will look great without the use of frames.
- You can choose any basis on which the picture will be created: thick cardboard, fiberboard or chipboard, plastic and other available materials. It needs to be covered with material and secured on the reverse side with glue or a stapler.
Advice
Do not throw away small pieces of fabric and shreds; they will be useful for the next work.
Absolutely any fabric is suitable for work
Ideas:
1It could be nature, flowers, trees.
To make a tree or flower look alive, you should use the following technique. The trunk or stem is drawn on the fabric and cut out, glued to the canvas. The leaves are also cut out, but only one side is glued to the canvas. For a flower, you can first create a composition using a needle and thread, secure it, and then glue it. It could be nature, flowers, trees
2Nowadays, many interiors use panels using one material, without any additional elements. The idea is as follows, for example, you have a living room where two or three primary colors are used in the interior: beige, orange, red. You need to choose a material with a pattern, where red flowers are painted on a delicate background. Or take a fabric with a red background with small beige flowers on it.
It is ideal to choose three different fabric options. Next, take a base, a square or rectangular sheet of plywood and cover it with fabric. The sizes of plywood can be different, the main thing is that in the end they look harmonious.
Fabric trees
3Pictures look great, for this you need to choose a drawing as an example. Then cut out the parts and glue them to the base. This is a bit of a time consuming process and it is better to start with simple drawings.
Advice
To add volume, you can place cotton wool under the fabric elements.
The use of photographs to decorate apartments has been used for a long time and, probably, every family uses such a technique. And although it won’t be possible to surprise you with the material, the design method will definitely work.
- Absolutely all photographs are suitable for this method.
- Black and white photos look beautiful.
- Additionally, you can use photos of nature and beautiful landscapes.
Using photographs to decorate apartments has been used for a long time
Design ideas:
Framework. Depending on what kind of panel is expected in the final result, you need to choose a frame. It can be made of cardboard, where only the front part of the frame is cut out of thick cardboard and glued to the photo; on thick cardboard, it can also be glued to the back, as a base. If the photo will be glued directly to the base, but a frame is not needed. You can use the fabric for the front of the photo as a frame.
Option from the framework
A family tree looks very beautiful in the interior; it brings comfort and creates a special atmosphere. Making it is quite simple, you will need a base, you can work with cardboard, the main thing is to find the dimensions. It can be painted or wrapped in fabric. Then a tree trunk and branches are cut out of the same cardboard. Covered with paint, if something doesn’t work out, problem areas can be easily covered. Then photos are attached.
Another original option
On the same basis, you can place photos in a chaotic order, and decorate empty spaces with additional elements. To delimit the photo, you can use colored tape or thick thread.
Another original option is to take a large frame and stretch the threads horizontally. Then use clothespins to attach the photo to them.
Advice
Photos of different sizes look beautiful, but geometry and accuracy should not be observed.
Paper is another convenient and affordable material that is easy to work with.
- You can attach paper fakes to the base or directly to the wallpaper.
- Paper can be used in any color, thickness and size.
- Paper napkins are often used and can be found in all sorts of colors and patterns.
Paper is another convenient and affordable material that is easy to work with
Design ideas:
Butterfly panels are widely used. To do this, take colored paper and cut out butterflies according to approximately one sketch. You can use one color or several, only in one color palette, for example, from soft pink to burgundy. Then butterflies are glued onto the base (cardboard, plywood) or directly onto the wall. It can be in the shape of a heart, with the lightest color at the bottom and ascending to the top. This could be a flying composition. Only the body needs to be glued; the wings should lag behind the surface.
Panel of butterflies in the shape of a heart
You can create a composition of flowers. Here it is better to use soft paper; cardboard will be difficult to handle. We take a square sheet of paper, it needs to be folded like an accordion. Next, the accordion is folded in half and these edges are secured with glue or a stapler, the free ones are stretched and also fastened. To make the edges of the flower appear curly, cut the folded paper with an accordion at both ends.
It can be beautifully decorated with small beads, stones or beads.
Advice
If you have a panel of butterflies, you can place them additionally around the room!
They can be called luxurious and elegant. Stucco molding from gypsum has always been valued, and now it is possible to make panels using gypsum yourself. Plaster can be purchased at any store, as well as forms for future compositions. But if you put in a little effort and time, you can do it without forms.
Luxurious and elegant product
- Craftsmen who do this professionally use special devices. To create it at home, you can use any available tools, pencil, spatula. That is, those objects that will be convenient for drawing.
- You should start with the simplest forms to become familiar with the material.
- Difficult works of art are unlikely to be achieved, but once you master the basics, you can produce beautiful drawings.
Apply a little plaster so that it does not have time to dry
Design ideas:
- You can work with plaster directly on the wall, but then you need to have a perfectly flat surface.
- Apply a little plaster so that it does not have time to dry. You can decorate flowers and patterns. If you draw well, you can create complex compositions.
- The material itself is not bright, so you can decorate it with a bright frame and paints. In the latter case, you should not overdo it so that the material does not resemble plasticine.
To create, you can use any available means - pencil, spatula
Advice
In the first stages, you can simply get acquainted with the material to know how it behaves in work.
Using ordinary threads and nails, you can make a panel that will make you admire it. Such crafts belong to the art of string art and are popular all over the world. And on sale they are highly expensive.
Product made from threads and nails
- You can make simple patterns, complex compositions and works of art.
- It is better to use wood or plywood as a base.
- In addition to multi-colored threads, you will need nails or pins; nails with beautiful heads will look beautiful.
- When using simple nails, they can be decorated with beads or stones.
- A sketch of the future panel (drawing) is applied to paper. Next, it is applied to the base and secured. Nails are hammered along the contour of the pattern; the less they are hammered, the more voluminous the pattern will be.
- Then the paper is torn off.
- A thread is wound around the nails horizontally and vertically.
You can make simple patterns, complex compositions and works of art
Decor:
- Flowers and stars. These can be three large flowers or several small ones. Flowers will look beautiful when using different colored threads.
- It could be a big heart, a cat, a dog or a bear. Even the simplest drawing will look original and unusual.
- You can make a drawing from several elements, but it will require patience and time.
Tip
When using thick threads, the consumption will be lower and the work will be done faster.
When using simple nails, they can be decorated with beads or stones
Such panels can be safely called bright and original decorations. Beads are used in many fakes; thanks to the multi-colored palette and durable material, you can create incredible compositions.
Using buttons
- To create such fakes, you can use beads separately, combine them with buttons or with other materials.
- You can use fabric, polystyrene foam, wood, cardboard as a base.
- The material is attached with glue.
- Before creating a bead pattern, you need to draw an outline with a pencil and fill it in small areas. First, glue is applied with a brush, then covered with beads.
DIY beauty
Ideas:
- It is better to start artistic fakes with simple drawings, for example, flowers, trees, animal themes. Try making a butterfly; to do this, draw an outline and highlight areas where different colors will be used.
- If the picture is large, you can use buttons, so the picture will be filled out faster, but will be no less beautiful.
- When you have artistic talent, you can draw a picture and highlight some of its elements with beads.
Beaded option
Advice
It is better to hang a beaded panel on an empty wall so that it serves as a bright accent in the room.
This work is similar to gypsum, but if gypsum is used in small areas, then plaster is most often used as a material for large panels. This is not to say that this look is easy for beginners in this business, but with a little training, everything will definitely work out.
This look is not very suitable for a beginner
This way the panel is made directly on the wall; it is better to practice on some smooth surface.
Work technology:
- The drawing is applied to a piece of paper, the following work is performed based on this sketch;
- Then the drawing is transferred to the plaster;
- According to the drawing, the form is applied layer by layer;
- To smooth the sheet without damaging the shape, you need to cover this area with film and carefully adjust and smooth it;
- To give the surface texture, you can use a brush with hard bristles;
- When the pattern has formed, you need it to dry completely;
- Next, use sandpaper to level the zones;
- You can paint the canvas.
It is better to train on any smooth surface
The process is labor-intensive and requires patience, but the result is worth it.
The only difficulty in creating such a panel is finding a sufficient number of corks. If you have wine corks at home, then creating an original panel is not difficult. This material is easy to process, lightweight and comfortable.
- They can serve as a background if cut into circles.
- Attached with glue.
- Combines well with natural materials.
It is necessary to have a sufficient number of traffic jams
Design ideas:
- Corks are available in both delicate beige tones and rich brown. If you cut different corks, you can use them to lay out a design.
- The cut circles can be painted with letters to form a phrase.
- You can cut out figures from them, which are then attached to the base.
You can insert a photo
With the advent of flash drives, disks have faded into the background. Probably every family has these computer accessories. It’s very good that they have been preserved, because there are many ideas on how to make unique, luxurious panels from them.
Design ideas:
For families with children, it would be important to make “Smeshariki”, cartoon characters. To do this, cut out parts from colored paper or fabric (nose, eyes). Then they are glued to the disk using glue. The characters are applied to a base, which can be made of cardboard or thick fabric.
Every family will find these computer accessories
- The discs are easily cut into different parts, which makes it possible to decorate panels with their help. In the light they shimmer and shine.
- Another option is to cover the disc with paint; you can choose any background that will suit the interior. When the paint is dry, apply the pattern using a pencil. Next, along the contour of the drawing, a layer of paint is removed using a knife.
- You can use a floppy disk as the basis of a panel. To do this, it can be decorated with paint or wrapped with thread.
Shell option
If a family likes to relax on the seaside, shells are a must-have souvenir. Children love to collect them and replenish household supplies. But very rarely there is a use for them, so from year to year they lie and wait for their time. Now is the time when they can serve as the main element of a beautiful panel.
- Before using the shells, they need to be washed and dried well.
- To apply them to the base you will need glue.
- Before work, for convenience, it is better to sort them by size.
- To diversify the design, you can additionally use sand, pebbles, and beads.
- You can add color using paints.
- To make the surface of the shell glossy and shiny, it can be coated with colorless nail polish.
Marine style
Ideas:
- It could be a flower made of shells or a chaotic arrangement. Much depends on where the panel will be placed. You need to maintain a marine theme or create an overall picture.
- Such elements will look beautiful on burlap, and simple branches tied with thread can serve as a frame.
- You can take a marine theme as a background and decorate it with shells.
- To create volume, shells are attached to the sidewall.
As you can see, any thing can be used. Here are some more examples of how to beautifully decorate a wall.
In black and white
This option can be considered an update of old things. In this case, any canvas is taken as the basis. An old painting, wooden planks, iron or glass elements. The base is decorated using paints, beads, threads and other materials.
Most often, products do not require a frame. They are hung by a rope or simply on a hook. It is better to use natural materials for decoration. This can be several paintings that are connected to each other.
Option to update old things
In large rooms, large panels made in the same style and color scheme will be relevant.
This element can be used not only in children’s rooms, they look great in living rooms and corridors. Many people know and have seen amulets that have a brownie on them. It symbolizes order and comfort in the house. A ready-made doll or one made independently can be used.
To make a doll, you can use foam rubber, which holds its shape well. Using fabric and thread, you can drag it to form the desired silhouette.
Look great in living rooms and hallways
You can use one intended for photos or paintings as a frame. You can do it yourself if you have thin planks. For the background, the fabric with which the base is covered is most often used. Since the doll has a certain weight, the base must be reliable - wood or plywood.
As additional materials you can use:
- ribbons;
- bows;
- beads;
- buttons.
If you have time and desire, you can make dolls that resemble family members and create a family panel.
A ready-made doll or one made independently can be used.
Now you can buy any wall clock. They have different shapes and sizes, color and texture. But it’s unlikely that you’ll be able to find a unique model; making it yourself is much easier. Such panels are convenient because you can choose all the parameters yourself. The only thing that should be taken into account are the general rules for all products.
DIY watch
The topic can be completely different:
- time of the year;
- nature;
- romance;
- flowers;
- abstraction;
- patterns.
All that is required for the job is the selection of appropriate materials and a base. The base can be foam, wood or plywood. First of all, it needs to be prepared. You can decorate with paint or covered fabric. If you plan to use multi-colored elements, then the base should be chosen in a single color.
It is not necessary that the clock be located in the center. On the contrary, if they are located on the edge, this will significantly expand the possibilities and you can create a beautiful composition. Here you can use all the techniques presented above. If the watch has a voluminous glass and it looks rough in the overall picture, it should be removed.
The subject matter of such a product can be completely different.
As a rule, watches have their own background; if they have already been purchased and the background does not match the overall interior, this problem can be easily solved. The watch can be easily disassembled, the main thing is not to damage the mechanism. The removed base can be painted or decorated with beads. You can use pieces of floppy disk that shimmer beautifully in the light.
Such a panel will not only bring beauty, but also benefit. It is suitable for the kitchen, bathroom, children's room. Its main advantage is pockets in which you can put any accessories. You can make them in different sizes and shapes, and use as many pockets as you see fit.
Knitted version of a practical product
This panel consists of a base to which pockets are sewn. A plank is attached to the top; it is better to use a wooden one. Depending on what accessories will be stored in the pockets, the base is selected. The heavier they are, the stronger the base should be. Plywood is perfect; it does not deform and will hold the shape of the panel perfectly.
Regarding fabric, there are no special frames, but it is also better to use thick fabric. Pockets can be of different sizes and placed randomly. You can use pieces of different fabrics, even if they differ in density.
Such a panel will not only bring beauty, but also benefit
Such panels are made from the pockets of old jeans and trousers, which looks very original. This product will perfectly complement the interior of the corridor.
You can decorate:
- ribbons;
- bows;
- buttons;
- stones.
If colored material is used, then its design is quite sufficient.
You should never give up, because the first successful job will bring positive emotions and pride in the work done.
We do it for the kitchen
9 Overall Score
Don’t know how to design a panel in an original way? Still choosing what is best to make? We will tell you about all the materials with which your crafts will look beautiful and original. After reading the information, please leave your ratings and reasoning in the comments. They will be useful to other readers. Your opinion is very important to us. Thank you for your participation. We appreciate your every feedback and time spent.
pros
- Availability
- Saving money
- Unique design
Minuses
- Time for crafts
- Sometimes hard to find materials
- Often, after an unsuccessful first time, work is suspended
Add your review
modernplace.ru