Every day, on the way to work, we dream of long-awaited holidays, weekends, to go to our favorite summer cottage, enjoy spending time with family and friends, and merge with nature.
A wooden chair in a country house is an excellent element of the interior, allowing you to relax comfortably and drink tea on the terrace.
Today, a cozy, well-equipped dacha should not be an unattainable luxury that requires exorbitant expenses. Schemes, drawings, technologies, Internet resources offer hundreds of ideas for creating garden furniture.
We invite you to create a chair with your own hands for your home or cottage.
Throughout our lives we are surrounded by furniture. Furniture production technology is evolving and improving. Garden furniture, designer, original - it is everywhere, we are surrounded by furniture! It’s natural to want to purchase a high-quality, practical, stylish item for your garden at an affordable price.
Any owner can assemble a chair with his own hands for a summer cottage or private home.
Innovative furniture showrooms and designer garden furniture stores provide a range of services, selling stylish wooden chairs, for children and adults, with or without armrests, but not every average family can afford this kind of pleasure.
Your favorite area will be significantly transformed if it is decorated with a luxurious, reliable, hand-made chair.
It is not necessary to resort to enormous expenses to purchase a fashionable piece of country furniture. A handmade product will provide comfort and will harmoniously “fit” into the design of your favorite garden. A flight of fancy, a list of necessary tools - everything you need to make your dream come true in everyday life!
Wooden furniture has been and remains a classic that accompanies us everywhere.
Useful tips
Making your own furniture is a very exciting activity. If the process is happening for the first time, make the most uncomplicated chair with clear lines and simple geometry. It will be easier to work, and the result will be neat.
When you have experience in carpentry, you can surprise family and friends with unusual shapes. A handmade round chair is effective and practical in any interior. Another easy way is to make a chair from a car seat left in the garage.
By being creative and following the instructions, you can make a chair with your own hands that will be used for its intended purpose for many years. In addition, a product made on their own will become a source of pride for the owners and a reason to brag to friends.
How to make a garden chair: drawing and detailed assembly description
MesterulManole
6681 1 2
Using ordinary boards and screws, you can assemble a chair that will be no less comfortable than furniture from the store
Have you decided to buy a plastic chair or a wicker rattan lounger for your country house? Don’t rush to spend money, because simple and at the same time comfortable furniture can be made from wood with your own hands. I offer simple step-by-step instructions for self-assembling a chair from wooden boards. But first, let’s decide what kind of furniture you would like to see in your summer cottage.
Requirements for country wooden furniture
The most comfortable chair is the one you make yourself
In order to decide what country chairs should be like, let’s imagine under what conditions and for what purpose this furniture is used.
A country chair is a structure with a seat, back and armrests. If you attach runners to the supports, you can swing on the chair. Country chairs are used for short rest both in the country house itself and near it.
The operating conditions can be described as difficult, since most of the time the furniture is used outdoors.
So, what qualities should distinguish country furniture?
- Durability . Furniture should last as long as possible, despite precipitation, direct sunlight and other environmental factors.
- Simplicity and ease of use . Furniture should be easy to carry so that, if necessary, it can be taken out of the house and then brought back. Ideally, furniture should be foldable.
- Low cost . The chair should be inexpensive, and preferably made with your own hands from available materials.
- Aesthetic appeal . A chair that will be used in a country house should decorate the interior and exterior of a country house with its appearance.
How to prepare for work
First, select a drawing. If furniture is being made for the first time, the simpler the drawing, the better. In our case, the drawing is simple, but the finished furniture will be beautiful, stable and durable.
The drawing shows the main dimensions of the chair, selected to suit the parameters of a person of average height. If you wish, you can recalculate the dimensions for yourself.
After the drawing is ready, we calculate the amount of materials and purchase everything necessary. In our case, a board with a cross section of 30×150 mm will be used to assemble the frame. To cover the seat and back, we use a board with a cross-section of 25×100 mm. Wood screws 40 mm long will be used as fastening elements.
Preliminary stage - cutting out the main elements
Using a miter saw makes it easier to cut the edge of a board at either a straight or beveled angle.
In accordance with the drawing, we calculate the complete set of structural elements and cut the required number of parts from the board. For longitudinal and transverse cutting we use a circular saw. For a curved cut we use a jigsaw.
To cut rectangular notches in a board, use a jigsaw or bow saw correctly.
After cutting, small chips or, on the contrary, protruding fibers will be visible along the cut line. In order not to remove these defects on the finished furniture upon completion of assembly, immediately after finishing cutting, go along the edge of the cut with sandpaper.
Manufacturing process
| Illustrations | Step-by-step assembly description |
| How to screw in a self-tapping screw? Almost all connections in the chair will be made using self-tapping screws, so you need to know how to screw them in correctly. We fasten the self-tapping screws by pre-drilling holes with a diameter of 2 mm. If you twist a self-tapping screw without first drilling holes, there is a risk of cracks appearing. Under the head of the self-tapping screw, we drill a countersunk hole to the diameter of the head and a depth of 3 mm. We recess the self-tapping screw into the recess below the surface of the board. | |
| Front legs . We make two parts shown in the diagram. The lower part of the part will be the front leg of the chair, and the crossbar will be attached to the central recess. The upper part of the part will be the armrest holder. | |
| We combine the front supports into a single unit . We install a 70 cm long crossbar into the central recesses on the front supports. All connections are made using wood glue and reinforced with self-tapping screws, 2 pieces on each side of the crossbar. | |
| We attach the armrest holders . We attach the upper parts of the sidewalls, 60 cm long, to the front supports. We maintain a right angle between these two parts. We fasten using wood glue and 4 self-tapping screws for each connection. | |
| Hind legs . We cut two parts from the board, like those shown in the diagram. The length of the legs is 63 cm. The end of the legs is cut at an angle of 75° and 115°, respectively. | |
| Attaching the rear legs . We place the rear supports on the outside of the armrest holders so that the cutting line coincides with their surface. The extreme point of the bottom of the rear legs should be flush with the rear edge of the armrest holder. | |
| Strengthening the hind legs . To prevent the rear supports from moving apart during operation, we install a transverse spacer between them and tighten the entire assembly with self-tapping screws, 2 pieces on each side. | |
| Seat holder . The seat trim will be attached to the horizontal holders. The horizontal holders will be secured with a straight edge to the front cross brace, and with a beveled end - to the previously installed transverse brace of the rear supports. | |
| How to install seat holders . The diagram shows the location of the three seat holders and their distance from each other. We fasten the parts as usual with self-tapping screws. | |
| Back and hind legs . 61 cm long pieces of board are attached to the outer seat holders. The fastening must be made so that the end of the backrest holder is flush with the bottom edge of the seat holders. | |
| Back trim . We fill the planks on top of the previously installed backrest holders with a gap of 20 mm between adjacent planks. | |
| Seat . The seat strips are attached in the same way as the back trim strips. | |
| Armrests . We attach pieces of boards 64 cm long to the sidewalls, as shown in the diagram. Fastening is carried out using wood glue and self-tapping screws. We use at least 2-3 screws for each armrest. We round the edges of the armrests at the front of the chair. |
Country house chair made from pallets
You can make such a design with your own hands, spending only a few hours. During the work you will need the following:
- wooden pallets (you can buy new ones or disassemble old ones that are no longer used);
- hammer;
- nails;
- sandpaper;
- fastenings;
- primer.
Pallet chair
Step-by-step instruction
Step one: in this case we will need to take two pallets of the same size, which will then be divided into parts. Moreover, if the design involves the presence of additional decorative elements, then more pallets will be needed.
Divide the pallet into parts
Step two: the surface of the wood should be thoroughly sanded.
Sanding the surface of the pallets
Step three: first you need to connect the parts of the seat and backrest together. At this stage, you can make a small cut to get the slope of the back.
Connecting the back and seat
Step four: it is better to fix all the parts with screws, because the connection made from nails is not very reliable.
Requirements for wooden country furniture
No matter what anyone says, the most comfortable chair is the one you make yourself. In order to choose exactly what kind of country chair should be, imagine in what conditions and for what purpose such furniture will be used. The country chair is a structure with a back, seat and armrests. If you attach runners to the supports, then you can even swing on the chair. Country house chairs are also used for short rest, both in the country house itself and near it. The operating conditions can be described as difficult because most of the time the furniture is used outdoors.
So, what qualities should country furniture meet?
- Beauty - the chair that you plan to use in the country should decorate the exterior and interior of the country house with its appearance.
- Low price - the chair should be inexpensive, and ideally made by hand from available materials.
- Convenience and ease of use - pieces of furniture should be easy to carry so that, if necessary, it is convenient to take them out of the house and then bring them back. Furniture should ideally be laid out at all.
- Durability - such pieces of furniture should last as long as possible, regardless of precipitation, direct sunlight and other environmental factors.
Now about preparation for production.
How to choose material
Creative garden furniture
In order for pieces of furniture to blend harmoniously into the landscape, it is worth choosing natural wood. To do this, you can use branches, trunks or tree roots, which will help create unique works.
Natural wood has a variety of shapes, which makes it possible to produce original furniture items with minimal processing. When choosing materials, you should be creative and try to see the unusual in ordinary things.
If you want to decorate your garden with not only fashionable, but also reliable items, take a closer look at a table with a base made of concrete blocks, bonded with cement mortar and then tiled. To make a tabletop, you will need 5*10 cm bars, fixed with glue in a frame. The strips forming the surface of the table are attached to the resulting holes.
Exquisite wicker garden furniture
Stylish and economical products can be obtained from branches of flexible tree varieties. Nothing can compare in beauty to wicker garden furniture. If you do not have experience in this process, stop at bird cherry branches, which are easy to process and pliable.
Let's summarize - the cost of a homemade chair
If you use the minimum set of tools that we talked about initially, you will spend about 8 hours preparing all the parts and connecting them. But if you have a more or less advanced tool, the time can be reduced to 4 hours.
Cost of materials:
A board and beam for one chair will cost you about 500-800 rubles. Consumables (sandpaper and glue) - 100 rubles. Marilka or varnish - 150-300 rub.
Of course, it’s not realistic to buy wooden chairs in a store for that kind of money, but it’s up to everyone to decide what’s more important to you: your time or money.
How does it swing?
Most home craftsmen make rocking chairs according to ready-made drawings, but prototypes often turn out to be developed and tailored to a specific person, and an exact replica is not so convenient. Therefore, before making a rocking chair, it is necessary to obtain at least initial information about its kinematics.
The CG of an upright person of normal build is located on the border of the lumbar and sacrum on the inside of the spinal column. In a sitting individual, it will blend somewhat forward and even less downwards.
In the chair-seat system, the overall CG shifts back almost to its original position and a little further down. The downward shift of the general CG for the design of a rocking chair is not particularly significant and we can assume that the projection of the general CG onto the supporting surface (floor) is approximately the same as that of a standing person.
In the future, the resulting error can be easily compensated by final balancing of the chair, see below.
The vertical location of the central center relative to the central center has a much stronger effect on the stability and comfort of the rocking chair; the latter is also a determining factor when designing rocking chairs on runners with variable curvature.
If the CG and CO coincide, this is an indifferent equilibrium: for any physically possible tilt of the chair, the projection of the CG on the floor falls on the point of contact of the runners O, pos. 1 and 1a in Fig.
The chair does not rock, and if you lean back too much, you will instantly somersault with the risk of breaking your neck. Fortunately, an exact match between the CG and the CO is only theoretically possible.
If the CG is higher than the CO, then its projection, at any inclination, “runs” outward, backward or forward, from the point of contact. At the slightest tilt, a tilting moment Mo occurs (positions 2 and 2a), and the rocking chair turns out to be unstable.
To avoid such a situation for a family rocking chair, it is designed and balanced for the tallest, heaviest and pot-bellied rider possible so that its CO is 450 mm or more higher than the CO. Then, when the chair is tilted, the point O will “run away” from the CG projection, the restoring moment Mv will constantly act (positions 3 and 3a) and the chair will not tip over when rocking within acceptable limits.
For those who are smaller, the excess of the CO over the CG will be too large, and the swaying will be harsh, but this can be easily compensated for by pillows under the back and seat.
In general, the lower the elevation of the CO above the CG, the softer and smoother the swaying, but the likelihood of capsizing, suddenly straightening up and standing up in a chair, is higher. Therefore, it is better for novice carpenters to set the CO exceeding within 600-700 mm.
There is no need to drag your own pillows with you into a chair on runners of variable curvature: it will itself rise to the position of greatest comfort. At the same time, the big guy will lean back more, and the slender one will sit straighter.
When swinging backwards, the point O will run away from the CG projection the further, the greater the angle of inclination, and it will simply not be possible to swing until it capsizes. And if you “pump” forward, which is actually difficult, the chair will smoothly drop the hyperactive person onto the floor: where should you rest? Go do something.
To construct a profile of runners of variable curvature, the radius of the generatrix of the circle (it is determined as in the previous case) will have to, firstly, be rotated several times by a fixed angle α; usually take α = 10 degrees.
Secondly, to build the rear branch of the runner, R is increased at each turn according to the law of geometric progression with the index k = 1.02-1.03. That is, it will be (see position 4 in Fig.) R1 = kR; R2 = kR1; R3 = kR2; R4 = kR3, etc., if required.
Actually, R changes according to some trigonometric function, but for furniture accuracy and the size of the rocking chair, it is more convenient to replace it with a progression, so it’s easier to calculate.
The construction of the anterior branch is carried out at a constant R, but with each rotation of the generatrix of the circle, the CO is raised vertically (ibid., in position 4 of the figure).
The initial elevation Δh1 is taken equal to 2-3% R, i.e. (0.02-0.03)R, and the subsequent ones also follow a geometric progression with the same indicator as for the posterior branch. Δh1 in this case is a fairly critical value; its smaller value should be taken for thin people, and its larger value for fat ones.
Finally, the resulting points are connected using a pattern with a smooth curve. Do not be embarrassed if the tangents to it turn out to be not perpendicular to the radii: in order for the chair to be stable, at each moment of rocking it should be on the opposite slope. When constructing, it is advisable to take the scale no smaller than 1:5.
The furniture is always like new
Climatic conditions contribute to the fact that both wood and vine or rattan fade, become dull and brittle. Cast iron and metal furniture can be destroyed by corrosion. So, if you do not have umbrellas in the garden, remember to systematically impregnate the furniture. To reliably protect materials from the harmful effects of external factors, they should be covered with something.
The best way to protect wood is to apply a special acrylic varnish to its prepared surface . It will not only protect the wood structure from moisture, but also prevent blue stains, mold and mildew from appearing on it.
The tree must be degreased. The old layer of impregnation should be removed with sandpaper, preferably with a grit of 150 to 320. The thickness of the paper is selected in accordance with the degree of unevenness of the base. Not all types of wood require impregnation. For an exotic wood like teak, this is overkill.
For garden furniture, it is advisable to use only high-quality hardwood lumber
Rattan garden furniture should also be coated with oil or varnish every 5-6 years. Corrosion on furniture made of metal must be cleaned with fine-grained sandpaper and painted with the chosen anti-corrosion paint.
It is important to remember that restoring old furniture is always cheaper than purchasing new one. Well-maintained and updated furniture will make your garden elegant and attractive without any additional costs.
A metal product always inspires respect, forged furniture looks brutal and elegant, and its appearance gives the interior a certain charm
Cold metal combined with soft textiles looks truly impressive and graceful
Chaise lounge for the cottage - comfortable relaxation in the garden
In ancient times, people loved to relax among the greenery on soft ottomans or sun loungers. Today these are not only comfortable, but also functional sun loungers.
Their streamlined, adjustable design features headrests and armrests. The fabric covers are removable, so the sun loungers can be placed in the garden even on rainy days.
Holidays at the dacha will be doubly enjoyable with a fashionable, stylish and comfortable sun lounger
When making a sun lounger with your own hands, it is very important to strictly adhere to the dimensions indicated in the drawings
Beautiful design and smooth lines - everything you need for a country chaise lounge
Making a chaise longue for a summer house with your own hands is not so easy; you will need certain carpentry skills
To protect from the sun, you can use a shade canopy or umbrella. The latter will brighten up your time spent outdoors. A bright, colored spot that protects from the sun will add a touch of freshness and lightness to your garden.
Garden umbrellas must be stable so that they are not overturned by a sudden gust of wind. Therefore, the umbrella frame must be durable. The correct base is also very important, and functional masts and bowls must be made of good quality material.
Remember that the larger the surface area of the umbrella, the less resistant it is to wind loads, so it must be securely fastened at the base
Original umbrella dome over the dining area
Rattan - a classic of the genre
Rattan has been used to make furniture and accessories since ancient times. Furniture made from it is characterized by lightness, elasticity and is associated with a romantic, elegant garden in the Provencal style.
This material is easy to paint, so you can always keep your favorite furniture looking its best. Rattan looks beautiful in its natural color, and the noble shade of bleached oak also suits it well.
Furniture made from natural rattan is traditionally considered the best choice in terms of comfort and coziness.
Furniture made from natural rattan combines environmental friendliness, style and comfort
Rattan wicker furniture will fit perfectly into the landscape design of your garden
Wicker furniture in the garden looks impressive and elegant, but it is worth noting that you are unlikely to be able to immediately create masterpieces that you saw in specialized stores without some practice. Rattan weaving is a rather labor-intensive process.
To begin with, it is best to practice on small objects, for example, weave a small stool or tabletop. Only after successful practice can you move on to weaving more complex furniture, such as a chaise longue or a swing.
A beautiful hanging rattan swing with soft cushions invites you to sit on it
Rattan swings always look stylish and expensive
Rattan in classic style
This calm and elegant style will bring life to any garden . Rattan is ideal for it. In a classic style, accessories are very important. Each piece of furniture should be lined with soft pillows in soft pastel colors, or the furniture should be covered with a cream blanket or woolen blanket, which will warm you up during cold summer evenings.
There are no special requirements for creating an interior in a classic style - absolute freedom of action. Furniture made in this style will look equally beautiful both in the garden and in the house.
White color not only calms, but also brings a bit of freshness and light.
Snow-white rattan furniture will look great in the bright and rich surroundings of your garden
A few creative ideas and your garden will become magical
Caring for rattan furniture
Rattan is not a moisture-resistant material, so furniture made from it should be protected from rain. Fortunately, due to its lightness, this does not cause much trouble. This material wears out over time, so the furniture should be taken care of regularly.
Reading books is useful and pleasant, especially if you do it in the fresh air
Modern garden furniture
Contemporary outdoor furniture follows two hot trends in terms of shape.
- The first is minimalism and geometric simplicity.
- The second is futuristic forms.
Products from both categories go well with natural greens. More attractive shapes are achieved thanks to special plastic molding, which is made possible by advanced production technologies.
Modern furniture will help you stylishly and tastefully landscape your local area.
A coffee table in the center will always look advantageous and invite guests to have a pleasant and calm conversation
Placing garden furniture on an open terrace is always convenient and practical
A beautiful and stylish terrace with beautiful modern garden furniture - everything you can dream of
Modern fluorescent furniture looks very interesting. It uses natural solar energy. During the day it absorbs rays to emit a fabulous glow in the evening. Therefore, she can replace the lamps in front of the house. Modern furniture should be purchased in ready-made sets. They can be designed in the same color scheme or bright duets.
A table glowing in the dark will enliven the night garden and give an incredibly fabulous and mysterious atmosphere.
Finding such a stump in the dark in order to sit down will not be difficult
How to do it at home?
Making a rocking chair with your own hands will still be possible for those people who have basic carpentry or welding skills, depending on the chosen master class.
On skids
The easiest way to make a homemade chair on runners is from an ordinary old armchair or chair. In fact, all that remains is to add the runners themselves, securely fasten them to the legs and, possibly, sew a cover. In addition to the chair itself on legs, you will need runners, a screwdriver, screws, a drill and sandpaper. To give the rocking chair an aesthetic appearance, paint and a brush will be useful. The runners themselves are cut out independently into shape using a pattern, or they are ordered from a craftsman.
It is important that the gap between the legs is 20-30 centimeters less than the length of the runners. At those points where the chair is fixed on the legs, holes are drilled, after which the runners are “fitted on.” If the result is positive, the latter can be sanded with sandpaper and painted in several layers.
The finished “skis” are put on the legs and fixed with screws in the already prepared holes
If the result is positive, the latter can be sanded with sandpaper and painted in several layers. The finished “skis” are put on the legs and fixed with screws in the already prepared holes.
Pendulum
An excellent pendulum rocking chair is made on the basis of bearings. Compact and durable design creates even swing and is ideal for outdoor use. For manufacturing, it is necessary to prepare two steel strips with dimensions of 40 by 4 millimeters and 60 by 6 millimeters, as well as profile pipes with dimensions of 20 by 20 millimeters and with a wall thickness of two millimeters. The movement of the rocking chair can be ensured by 8 bearings, the outer diameter of which is 32 millimeters, and the internal diameter is 12 millimeters, as well as 8 bearing cages. They are created by hand on a lathe, or cut from a tube. Finally, you can’t do without a pair of garage hinges and bolts with nuts size M12.
In order to minimize welding, profile pipes can simply be bent using a homemade jig. To avoid making mistakes, it is better to first apply markings every 100 millimeters. The entire frame of the rocking chair is made from a profile pipe, that is, the support part, two sidewalls, the seat and the back. As a rule, for a standard size of outdoor furniture it takes about 20 meters. From the strip and profile, parts are created that regulate how much the back of the chair tilts, in the amount of 2 pieces.
A steel strip measuring 6 by 60 millimeters is cut into two equal parts. From it, as well as bearings and bolts with nuts, pendulums are created in the amount of 4 pieces.
On springs
It is not recommended to make a spring rocking chair with your own hands, since this mechanism is very complicated to implement. The design has a powerful and motionless base, above which there is a large spring. It is she who is responsible for rocking the soft seat mounted on top. It is much easier to make a hanging rocking chair, which will decorate both the summer cottage and the children's room.
The easiest way to make a homemade swing is from a hoop with a diameter of 90 centimeters, a piece of thick fabric with dimensions of 3 by 1.5 meters, non-woven fabric, 4 metal buckles, 8 slings and a metal ring, from which the chair itself will be suspended.
The hoop is either created independently or formed from a metal-plastic tube or bendable wood. First of all, a pair of equal squares with sides of 1.5 meters are formed from 3 meters of fabric. Each of them is folded 4 times, after which a circle with a radius of 65 centimeters is cut out of the workpiece. The blanks are marked with an internal contour and holes for slings.
At the next stage, both blanks are ground together, leaving a hole for the frame. The remaining free allowance is cut with teeth, after which the finished cover is turned inside out and ironed again. The hoop itself is covered with the selected filler, cut into strips with a width of 6 to 8 centimeters. The frame is inserted into the case, both parts are connected to each other. The cover is filled with strips of padding polyester sewn to the fabric with a hidden seam. The sling is cut into 4 two-meter pieces, the edges of which are melted on both sides. The slings are pulled through the patterns and stitched several times. Buckles on the free ends allow you to adjust the height and inclination of the rocking chair. All slings are assembled and fixed on a metal ring.
How to make a hammock chair from a metal hoop is described below.
We sit comfortably, with a backrest
Homemade country chairs, made with creativity and taste, can be very different from the samples given here. Blind copying is not required, the main thing is to understand the required proportions, assembly principle and design features of the selected model.
Fig. 11. Standard chair
Fig. 12. Chair assembly
The chair frame (without the seat) is assembled twice, rough (without wedges, dry) and finally. Assembly begins with the “apron” (rear legs, rear, longitudinal drawer), after which the front part is connected to it.
A garden chair can have a solid or stacked rigid back, the elements are attached to spikes. For the sake of aesthetic appeal, connections with open and through tenons are rarely used. Bolts, confirmations, and self-tapping screws are also rarely used. Nails are not used under any circumstances.
Fig. 13. Making a groove for a furniture tenon
Summer residents often opt for folding chairs, which take up little space when folded. In this connection, the home craftsman should be protected from an unsuccessful design that is still in circulation.
Fig. 14. Not a recommended folding chair model. Due to the huge overhang of the seat forward, stability is disrupted; sitting on the edge of a chair, it’s easy to find yourself on the ground
Fig. 15. Designs of folding chairs for the garden
Fig. 16. Garden chair
DIY simple swing from an old chair
This model of a hanging chair or swing chair is good because it uses that part of the old chair that usually remains from it, namely the seat with a back, because chair legs, as a rule, are the first to deteriorate and break; restoring them is quite problematic
Of course, we sand the old part of the chair, and for aesthetics and durability we cover it with paint or stain. The most “difficult” part of making this swing chair is to make two boards with two holes in each to place our chair on and tie ropes to below. It is important immediately before attaching to center the boards under the chair so that your fifth point is in the center of gravity when sitting on the chair in a suspended state
Preparation of the drawing
On the drawing of the chair, the configuration of each part is indicated and the necessary dimensions for manufacturing are indicated.
Dimensions are determined according to the standards developed by design specialists for seating comfort:
- height and width of the chair in the axes - 70 - 90 mm, no more than 60 cm, respectively;
- seat depth - 54 - 70 cm;
- the seat is placed at a height of 42 - 50 cm;
- The height of the armrest above the plane of the seat is 18 – 24 cm.
These dimensions are adjusted if the garden chair is made for children or teenagers. The width is also made taking into account the build of family members.
Making a frame with your own hands
Before you make a chair with your own hands, you must carefully prepare for this process.
It is recommended to prepare in advance all the necessary starting materials and tools, as well as roughly study the instructions.
First, prepare all the tools and materials. Their list includes:
- wooden boards;
- jigsaw;
- drill;
- self-tapping screws 60 mm.
Every structure has a frame, because without it it cannot exist. Therefore, it is logical to start creating it first. Prepare as many boards as possible.
Sawing the legs and back
First you need to make the appropriate markings on the boards. Using a pencil or other similar means, draw the outline of the future legs of your chair. If you can't do it by hand, you can take a ready-made chair and use it as a template. Place its legs on the boards and trace.
Now you need an electric jigsaw. You can use the usual one, but, of course, this process will not be pleasant. Using a tool, cut out the legs according to the markings from the boards. The two back legs of the chair should be different from the front ones. To save your time and effort, make them long to the full height of the chair so as not to make the backrest elements separately.
The human factor plays an important role here. There is a high chance that you could have made a small mistake when cutting out the legs and they are slightly different. To do this, attach them to each other and remove any irregularities.
The next step is to make the upper part of the chair, namely the back. To do this, take the rear legs and two small bars that will serve as support bars. Install one of them at the seat level, and the other in the structure itself. Assemble the back using long screws and a drill. It is best to screw two self-tapping screws into each connection.
Before screwing in the screws, be sure to prepare the mounting holes. This is done so that when screwing in the screw does not go to the side, and also does not crack the wooden block.
Place all the legs in a vertical position and check that they are level and that your structure is not wobbly. If you have any problems at this stage, use a jigsaw to remove any rough edges.
Seat and armrests
Let's move on to the final stage. Take 3 wooden blocks the same length as the bottom crossbar in the back of the chair. Place them between all the legs to form the seat and primary frame. To strengthen the future product, make four wooden corners and secure them with self-tapping screws in each corner of the structure.
Now install the seat itself. To do this, cut out a suitable piece of plywood and secure it tightly to the surface of the chair using the same self-tapping screws. If you want a softer seat, you can use special textile tapes. They will also be used for the backrest.
For now, it looks more like a chair, because there are no armrests. Everything is simple here: prepare 4 bars, 2 of which should coincide with the length of the lower crossbars connecting the legs. The remaining two bars will connect the armrest to the bottom of the chair.
Now round the armrests and sand them. You can install additional crossbars on the back to achieve a greater level of structural strength.
The frame preparation stage can be considered complete. All that remains is to check all connections for strength.
Preparing for work
Choosing the right wood is important for a quality product, as not all types work well outdoors. Prepare tools for work. The structure is made according to a drawing or diagram, so as not to make mistakes when cutting and assembling.
Material selection
Well-dried wood is suitable for work; its humidity should not exceed 20%. A product made from raw material will dry out, crack, and wobble over time.
Choosing the type of wood for the street:
- Western red cedar, cypress, and redwood are the most suitable - they do not need to be treated with protective agents, but such materials are expensive;
- walnut and teak are more often used - durable types that also have a high price;
- Oak, cherry, birch, acacia, and conifers (pine, larch) are popular for garden furniture among craftsmen ; they are processed to increase durability.
For individual parts, moisture-proof plywood is used, for example, laminated chipboard, fibreboard, OSB and others. There are multilayer materials, but they are more expensive.
Tools
It is easier to work with electric tools, but for small volumes manual labor is used.
Prepare the set:
- jigsaw, drill, screwdriver, grinder with discs for grinding;
- tape measure, pencil, square, level (bubble);
- clamps, pliers, construction knife, hammer;
- brush for glue, impregnation, rags.
An electric jigsaw can be replaced with a wood hacksaw. It’s good if you have a manual router with a set of cutters. Instead of a grinder, take a block of wood on which sandpaper is fixed for manual sanding.
Workplace
a workbench is placed in a barn or garage to carry out work conveniently. Woodworking tools are within walking distance. They place the necessary materials and workpieces so as not to waste time searching, and determine the storage location for the processed parts.
Select the area where the chair will be assembled . Trimmings and shavings are regularly removed here. Organize good lighting and comply with fire safety requirements.
Adviсe
- When choosing materials, do not immediately run to the hardware store. Take a closer look at what you have available. Perhaps you or your friend have had beams and boards lying around for several years that you would hate to throw away. Stumps and snags that interfere with the site can also become a unique item or part of it. Do you remember if you have any hunting trophies lying around on your mezzanines? Antlers, skins and other paraphernalia will fit very harmoniously into the interior of your recreation area.
- Pallets (pallets) can be bought for little money at construction sites, in stores or online. You'll save significant time on cutting and assembly with these versatile designs.
Let's start manufacturing: marking features
To make all the details look neat, you must first round the corners of the legs and supporting elements. To do this, we make markings. We move it away from the end to a distance equal to the width of the slats, and draw a line perpendicular to the slats, after which we divide it in half. Now we have the center of the circle, the radius of which is equal to its width (in our case it is 40 mm). It needs to be drawn, because it is on it that the corners need to be removed from the blanks. Perhaps in words it looks a little sloppy, but by looking at the photo example, you will immediately understand what I am talking about.
This is what the marks on the legs and support bars should look like (40 × 20 × 320 mm)
Here it is worth paying attention to the fact that if on the legs (they are long) such markings are made only on the top, then on the support rails both sides are processed in this way.
The marks I made are not just for uniform rounding of parts. It is in the center of the circle that a hole for the bolt will be drilled, from which a movable hinge will be obtained.
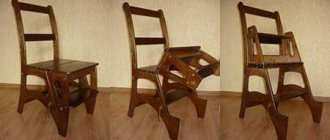
Connecting the support slats to the legs of a folding chair
The first step was to make a hole in the support bar and leg. After that I removed them using a bolt. This was a temporary measure, so I didn't go into detail about the bolts - that can be done later. Due to the fact that I did all the work by trial and error, without yet knowing what the result would be, this was necessary.
The support rail was screwed to the leg
We combine the legs crosswise
Having figured out what to do next, I drilled the second support rail. The second leg was also punctured. Once I was sure I was on the right track, I decided to fully assemble one of the double chair legs with a second support bar that I pulled up with a clamp. I was pleased with the result. There remained the problem of the length between the crossed legs, which would ensure the stability of the chair when open. But this problem was resolved quickly. Crossing the legs of the stool, I placed it on the ground, positioning it so that the distance above and below was the same. It became clear that the required length before joining should be 215 mm. Finally, when the folding chair was assembled, I realized that I was right.
We measure the required 215 mm and make a hole in the center
All that remains is to connect the legs in the drilled places with a bolt. The loop is good. At this point I haven't pressed the bolts flush with the wood yet. Despite the fact that up to this point everything went as it should, you should always be prepared for the fact that all connections will have to be disassembled, which means there is no need to rush with such things.
The legs are fixed with a bolt, which should not fit into the tree yet
Now I could begin a job that I hadn't fully thought about: connecting the two legs to create a piece of furniture.
Decorating wooden furniture
An equally important stage in furniture manufacturing is decor. At the same time, it is not necessary to purchase expensive accessories for such purposes, because you can even use old, unnecessary things, pillows.
You can cover the back and seat with padding polyester, and stretch decorative fabric on top. Fasten the upholstery to a wooden structure using a furniture stapler. In addition, the back is sometimes decorated with buttons, which are covered with the same fabric. You can hide the marks from the staples with decorative edging or various laces.
Example of garden furniture design
At this stage you will have to show your imagination. You can decorate the surface using paint of different colors - this will allow you to get a unique product that suits your interior specifically.
Preparing the circuit
First you need to decide on the type of chairs that will need to be made. It is desirable that they be the same. It's more beautiful, more convenient and simpler. Then it is recommended to draw several sketches from which to choose the best one. Then you can proceed to drawing up drawings.
It is necessary to take into account a number of points related to size and shape. The optimal parameters for the seat are a platform of 40x40 cm. The distance from the ground should be about 40-42 cm. The back is straight, 45 cm high, but can be raised up to 70 cm. In this case, you will have to equip an orthopedic headrest.
It is better to connect individual parts using the tongue-and-groove system, but this is quite difficult, so it is better to use corners.
For a solid base, the support can be made in the form of legs with transverse strapping. For use on the ground, it is better to make a platform, frame or runners. In this case, the contact areas should be covered with sleeves, steel or plastic overlays.
Implementation of unusual ideas
Furniture made on site
To create interesting items for decorating the landscape, you can decorate tables, chairs and benches with beautiful original branches. Such furniture will become a wonderful and appropriate element of the garden exterior and will not leave any of the guests indifferent.
Another option for making a table for a summer house is to use a large cut of the trunk as a support and a horizontal cut of the butt as a cover. The horizontal cut is fixed on a shield made from parts of the trunk. To make the structure reliable, it must be supported with logs, the tops of which have been previously hewn off, and secured to support pillars.
Some tips for beginners
So, before we begin to describe the process of making chairs, we would like to draw your attention to the following nuances:
- if you have never made any furniture yourself, you should start with the simplest designs, and not take on complex projects and drawings that cannot be carried out without appropriate preparation;
- It is better to take pine, linden or birch as a material for wooden products; a more budget-friendly option is plywood or chipboard;
- Coniferous trees emit resin, therefore, in order not to spoil the clothes when using wooden chairs made from pine needles, such material must be deresined before starting production;
- wooden surfaces should be treated before use - first sanded well and then coated with an antiseptic or other protective material;
- The chair legs that will be in contact with the ground must be reinforced with tin material to prevent the wood from rotting.
Recommendations
Here are some useful tips that will make it even easier to make a chair from wood with your own hands. To begin with, let's say that before creating any structure made of wood, you should carefully think about how it will roughly look and what you want to see it as. This will allow you to at least approximately determine how much of a particular material you need.
Another important aspect is that you should not neglect such a thing as drawings. For some reason, many people do not pay enough attention to them, which is why they end up with crooked chairs and armchairs. In this matter, everything should be thought through to the smallest detail and the parameters of each detail should be checked. It would not be superfluous to say that it would be better to use a circular saw for cutting longitudinal parts, and a jigsaw for transverse parts.
Another important issue concerns the connection of the chair elements. Everything is quite simple here. In connections where the main load occurs, it is better to use self-tapping screws or self-tapping screws. But in other cases, you can use adhesive or chopsticks made of wood. Choppers can also be used to secure the upper parts.
An important point will be the selection of materials for processing. But here everything will depend on how high-quality the wood is used. If it is “clean” and has no defects, then it will be enough to treat it with stain and apply varnish. But if there are stains on it and there are some defects, then you should putty them, then cover them with a primer and only then paint. Another important point is that you should not paint the wood right away. It must be pre-treated with drying oil. Otherwise, it will quickly be absorbed into the surface. Then there will be bald spots, which will ruin the appearance of the chair.
Preparing the tools
Before starting work, you should make sure that all the necessary tools and materials are at hand. It would be a shame if, due to the absence of any small part, you have to stop the entire process in order to go to the store to get it.
So, the list of materials will be like this:
- electric saw;
- plane;
- Sander;
- drill;
- screwdriver or screwdriver;
- hammer;
- jigsaw;
- self-tapping screws, bolts and screws;
- metal corners;
- glue;
- wood varnish;
- pencil and tape measure.