How to sew a Pinocchio costume with your own hands? It would seem, why sew yourself when there is such a variety of choices on the market these days? But handicrafts have many positive aspects. This is the ability to choose fabric, individual size. It is not always possible to find suits of good quality and suitable size in the store. Original solutions will allow your child to stand out from all the kids at the celebration. It should be noted that doing something with your own hands is useful and important. Any mother wants to make her child happy on one of his favorite holidays. Undoubtedly, such a gift will be given by her with love, and little “Pinocchio” will accept it with joy. And you don’t have to be a skilled needlewoman. No need to worry. As practice shows, creating such a masterpiece is not difficult. Everyone has a creative side. Therefore, create boldly!
Process description
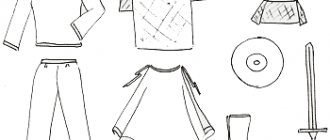
Let's take a step-by-step look at the work ahead. First you need to decide on the choice of material and highlight the main details of the costume. Satin fabric looks very beautiful. But then you will need to put in a little more effort. If you are not very comfortable with sewing, then to make the work easier, choose a simpler material. For example, cotton or fleece. This is something that does not crumble and can be easily dealt with. The costume of our fairy-tale hero consists of a vest, shorts, and a cap. And, of course, a golden key as an additional accessory and an important element of the image.
Cap
Let's start preparing for the holiday by making a cap. It should be striped and with a tassel. You can simplify and use a plain fabric, for example, red.
We will need cardboard, fabric, scissors and bright yarn.
Let's make a pattern. First measure the circumference of your child's head. Draw a cone on cardboard, taking into account all dimensions. It turns out to be a triangle. Let's cut it out.
We apply the pattern to the fabric, trace it with chalk or a dry piece of soap, and cut it out with seam allowances. We connect the edges of the resulting triangle and sew it together.
The base can be folded up, leaving a little space for inserting an elastic band. This will allow the hat to fit tightly on your head. We will make a tassel from the yarn. We will wind a thread on any small object (the more there is, the larger and more magnificent the tassel will be). On the one hand, we tie the resulting bundle, and on the other, we need to cut it with scissors. And then we’ll sew it to the top of the cap.
Making vests and shorts
Let's start making the vest and shorts. Let's take cardboard, fabric, scissors, and an elastic band for the belt. The same material can be used for both the vest and shorts. Of course, it is best to try to find fabric in two contrasting colors. For example, the vest will be brown or red, the shorts will be green or blue.
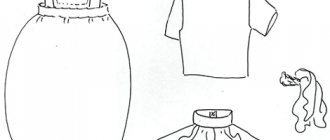
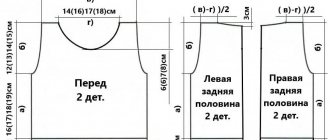
We draw details on cardboard according to the samples proposed below. The sizes can be increased or decreased if necessary. We cut out the patterns.
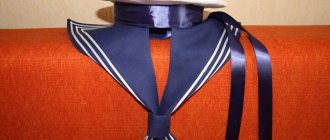
The fairy-tale hero's vest is complemented by a white collar with ties. Measure your child's neck. Draw a circle on the cardboard, then inside it is a smaller circle, equal to the circumference of the child’s neck. We cut the circles along the radius to the center.
We place all the blanks on the fabric, outline them taking into account the allowance and cut them out. Then we connect the back and front, sew the shoulder and side lines. We process the sections of the collar and sew braid for ties to the edges of its smaller part. The vest is ready.
We sew the shorts along all side seams. We turn the edges at the top by 2-2.5 cm. Sew, leaving a small hole. Measure the circumference of the baby's abdomen. We thread an elastic band of the appropriate length into the hole. You can use a cord instead. The bottom edges of the shorts need to be folded 2 cm and stitched.
Useful ideas
It is not necessary to completely sew a Pinocchio carnival costume. You can make only the basic elements - a nose, a cap, pompoms, a key. Shorts can be found in every boy's wardrobe. The same goes for the shirt. The jacket will be replaced by a turtleneck and vest. Not only the nose, but also the cap and collar can be cut out of paper. Striped knee socks will complement the carnival costume. For shoes, Czech shoes are suitable.
The image of Pinocchio will not be complete without a smile. It is recommended to wear a suit only in a good mood. Then everyone around will be infected with the enthusiasm and fun of a familiar character.
Pinocchio doll made of wood, made with a child
Correct priorities play a key role in the life of any person, and they should be raised and cultivated from childhood. In this sense, any creativity around a child, and especially with him, is good and correct.
If you take colored paper
Pen, scissors and glue
You can make a hundred rubles
Interests are instilled and useful skills are developed. For all participants in the process. In addition, any handicraft in our information age is simply a guarantee of mental health and inner harmony, because a person must work not only with his head, but also with his hands. Ideally, to approximately the same extent. Well, doing something together with a child is very useful and pleasant, this includes spending time together and teaching and upbringing.
How did this happen
The story of the doll itself is as follows: the village school where the daughter studies was invited to participate in the city competition for the best doll. Those who wished were invited to make one with their own hands. The choice of type, material and image is at the discretion of the participant. The competition itself in the city turned out to be very chaotic, poorly organized and superficial. Many dolls were judged based on a photo taken hastily at school. We believe that our Pinocchio is very good, and only the aforementioned unfortunate circumstances prevented us from giving him a proper assessment.
The agony of choice
stroller without brakes,
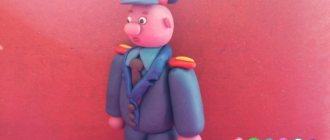
It was decided to make a doll, not quite a miniature one, but about thirty centimeters in height. So that you can put it in your pocket and look impressive. They decided to make the “baby” himself wooden and dress him in real rag clothes. When mentioning a wooden doll, Pinocchio involuntarily came to mind. Everyone liked the option and settled on it.
LiveInternetLiveInternet
—Tags
—Categories
—Quote book
Effective Prayer for Prosperity (Prayers by Joseph Murphy) I want to tell you about one prayer.
Come see beautiful women's suits and dresses (sewing ideas), you won't regret it. Always be beautiful.
Method of knitting edges in scarves and blankets I was taught this method at one time and I learned about it.
-Music
—Links
-News
—Applications
—Search by diary
—Subscription by e-mail
-Friends
— Regular readers
—Communities
-Statistics
Let's get started
At first glance, the work seems impossible and difficult. Too many patterns and materials. But becoming a master of sewing is not at all necessary. Every mother can make a Pinocchio costume. The main thing is not to leave work until the last night before the masquerade. You can sew masquerade clothes quite quickly, but it is better to plan the work over several days.
- Let's start making the first carnival part - a jacket. We make a pattern and transfer it to the fabric. Don't forget to allow 1cm seam allowance.
Tip: If you are not very comfortable with sewing, choose a fabric that is easy to work with. Replace shiny satin for the jacket with fleece. It doesn't crumble and is easy to work with
- We cut out the parts and sew them together. The jacket is almost ready.
- The final detail is a wide white collar.
- Make a pompom from threads and decorate the collar.
Tip: You can sew one or several large buttons onto the jacket, or you can cut them out of paper and glue them.
- We transfer the shorts pattern onto the fabric. First you need to sew the parts on the sides. Then bend the top edge so that you can thread the elastic through.
Tip: If you don’t have an elastic band in the house, the shorts will stay on just as well with a lace.
- The striped cap is very easy to sew. Cut out the triangle and sew it together. Decorate the headdress with a pompom at the end.
- If your child's hair is not naturally curly, you can make an imitation of wood shavings from paper. Cut strips and glue them to the edge of the cap. Do this carefully so that the homemade hair looks like the original.
- We make the nose out of paper and put it on with rubber bands.
- Cut out the key. It shouldn't be small. The size should be such that the child can wear it comfortably.
- Draw the key on cardboard and color it with yellow paints. Don't forget that the key is golden.
Tip: To make the key shine as if it were actually made of gold, wrap the cardboard template in gold foil.
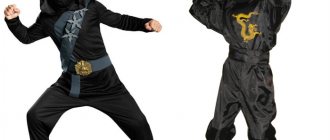
Using the same scheme, you can make an adult carnival costume, for example, for a theatrical performance or masquerade.
Fastening workpieces
The movable connection of parts of a wooden toy provides two types of fastening:
- the wire;
- on hinges.
Connecting toy elements with wire is the easiest way to do it, but it has a big drawback - it is suitable for small toys. If the product is more than 30 cm high, it looks awkward. Some craftsmen use dense metal rings, inserting them into the elements that need to be connected. The ring connection looks neater than the wired one, but the doll's limbs cannot move freely in all directions.
The best option & #8212 is to make a joint, which has been used by master puppeteers for centuries. The components of the loop are a disk with a drilled hole in the center and a fastening axis that connects the disk to the doll part.
Do-it-yourself silver castle accessory for a children's party
What image appears in our imagination when we hear the word castle? I don’t know about you, but memories from a distant, distant childhood come up for me. I immediately remember my grandmother’s huge forged chest, closed with a heavy iron lock. Oh, how I wanted to open it and find out what was so interesting lying there, nothing less than an ancient treasure.
Locks always hide a secret, so this accessory is perfect for any children's party. Kids love solving mysteries and winning rewards, so why not use that passion to create an exciting adventure?
The castle can be made from cardboard, plastic, clay, wood and much more. Let's stick to cardboard. Another important condition of any lock is that it must be easy to open and remove, even by a small child. So, with all these requirements in mind, let's get started.
Sewing shorts for Pinocchio
Shorts can be made of brown, blue, black or green fabric. Shorts made of corduroy or satin will look beautiful. First you need to prepare a paper base and transfer it to the fabric. After that, the shorts need to be sewn along the instep and side seams.
The top of the product is folded 2-3 cm and stitched. A small section of the top should remain unstitched. Then you need to measure the elastic band, which is equal to the circumference of the baby’s abdomen. It must be inserted into the child's shorts. The last stage of working with shorts will be to hem the bottom of the product by 2 cm. That's all. The suit is ready. You can try it on little Pinocchio.
The finished product can be decorated with rain. The baby can take part in this. You can complement the look with bright blush on the cheeks of a fairy-tale character. Don't be afraid to experiment. Believe me, the baby will remember his performance and the carnival costume made for him for the rest of his life. And memories are expensive in our time, or rather, they are priceless.
Originally posted 2018-03-19 09:41:44.
Making a costume for a fairy tale hero
After all the small details of the future image are ready, you can begin to implement the large elements. The suit, as noted earlier, consists of shorts and a T-shirt. Moreover, the T-shirt should be loose-fitting.
To make a T-shirt you need to take:
- Fabrics of different colors (green, blue and red).
- Threads to match the fabric.
- Pattern on paper.
- Scissors.
When making a pattern, any baby's T-shirt is suitable. The pattern itself consists of three parts:
- Backs.
- Sleeves.
- Front.
After all the details are made on paper, they can be transferred to fabric. After which the front of the product, back and sleeves are cut out. In order to assemble a T-shirt, you need to connect the front and back pieces facing inward, stitch the shoulders and sides of the product. Then we stitch in the sleeves and trim the neckline. It is worth remembering that space should be left for the fastener. The penultimate stage of working with a T-shirt is hemming the bottom of the T-shirt itself and its sleeves. You need to sew a large white button on the front of the product. The T-shirt for Pinocchio is ready. You can freshen up your T-shirt with a white drawstring collar made of lace.