- October 24, 2019
- Leisure
- Victoria Samarskaya
Children's carnival costumes are always a big problem for parents. For the New Year or a themed event, you have to look for a special outfit, spend a lot of money on it, so that next time you can come up with a new option, since the previous one either does not fit in size or does not quite meet the request. We suggest making a costume with your own hands, why not?
Costume base
Is your child having his first costume party in his life, and you don’t know what to do? The best option for a boy is a DIY cat costume. You can sew it quickly and without trying on using a ready-made hoodie. Using it and the pants we will cut out the suit itself. And to sew the base we will need:
- Needle, thread, scissors.
- Terry or fur fabric (old robe, towel).
- Chalk, marker or needles for basting.
Our steps: apply a sweatshirt and cut out the front and back. To do this, simply trace a piece of faux fur or a terry robe with a marker (with chalk or pins). Leave 1-2 cm as seam allowance. Fold the fabric in half and draw around the sleeve to make two at once. We cut out the hood. It will consist of two shelves, which we will stitch to each other.
All that remains is to attach the panties, which we will gather at the waist into an elastic band. Let's take a closer look at the kitten.
What will make our baby like him? Of course, ears, paws, tail and face.
Basilio the cat costume for a children's party
The cunning blind cat from the fairy tale about Pinocchio is no less in demand at all kinds of holidays and performances. So why not copy his outfit for you too? To make a cat costume for a boy for the New Year you will need:
- vest;
- striped trousers;
- striped leg warmers;
- round glasses;
- artificial fur;
- old hat;
- cane;
- any vest.
If you remember what Basilio the cat looked like, you can pretty quickly replicate his costume for a child.
To do this, put the boy on a vest and trousers. Next you need to make a vest and tail.
1. Cut small rectangular pieces of fur.
2. Sew them to the vest front and back in a vertical position.
3. From the remnants of fur or fabric, sew a butterfly, on the back of which there will be an elastic band.
4. Use two thin strips of fur to make a cat's tail. Sew it to the waistband of the trousers from the reverse side.
Complete the New Year's cat costume for a boy with round glasses and a cardboard sign hanging on his neck with the inscription "blind."
Mask or face painting?
It all depends on the timing and possibilities. Paints that do not contain harmful substances, since they are created exclusively on a water basis, will not crumble or crack, dry quickly and will not stain clothes. If we need a kitten costume for a matinee, face painting will be the most convenient option. After the event, it is enough to rinse the baby’s face with warm water, and the bright colors will easily come off without causing any allergic reaction. In addition, you can always choose a color to match the suit you made yourself.
What will you need?
- Sponge
- Thin brush.
- Napkins.
- Special paints for face painting.
Apply the base with a sponge. We use white for this. We have to whiten the bridge of the nose, the area above the upper lip and between the eyebrows. Lighten the chin slightly. If we don’t sew the ears, then they need to be drawn above the eyebrows in the form of triangles. Pink paint will do as a base. It should also be applied with a sponge to the cheekbones, chin and tip of the nose.
Next we work with a brush. Having deceived her with black paint, we draw the outline of the ears, nose, mustache, and put black dots above the upper lip. Napkins are needed to touch up the drawing and make adjustments to it. Fantasize.
Makeup for a cat for a costume
- To make the image complete, use face painting to make up your “Kitty”. It’s enough to outline the girl’s eyes, draw a mustache and a black nose – and the charming kitty is ready to go out!
Grim Kitty Aquagrimm
- An adult girl may well dress in the same cat costume - it is important that the selected items look harmonious in such a “cat” ensemble. And if the lady is wearing stockings and gloves equipped with sharp claws, then in this case the cat will turn out not only graceful, but also seductive.
We will also talk about costumes:
- Policeman
- Robot
- Ninja
- Chanterelles
- Indian
Making a mask
If you still need a kitten mask, you can make it from paper. You need to take the color that the animal will be.
What actions need to be taken? Draw the silhouette of a muzzle with ears. Next, you will need to consider the mounting and detailing of the mask. We make holes on the sides through which we thread the lace. This way the product will be attached to the head. To detail the mask, cut out two white triangles for the ears and glue them with glue or double-sided tape. Using the same method, we create the lower part of the muzzle. Cut out a nose from pink paper. If desired, you can make the mustache white.
Now let's move on to the eye holes. First you need to draw them and then cut them out using nail scissors. The result can be seen in our picture just above.
How to make a “cat” headdress
If the image of a child does not suggest a specific hero, but just a cat, then you just need to make a tail and a headdress. For this you will need:
- white and black faux fur;
- black hat;
- pink satin;
- 2 plastic eyes and nose.
1. Cut a triple figure eight from white fur and sew it to the bottom of the hat.
2. Make two triangles from black fur and trim them with pink satin on one side. Slightly bending them, sew them to the top of the hat.
3. Use a glue gun to glue on the eyes and nose. If you haven’t found ready-made parts of the face, you can take them from an old unnecessary toy.
Ears on the hood
If the child is very small, it is not necessary to make a mask or paint a face using face painting. We offer a DIY kitten costume for a boy, where the ears will be attached directly to the hood. Look at the picture at the beginning of the article. Here the muzzle is drawn directly on the top of the headband.
To make the ears, you must use the fur or terry fabric from which the suit itself is made. Having retreated 1-2 cm along the edges, you should sew a piece of another material of a slightly smaller size in front. It may be the same color, but have a shiny texture. Or slightly different shade. In our example, we considered white, a contrasting color, but pink or red can be used. It all depends on how bright the child’s costume is for the matinee.
Mask for a cat costume
- To complement the cat costume, you can purchase a beautiful mask in the department where they sell masquerade costumes and various accessories, or place an order online in an online store.
- But if you are a creative person, then make it yourself - an unusual design will add uniqueness to the image that you create.
From such a drawing you can make a mask. You can make it from cardboard or beautiful lace.
Making the tail
We need a tail if we make a kitten costume for a boy with our own hands. It should not drag on the ground, so it can be done in two ways. Either we will need a wire base on which we will place a tail sewn from faux fur, or we will stuff it with plastic bags to the required density. To do this, you need to cut a strip of the required length, stitch it from the inside out, and then turn it fur side out.
It is best to attach the tail to the belt using double-sided tape, but you can also sew it on if you do not plan to use the pants for other purposes in the future.
How to sew a full skirt?
To create a beautiful, delicate image, you need to sew a fluffy skirt - a tutu. To make a skirt you will need from 2 to 5 meters of fabric, thick elastic, threads, and needles. To make the skirt airy, you need to use tulle, organza or mesh. If the girl is older, more fabric may be needed. The fuller the skirt, the more fabric is used to make it.
The easiest way to create an airy skirt is to cut strips of fabric that are tied to an elastic band. The strips need to be cut twice as long as the length of the skirt, bend each separately in half and tie to an elastic band, pulling one tightly to the other. The more stripes, the fuller the skirt. There is also a special elastic band with holes on which you can attach tulle strips in several rows. Such a skirt will be even more airy and beautiful.
Another option for making a tutu skirt involves using a sewing machine. Rectangles are cut from tulle, which need to be folded into even folds and sewn to an elastic band, or pieces of tulle folded in half can be stitched in a circle, then an elastic band of the required width should be inserted. The top of the elastic band can be decorated with a ribbon.
A do-it-yourself cat costume made for a girl, or rather part of it - a tutu skirt - can not only be used for matinees and carnivals, but also worn as regular everyday clothes.
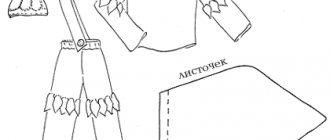
cat paws
How to sew a kitten costume for a boy with your own hands, so that the child feels like a real little fluffy ball? To do this you need to make paws. This can be done using ready-made wool gloves of the desired color and felt or flannel fabric. The picture below shows that for each finger you need to cut out a brown circle. They can be supplemented with claws, but this is not at all necessary.
You should cut round triangles onto your palm. The fabric can be glued or sewn with threads to match the gloves.
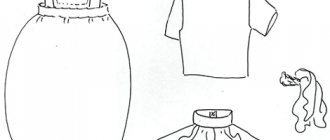
Cloth
By sewing a cat costume for a girl with your own hands, you can additionally use clothes you already have in your wardrobe. For example, a regular knitted sweater with long sleeves or a plain turtleneck will go perfectly with a full skirt. Both girls and boys can tie a butterfly around their neck. You can complement the look with a sleeveless vest of the desired color. Beautiful openwork tights will decorate a cute cat. You can attach pieces of fur to shoes, shoes or boots.
Puss in Boots: ideas
If the boy is more mature, then he will want to see himself as a fairy-tale character at the matinee. The best option is Puss in Boots. We can use a tail, paws, a mask or face painting, but the main components of the costume will be a cloak, boots and a hat. How to make a cat costume? We will need:
- Corrugated paper and cardboard.
- Shiny fabric for a raincoat (blue and red).
- White lace.
- Belt.
- Golden braid.
- Christmas decorations.
The basis of the suit is a white shirt and sweatpants. They should be beaten. Sew stripes on the pants, and choose lace for the shirt instead of the collar and cuffs. If necessary, you can use corrugated paper. It is better to put the cuffs over the shirt and secure them with an elastic band and a button. To make a cloak you need a piece of bright fabric. Comfortable length - up to the knees. It is best to trim the fabric with gold braid and connect it at the top with a hook. If you don’t have a sword, then you can make one from ordinary newspapers, rolling them into a tube. Sew a decorative ribbon on top.
The hat can be trimmed with a ribbon and decorated with a feather. It is also easy to make from cardboard by bending one edge. Boots can be easily made using shoes or an old leather bag. The best decoration for boots is the buckles. The boots can be sewn to the tops of leather from an old bag, and they can be sewn directly to sweatpants or shorts.
LiveInternetLiveInternet
Monday, September 16, 2013 12:05 + in quote book Master Class on sewing a New Year's costume for a boy, consisting of trousers with boots (2-in-1) and a belt (suitable for a midshipman, musketeer, puss in boots, prince costume) . For work you will need: black satin crepe, burgundy satin crepe, black gabardine, glue web, doublerin for thick fabrics, gold bias tape, gold braid 1 cm wide, gold ribbon 10 cm wide, burgundy satin ribbon 5 cm wide, gold bindweed, glue moment crystal, black bias tape, threads in color. 1. We make patterns for buckles: a small one for shoes, a large one for a belt. Dimensions: small – outer rectangle 5cm*6.5cm, inner – 2cm*3.5cm; large - outer rectangle 7cm*9cm, inner rectangle 3cm*5cm, in the middle there is a jumper 1cm wide. 2. For buckles we use a wide brocade ribbon. 3. We glue it with double tape and cut out small buckles - 2 pcs. 4. We burn all the edges of the buckles with matches. 5. Cut out 1 piece of a large buckle. 6. Burn the edges with matches. 7. Using moment crystal glue, we glue the buckle back to back onto the doubled tape. 8. Cut out the buckle with a utility knife and burn the edges with matches. 9. Cut out a belt 11cm*95cm from gabardine. Fold in half and stitch, leaving one narrow part unstitched. Through it we turn the belt onto the face. 10. Sew the waistband into the edge using a sewing stitch. 11. Sew off the edges of the belt with a wide stitch. 12. We pass the unstitched edge of the belt through the yarn. 13. Carefully fold the edge and attach it. 14. This is how you get a belt. 15. Since our buckle is more decorative than functional, we will sew Velcro (Velcro) where the edge of the belt is attached (you need to try it on your child!). 16. Attach Velcro. 17. Our belt is ready. 18. Using wide sports shorts or pants, we make a pattern for trousers. The wider the pants you cut the pattern from, the better! We determine the length of the pants as follows: they should be just below the kneecap. We do not narrow the pants at the bottom!!! We'll collect them later. We cut out four identical parts from burgundy crepe satin. 19. We sew on the side seams. 20. We process the side seams with an overlocker. If you do not have an overlocker, then you need to process the seams with a wide, dense zigzag, as the fabric frays a lot. 21. We make crotch seams. 22. We process step seams using an overlocker or zigzag. 23. We sew the middle seam. 24. Sew the middle seam in one continuous line, placing the crotch seams towards the back of the trousers. 25. We process the top of the pants with an overlock or zigzag stitch. 26. Steam all seams. 27. We attach gold ribbon stripes to the side seams. 28. Be sure to bend the ribbon through the top into the trousers, so that later it can be hidden when stitching the top. 29. We sew the tape to the edge first on one side. 30. Then on the other. 31. We attach a hem under the elastic at the top of the trousers. 32. Sew the hem, leaving a small area to insert the elastic through. 33. Using a pin, insert the elastic into the pants. 34. We will make the boot pattern according to the principle of this pattern. We will need the following dimensions: 1. Shaft width (W). You need to measure your leg under the kneecap (our trousers are up to this length), but not tightly, but loosely. If you are not sure whether you took the measurement freely, then pass the centimeter closed to the ring through your leg; if the leg fits freely, then your measurement is correct; if the instep cannot fit into this ring, then you need to make the boot a little wider. 2. Boot height (VG). From the hem of the trousers (the place where we measured the width) to the floor. 3. Lifting height (VP). From the widest point of the rise we mentally draw a horizontal line and measure from the floor to this horizontal line. 4. Lifting width (ШП). We measure the width of the rise at the highest point, but not with a centimeter tape, but rather with a ruler, since we do not need the girth, but a straight line, which will be the width. You can also measure the width like this: place your foot on a sheet of paper (your foot should be wearing slippers, which we will wear under our suit). And we outline the foot in the place where the highest point of the instep is. This is the width we need. 5. Ankle half-circumference (AM). You need to measure the circumference of your ankle and divide it in half. 35. We cut out the boot from gabardine (2 parts) according to the pattern that was used for the example. We build it like this: from point A we put SHG - point B to the right and VG - point B down, we complete the rectangle. We draw a vertical line through the middle of the rectangle, mark point G at the bottom. From bottom to top vertically we lay off VP - point D. From point G to the right and left we lay off ШП/2 - points E, E1. We divide the GD line approximately in half - point Zh. From point Z to the right and left we lay off PL/2 - points Z and Z1. Smoothly make a notch for the leg. 36. Cut out the toe of the boot from gabardine (2 parts). The pattern is made simply: we outline the notch already made on the boot top. We measure the length of the nose from the top point of rise and set it down. We make the nose semicircular. We cut out without any increments. 37. Cut out the boot lapel (2 parts from gabardine). We make the pattern like this: draw a circle with radius = (SH/2π)/2. Then we add the width of the lapel (desired) to this radius and draw a second circle from the same point. Divide the circle in half and get a pattern. We make increases only on the sides and along the inner diameter. 38. Cut out two lapel pieces from crepe satin. 39. Duplicate the toes of the boots. 40. On one part of the boot (gabardine) we lay out an adhesive web. 41. Place a piece of crepe-satin on top. 42. Iron. 43. We cut off the excess along the bottom if it was formed when gluing the parts. 44. We process the bottom of the boot and the entire part of the nose with black bias tape. 45. Sew off the trim on the nose. 46. We sew off the trim along the bootleg. 47. We baste the bindweed to the boot and finish the bottom with gold bias tape. 48. Attaching bindweed. 49. We sew off the binding. 50. This is the blank for the boot. We process the second boot in the same way. 51. We put the nose of the boot under the boot and bait it. 52. Cut off a piece of elastic for the strip. 53. From one edge we pin one end of the strip between the nose and the boot. 54. We also pin from the other edge. 55. It should look like this. 56. Attach the nose to the boot using the binding (along the unstitched side). 57. We additionally sew the corners where the strips are attached - from the point along the arrows. 58. We measure out a piece of burgundy satin ribbon with which we will decorate the boot. 59. Find its middle. 60. Fold the middle a little. 61. Place the ribbon in its place and attach a buckle on top. 62. We pin the edges of the tape so that they do not move. 63. Attach the buckle along the outer edge. 64. Then on the inside. 65. This is how it turns out. 66. Fasten the side seam of the boot, carefully aligning the edges of the tape. 67. We process the seam using an overlocker or zigzag. 68. We also sew the second boot. 69. Clip off the side seams on the lapels. 70. Carefully combine the bindweed. 71. We process the seam using an overlocker or zigzag. 72. We put the lapel on the boot and bait it. 73. It turns out like this. 74. Gather the bottom edge of the trouser leg so that it is equal in width to the boot. 75. Turn the trouser leg inside out and insert the boots inside (to make it face to face). We attach the boot to the trouser leg. 76. First we machine stitch – 1cm from the edge. 77. Then we process the edge with an overlock or zigzag. 78. We also sew on the second boot. Our costume is ready. Happy New Year! 1.
2. 3. 4. 5.
6.
7.
8.
9. 10. 11. 12. 13. 14.
15. 16. 17. 18.
19. 20. 21.
22.
23.
24.
25. 26. 27. 28. 29. 30. 31. 32.
33.
34. 35. 36.
37.
38.
39. 40.
41.
42.
43. 44.
45. 46. 47. 48. 49. 50.
51. 52. 53. 54. 55. 56. 57. 58. 59. 60.
61. 62.
63. 64.
65.
66.
67.
68.
69.
70. 71.
72.
73.
74. 75. https://masterclassy.ru/shite/kostyumy-svoimi-rukam...emen-master-klass-chast-1.html Costume for a boy. Puss in Boots. Hat and cloak. Master Class. Part 2. Master class on sewing a New Year's costume for a boy, consisting of a hat and a raincoat (suitable for a midshipman or puss in boots costume). For work you will need: black satin crepe (the quantity depends on the length of the raincoat, you need to buy enough to fit the raincoat pattern), crystal glue, glue stick, doublerin for thick fabrics, gold bias tape, white thin boa, black bias tape, threads in color. 1. Make a pattern for the brim of the hat. First you need to measure the circumference of your child's head. Now we make a pattern for the brim of the hat. The head circumference is the value L. Now you need to: calculate the internal diameter using the formula r = L/2π and the external diameter using the formula R = r+12 (this is the width of the margins), cm. The center of both circles coincides. We build a pattern and cut it out of paper. 2. Now we make a pattern for the crown and bottom of the hat. Draw a circle with radius R (such as the outer radius for the brim of the hat). We measure the length L along this circle and draw vertical lines to the center of the circle. Along these verticals we measure 9-10 cm (the height of the crown). Now from the center of the circle we make a circle passing through the marks on the verticals. The result is a crown pattern. We measure the circumference of the top of the crown (L) and draw a circle with radius = L/2π - this is the pattern for the bottom of the hat. 3. Cut out 2 parts of the hat brim from dublerin and glue them onto crepe satin. Then we cut it out with 1 cm increments on the inside, without any increments on the outside. 4. Also with doubler we cut out 2 parts of the crown. Increases along all edges of 1.5 cm. 5. Cut out 2 bottom parts with doublerin, add 1 cm. 6. Using a glue stick, connect both parts of the hat brim. This is done so that during further sewing the fields do not move out, but lie tightly to each other. We glue the parts only in the middle and closer to the outer edge. 7. Trim off the excess around the edges of the hat. 8. We also glue the parts of the crown and bottom. We glue the parts together in the middle. 9. On the crown of the hat we cut increases along the inner and outer radius. 10. On one part along the bottom edge, wrap all the additions inward and bait. 11. We do the same for the second part of the crown, making sure that the diameters of the parts are the same. 12. In the same way, we add increments along the upper edge. 13. We cut the increases at the bottom of the hat. 14. Draw a circle with chalk (following the bottom pattern). 15. Between the two parts of the crown along its upper edge we sew the bottom, focusing on the circle drawn with chalk. 16. This is what we get. Now we sew the bottom to the crown with a back seam using the needle. Fasten the thread from the wrong side and pull the thread to the right side. Make two stitches with a forward stitch and pull the thread to the right side. Now pierce the needle back to the end of the first stitch and, going along the wrong side at a distance twice the distance of the top stitch, bring the needle to the front side and pull out the thread. Make the next puncture with the needle again in the opposite direction to the place where the last stitch ends. On the wrong side, skip double the top stitch distance again. The top stitches should be the same in length - 0.5-0.7 cm. 17. So we sew until the parts of the crown are joined. We join the crown in this way: two parts together on the left side are inserted between two parts on the right side. 18. We wrap the increase on the right side of the crown inward. 19. Sew with a hidden seam. 20. We just wrap the increase inside and bait it. 21. Mark the inner radius on the brim of the hat with chalk. 22. We cut increases. 23. We insert the brim of the hat between the two parts of the crown. 24. We bait, focusing on the circle drawn in chalk. 25. We sew the place where the fields join with the crown using a typewriter. 26. Sew the baited increase inside the crown using a hidden seam. 27. We decorate our hat with golden bias tape. 28. Glue it to the instant crystal glue. 29. Finish the edge of the hat with gold bias tape. 30. Now we decorate the edge with a thin white boa. 31. Glue it with instant crystal glue along the entire edge of the hat brim. 32. We wrap one edge of the hat to the crown and sew it with hidden stitches inside the collar. 33. This is what happens. You can attach a handmade decoration to the hat. 34. Making a pattern for a raincoat. To create a pattern, you need to take two measurements: 1. neck girth, since our cloak will not be completely cut like the sun, then add 5-7 cm to the girth and 2. the length of the cloak. Then we proceed to constructing the pattern of the sun cloak. We calculate the radius: R= neck circumference/2π. Draw a circle on a piece of paper. We add the length of the cloak to the radius obtained earlier and draw the lower circle from the same center. Cut out both circles. Mark a sector equal to one quarter of the circle and cut it out. We cut out a cloak from black crepe satin. 35. Finish the bottom edge of the cloak with gold bias tape. 36. The corners of the cloak can be slightly rounded to make it easier to process. 37. Attach the binding. 38. We begin to bait the black trim. We fold it in half and sew 30-40 centimeters - this will be the tie of the raincoat. 39. Then we trim the neck of the cloak with trim, and at the end we make the same tie as at the beginning. 40. Attach the binding. 41. Tighten the ends of the ties into a knot. 42. We iron the product and get a raincoat like this. 1.
2. 3.
4. 5. 6. 7.
8. 9. 10. 11. 12. 13. 14. 15. 16. 17. 18. 19.
20. 21.
22.
23. 24. 25.
26. 27.
28. 29.
30. 31. 32. 33.
34. 35. 36. 37.
38. 39. 40. 41. 42. 43. 44.
45. 46. 47. 48.
49. https://masterclassy.ru/shite/kostyumy-svoimi-rukami/634-mk-po-poshivu-novogodnego-kostyuma-dlya-malchika-sostoyaschego-iz-shlyapy-i-plascha-podoydet-dlya-kostyuma- gardemarina-ili-kota-v-sapogah.html
| Categories: | ~ NEW YEAR'S COSTUMES ~/Master classes on New Year's costumes |
Tags:
New Year's costume New Year's dress costume patterns master class
Cited 10 times Liked by: 1 user
Like share
0
Like
- 1
I liked the post - Quoted
- 0
Saved
- Add to quote book
- 0
Save to links
Liked1
0
DIY kitten costume for a boy: other characters
Gone are the days when children watched cartoons about the cat Leopold and Matroskin. Today they are interested in other characters. Children's carnival costumes of characters from the series “Three Cats”: Compote, Caramel and Korzhik are in demand. For a boy, you should choose old green outfits. Perhaps he has already grown out of them, but capris on Kompot will look even more interesting. Its main distinguishing feature is the green cap with a pompom. For Korzhik, the basis should be a vest and blue trousers. Light jeans will do. The headdress is a capless cap with two satin ribbons at the back.
Another character that children love very much is Supercat. As a base, you should take a black turtleneck and tight-fitting trousers. Instead of an amulet, you can use a 3-4 cm ball, which can be easily made from foil. In addition to the black mask, you will also need ears made of black felt, which need to be sewn and stuffed with padding poly, placed on a wire.
Catboy from PJ Masks is a real kids' favorite. The basis of his suit should be a blue turtleneck and pants of the same color. Using acrylic paints, paint a mask in the chest area. You can also do it in the form of a white applique. On your head you should choose a blue knitted cap, on which you need to sew ears. The headdress must cover the nose and eyes. You need to make slits for the eyes in it, and paint the eyebrows on top with white paint. Then our character will truly look like Catboy.
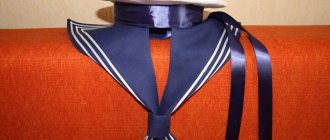
Cat Matroskin from the cartoon “Three from Prostokvashino”
The smart and thrifty cat Matroskin also deserves to participate in the children's party.
For his costume you need:
- vest;
- cotton hat;
- black thin boa;
- red scarf;
- gray felt.
This costume is made very quickly and does not require any special expenses.
1. Trim the sleeves, collar and bottom of the vest with a black fluffy boa.
2. Cut out ears from gray felt and glue pink triangles inside. They can also be topped with a thin fluffy boa.
3. Sew the ears to the hat.
4. Draw a mustache and nose with a black pencil and tie a red scarf around your neck. The image of Matroskin is completed.