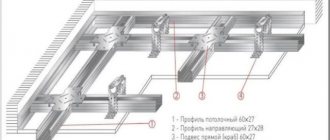
When carrying out drywall work, many home craftsmen have a question about how to install profiles for drywall in the corner.
Although this stage in itself is not difficult, taking into account the existing interest and some nuances that have to be taken into account, we decided to prepare detailed material on setting up a metal profile structure, fastening sheets in the corner, adding here several techniques for finishing external and internal corners.
Any design is easy to install.
The entire manual includes the following sections:
- Installation of load-bearing and drywall in internal corners;
- Installation of profiles and plasterboard sheets in external joints;
- Non-standard angles and working with them;
- Finishing work, the final stage of assembly.
DIY rope square
- Georgy Menshikov January 15, 2018
- Useful tips
A homemade rope square is simple and accurate!
A square is always needed. It is difficult to imagine the modern world without the simplest measuring tool, a square. Wherever something needs to be placed or strengthened perpendicular to each other, a square is required. It is necessary, for example, to set the wall at right angles to the floor. A small square cannot do this. The longer the mating parts, the larger the square must be to ensure the required orientation accuracy.
Large angles are available, but they are expensive. Square size 1050x500 mm. sell for 9800 rubles! Probably some kind of shed costs less. But in small-scale construction, even such a square does not solve the problem. There you already need squares with a side of several meters. What to do?
Solving the problem is easy if you know the “magic” numbers 3,4 and 5!
Our square will be foldable and can fit in your pocket.
Flexible stool
Another couple of days passed with shavings and sawdust as my faithful companions.
That's what I decided to do this time.
I didn’t take much pictures of the process, if anyone is interested, please ask.
I first adjusted the dimensions of the stool and the length of the seat parts in Corel, and after a trial assembly I slightly changed the width of the legs so that the seat could be folded out better.
Material: ash. Assembled with M6 studs, washers and bushing nuts. Legs on 8mm tie.
So, the manufacturing process:
- We drive two nails into a long board at a distance L = 5 meters from each other. This distance must be done accurately. It is better to mark with a metal tape measure.
- We put two rings on the nails, for example from keys, and tighten the rings tightly with strong twine or rope. The rope or twine must be securely fastened to the rings.
- We drive two nails into the board at a distance of L = 4 meters and repeat the operation according to point 2.
- We repeat the same thing for L=3. All. The square is ready.
Let's check the perpendicularity of the vertical beam to the horizontal platform. Using nails, we fix one of the cables, for example a three-meter one, on a vertical beam at points 1 and 2. We put rings of five and four-meter cables on the same nails, bring the free ends together and tension the structure. If point 3 coincides with the horizontal platform, everything is in order. Angle 90 degrees.
Of course, you can make a square not from three separate cables, but from one, made in a triangle. Then you only need three rings, correctly positioned on the rope.
A similar option for checking the frame is shown in the photo. Here’s another option for checking the same frame, if you don’t have a square, but have a metal meter.
Measure two legs of 60 and 80 centimeters from the corner of the frame, attach a ruler to the marks. If the legs are measured accurately and the ruler meter matches the marks, then the frame is made correctly. The angle is right.
And finally, we will correctly install the fence on the plot.
Stretch one of the legs of our square along the fence and secure it with pegs. Stretch our square and drive in the third peg. You've got a right angle. You can put up a fence.
All these tricks with a rope square are based on the school formula: “the square of the hypotenuse is equal to the sum of the squares of the legs.”
The integers three four and five that satisfy this condition are easy to remember. These numbers can be changed multiple times.
You can, for example, make segments 1.5 2 2.5 meters long, or 0.6 0.8 1 meter and even 0.3 0.4 0.5 meters. You just need to take into account that the smaller the size of the segments, the more accurately you need to determine their length.
The calculation shows that under the most unfavorable circumstances, when the error in the length of all cables is 1 cm, then for a square with lengths of 100 80 and 60 centimeters, the angle will not be 90 degrees, but 93 degrees. For lengths of 3 4 and 5 meters only 90.059 degrees.
The rope triangle, despite its primitive simplicity, gives very good accuracy results.
Author of the article “Do-it-yourself rope square” Georgy Menshikov
Baby chair
A long time ago I had the idea of making children's furniture for small children. And last year a table and a couple of chairs were made. But even then, based on the results of the work, the idea of making it collapsible stuck in my head. In general, having seen enough of different options on the Internet, I recently tried it and this is what happened.
I don’t know if it was possible to come up with something new in the design, decide for yourself. I had to tinker with the fasteners, because... I couldn’t find any furniture screws nearby, so I ended up making some kind of screws from an M6 hairpin and a sleeve nut.
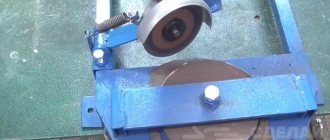
Round corner welding process
A rounded corner is formed by special bending of one pipe, and not by welding two like a standard straight one. To do this, you need to draw a transverse line on it using a square.
Then, on the side of the future internal corner from this line, a point is marked at a distance of the width of the pipe. In this case, it is 5 cm, so the mark is placed with an indentation of 5 cm. Now you need to move the compass apart by 5 cm, and connect the point and the edge of the line, drawing a quarter circle.
Next, you need to mark a second one behind this point, at a distance from the line equal to the distance of the drawn circle. You can simply take a grinder disc with the same rounding, attach it to the drawn arc, and put marks along its edges. Then it is installed at one point at the beginning of the line, and rolled along the pipe. The mark we need is placed at the point where the second point touches it.
This distance can also be calculated mathematically using the circumference formula “P=2πr”. Where r is the radius of the circle, which in our case is always equal to the width of the pipe. The distance that needs to be retreated from the line will be equal to a quarter of the circle calculated by the formula.
At the last mark on the pipe, another transverse line is drawn under the square. Now you need to shade part of the pipe, as in the picture. Do the same on the other side of the pipe. You will also need to shade the short rectangle on the side wall.
The marked shaded part of the pipe is cut off.
The edges of the cut need to be sanded.
After this, the pipe is bent.
It will resist, so you can knock it out with a hammer and hold it for tack welding.
Next, the joint is welded with a continuous seam.
How to choose a good construction square?
Of course, a square cannot be the first on the list of necessary measuring tools, but you shouldn’t put off purchasing it for too long either. Let's figure out how not to get confused and choose what you need in a specialized shopping center, and not something from the nearest rack. First of all, it is important to understand the scale of the upcoming work: a medium-sized specimen is quite suitable for interior decoration, but for checking large external structures, you need to choose a more massive model.
When going to the store for a new square, take with you a regular sheet of A4 paper, the thicker the better. Folded neatly in half, it will become an ideal controller for the right angle of the desired tool.
If you are already convinced of the accuracy of the square, then it would be useful to check the quality of the application of the divisions of centimeters and millimeters, whether they will be erased after the first use. In principle, it is enough to apply a measuring scale on a square only on one side - the main working one, but, as many craftsmen admit, sometimes it is convenient for the tool to have two division scales at once: and on the handle too.
The handle is often made of a different material than the main part. A wooden handle initially feels better in the hand. But in the case of plastic or metal options, preference should be given to models with rubber inserts that prevent fingers from slipping . Therefore, you need to try everything yourself and choose the tool that will be comfortable to hold in your hands, then it will be easier to achieve accuracy of work.
How to find a 90 degree angle using a tape measure without additional tools
Today on the construction market, measuring instruments are presented in a wide range from rulers to laser systems. Let's look at ways to find a 90-degree angle using a tape measure without additional equipment other than a calculator and pencil. Let's look at three methods that allow you to solve the problem without introducing errors. Read to the end and you will learn how you can build an angle of 45 or 30 degrees using the same techniques.
Methods for determining a reversal
Previously, a common solution was how to create a 90-degree angle, for example, there was a regular construction corner on the foundation. The main thing is that it has been tested and corresponds to 90 degrees. Today, professionals use laser levels to simplify the process and speed up installation work. The third option is to use a regular measuring tape.
Regular construction tape
Pythagorean theorem
Anyone who attended school is familiar with this proven theorem. It applies only to triangles in which one of the angles is necessarily right. The sides adjacent to it are legs a and b, the connecting segment is the hypotenuse (c). The formula looks like this: a²+b²=c².
The convenience of using this method of finding a right angle during construction is that markings can be applied in any room of any size. The presence of foreign objects is even acceptable here. The main thing is that there is access to the corner and walls, so that the connecting hypotenuse can be freely extended. Additionally, you only need a calculator to quickly make the necessary calculations.
How to make a square with a right angle yourself in 5 minutes?
1. We connect two even wooden slats together, so that one of them is perpendicular to the other.
2. We measure two legs according to the system outlined above.
3. Nail the wooden strip to the first mark.
4. We measure the hypotenuse and fix it on the second leg.
Each of us went to school. There a person receives a huge amount of knowledge that may later be needed in life. Not everyone, of course, can fully appreciate the significance of the knowledge acquired at school, but this is not the point now.
Mathematics. This is a scary word for many.
, which frightened quite a number of schoolchildren at one time. Numbers, formulas and calculations were amenable to only the most inquisitive. And every year this complex subject became more and more difficult.
In high school, geometry appears and everything becomes even more complicated and incomprehensible. Perhaps many at least once in their lives, but in their hearts, cursed a science they did not understand and wondered why it was needed at all, and whether it would be needed in life.
Perhaps it was not possible to apply the knowledge acquired at school in everyday life. It was hardly necessary to calculate logarithms and quadratic equations in broad daylight or prove that two parallel ones would never converge. But where knowledge of geometry and mathematics may certainly be needed is in construction and when carrying out repairs.
This article will focus on calculating the right angle, which is required during the construction of buildings. Accuracy during the construction of buildings must be observed without fail.
, because only accurate calculations can eliminate distortions and instability in the organization of the entire building. Calculating a right angle during construction is not such a difficult process, which will require knowledge and application of some simple rules of mathematics and geometry. This will be discussed in more detail below.
Angles of 30 and 45 degrees
By choosing one of the methods for calculating a 90 degree angle with a tape measure, it will not be difficult to form three options for acute angles. 45 degrees is obtained if it is an isosceles triangle. For 30 degrees you need to extend the hypotenuse, which will be equal to two short legs. Here between them there is then an angle of 60 degrees.
Right triangle with angles of 30 and 60 degrees
The main thing
In the interior, it is often necessary to place right angles under furniture or plumbing equipment.
Using a tape measure, you can check a 90-degree turn in three ways: the sides are equal to 3/4/5 parts, if the connecting segment between meter walls is 141.4 cm, applying the Pythagorean theorem.
Also, a tape measure is enough to form three angles of 30, 45 and 60 degrees.
Additionally, you may only need a calculator and a pencil for marking.
Methods for aligning internal and external corners at 90 degrees
To level vertical foundations, the construction market offers a wide range of materials and tools. Let's look at ways to level a wall corner at 90 degrees with your own hands, what you need to use for this, and whether you can cope with the task with only a tape measure with a marker on hand. Let's get acquainted with the rules and subtleties of the work. After reading the article, both experienced and novice masters will be able to implement their plans.
Which manufacturer to choose
Considering that such devices are used for precise calculations, errors are unacceptable. Therefore, it is very important to understand which brands are conscientious in their production.
Among those tested are:
- Italian company IDF.
- American brand Stanley.
- Chinese concern Matrix.
- Chinese manufacturer Sparta.
- Mexican brand Trooper.
- Russian company CRAFT.
- Chinese Powers Start.
- Russian manufacturer Scrub.
- German manufacturer WolfKraft.
You can see that there are serious manufacturing companies on the market. That's why you have a wide choice of both models and brands.
Where you need a 90 degree angle between walls
Floor or ceiling tiles, pieces of furniture, and a classic bathroom have a strict rectangular geometric shape. Installation of such items is usually carried out close to the walls. In the case of a plumbing room, additional steps must be taken to fill the discrepancies between the edge of the equipment and the vertical surface when the angle is not 90 degrees apart.
Curvilinear gaps along the cabinet or tabletop force you to be careful in use, do not look aesthetically pleasing and attract unnecessary attention. The same applies to tiled layouts. At the same time, it will be impossible to hide the significant narrowing of the masonry even visually.
The way out of the situation involves only three solutions. This is visual camouflage with materials that fill the void, the manufacture of furniture to individual sizes with its overall increase in price, or the alignment of wall corners with wallpaper, tiles, panels, and objects. The last option is considered the most effective, since it is durable, greatly simplifies the choice regarding finishing and furnishings, and you don’t have to adjust or seal anything else.
Creating a Swenson Square
The author of such a useful device did not have time to properly file a patent for his brainchild, and numerous businessmen are actively using this.
The only thing they can't use is the special diamond cut hole, but some very resourceful competitors make a slightly different shaped slot. In the initial version, the Svenson square did not have a comb for special parallel markings and the hole itself. However, the comb is not an option that you cannot do without. It must be said that in almost a hundred years of history the device has not undergone significant changes.
Right Angle Tool
The easiest way to make a 90-degree angle on a wall is to use a ready-made bench square with a minimum short side of 30 cm. Before purchasing this tool, it is important to check its accuracy. To do this, you can use a similar object and insert one into the other along the plane, or use a sheet of paper with a pencil - applying a square on both sides of the line drawn perpendicular to the base should be a complete coincidence. Next, use the same tool to check the internal and external corners of the room.
Another method is relevant in the absence of a special verified square. Here builders use the rule of the so-called “Egyptian” triangle. If the legs of a figure are equal to 3 and 4 conventional units, then the hypotenuse will be 5 similar units. It's easy to remember this approach: 3/4/5. A triangle is drawn on the floor for subsequent installation of vertical beacons, or according to the drawing, a handmade square is made from hard materials at hand: profiles, rules, timber, boards.
The third method is more convenient than others, but it will require a laser level with a function for constructing an angle. Classic inexpensive devices cannot perform this task, since they are limited by the vertical and horizontal levels. At the same time, the search for a budget universal level may come down to deviations from the parameters specified in the passport. The result will one way or another require checking with a simple square.
You can make a right angle when plastering walls not only with a square. There are special spatulas for removing internal or external seams. But craftsmen rarely work with them, since it is almost impossible to obtain strict geometry in this way - the junction of adjacent planes turns out to be round in shape and requires modification.
Make or buy?
Somehow last year, the idea popped into my head that I needed a shelving unit for the hallway at the dacha. Oh, these thoughts don’t allow me to rest properly.