Throughout the long winter, we look forward to pleasant summer days, and with the onset of hot weather, for some reason we begin to dream of coolness. How delightfully a light breeze created by a small homemade fan will help restore strength and relieve fatigue. Plus, making it is incredibly fun, right?
We invite you to familiarize yourself with step-by-step instructions for assembling simple, effective devices from literally waste raw materials. The article presented to your attention describes in detail how to make a fan with your own hands and what a home craftsman will need for this.
At your disposal is a detailed description of the manufacture of options, the effects of which have been tested in practice. You can make such devices yourself without having any experience at all. For a complete understanding of the information, step-by-step photos and video instructions are included.
A simple homemade product from CDs
The simplest fan can be made from CD discs. It can be used, for example, for local impact on a user who spends a long time at the computer.
Let's prepare the raw materials to complete the work:
- CD discs – 2 pcs.;
- low-power motor;
- wine bottle cork;
- cable with USB plug;
- a tube or rectangle made of thick cardboard;
- soldering iron;
- candle or lighter, hot glue;
- pencil, ruler, squared paper.
For our purposes, you can use a motor from an old toy, for example, from a toy car. A toilet paper roll slightly decorated with decorative finishing paper can be used as a cardboard tube.
The main advantage of this model is that almost any do-it-yourselfer will have all the materials needed for its manufacture.
The assembly process of the mini fan is quite simple.
Let's take one of the CDs and use a marker to divide its surface into eight equal sections. The easiest way to do this is to use a sheet of checkered paper.
Draw a cross on it from a horizontal and vertical line. We divide each of the four resulting right angles in half. Using cells, this is not difficult to do.
Using a very simple method using a checkered piece of paper, we can achieve the ideal layout of the disk into eight equal sectors
We place a disk on our drawing so that the intersecting lines are in the very center of its hole. Alternately applying a ruler to the lines diverging from the center, we make markings on the disk. This way the sections will be the same.
To divide the disk into blades, follow the marking lines with a soldering iron from the transparent part to the edge.
You can also use scissors for cutting, but there is a danger that the workpiece will crack during the process. If you don’t have a soldering iron, you need to use a knife preheated on the stove. When working with a soldering iron, deposited plastic is formed along the edges of the cut, which can be easily removed with a knife.
Cutting a disk with a soldering iron is the most effective method in which the workpiece will not crack or deform, and the remnants of the deposited plastic can be easily removed with a knife
We heat the surface of the disk over the flame of a burning candle so that the blades can be slightly expanded. If you don't have a candle, a lighter or a soldering iron will do.
The central part of the disk should be heated, and all blades should be turned in the same direction. A wine cork is placed in the hole of the disc. To fix it better, you need to pre-treat the edges of the hole with hot glue.
The USB cable must be connected to the motor. If we don’t guess the direction of rotation of the propeller, we can swap the reins, that is, change the polarity.
The motor needs to be glued to a cardboard tube, and the tube itself to a second CD, which will act as the base of the stand.
When the plug is installed in the hole, the stand from the second CD and cardboard tube, as well as the connecting device are already assembled, it is very important to correctly fit the propeller onto the motor shaft
Now the propeller needs to be “planted” on the rod of the future fan. We will try to make sure that it is installed strictly in the center. You can secure it in this position using hot glue.
After all work is completed, the fan is ready for use.
Although the construction of this device will not take you much time, the result of the work performed will undoubtedly please you
How to make a similar, but slightly more complex design by including a regulator in the circuit, look at the video posted at the end of this article.
Do you find these homemade instructions complicated? Then you may be interested in information about the types of fans and the rules for choosing them in order to purchase a ready-made device offered by manufacturers of household appliances.
The second option for converting a cooler into a windmill
Well, let's move on to plan “B”. Let's take a regular brush motor from a printer. It easily turns into a generator without any modifications. And thanks to the mechanical commutator, when rotating, it immediately produces direct current. And no straighteners needed
Its starting force is minimal, which is important for a small impeller. However, it should be noted that for effective operation it requires high speeds, and therefore wind speed
Let's see what we can survive from it by conducting a series of tests. We can conclude that in the wind at a speed of up to five meters per second there is nothing to catch at all, but in the range from five to ten meters per second it is quite possible to power a large LED flashlight and in practice use it for emergency lighting of small rooms, corridors, street paths or as a beacon. You can dispense with batteries in a small radio, and if you add a storage device in the form of an ionistor to the circuit, the problem with gusts of wind will be solved and the design will become more practical. If you live in a high-rise building, then it is ideal to place such a wind generator on the balcony and find a use for it. But you will have to forget about charging mobile phones with such a windmill. There just isn't enough power. Getting the voltage up is not a problem; the phone’s circuitry will work for that and will show the charging process, but the current will be no more than 50 mA with a wind of about ten meters per second. And this is meager power. For normal charging you need ten times more. Alas, this is only possible with hurricane winds. By the way, the big advantage of a small windmill is that it is not afraid of strong gusts of wind and therefore does not need protection, and the cheapness and simplicity of the design can awaken the imagination of a much larger number of home-made workers who are able to create miracles with their own hands. The process of making a windmill from a computer cooler is shown in detail in the video.
If you don’t have air conditioning or even a household fan at home, and the summer heat doesn’t allow you to live normally, you can use your wits and use old computer parts. Any craftsman can assemble a fan from a cooler, fortunately, the materials for construction are always at hand, and in every home or office you can fish out something useful from computer trash.
Fan based on a plastic bottle
What our craftsmen don’t do from plastic bottles! The time has come to say that they also make a very good fan. It may not ventilate your entire room, but it will definitely help those who have to work at a computer.
We offer two options for creating such a fan model.
Option #1 - hard plastic model
To complete the work we will need:
- plastic bottle with a capacity of 1.5 liters;
- a motor from an old toy;
- small switch;
- Duracell battery;
- marker;
- scissors;
- candle;
- hammer and nail;
- Styrofoam;
- hot glue gun.
So, we take an ordinary 1.5 liter plastic bottle with a stopper. At the level of the label line, cut off its upper part. This is exactly what we need to make the propeller. We divide the surface of the plastic blank into six parts.
We try to mark it out so that we get equal sectors: the quality of operation of the future device depends on this.
We cut the workpiece along the markings almost to the neck. We bend the blades of the future propeller and cut off every second of them. We are left with a blank with three blades equidistant from each other. The edges of each blade must be rounded. We do this carefully.
To remove those parts of the blades that are closer to the neck of the workpiece, it is better to use a utility knife; do not forget to round the edges of the blades
Now we will need a small candle. Let's light it up. We heat each blade at the base on it to turn it in the direction we need. All blades must be turned in the same direction. Remove the lid from the workpiece and punch a hole in the very center using a nail and hammer.
We place the plug on the rod of a small motor. Such motors can remain from old children's toys. As a rule, getting them is not difficult. Secure the cork with glue.
Now you need to make a base on which the motor will rest. For this purpose, we take, for example, a piece of polystyrene foam. We attach a rectangle to it, which can also be cut out of foam packaging.
Our motor, to which the propeller is attached, will be fixed on the upper surface of this rectangle. To do this, you need to make a recess in the foam that corresponds to the parameters of the motor.
Hot melt adhesive is used to secure the elements of the product. If it is unavailable, other adhesives can be used. It is important that the fastening itself is as reliable as possible.
Polystyrene foam is a convenient material for constructing a fan stand, because it is easy to give it the desired shape, but it is better to make the base of the stand heavier.
A small switch and a power supply, the role of which is played by a rectangular Duracell battery, are attached to a foam stand. We assemble the simplest chain, trying to do everything as carefully as possible.
All we have to do is screw the propeller onto the plug fixed on the motor. Our fan is completely ready for operation.
The foam stand probably weighs too little to give the device the necessary stability. After all, with a sufficient span of blades, it can turn out to be quite powerful. Therefore, it is advisable to make the base of the model heavier.
Option #2 - soft polymer product
Let's prepare in advance everything that we will need during the work:
- two bottles of SevenUp lemonade;
- electric motor 12 V DC;
- seven thick straws for drinks;
- connector for power supply;
- the power supply itself;
- switch;
- scissors and utility knife;
- marker;
- hot glue gun;
- Super glue;
- plastic ties;
- wire cutters;
- soldering iron;
- insulating tape;
- CD disk.
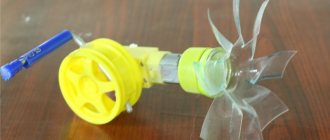
So, there is another option for building a homemade fan from a plastic bottle. Let's take a bottle of smaller capacity, for example, SevenUp lemonade.
The algorithm for cutting the blades of the future propeller is the same as in the previous version. The plastic of this bottle is much softer, so you can give the desired slope to future blades without resorting to heating them.
A hole in the center of the cork should be made using an awl or nail heated over a fire for this purpose. The 12 V DC electric motor, on the shaft of which the propeller will be attached, can be taken from old toys or a hairdryer that is unnecessary in the household.
The cover is fixed to the shaft using hot melt adhesive. We immediately screw the light propeller to the lid.
When talking about this option for constructing a fan, we mentioned seven tubes, but if the tubes you have have a smaller diameter, you will need more of them: you need them to fit tightly into the neck of the lower workpiece
The most interesting thing is the construction of the stand. It turns out to be not only stable, but also attractive. To create it you will need seven thick drinking straws. It is necessary to glue them together with superglue. It turns out to be quite a strong and attractive stand.
For the base, take the top part of a plastic bottle larger than the one from which we made the propeller. We push the stand of tubes into the neck of the workpiece, approximately to the middle of its length. We fix the stand in this position using superglue applied to the neck of the workpiece.
Now you can install the engine on the rack, securing it with hot glue. The fact that the stand itself is made of hollow tubes helps hide the wires nicely. We simply pass them through the central tube. This way the wires end up inside the base of the device.
To further strengthen the structure, you should use plastic ties, which are glued with hot glue to the stand on the sides of the motor so that the tie lock is tightened over the motor itself, ensuring its immobility. The excess tip of the fastener is removed with pliers.
In the plastic surface of the bottle, which serves as the base of the structure, holes are cut for the power supply connector and switch. It is better to do this with a utility knife.
We connect the connector for the power supply and the switch. The wires should be soldered and insulated. The switch and connector are fixed to the plastic with hot glue.
The CD disk, which becomes the bottom for the base of the future fan, is not only the finishing touch of the work, but also makes the product more stable
To make the base heavier and more stable, we will build a bottom for it from a CD.
To do this, lubricate the edges of the plastic blank with hot glue and press the disk against it.
The motor is connected to the power supply via a connector, and the device itself is turned on using the red button located on the left
Now we connect power through the connector. For this purpose, you can use a power supply for LED strips, which is sold in electrical appliance stores. Well, this homemade product is ready to go.
To make sure that you correctly understand the sequence of work performed, watch the video at the end of this article.
Cooler installation
As a rule, CO is a single structure. Indeed, individually, each of its elements is absolutely useless: the radiator will not be able to provide a sufficient heat transfer rate, and a fan designed for a specific cooling system is difficult to use anywhere else.
Installation of the CO on the CPU is carried out using special clips designed for a particular type of socket.
After the CPU and its corresponding CO are installed, the latter must be connected to power. Usually, the power connector for the cooling system is located on the motherboard, but there is a certain unpleasant moment here.
The fact is that there may be several such connectors on an MP. They are absolutely identical (they consist of four contacts and have a key for correct connection), however, we are only interested in the one that is intended for the processor.
How can you determine which power connector you need to connect the processor fan to? It's very simple: it is always signed on the MP backing. It can be called like this: CPU-fan, CPU-cool, etc. The main thing here is the presence of the abbreviation CPU (central processing unit).
Stylish product without blades
We are accustomed to the fact that the main part of the fan is the propeller. This design part rotates, creating the necessary air flow.
But there are also bladeless models. They have become fashionable, primarily due to their safety for younger family members and pets. In addition, these products look stylish: they can fit into any interior and decorate it.
The finished bladeless fan is completely different from the device we are used to seeing, however, it works great
Like most other things that serve a person, a bladeless fan can also be made with your own hands.
The principle of its operation is simple: at the base of the device there is a small turbine, which allows you to create air flows passing through the side openings.
For work we will need:
- computer cooler;
- power supply unit and connector;
- small switch;
- hot glue gun;
- cardboard or thick paper;
- scissors, pencil, ruler, compass and caliper.
In principle, we need a caliper solely in order not to make a mistake in the dimensions of the product. If it is not available, then you can get by with a regular ruler, tape measure or measuring tape.
Let's get to work.
First, let's make the body - the base of the product. To do this, cut out four rectangular pieces of cardboard. To determine the parameters of the base, measure the width of the cooler. The resulting size will match the width of the rectangles.
For convenience, we will operate with specific sizes. The width of our cooler is 120 mm. This means that the width of the rectangle is also 120 mm.
A small switch and power connector will be built into the body of our product. In order for them to stay tight enough in the future, you need to take measurements from them.
The holes in the housing must correspond to the obtained values. You need to make holes until the rectangles become part of the body: cutting them out in flat objects is always easier.
We need a twelve-volt power supply and a corresponding cooler that consumes only 0.25A. Taking into account the fact that we have a 2A unit, we can assume that we are quite well prepared for the further operation of the future device.
Now we take sheets of cardboard from which we have to cut out the elements of the main part of the fan. First, let's draw two circles. The radius of each of them is 15 cm. Cut out both circles.
In one of them, let's call it A, we will draw an inner circle with a radius of 11 cm. In the second, which we will call B, the radius of the inner circle will be 12 cm. Carefully cut out the inner circles. We received rings A and B.
The resulting rings will be attached to the body of the product. In order for them to better adhere to the surface of the body, we will apply one of the rectangular blanks to each of the rings and cut off a segment, the flat side of which corresponds to the width of the rectangle.
In order to reliably glue the rings to the base on which they will be installed, it is necessary to ensure the maximum contact area: for this purpose, a sector is cut off at the bottom of the product
The main part of a bladeless fan is cylindrical in shape. To make it, we need strips of cardboard with the following parameters: the first - 12x74cm, the second - 12x82cm, the third -15x86cm. During the assembly process it will become clear what to do with each of these three strips.
Before assembling the body, cut a notch in the bottom of each rectangle. This way we not only make legs for the future fan, but also create channels for incoming air.
The recesses in the lower part of the base can be made in a rectangular shape, but it is better to add an arc to the original rectangle, drawing it using a CD disk
We will assemble the body using hot melt glue. The cooler should be located approximately in the central part of the case, surrounded by four rectangles that form the walls of the structure. Lubricate the cooler around the perimeter with glue and surround it with walls.
Don't forget that the notches in the walls that we just cut should be at the bottom of the case.
The wires from the cooler can be tucked into a corner of the structure, securing them in this position with glue.
At this stage it is best to mount and connect. Since we are using a switch, we need to split one of the wires and form a circuit.
The wires should be connected to the power connector (red - positive, black - negative). If we get the polarity wrong, we just need to swap the wires. Using hot glue, we secure the connector and switch in the places intended for them.
We connect the power and check if the turbine is working. If everything is in order, we continue assembling our bladeless model.
We take ring A, which will be located in the front of the device, and the first strip (12x74cm). We close the strip into a circle and glue it into the inner circumference of ring A. The result is something like a cylinder hat without a top, but with a brim. The same must be done with ring B and the second strip (12x82cm).
This kind of hat came out of ring A and the first strip that we glued along the inner circumference of the ring
We glue the first “cylinder” to the front side of the body in the place where we cut off the segment. We also glue the second “cylinder” to the back side of the body with a cut surface. In this case, the smaller “cylinder” ends up inside the larger one.
The stability of the structure can be imparted using five strength partitions, fixed between the rings using the same glue. They need to be cut out of cardboard. The length of the partitions should be slightly less than 12cm.
Now the side surface of the main structure should be covered with the remaining third strip of cardboard (15x86cm).
This photo shows the internal structure of the fan quite clearly, which will be hidden from us by the last (third) strip
In principle, the fan is ready. All that remains is to give it an external gloss. To do this, remove excess glue and cover its outer surfaces with paint or decorative paper.
You may also find the information on fan speed controls contained in our other article useful.
So that you can see how correctly you understood and did everything, watch the video on how to create a bladeless fan yourself, which we placed at the end of this article.
If you are interested in assembling interesting and useful devices, then you may be interested in the information about making an air conditioner at home, discussed in our other article.
And in the cold season, you can assemble a heater or a homemade fan heater using a minimum of materials.
As a result…
DIY ventilation systems for the workshop are ready. Ventilation is a must in every professional workshop; it removes harmful fumes, poisonous gases, as well as dust and dirt that have settled in the air. Additionally, ventilation creates an air flow and displaces exhaust air from the room with new air from the street. I talked about three ways to create a homemade ventilation system for various purposes. What type to make for your needs is up to you to decide.
Question
Write in the comments why do you think dispersed dust is so dangerous for humans?
Manufacturing.
We cut out the connector on the USB cable that we don’t need.
2.
Carefully remove approximately 3 cm of outer insulation from the cord so as not to damage the wires located inside. Usually, with a fairly sharp knife, apply slight pressure, around the wire and then pull out the cut part.
Under the insulation there are usually just 4 wires
In my case, the wire is shielded and in addition to 4 wires there is also foil and the screen itself, but this is not important
We cut off everything unnecessary, leaving only the red and black wires
And carefully strip the remaining wires by approximately 1 - 1.5 cm.
5.
We cut off the connector from the fan.
In my case, the fan is without a sensor, so there are only 2 wires, but if the fan is with a speed sensor, then there may be 3 wires (a yellow one is added) or 4 wires if the fan is controlled, as a rule these are processor fans
It doesn’t matter how many wires you have, but if there are more than 2 of them, then just like with the USB cord, we leave only red and black (if there is no red, then yellow and black.), we bite off the rest a couple of centimeters at a time
), we bite off the rest a couple of centimeters.
And carefully strip the wires from the fan in the same way as on the USB cable, by 1 - 1.5 cm.
Twist the black and red wires together. DON'T BE CONFUSED! BLACK SEPARATELY! RED SEPARATELY!
electrical safety
The exhaust device belongs to the category of electrical devices that pose a risk of electric shock. As a result of the settling of fat and moisture in the mechanism, a breakdown of electricity from the fan motor to the metal frame is possible. In addition, the room itself is also dangerous due to elevated ambient temperatures and high humidity.
Let's figure out how to properly make a hood, fulfilling all electrical safety requirements.
Important: the product is connected to the network with 3 wires: phase-0-ground. Before installation, perform reliable grounding. To do this, connect to a dead neutral. Do not ground the hood to a drain or gas pipe.
The protective grounding process is performed as follows:
- Open the introductory panel in the house or entrance. This requires caution and attention, because the voltage is 220 V.
- The wires come out of a pipe built into the wall.
- Locate the threaded pin with the ground connections connected to it. This is a solid neutral, which is already grounded in a special place. Do not disconnect other ground connections - this is life-threatening.
- Throw the terminal up and tighten with the nut.
- Connect a 2.5 mm² wire to the device installation location.
- Connect the hood to the electrical network through a 6.3 A circuit breaker.
Wiring for equipment is laid depending on the design of the kitchen. If the connection is made automatically, it is mounted behind the wall cladding, in a PVC box, under the baseboard, and when plugged into a socket, behind the furniture.
If there are problems with conducting electricity to the hood, it is better to use the services of an electrician.
We perform power calculations
For a competent approach to the question of how to make a hood in the kitchen yourself, you need to pay special attention to performance calculations.
The power of the equipment shows the volume of air flow that the mechanism passes in 1 hour of operation. It is calculated using the following formula:
[SхHхK1хK2]/t, where
- S – kitchen area, m²;
- H – ceiling height, m;
- K1 – minimum reserve coefficient, K1=1.3;
- K2 – air exchange coefficient for the kitchen, K2=12;
- t – time at which air exchange occurs, t=1 hour.
Power is measured in m³/hour.
Cleaning and care
Due to the rapid contamination of the mechanism, the equipment must be cleaned of fumes once every 2 months, otherwise a fire may occur. This process involves cleaning the kitchen hood filter and treating the external surface of the equipment with cleaning agents or soap solutions.
Grease filters are changed once every 3 months. Carbon elements are disposable, so they are completely replaced once every 4 months.
Despite the fact that the hood does not have a complex device, sometimes problems arise with its performance. In these cases, it will be necessary to make minor repairs to kitchen appliances.
What you will need
1.
The main thing we need is the fan itself. Any fan for a system unit or processor will do, the main thing is that it has a stable design and can be placed on something. As an example, I took a 12 cm fan, without a sensor, for a system unit.
If you have a choice, it is best to take fans with the highest possible rotation speed, since the power supply for such fans requires 12 V, while the USB port only has 5 V power and, accordingly, the rotation speed will be slower. Rotation speed is measured in revolutions per minute (RPM) and can usually be found on the fan packaging or from the retailer, sometimes it is indicated on the fan itself. In my case, a fan with a rotation speed of 1200 RPM, when connected to USB it will be somewhere around 500-550 RPM, which is extremely low and only enough to create a small draft :). It is advisable to take fans with 2500 - 5000 RPM (some can operate up to 8000 RPM).
2.
Next, of course, you will need a USB cable
Any cord with a standard USB plug on one side will do, and it doesn’t matter which connector on the other, we’ll cut it off anyway
This could be a cord from an old printer, mobile phone, mouse or keyboard, in general, from anything. The length of the cord should not exceed 2m.
3.
We will need any insulating tape.
Well, or as a last resort, the great and irreplaceable one is adhesive tape, but I highly do not recommend it.
4.
Side cutters are also needed.
Well, or if there are none, then use something to cut off the wire and strip it of insulation. You can use, for example, scissors to cut the wire, and remove the insulation with any knife.
Kitchen hood functions
Every hour in the rooms used for food preparation, a 10-fold exchange of air must occur, for which the following must be done:
- The room must be cleaned of harmful impurities formed as a result of heat treatment of products.
- The surface of the stove is thoroughly treated with detergents.
- The owner of the apartment must install a hood in the kitchen.
The kitchen structure performs the following functions:
- protection of ceilings, walls and furniture from soot and greasy dust;
- air purification and filtration;
- trapping smoke and odors resulting from combustion;
- removal of fumes emanating from the stove;
- preventing the spread of harmful carcinogens into adjacent rooms.
Such equipment in the kitchen is often a design element. The frames are made of wood, glass, plasterboard sheets or plywood in different shapes and with decoration, which directly affects the design of the kitchen hood.
Why do you need a manicure vacuum cleaner?
Nail extensions allow women to make their hands well-groomed and attractive. However, when filing gel or acrylic nails, a large amount of dust is generated, which contains many harmful components.
When filing extended nails, a lot of harmful dust is generated
Prolonged inhalation of fine particles leads to their settling on the mucous membrane of the respiratory tract, which can give rise to the development of certain diseases:
To prevent such unpleasant consequences, manicurists use special vacuum cleaners when removing gel nails.
Video: manicurist on the benefits of a manicure vacuum cleaner
Review of the most popular models
Novice manicurists most often receive clients at home, and therefore wonder which brand of desktop vacuum cleaner is best to choose.
The most popular models of mobile hoods are provided by the following manufacturers:
- Ultratech - vacuum cleaners from this company are distinguished by their virtual absence of noise and a long warranty period (24 months). The device meets all necessary requirements.
- Salon Professional - devices are produced by an American company and are characterized by a powerful built-in fan, which allows you to instantly clean the air of contaminants.
- Lady Victory - the manufacturer made sure that Lady Victory devices were as comfortable as possible for the client, so their body is covered with soft material. The company offers many colors of leatherette to choose from.
- Planet Nails - vacuum cleaners of this brand combine good quality and low cost. In addition, Planet Nails models are distinguished by their compactness.
- Simei - instrument bodies are made of high-quality plastic and equipped with a soft rubberized lining for the client’s hands. A big advantage of the device is that it has a built-in convenient LED lamp that provides good lighting. The suction power of the vacuum cleaner reaches a distance of 10 cm.
Photo gallery: popular models of manicure vacuum cleaners
Homemade gas heater
The main advantage of this model is that its production requires a minimum of parts, which can always be found in the household of any craftsman.
Preparation of materials and components
To make a gas heater for the garage, you need to prepare in advance:
- burner with valve;
- tin sheet;
- metal scissors;
- drill with a thin drill bit;
- rivets;
- riveter.
To make the grille, you will need a piece of fine-mesh metal mesh. It’s great if you have a regular wire colander sieve on hand, it will act as a protective grid.
Collet cylinders are convenient because when using them, you don’t have to use up all the contents at once. The presence of shut-off valves allows the devices to be used repeatedly.
If desired, the heating structure can be made using not only disposable cans used for refilling lighters, but also using a small refilled cylinder.
Cutting blanks and assembling the structure
When making the structure, the first thing to do is fix the heater to the burner.
Four rectangular ears are added in the direction of the four sides of the workpiece applied to the galvanized sheet. One of the ears should be made twice as long as the others. The blanks are cut along the intended contour, trying to make smooth, burr-free cuts.
The burner is screwed to the cut-out tin blank using bolts. The ears located on four sides of the workpiece are bent in the opposite direction and used to fix the strainer.
To attach the second protective mesh, take another piece of sheet metal and cut out a circle of exactly the same size from it. Elongated ears are added to the workpiece, necessary for attaching the mesh.
Stepping back half a centimeter from the edge of the circle, drill 10 through holes along the circumference. A strip is cut from a piece of fine-mesh metal mesh, the length of which corresponds to the diameter of the cut tin blank.
The bent ears of round tin blanks are fixed to opposite sides of the mesh strip using a riveter and rivets. When assembled, you should get a cylinder with mesh walls and tin ends.
At the final stage, all that remains is to turn on the gas water heater and check its performance. The heat produced by this small device is enough to heat a small room or garage.