Top businesses
Wood is a material that has always been able to inspire people who know how to work with their hands, and continues to do so. In this collection we have collected directions for business in wood products.
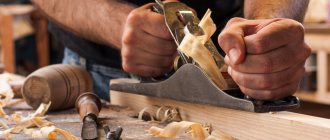
Business in the production of wooden products can hardly be called simple. To succeed in it today, even in the format of a small carpentry workshop, you need a combination of several factors at once - high skill, productivity, the ability to beautifully sell your creations and the desire to spend on everything, in addition to money, another valuable resource - time. In the conditions of competition with the bottomless market of China and the development of hypermarkets, specialization and your own unique niche products in which you want to grow and develop are simply necessary to survive. In this collection we will offer several such directions. You can start trying your hand at many of them almost immediately, without the availability of professional tools and space.
Production of wooden bread bins
With the help of imagination and a little effort, such a thing as a bread box can turn from a household item into a highlight of the kitchen. You can master the entire production process from the creation of a workpiece to final processing, or start small. For example, if you live in a large city, you can purchase ready-made blanks in the form of unprocessed boxes. They are usually sold in stores like Leonardo and Leroy Merlin. Having bought handles and a lid there, you can concentrate on perfecting the decor without doing carpentry work for now.
But, naturally, you can reduce the cost of a bread box only by making it yourself. To do this, you will, at a minimum, need a jigsaw, a furniture stapler, wood glue, small nails and screws, canopies and stain. As for the material, plywood or odorless wood is suitable - for bread bins, it is not recommended, for example, to use coniferous wood. Basically, bread bins differ in their doors - they can be hinged, folding or accordion-style, so each of them has its own fittings. To stand out from other bread bins, think about how else it might look. Perhaps it will be a bread chest, the body of a Soviet truck with the inscription “Bread,” or a triangular corner bread box, thanks to which the housewife can save space in the kitchen by pushing it into a corner.
Crafts and toys for children
You can make many different crafts from saw cuts for a school exhibition or kindergarten.
Toys made from this material look original: stylized animal figures, play furniture.
Many ideas for New Year's crafts from saw cuts can be found on the Internet: snowmen, snowflakes, flowers, decorations with a pattern applied to them.
From coniferous wood cuts you can make unusual Christmas trees that will not only decorate the room for the holiday, but also fill the house with the aroma of pine needles.
To make a classic triangular-shaped Christmas tree, you will need a frame of thin slats. Round blanks should be placed inside the frame, the voids should be filled with transparent glue or epoxy resin.
Wooden stands and tables for laptops
A laptop stand can become a sought-after functional product “for yourself and for others.” Since their prices are usually in the range of 1-3 thousand rubles, this product is perfectly positioned as a stylish original gift. Due to the coronavirus, today many people have switched to remote work. And while working on a laptop, they came to the conclusion that they didn’t really want to sit at a regular table all the time.
There are many types of laptop stands. These can be tray stands for working while lying in bed, folding or sliding tables that are used for working from the sofa. The latter, by the way, can be used simply as magazines or for eating. In this direction, much depends on the quality of wood processing and presentation. Such a product should look aesthetically pleasing and look expensive both in photographs and in reality. The problem is that it will be difficult to compete on prices with Chinese goods, so even in this case you will have to somehow surprise the buyer.
Stands
As a simple craft, you can consider different stands for something. The easiest way would be to make stands for hot dishes; for this it is quite possible to use a ready-made saw cut without any additional processing.
Depending on the size of the dish, you need to select the diameter of the workpiece.
To give the product a unique look and style it to match the interior of the room, you can use a wood burning device, a pattern or an ornament as desired.
Manufacturing of garden furniture
Coronavirus and restrictions on movement forced many people to stay within their region and start improving their plots and summer cottages. In this regard, the demand for garden furniture has increased. By engaging in its production, you can produce tables, chairs and garden benches, armchairs and sofas, chaise lounges, deck chairs, swings, gazebos, canopies, pergolas and much more. Wood is one of the most popular materials in such production, which is both environmentally friendly and gives room for imagination. Despite the fact that wooden garden furniture requires constant care and treatment from moisture and pests, it is rightfully considered one of the most comfortable and pleasing to the human eye. And no one forbids combining it with metal and other materials.
At a minimum, for small production you will need a set of surface planer, drilling and milling machines, grinders, a circular saw and a jigsaw. In addition, there will be secondary costs, such as equipment, hand tools, a vacuum cleaner and an aspiration system. As a result, the amount for the minimum set can easily exceed 150 thousand rubles. And taking into account the set of starting materials, the total investment (subject to working on your site on a minimal scale) can be estimated at 250-300 thousand rubles. The main points of business and sales channels for garden furniture are presented in this article.
Family Bunch
Good afternoon. Today we are starting to upload articles on the topic of DIY wood crafts . In this first article I want to show you what simple crafts can be made from wood - both for children and adults. Many ideas are suitable for labor classes at school - for boys. Some ideas are suitable for a school competition of crafts made from natural materials. Some wooden crafts can decorate your dacha or yard . Here you will find a storehouse of inspiration and joy in anticipation of such interesting and simple work. In this article I will prove that everyone can . Because here you will find simple and feasible tasks. Even a frail woman with a manicure can do half of the crafts in this article. So - let's fall in love with wooden creativity.
Let's start with simple magic.
Tree + sun
Crafts that glow with love.
Here are the simplest and cutest country crafts made from wood. For the craft, you need to cut a log (ask when you are sawing the firewood with a grinder to make several thin cuts). Or you can do it without cutting - just take a board of any size.
We drill holes in the wood so thick that a store-bought glass pebble will fit into it. Such sets of multi-colored decorative glass stones are sold - in the gift department, and in the department where there are candles, vases and everything for holiday decor.
You can simply drill such holes with glass into a board and hang it on an apple tree. You can drill such holes in the fence - if the sun shines into it at least once a day at a low angle.
That's very beautiful. Magically. Like in fairyland. Your children will be delighted with this wooden craft.
Simple wooden crafts
from log cuts.
If you have logs being cut into firewood in your yard, you are in luck. You can get priceless craft material for free. Ask the men to cut you flat cuts from both small and large logs. Lovingly stack them away from the woodpile and start dreaming up future wood crafts. For example, let these be wooden owls . It's easy to do and looks beautiful. The saw cuts can be nailed to each other. You can put them on liquid nails (like glue).
The surface of the cuts can be rough and unsanded (as in the photo with the bunnies craft). Or you can sand it with sandpaper and even varnish such an ornamental material. Or paint it the color you want.
From large saw cuts you can make large country wood crafts. And small log houses (made of thinner branches and logs) are suitable for miniature crafts - for example, these birds. You can cut branches of this thickness yourself with a hacksaw - manually, without a chainsaw.
Log cuts can become a canvas for art installations. Such wooden crafts-pictures can be made from any natural material. Go to the river and find smooth, flat stones. They will become a source of interesting crafts. The stones can be easily painted with felt-tip pens, office fat markers or just gouache (after work, fix the gouache with hairspray or nail polish).
Here's another way to make beautiful AIR crafts from wooden cuts. Openwork cut through with an electric jigsaw (photo with a maple leaf craft) looks simply magical.
Here is a small master class from which you can see how the process of cutting out openwork patterns on a thick cut of wood occurs.
First we outline the stencil with a pencil. Then we use a drill to drill holes in the key nodes of the drawing. And then we use a jigsaw to move from one holey node to another.
You can come up with a device yourself that will help you cut wood products using a regular drill. Make your own electric jigsaw. Holding the comfortable handles with your hands, you simply move the device - following the lines of your drawing. The thinner the drill, the finer details of the design you can cut out with it. Well thought out.
Or you can buy a jigsaw - it costs an average of $100. You can find it and over 50, we don’t work on an industrial scale, so it’s not necessary to buy a very powerful, expensive tool.
Mosaic crafts
From cuts of thick branches.
If you have a boring barn wall looking right at you in your country yard. Then you need to make it not boring. Let's decorate the shed using wood crafts. Let's make a mosaic applique from small-sized wood cuts. Such cuts are obtained by cutting thick branches or thin logs with a hacksaw (or chainsaw).
the base for such a wooden craft from a sheet of plywood. First, we draw the silhouette of the future craft on it. We cut out the plywood base with a hand jigsaw or a special power tool. And we glue wooden rounds onto it - with liquid nails, with wood glue or with hot glue from a gun.
And even at home you can make a decorative frame for a mirror from wooden rounds from saw cuts (master class in the photo below).
- Also buy a round mirror. Place it on a sheet of plywood and trace it with a pencil.
- Around the resulting circle, retreat a few centimeters (to the width you want for the frame). And with this indentation draw a second circle.
- Cut a large circle out of plywood. And cover the outer ring with wood cuts. You will get a beautiful wooden craft frame - all you have to do is glue the mirror into the middle using liquid nails.
Puff Crafts
made of wood.
This is perhaps my favorite type of wood crafts. Here the woven shields lie on top of each other creating a LAYER VOLUME of the craft.
Here is a cow craft made from three layers of wooden shield. The first layer is the body, the second is the head, the third is the bangs and nose.
You can paint all layers of your craft one color (like the polar bear made from wood) or different colors (like the mouse on the moon - photo below).
Or you can leave a textured wood pattern (as in the crafts in the photo below).
The wooden fox has a two-layer structure - a back layer, and the head and tail are placed on it.
The duck craft has 5 layers - a central layer with the head, and two layers on both sides (tummy + wing).
The more layers you layer on top of each other, the more voluminous and convex your craft will be. Here in the example with the craft “Lions made of wood” you can see how the animal’s muzzle moves forward thanks to four layers of a thick wooden board.
If you paint your crafts. Complete the facial expressions, add small details - folds, spots, etc. You can get very realistic and expensive wood crafts. Your small hobby can become your business. Such works can be safely put up for sale.
You can come up with your own characters. Draw their layers on a sheet of paper. Enlarge the craft first in a paper template - transfer the contours to a wooden board and cut it out. Or find pictures in a children's coloring book and redraw them in an enlarged size.
Wood craft
For school activities
At the labor lesson.
Such LAYER wood crafts can be cut NOT FROM THICK SHIELDS, but from a thin plywood sheet . And then such work can be carried out in labor classes as part of the school curriculum. On the topic “sawing with a jigsaw on plywood.”
Here's an idea for you - how to make a two-color puppy craft from 3 plywood panels The first very back layer of WHITE PLYWOOD shows only the tips of the ears, tail and one hind leg. We will cover the second layer with stain (so that it darkens). Eyes, nose and lines can be drawn with a marker, or burned with a special device for burning wood.
Using the same technique of shields with different shades of color, you can make a lot of three-dimensional crafts from wood during labor lessons at school or in a woodworking club.
Wood crafts
in the form of an APPLICATION.
Using a very similar technique, you can make an applique from wood. Here, too, a wooden board made of solid wood (that is, not a glued board, but a solid board). Because we will be sanding it, and the glued board may delaminate from sanding and the glue seams will be visible.
- The entire future craft is drawn on paper . Divided into parts by lines. Each detail is numbered. And it is photographed (so that later the location of each element can be verified from the photo).
- Next, the drawing is cut along the lines into elements. We outline each element on the board with a pencil. We cut out an element from a flat board. All elements are flat on top, rough around the edges of the cut and with sharp sawing edges.
- Now our task is to smooth and round all the edges of each detail . We trim off the sharp edges of the cuts with a chisel. And we grind it on a grinding machine (if you have one) or do it manually with sandpaper of varying degrees of hardness and roughness.
- After sanding, all parts are painted with tinted stain (sold in hardware stores). Depending on how many times you wipe the part with stain, you will get a lighter or darker tone. Very light parts can be wiped simply with vegetable oil. You can check the color shades in advance on scraps of wood left after sawing the craft.
You can also paint wooden parts with watercolor or gouache (using a foam sponge rather than a brush). After painting, to prevent the part from getting your hands dirty, you can spray it with hairspray or saturate the craft with another wood coating compound (just check the color first on scraps).
It just seems that the cow (in the photo of the wooden craft above) is behind the moon. In fact, all the parts are in the same plane. On a piece of paper. But thanks to the streamlined edges of the parts, everything looks voluminous, soft and as if pressed into each other. Nothing is actually pressed in - everything just lies next to each other.
Ideas for such flat wood applique crafts can be taken from children's coloring books. There are just pictures with large details. You can find a children's coloring picture on Google - enlarge it and print it. Or redraw directly from the monitor screen by placing a sheet of paper on the glowing screen.
Methods for grinding parts
for wood crafts
(instructions to help).
To make it easier to sand the smooth edges of parts without rubbing calluses on your hands, I want to give some useful tips.
You can clamp the sanding belt in a special vice, also made of wood. Here's how it's done in the left photo below. Or come up with your own version of the device.
Here in the left photo - sandpaper is wrapped around a thick piece of wood with a semicircular edge. And the edges of the sandpaper are wrapped in a groove, and clamped with a bolt twisted through a round cylindrical piece of wood-clamp.
There are also grinding attachments for drills. And then you can grind the parts using the rotational force of the drill and the magical power of electricity.
Below we see grinding attachments for a drill - plate and drum shapes.
There are sanding devices for drills, where you can change the sandpaper yourself - remove the old worn-out sandpaper and fill in a new one.
By the way, on AliExpress you can immediately buy grinding drums for a drill in bulk for 3-4 dollars per batch of 100 pieces. If you search, you can find it cheaper.
And to prevent the drill from spinning in your hand while working, you can create a special FASTENING STRUCTURE that will fix your homemade grinding machine in one place, and all you have to do is bring the parts to the grinding drum.
The design of the mounting pallet can be different - with a wooden clamp (photo above), or with a retainer in the form of a metal bracket (as in the photo below).
With such an assistant, making wood crafts with your own hands is a pleasure. Quick, pleasant and immediately beautiful results. Such work can be put on stream - and a whole production of beautiful wooden (smooth and safe) toys for children and gift wooden paintings can be established.
You can become a successful master. Completely unexpected for myself. Just like that, look at this article and fall in love with the idea.
The imagination of wooden crafts is limitless. Remember the formula for success - everything can be made from wood. The main thing is to start... then continue... and finish.
For example, knocking toys. Beautiful fun for children and for decorating the garden. Such a knocker or woodpecker may knock on your door, announcing guests on the porch. Just like in a fairy tale, pull the string and the door will be opened for you.
You can make decorations for your children's room with your own hands. Essentially, reincarnate and become a designer of interesting interior wood crafts. Any boy will be happy if his children's room sparkles with motifs from the Jungle.
You know... I’ll probably continue the topic of wooden crafts for children’s room design in one of the following articles. I'd like to see what ideas are hidden here. And making someone fall in love with this is a good thing.
And perhaps we should create an article with handmade wooden toys for children. I also need to write. And then the link will work here.
In the meantime, let's continue...
WOOD CRAFTS
and WASTE material.
Where do future crafts live? …. Old half-decayed boards. For example, from grandma's fence. Which are usually used for firewood or removed from the yard as excess garbage. Stop. Let's not throw them away. Let's dig through this pile and create something wonderful - with our own hands from wood.
A wooden mop-brush, if cut in half, turns into the mouth of an evil dog. A little imagination and work. And now the service dog is bristling and grinning at you.
A beautifully crafted piece of art. Wood and waste material.
Any waste material (pieces of iron, plastic) and old pieces of wood can populate your home with fairy-tale characters. They are alive. They have a soul and their own history.
Make a craft with your children. If you have sons, they will be happy to tighten the nuts and screws on a new craft made of wood and iron. This is such happiness for the boys. The entire neighborhood can take part and even share useful trash from their home. Bring all kinds of trash - we'll have a blast.
Wood crafts
Imperishable beauty.
Peeled veneer from old furniture boards quietly becoming damp in your shed can also become a source for wood applique crafts.
From this thin wood material, you can directly cut out the details of a future craft with scissors and stick it with hot glue from a gun (or with wood glue).
You can also use thin birch bark instead of veneer. And also make interesting flat crafts from wood.
Wood crafts
(logs, firewood and bark)
Ordinary firewood from your woodpile can become a source of inspiration for wooden crafts for the dacha.
If you cut a round log diagonally, you get a figurine with its face turned towards you. All that remains is to draw this face, add elements of eyes, ears, and nose to it.
You can use logs and round logs to form the body of an animal. The logs will be the legs and the logs will be the back. The head can be made from a round cut of a small log. Or use an ax to shave off the muzzle to the desired shape from the same log as the body of your four-legged wooden craft.
Show your imagination and don’t stop before a difficult task. A squirrel made of wood or a snail made of logs - there is nothing complicated. We use our brains and a sense of humor - it will tell you the most ridiculous, but effective ways to convey the delicate image of an animal using rough wood and other natural materials.
YOU can work with a chainsaw or an ax - sawing out or beheading the face of your wood craft. You can make these cute pigs with your own hands as a fun wooden craft for your dacha.
And in the bushes you can put a beautiful, proud deer - also a simple and quick craft made from wood and branches.
Wooden crafts
from chips from a log.
It happens that when you chop firewood, large shaped chips break off from the log. This chip often has a bizarre shape - already similar to something (a bird, a panther, the profile of a face). You need to carefully put such a gift of fate aside, so that you can later return to it and complete the craft started by nature. Trim something with a knife, highlight something with paint, glue something as an additional detail. And you will end up with a do-it-yourself wooden craft - beautiful and original.
These are the ideas I managed to find for wood craftsmen.
Now you too can make beautiful crafts from wood with your own hands. Moreover, this article is only the first in a series on the topic of wooden crafts , which are understandable and easy to make at home. You've probably already fallen in love with some ideas and are determined to implement them - I keep my fingers crossed for you - let everything work out in the best possible way. And your wooden craft will appeal to your entire Family Bunch.
Production of unusual backgammon
Backgammon made according to an exclusive project can be an expensive gift both in terms of the final price and cost. Especially when it comes to manual work. But today a milling cutter can reduce costs and labor costs - with the help of a CNC machine, anyone can make backgammon production a cost-effective process if they wish. Classic patterns for backgammon are made in the oriental style, but today you can find backgammon on absolutely any subject.
As for the types of wood, oak and beech are excellent for backgammon; alder is also used. To ensure that your backgammon lasts a long time, when choosing, you should rely on wood with high hardness and density. In addition, you need to take care of giving the product an expensive look by testing various processing options on different wood. You shouldn’t save too much on hinges.
photo from Instagram page @nardishki
Why is this type of processing needed?
The entire human world around us is filled with electronic assistants and artificial materials. Under these conditions, it is not surprising that among city residents it has become popular to use wood in interior design in order to get at least a little closer to nature.
By processing an antique board or timber, the owner receives an exclusive product, because each tree has its own unique relief.
In addition, aging technology significantly increases the strength of raw materials, in contrast to the natural influence of the environment and time.
And by coating the wood with protective solutions and varnishes, its service life is extended; in addition, the paint or varnish prevents insects from entering and prevents the process of wood rotting.
This type of decorative finishing is used for ceiling beams, flooring, and furniture.
However, it is important to understand that not all lumber is suitable for this type of work. The aging technique cannot be used for the following types of wood:
- cherry, pear (other fruit types);
- maple;
- beech;
- teak;
- alder.
Therefore, for antique wood processing, it is better to purchase hardwood, which is perfect for:
- oak;
- nut;
- ash;
- larch;
- pine.
And by performing high-quality tinting of the product, you can get an imitation of an expensive type of wood, using inexpensive pine or ash as a basis.
Important! Old trees require more careful processing because they have many layers with different densities. Therefore, in order to accurately determine the age of the raw material, you need to pay attention to the number of rings on the cut: the more there are, the older the tree.
Wooden rocking chairs for children
Wooden rocking tumblers for babies today make it so that even adults want to turn into a child for a short time. Here, as in many other areas of working with wood, everything is limited by your imagination and ability to bring your idea to life. The rocking chair can be made either on a spring or on an arched base like a rocking chair. As for the forms, it’s worth listening to the children themselves. Some of them will certainly enjoy swinging on tumbler airplanes or tumbler horses. But someone might already prefer to climb on a unicorn or minion. But you shouldn’t forget about your parents, since they are the ones who ultimately make the purchasing decision.
Benefits of working with wood
It is worth mentioning how exactly wood differs from other available materials:
- Wood of various species has a soft, but quite durable structure. The internal base lends itself perfectly to a variety of processing techniques: firing, cutting, sawing.
- For optimal work, no special skills or abilities are required; the master only needs to be able to handle certain sets of tools.
- Wood, even without decorative finishing, gives finished products an excellent natural shade.
- A large collection of ready-made projects and a wide range of products available for work.
Craftsmen today have free access to detailed instructions, video tutorials on how to carry out creative work, diagrams and interesting drawings. You can familiarize yourself with any of them on web resources for practical design, creativity and landscape design.
Production of wooden utensils
Wood is an excellent material for making bowls and plates, trays and containers, cutting boards, rolling pins and rolling pins (we'll talk about the latter in more detail later). Birch, larch, linden, aspen, cedar, juniper, bamboo, and hevea are often used for dishes. Moreover, in dishes made from different breeds, the same dish can acquire a slightly different, unique taste.
As a starting set of tools for making wooden utensils, a lathe, cutters, jigsaw, saw, chisel, plane and sander may be enough. For dishes, the lower part of the trunk, rhizome or burl of a freshly cut tree is best suited. The wood must have a straight-grain structure without shells. Finished products are coated with food varnish or other means that are harmless to the body and do not spoil the quality of food. With the help of social networks like Instagram, various kitchen sets, salad divider plates, gingerbread boards and much more are selling well today.
Wall decoration and methods for attaching wooden slats with your own hands
Fastening is carried out in two main ways:
- Glue. For this method you will have to carefully prepare the surface. Large irregularities will not allow for high-quality cladding. Special adhesives are used. The walls or ceiling are first primed for better adhesion.
- Frame or sheathing. This method of fastening is necessary when planning loads on the slats or in the presence of significant defects on the surface. The sheathing is made of wooden beams or boards. Fastening to the wall is carried out with dowels. The installation step is 40-60 cm.
Attaching the lamellas to the sheathing can be done using nails or screws. The caps should be recessed into the wood and not visually noticeable.
Production of chests, caskets and cases
To make the simplest box or case, it is not necessary to have an arsenal of expensive equipment. A milling table with the most primitive cutters, a jigsaw, a grinder and a couple of clamps can usually be enough. And as starting material you can even use parquet scraps, all kinds of wooden dies, pieces of plywood, MDF and chipboard. Since boxes and cases are small-sized products, they can be made at home, as a mini-business in the garage.
In the future, as you develop and gain experience, you can master new technologies, try different types of wood and processing. In addition, already at the start you can practice decorating, for example, by immediately purchasing ready-made blanks on Aliexpress and similar sites. A larger and more expensive option in this direction could be the production of chests: the principles of their production are largely similar. You can sell your product using social networks, souvenir shops, fairs, marketplaces, and so on as channels. And, of course, you should think carefully about your unique selling proposition.
Types of wooden slats
Wooden slats vary in the wood used:
- Pine is a budget option, but has sufficient strength and resistance to other external influences. Among the disadvantages is low resistance to mold formation.
- Beech - they are distinguished by a more attractive appearance, dense, solid structure with an interesting texture. You should be wary of increased moisture absorption, which requires special impregnation.
- Oak - considered the best option for most parameters, but has an increased cost.
- Rare wood species - lumber from red and black wood belongs to this category.
Exotic species include padauk, ramin, verdi, boxwood, teak, mahogany and some others. They are particularly chic, but are expensive.
Veneered MDF - in fact, here the wood is represented only by a surface layer that imitates a wooden lath.
This option is cheaper, but fully meets the requirements. Veneer can be natural or fine-line. The use of such material is similar to wooden slats. However, when using it, it is possible not only to provide an attractive design, but also to improve the acoustic parameters of the walls. Veneered slats look especially attractive in niches.
The choice of slats depends on many factors, with the financial side often becoming the determining criterion.
Production of wooden wall clocks
It would seem that a watch is a thing that not everyone, but only an experienced specialist, can make, but today this is not entirely true. On the Internet you can easily find ready-made blanks, both simply for decorating watches, and ready-made watch mechanisms. And there are so many ideas for the appearance of a watch that you can’t find with any other home decor items. Moreover, the most non-standard options are sometimes made even without a CNC and a milling cutter - with a set of hand tools such as a saw, screwdriver, hammer, chisel, ruler and pliers. Almost any owner will have all this at home.
The most important thing to do to start making watches is to get inspired. To begin with, you can explore DIY watches that can be made by hand, and then move on to more complex options. Some people are inspired by the unusual shapes of dials - they are made convex and convex, in the shape of surfboards and cars, they are torn apart in parts or completely eliminated, leaving only the hands and the internal mechanism. On the “1000 Ideas” portal, for example, we talked about the trend towards facelessness and ultra-minimalism, which is actively used in watch production. Experimenting with watches and time truly has no limits, so you can always find that idea that no one else has ever had before.
Features of working with the material
Wood, like any other natural material, is susceptible to various damaging factors. Excessive humidity, scorching rays of the sun, pests and fungi can quickly destroy the structure of the wood surface, leading to rot and cracks. As a result, appearance, shape, and size are lost.
Such a craft can no longer fully fulfill its aesthetic or practical functions. To avoid such problems, a number of features should be observed when working with the material:
- Before starting creative work, the prepared material is carefully inspected for cracks, sharp chips, nicks, pest passages and fungus.
- Sharp edges are cut down and sanded with sandpaper.
- Absolutely all wooden surfaces must be subjected to high-quality impregnation with an antiseptic, antipyretic, moisture-resistant and antifungal compounds. This approach allows you to significantly increase the possible service life of a decorative product.
- An additional protective layer can be created by applying stain and then transparent acrylic varnish. In addition, this technique gives the wooden surface a pleasant glossy shine and stylish appearance.
To fasten the prepared parts, both strong glue and self-tapping screws, metal corners, and nails are used. It is important to ensure that when working along the outer contour there are no protruding sharp edges that can lead to injury (especially for children).
Making sculptures from stained wood
Along the banks of large rivers or on the sea coast you can find a lot of stained wood, the so-called drift wood, which is excellent for handmade products. Sometimes the master already has some kind of profile in which he is already working, and sometimes the idea of future products and sculptures is suggested each time by the very shape of the finds. In the second case, the creative process turns into art. Such products are in demand in landscaping, are sold as expensive and exclusive gifts to “important” people, and are bought as unique symbols and trophies by hunters or fishermen (for example, if the sculpture represents a fish or animal). Also, if you know a place where you can find a lot of stained wood, have a boat and an echo sounder, you can make money by selling it, because such material is quite expensive.
Photo from drevologia.ru
Goals for creating crafts as part of vocational training
Original crafts during labor lessons in 3rd grade allow you to solve important problems, in particular:
- unleash limitless creative potential;
- open the mind;
- teach children to work with their hands.
We recommend reading:
- Natural vitamin supplements - do we really need them?
- Who is better to buy links from?
Metalworking catalog
Production of wooden toys
Wooden toys are currently experiencing a renaissance. No matter how you look at it, there are advantages everywhere - environmentally friendly, safe, aesthetically pleasing, pleasant to the touch. All that remains is the “little bit” - so that not only adults, but also children like them. And not only for the youngest, but also for older children and teenagers. There are more than enough ideas in this direction - catapult toys, construction sets, tumblers, educational sets and much, much more are made from wood - you can see some of them in this collection. What’s especially nice is that a minimal set of tools is enough to produce some options.
But as in any other business, in the production of wooden toys there is a second, no less important side (besides the idea itself and its implementation) - implementation. Your products should catch the eyes of as many people as possible. This means that you must present them on various resources - on social networks, on bulletin boards like Yula, Avito and Yandex.Ads, on sites selling handmade goods like Crafts Fair and Etsy. com.
MBOU "Prechistenskaya Secondary School"
The other day it’s my mother’s birthday. I don’t earn any money myself, I’m only in the 6th grade, but I decided to give her a gift with my own hands. I consulted with my brother and decided to make a potato masher (masser). This potato masher will complement your kitchen interior. I think she will like this gift since she is a housewife and has to cook a lot.
- General goals and objectives for the project
Goal: make a pusher with your own hands on the STD-120 machine
1.develop and implement the project
2.improve the skills and techniques learned in the technology lesson
3.gain more knowledge in the field
4.evaluate the work done
1.3 Historical origins of the pusher
A potato masher (also sometimes a potato masher, potato masher) is a type of kitchen utensil for preparing various dishes with a soft consistency.
According to its design, a potato masher consists of a vertical straight or curved handle and a horizontal plate, with the help of which a particular substance is mashed. The head can have a semicircular shape with long longitudinal slits or, for example, be a metal washer with holes.
In England during the Victorian era, potato masher were made of wood; modern ones are usually made of metal or plastic. The plate is usually made of metal, and modern potato mashers can be a one-piece design ending in a wave-shaped kneading element or a round head with a grid. The original design of the potato masher was patented by Lee Copeman, who did not like lumpy mashed potatoes, in 1847, the potato was made by the Frenchman Antoine Parmentier. By the 18th century, although it is believed that the first special device for mashing potato masher had already become quite widespread in Europe and the North American colonies, by the beginning of the 20th century it had become an ordinary and affordable attribute: for example, in 1908 in Great Britain, a wooden potato masher together with its production cost 4 cents. In the USSR, potato masher, as a rule, was made of wood in the shape of a “bell”, with straight and sometimes shaped handles.
The world's largest collection of potato mashers is owned by German collector Rolf Scholz. This collection, numbering 243 variants of this utensil, attracted the attention of the German press.
Potato masher is used mainly in households, but sometimes also in catering establishments. Using a potato masher, various dishes are prepared, primarily mashed potatoes, which is where its name comes from, as well as, for example, applesauce or pureed vegetables and melons, egg salads and refried beans, and some types of sauces.
1.4 Options for pushers
3.
Production of figured rolling pins and gingerbread boards
A kitchen appliance such as a rolling pin has existed in one form or another for more than 3 thousand years, but has recently undergone a transformation. Curly rolling pins with ornaments in the form of patterns, animals, cities, and so on began to appear more and more often on the Internet. Curly rolling pins are used in baking and when working with dough, the best of which is shortbread dough. Curly rolling pins are also used for working with mastic, natural and polymer clay, and baby sand-clay.
You can make shaped rolling pins with fine detail using laser engraving. These rolling pins are best made from hard wood, such as beech. Gingerbread molds are also in demand today. Before the advent of machine tools, craftsmen who created boards with counter-relief carved into them had to have unique skills in notched carving, and the production of such boards was ordered to the best bakers.
photos of works from Instagram page @lubimova_com
Unusual house made from cuttings
To construct this house you will need experience working with wood products and ability to use tools.
The house is assembled according to the type of log houses.
Let's prepare:
- several wooden cuttings;
- a small part from a sheet of chipboard;
- kebab skewers or sushi sticks;
- drill, jigsaw, chisel;
- finishing varnish.
Progress:
- We cut the cuttings into bars of the same length according to the size of the house.
- We fasten the blocks with tape, measure 3 cm from the edge and drill a hole in the center. It should be larger in diameter than wooden sticks.
- On each “log” in the hole area, we use a chisel to cut out semicircular recesses for better fastening of the parts together.
- We assemble the “log house” of the future house, matching the holes. We hammer wooden rods into them.
- To make a roof from a sheet of chipboard, we cut out two rectangles and nail them with small nails.
- Using a jigsaw, we make blanks for the ridge, shutters, doors and canopy from laminated chipboard. Glue the resulting parts to the craft.
- We install the house on a strong foundation.
- From thin cuts obtained from the remaining cuttings, we draw a path to the house.
- We decorate the composition at our discretion and cover it with varnish.
Production and sale of children's playgrounds
Children's playgrounds made of wood are aesthetically attractive slides, houses, stairs and swings that can be sold for tens and even hundreds of thousands of rubles, also providing assembly, installation and delivery services. They are most often made from pine and larch, but wooden towns in their pure form are rare. Usually they are combined with metal profiles for the base, or plywood is used in some places. Another thing is that when starting such a business, you will have to compete with companies that have been operating on the market for decades, and this format is closer to a factory than to a carpentry shop. In the production of wooden platforms, you cannot do without a set of machines, a staff of at least a dozen employees, and premises of about 500 square meters, even for small production.
Sites are sold both to private clients and through participation in tenders. It is usually unprofitable for manufacturers to participate in the latter, so only the former remains. If you prefer sales, then you can focus exclusively on them, entering into cooperation with manufacturers, but not producing anything yourself. There are many times more such companies than the factories themselves. Essentially, they group together offers from different manufacturers and offer a discount that their partners give them.
Armchair
In the case of slatted structures, it is better to immediately consider a hybrid option in the form of a chaise lounge - a beach lounger. Other design options in the interior will look too rough.
Portable, lightweight design with a fabric back is easy to assemble and convenient to transport. It is recommended to make the load-bearing elements from maple wood, and the lintels on the seat from cherry, beech, and pine.
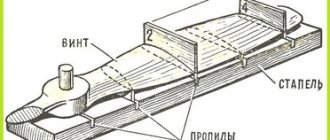
To make a chair, you need to prepare the legs: 2 parts 20x40x800 mm and 2 parts 20x40x560 mm each. The lower crossbars are also paired, 10x50x380 mm each. Top 1, size 20x40x380 mm. The crossbar for sitting is also needed in a single copy, 20x40x300 mm. You will also need 5 slats 20x40x400 mm and a piece of fabric for the back 600x500 mm.
The assembly order will be as follows:
- jumpers are attached to a long pair of legs at the top and bottom;
- fabric for the back is stretched over the resulting part;
- The seat is assembled: a jumper is attached to the short legs at the top, then 5 prepared slats;
- chair assembly: the second pair of legs is passed between the lower jumpers of the long part and secured with a movable connection.
- You can first paint or coat the chaise lounge frame with impregnation.
Production of hangers
If you're looking to find a budget niche in wood crafting that requires more brains than hands, consider hangers. In terms of effort and physical labor, very little is required, and many hangers can be made from materials that others consider almost trash. On the Internet you can find many examples of hangers made from old cuttings of garden tools, chair backs, wooden rings and horns from clothes hangers, hangers made from rake teeth, wood knots, and so on.
What can you do on your site?
Fencing.
The fence is an important part of any site. And to make it, you don’t have to buy expensive materials; you can use the “gifts of the forest.” A picket fence made from branches collected in the forest will look original.
Fences are needed not only to surround your garden from the outside, but also to divide the space internally.
These can be slatted walls that will appeal to climbing plants, or flower boxes arranged vertically in a checkerboard pattern. This wall looks very beautiful thanks to the flowering plants.
Flowerbed.
This is the kind of craft that no garden can do without. But a stump left from a cut down tree, a log, or even an ordinary large log can become a flowerbed. But you will have to arm yourself with a chisel and a hammer to hollow out a recess in which the flowers will then grow.
You can make it simpler and decorate a ready-made flowerbed with twigs or neat bars.
Bridges.
The decorative bridge will delight both children and adults. You can even dig an artificial pond for it, but even without water such an element will look quite natural.
Track.
Ordinary paths instantly change the impression of your dacha or garden. Neatly designed paths help create the “face” of the site.
And making them is as easy as shelling pears:
- It is enough to prepare tree cuts and collect pebbles from the shore of the nearest body of water. At the same time, the cuts do not have to be the same diameter - it will be even more interesting if they are different, but the thickness should be the same.
- Don't forget to first dig a trench (its depth should not exceed 10 cm) and fill it with sand.
- Cuttings, pebbles, earth are laid on top, and lawn grass seeds are planted.
Production of wooden stairs
A staircase is one of the main functional and interior elements for country and private houses with several floors. Wooden stairs can have completely different sizes, designs, types of finishing, be single-flight or double-flight, have sides and finishing of the end openings or not. But be that as it may, a staircase is not a piece of carpentry where you can rely only on yourself. Here you will need a designer, an architect, a wood craftsman, an installation team, and, preferably, hire a separate sales specialist.
For your workshop for the production of stairs you will need an area of about 150 square meters. Since wooden stairs often include various carved or forged railings, unusual balustrades and fences, sculptures, lamps, etc., and expensive types of wood are often used, the staircase turns into a rather expensive product for both the manufacturer and the client. Which, however, are not translated at all. Ideas for unusual staircases can be found in this collection.
Advantages and disadvantages
Decor made from slats has the following advantages:
- environmental cleanliness;
- ample opportunities for designers to create various compositions that differ in color and size;
- repairability of the slatted coating: the ability to eliminate defects on the surface, restore color, replace individual elements, etc.;
- the ability to change the appearance by external processing (painting);
- versatility, possibility of use in premises for various purposes;
- increased feeling of coziness and comfort.
- affordable price;
- ease of installation;
- masking all wall defects;
Decor made from wooden slats also has certain disadvantages:
- cladding with lathing reduces the total area of the room;
- the flammability of wood, which increases the fire hazard of the entire room;
- insufficient durability of some types of wood.
To decide on the use of wooden slats, you should carefully analyze the pros and cons of such cladding, taking into account specific conditions.
Making flower pots
If you're looking for an easy-to-make item that can be sold at a reasonable price, consider flower pots. To produce flowerpots, you do not need to acquire expensive professional tools, and you can use leftover timber and lining as materials. On the Internet there are examples of making outdoor flower pots using firing, antiseptic treatment and water-based varnishes with dyes. There is nothing complicated in the production technology, and in order to do everything faster than by hand, you will need a circular saw and a grinder.
Material selection
Every owner has unnecessary scraps of boards and plywood sheets on his farm. If they are not available, then lumber can be purchased at a specialized store or at the construction market. In addition, the summer cottage is full of improvised tools for creating crafts from wood with your own hands - saw cuts, roots, branches, branches.
There may even be a dried tree or stump. From all this you can come up with many unusual items. For the most part, the ideas are simple to implement. Even a beginner can implement them.
The main tools are a saw and a jigsaw. You may also need a hammer, nails or screws.
Production of furniture for pets
One of the interesting niches in the production of wooden products is furniture for pets. From wood you can make doghouses, houses with scratching posts and tables with labyrinths for cats, houses and castles for rodents and much more. The cost of producing furniture for animals is low, and large premises for a workshop and warehouse are not needed. As there are more and more such products in pet stores, you need to think carefully about how you will differ from the mass market. Not only a sense of style will help here, but also knowledge of animal habits. For example, cats like the opportunity to watch from hiding places, so the walls of houses are often made with small windows. Also becoming popular are cat ladders, bridges and island shelves that hang on walls and allow cats to satisfy their natural need to climb trees and hills.
Physical and mechanical properties
The appearance of the wood is pale white to light brown, with well-defined areas of sapwood and heartwood. The growth rings are usually thin, and the color is generally uniform over the entire cut surface. Knots and other defects are rare. Wood with an even texture and moderate natural shine.
Thanks to the wood, which is soft and low-density in its structure, moisture is evenly distributed over the cross-section of the trunk. When dried, lumber produced from linden practically does not crack and is not subject to warping.
Characteristics of linden wood:
- Janka hardness - 1.824 N;
- hardness of the cross-cut surface – 19.0 kgf/cm2, radial cut – 16.4 kgf/cm2, tangential cut – 16.4 kgf/cm2;
- average density - 495 kg/m³
- specific gravity (at humidity 15%) – 0.53 g/cm3
- radial shrinkage 6.6%, tangential 9.3%, volumetric 15.8%;
- strength of linden dried to a moisture content of 15%, compressive strength along the fibers 39 MPa, bending strength 68 MPa.
Due to its porous structure, linden can be called a hygroscopic material. The humidity levels of a freshly cut tree are 50-100%.
There is virtually no odor, even during processing. Linden bends well and has low wear resistance. Any types of processing, staining, polishing, grinding and other types of processing of linden products do not cause difficulties. Wood retains heat very well and is not affected by rodents.
The peculiarity of linden in not absorbing heat has long been noted, so finishing a bathhouse with linden lumber is the best option.
Making growth rulers
How to turn an ordinary flat board into a real family heirloom? Nothing complicated. If you apply length measurements to it and attach it to the wall, you will get a growth ruler. By becoming someone whose constantly growing children will be able to celebrate their growth. Of course, in order to sell the line at a high price, a piece of plywood will not work for you; you will need to test different types of wood and methods of processing and design. The design can be anything: the simplest is in the form of an enlarged school ruler. But it is not necessary to adhere to a rectangular shape. For example, the image of a giraffe is perfect for growth rulers, when divisions and centimeters are marked on the animal’s long neck.
You can also think about original captions for various marks. Here you can show your imagination, for example, denote the shortest stature with the words “dwarf”, “hobbit”, “midget”, and the tallest ones with the words “giant” or “Gulliver”. In short, after you think about these and other questions, you may have a whole “line” of thematic lines that are not yet available from other sellers.
Doll house made of twigs
There are probably still children whose grandmothers live in log houses in the village. How nice it is for a child to have such a playhouse with his favorite characters and remember his rural holiday.
To work on this craft you need to prepare:
- cardboard;
- twigs of different sizes;
- moss;
- small scraps of fabric, threads, decorative clothespins;
- scissors, pruning shears;
- masking tape;
- glue gun
Let's start making a house:
- We cut out the parts of the house from cardboard and glue them together using hot glue.
- To ensure the stability of the craft, we cover the corners of the house with masking tape.
- Using scissors we cut out windows and doors.
- We begin to cover the walls of the house with thin branches, cutting off the required length with pruning shears.
- To obtain a roof, bend a measured sheet of cardboard and glue it with a glue gun.
- To make a pipe on the roof, we cut off a small part from a thick branch and use glue to attach it between the branches of the roof.
- We make a door. To do this, use pruning shears to cut the branches in half lengthwise and glue them to a cardboard rectangle. We glue the door into the doorway.
- We attach curtains made from fabric scraps to the inside of the windows with glue.
- We install the craft on a base decorated with moss.
- We make a ladder from thick branches and attach it to the house.
- We'll hang the laundry in the courtyard.
Glue two thick branches to the base, stretch a thread between them and, using decorative mini-clothespins, distribute scraps of fabric on it.
To give this composition a New Year's touch, you can lay pieces of cotton wool simulating snow on the roof of the house and on top of the moss, and fasten a Christmas tree branch in the yard. The beads hung on it will look like Christmas tree decorations.
Production of busy boards
Busy boards are educational stands and houses for children from 1 to 4 years old. Busy boards are equipped with various objects such as handles, switches, levers and buttons, with which a child can interact and develop his intelligence in the first years of life. Almost anyone can create business boards if they wish, the main thing is to apply a little imagination. All items can be purchased in hardware stores, art stores, on sites like Aliexpress, or found for almost nothing on classifieds sites. However, you need to ensure that the parts are not too small, sharp or brittle and remember that children will be playing with them.
With a fairly low cost, bodyboards are sold at prices ranging from 2-3 to 10 thousand rubles. The cost depends on the size and content. It is better to promote such products through social networks and the Internet. And also think about advertising in places where mothers with children flash and walk - in parks, on courtyards, in the entrances of new buildings where young families move in, and so on. You can start such a business with about 125 thousand rubles available. More detailed information about the busy board manufacturing business can be found here.
Furniture made from saw cuts
Using wood slices, you can make original and functional furniture for your garden.
It's easy to make a beautiful table.
- To make a table, you need to knock together the supporting part.
- Additional sides are made on top.
- The sections are properly processed, polished, and placed in a frame.
- The cavities between the tabletop parts are filled with epoxy resin.
- After drying, the product is carefully polished.
In a similar way, you can decorate a stool, a small bench, or decorate a gazebo.
The use of wooden saw cuts in the manufacture and decoration of home and garden interiors is gaining popularity. The material is safe for health. The products are characterized by low cost. And they perfectly complement the interior.
Unusual wooden shelves and racks
One has only to type in the phrase “unusual shelves” into a search query, and in response, such a range of shelves immediately appears, the existence of which is impossible to even suspect in advance. Shelves in the form of branchy trees and cacti, in the form of boats and airplanes, honeycombs and fish skeletons. Ideas immediately arise, for example, for collectors of car models, a wall-mounted rack in the form of a truck, the trailer of which is divided into many small shelves, is perfect. The size of which will allow you to place one or several copies of toy cars in each.
One of the interesting ideas can be considered racks in the form of Swedish stairs. Thanks to the step bars and the stable shape of the rack, the owner, who often has to get something from the upper shelves, does not need to resort to a ladder.
Mikhail Semynin
(c) www.openbusiness.ru - portal of business plans and guides for starting a small business
11/15/2021
Save the article to carefully study the material
Remember article
You can save this page using:
Baba Yaga's Hut
Children will undoubtedly like this craft and will create the atmosphere of a fairy tale in the children's room.
Before work, let's prepare:
- wooden clothespins;
- dry moss;
- autumn leaves and berries;
- cones with open scales;
- cardboard, plasticine;
- glue gun
Let's start making the hut.
- We disassemble clothespins into individual components.
- Using the obtained components, we construct a home for a fairy-tale witch.
- We attach leaves and pieces of moss to the roof using glue and decorate with sprigs of berries.
- We cover a sheet of cardboard with moss and install the hut on it.
- We will make Christmas trees from cones. To do this, you need to paint them green and place them around the house.
- Let's revive the decorative composition with forest inhabitants. We fashion the animals from plasticine and distribute them among the Christmas trees.