Not a single farmer, summer resident or rural resident can do without rakes, shovels, hoes and other cutting tools. Cuttings will always be in demand and their production is a wonderful business idea that can be implemented even at home with a small start-up capital.
The demand for cuttings is especially high from March to September - throughout the entire growing season. But even in winter, such a product is quite in demand, as it is purchased for snow shovels.
This article will discuss in detail the process of creating a business using cuttings. We will study materials for production, equipment, draw up a business plan and talk about other nuances.
We select the workpiece size, material and other characteristics
The first step is to determine the ideal size. It is generally accepted that the height should be exactly at the worker’s shoulder, that is, approximately from 140 cm to 180 cm, depending on your height. You can make it a little shorter, especially if you plan to make a shovel, because too long can cause you some inconvenience during subsequent use. Naturally, for a sapper shovel this figure generally decreases to 70-80 cm, perhaps even less if it is traveling.
Now we need to choose the material. Not only the strength, but also the appearance of your product will depend on its quality, since some types of wood may suffer when further dried or when wet in winter. Let's take a closer look at what is best to make a handle for a shovel with your own hands, and what is better to immediately throw in the trash.
Based on the species described above, we will choose birch for our cutting, which can be found at any sawmill and purchased inexpensively. It would be best to glue the cutting from 2-3 strips, but if you are not particularly concerned about slight deformation over time, you can use a standard blank.
Machine selection rules
Next, let's look at how to choose the right machine. There are several types of machines with different productivity. For beginners, machines with low power (engine power up to 1.5 kW) are suitable; for full-scale production, serious machines with power up to 10 kW are suitable. In principle, in most cases, low-power devices are sufficient, which make it possible to produce up to 200 handles per shift. Also keep in mind that when choosing a machine, you should select those models that allow you to change the diameter of the workpiece so that you can make different options.
If you want to organize the production of cuttings as a business, you can buy a ready-made line, which consists of two machines: a milling machine, which gives the workpiece a rounded shape, and a machine for rounding the ends. A high-quality kit can be purchased for 250-300 thousand rubles (2022 prices). If you purchase equipment with a total power of up to 3 kW, then you will be able to organize work even in the garage, which will allow you to save a lot on renting a room. But for powerful devices you will need a separate three-phase line, but up to 500 cuttings are made per shift.
Step-by-step instructions for making a holder
In order to produce a shovel handle whose technical characteristics will not be inferior to the factory ones, it is necessary to pay attention not only to its fit, but also to anti-corrosion treatment. The easiest option is to buy a blank, but you can make it yourself, which is what we’ll do now.
In order to make a truly even holder that would satisfy your requirements, you need to choose a branch that will be 2 times thicker than the required diameter. Try to choose without knots, branches, or bends so that the fibers are as even as possible.
First you need to dry it. 20 days in sunlight will be enough. Then take a plane and remove the required amount of wood. Align under the bar or level, scroll and align relative to the axis. Extremely precise dimensions are not needed, but it should not be made crooked either.
Be sure to sand it to avoid nicks. This can be done with a special machine or manually. First go over with coarse-grained sandpaper, then with fine-grained sandpaper. Next, we impregnate it with a special suspension for wood, you can buy it in any store. We let it dry for 24 hours, then we cover the entire area with varnish in 2 layers so that the appearance is just perfect - this is not necessary, but wouldn’t you enjoy working with such a shovel?
Properly planting the cuttings
A lot depends on this, and first of all, the comfort of work. If you don't have any play or spin, digging up soil and digging trenches will be much more enjoyable. Let's look at how to place a cutting on a shovel.
Measure the diameter of the hole. As a rule, they are made under a cone, but can be straight. In the second case, we need to measure the diameter - this figure should be in the middle of the future sharpening or even at a distance of 1/3 from the bottom. We remove the wood using sandpaper at an angle of 20-25 degrees, you can do this with a knife, and then sand it with sandpaper for evenness.
Fill the treated surface with impregnation - this is necessary so that the attachment point does not rot after a few years and does not lose its strength . Let it dry for 12 hours and soak the cutting in epoxy resin. It will be a kind of seal.
The length of the shovel handle should include possible changes after the work is completed (we’ll put 10 centimeters in the bucket), so take this into account and do it with a margin. Then you can saw it off without any problems, but with a short cutting you won’t be able to do anything.
Source
Assembly
Stuffing a cutting is a simple matter, but it is worth taking into account the following subtleties:
it is very important that the handle completely fills the chamfer (recess) of the blade, which will give the shovel an additional margin of strength, otherwise the shovel will bend even with a small force; Before inserting the cutting into the planting place, it is advisable to moisten its treated end with hot resin, which will protect the tree located in the planting tube from moisture and rotting, and the planting will be stronger; insert the holder into the planting tube of the blade and, turning the shovel upside down, tap the end of the handle on a hard surface; if you are convinced that the wood has completely occupied the planting chamfer, you can fasten the blade to the handle - for this there are two holes in the planting tube; Here it is safer to use screws rather than nails.
At the base, they will cut the pipe to the length you request. Typically, the length of a shovel handle for a person of average height is one and a half meters. The planting tube of the shovel for such a cutting should be several millimeters larger and preferably cone-shaped.
This can be a piece of roofing material soaked in hot bitumen, or a regular bandage soaked in epoxy resin. After inserting the cutting into the planting tube of the shovel blade, it must be secured well. Unlike fastening a wooden handle, screws are not enough here. Reliable fastening can be provided by bolts with a diameter of 5–6 millimeters. In two places of the landing tube, two holes of suitable diameter are drilled with an electric drill at a distance of 10–12 centimeters from each other. The planting tube of the shovel is drilled through along with the aluminum handle installed in it. After this, insert the bolts with washers into the holes and tighten the nuts.
Shovels and plastic cuttings are attached to the canvas in a similar way. To give the ideal shape for the cone-shaped landing tubes, it is recommended to heat the plastic with a hairdryer or gas burner. Shovels with aluminum or plastic holders are very light and durable. However, they must be handled very carefully - such holders are afraid of impacts. A slight deformation in the center of the handle will cause it to bend (plastic - break) and it will no longer be possible to restore it.
This is a completely optional part of the shovel, but it greatly simplifies the work process, especially if you have to deal with clay or hard soil. These pens are available in a variety of materials and shapes. You will find a suitable option at any hardware store. The handle is attached to the handle with ordinary screws.
How to make a shovel with your own hands, see the video below.
Types of holders
There are a large number of varieties of holders in size, length, grade, etc. We have already described above what standard thickness is accepted for various tools, now let’s talk about length. For a regular shovel, handles are usually made up to 130 mm long, for shovels and rakes - up to 150 mm. The holder for a hoe can reach 150 mm, and for a rake generally 180. However, there are no strict standards: you can produce one option for those who need short handles, and a second for those who need long ones. The best wood options for handles are alder and birch, as well as beech, if it grows in your area. Sometimes cedar blanks are used, but usually conifers are not recommended for production due to the fact that they are heavy and impregnated with resin.
The machine processes the workpiece independently in one run
There are three types of handles:
After the holder is made, one edge is given a rounded shape using a special tool. This is done for ease of use: the rounded shape does not damage the hand during operation and does not lead to injuries. The second edge of the handle is usually made conical so that it can be mounted on the tool. But this is an optional condition: often the cuttings are sold straight, they are processed for a specific tool, depending on the shape and diameter of the corresponding socket. To give the material roundness, you need a round-blade machine, which is a powerful electric motor with blades. The workpiece is simply inserted into it and the blades round it to the desired shape. Using this machine, you can not only round conventional holders, but also produce other cylindrical objects.
Tips for choosing
Defects in the handle can become a serious obstacle to the normal use of the shovel. Don't rush and buy the first copy you come across. To choose the right handle option, you should know the characteristics of your bayonet shovel. Tools differ in size and thickness of the blade, being divided into 3 categories: P, V, U. The correct handle is selected in accordance with these data.
Productivity and ease of use depend on the length of the handle. Usually the length of the handle is selected depending on the height of the person. The cutting should be 10 cm short of the shoulder or elbow bend.
Note! For the handle, hard hardwood is preferred: birch, alder, ash. The tree must be free of wormholes, nicks, knots and cracks if it is the highest grade
How to choose the right handle for a shovel
The main problem for craftsmen when choosing a handle is haste, as well as often ignorance, since they choose the first one they come across and already at home there are quite great difficulties in attaching the handle to the bayonet. In order to avoid making such mistakes, you should at least become familiar with the types of shovels in general terms.
There are 3 types of garden shovels:
In each of these types there are significant differences in the thickness, dimensions of the metal sheet and lining, and therefore the handle must be selected based on these parameters.
First of all, when choosing a factory cutting, you should pay attention to defects, which in the future will significantly affect the productivity and durability of the product:
The surface of the cutting should be smooth, even, with a uniform color
It is recommended to pay special attention to the coating - it should be varnish or paint, which prevents accidental splinters from getting under the skin, and also protects against premature deterioration of the material and environmental influences
Wood selection
Despite the widest range offered by the construction and gardening market, there are several reasons why it is worth making a shovel handle with your own hands. Firstly, for the manufacture of shovel handles in industry, low-quality material is often used, namely wood waste. You can control the process at each stage of production and make a cutting from the highest quality and durable wood.
Sales plan for finished products
All costs will pay off sooner if you start looking for wholesale buyers at the stage of developing a business plan. This is the best option since retail sales will not bring in much profit. The production of aluminum, wooden and plastic shovels may be of interest:
- agricultural enterprises,
- construction organizations,
- mining companies,
- military units,
- housing and communal services,
- municipal authorities.
As an additional income, you can launch your own retail outlet selling finished products. It is not at all necessary to open a large store - a small tray located at construction and gardening markets will do. This can be a great start for those who are planning to make cuttings for shovels at home.
Take care of at least minimal advertising. A large-scale marketing campaign will obviously be superfluous here, but it is necessary to “notify” the potential audience about the product being released. A budding entrepreneur will have access to many advertising platforms - advertisements in newspapers and posted at bus stops, information on the Internet, commercials on the radio.
Homemade cuttings
Even a novice craftsman can make a homemade handle for a shovel. If you apply a little effort, the technical qualities of the homemade product will not be inferior to the characteristics of the factory manufacturer. Required materials and tools:
Handle for a shovel - production begins with the choice of material. The quality of the wood determines the strength of the product, as well as its appearance. The most popular and affordable is birch wood. You can purchase inexpensive blanks or look for material at a sawmill. It is advisable to find a tree without flaws (knots, bends, crooked fibers).
Important! The branch for the future handle should be 2 times thicker than the required diameter. The length of the cutting is selected taking into account the fact that about 10 cm will be planted in the shovel bucket
It is better to make the handle a little longer and then file it down than to make the handle too short.
The branch or board is dried in the sun for 15-20 days. After drying, the diameter of the branch becomes smaller. If you are using a special blank, you can skip this step.
The shovel handle is ready.
Note! Protecting a wooden handle with varnish or paint helps protect it from dampness and damage. However, there is increased slippage of the handle in wet palms, which leads to the formation of calluses and dropsy
Experienced craftsmen recommend not varnishing. It is better to apply impregnation and sand the surface. Consecutive sanding with large and small fractions allows you to polish the wood and give it strength.
Description
A shovel is a hand tool designed for digging, carrying and clearing. It consists of a tray (canvas) and a handle (handle). It is usually chosen based on its base, which must be sharp and durable. The cuttings are the last thing to pay attention to. Meanwhile, it is the shovel handle that is responsible for the convenience and quality of work.
Finished products offered for sale in the store are made using special equipment. The production of cuttings for shovels in large batches is carried out thanks to the operation of several machines:
- round rod machine;
- cylindrical grinding;
- occipital
On a note. Finished tools and components meet all quality parameters.
DIY making
To make your own snow scraper, you do not need to have any special knowledge. This tool differs from a regular shovel in that it requires more material. But even in this case, it will still be economical.
To make a simple wooden scraper yourself, you will need a wooden board and a couple of bars. One side needs to be covered with a metal strip to improve the sliding of the device. The bars will be needed to make a square frame, which is subsequently attached on one side to the board using self-tapping screws.
But we can offer another option for manufacturing a scraper, which involves adding wheels to the design. For such a snow removal tool, you need to prepare the following:
The process of making a snow scraper on wheels will look like this:
It is not always possible to find metal sheets on the farm. In this case, it can be replaced with any unowned pipe of large diameter. You need to cut it into two parts, and then take one and use it as a scoop.
Winter is a difficult time for owners of private territories. At this time of year they have to regularly clear the area of fallen snow. But it will be easier to do this job if they have a special tool. Most often, a snow shovel is used for this purpose. But for larger territories it is not always enough.
Due to the fact that the scraper has a simple design, it can be made from lumber available in every household and thereby save a considerable amount of money. But the main thing is that the snow scraper will ideally meet the owner’s requirements, which will make the work as convenient and efficient as possible.
How to plant a cutting correctly?
First of all, the comfort during work will depend on the planted cuttings. In cases where there is no backlash or scrolling, working with such a shovel will be much more pleasant. So, how to properly plant a shovel handle?
We measure the diameter of the hole. As a rule, they are made with a cone, but they can also be straight. In the second case, it is necessary to measure the diameter - this figure should be in the middle of the future sharpening or even at a distance of 1/3 from the bottom. Next, we remove the wood using sandpaper at an angle of 20–25 degrees. You can do it with a knife, but for evenness it is recommended to sand it with sandpaper.
To prevent the attachment point from rotting and losing its strength after a few years, fill the treated surface with impregnation. Next, let it dry for 12 hours, after which we soak it in epoxy resin. It will act as a kind of seal.
Immediately after pouring the resin (you can also use bitumen for this purpose), we hammer in the holder. To do this, you need to insert it into the seat, turn the shovel up with a scoop, and then hit it on a hard (thick metal or concrete) surface. Remember, the blows must be sharp. After about 5-7 blows, the ladle should sit on the handle (to the level of the start of sharpening). Let the resin dry for 24 hours (pouring a lot of hardener is not recommended) and it can be used.
When you decide on the length of the cutting, this size should also include possible changes after the work is completed (about 10 cm will fit into the bucket), and therefore it is recommended to do it with a reserve. You can cut off a cutting at any time, but you won’t be able to grow it any longer.
Terrible on the face, kind on the inside
Yes, the cuttings turned out to be crooked, but they were very comfortable - they fit like a glove in your hand. And most importantly: if you have studied strength of strength, you know that curved rods that bend are stronger than straight ones. The same principle works here too (photos 6 and 7). And one more advantage: none of the dashing people will covet such goods; now give the thieves something similar to a fashionable Canadian shovel.
If one of the handles does break, then I use the fragments either for short handles (sometimes I make one handle out of two) or as pegs for marking. If the working surface of a shovel or hoe breaks, I drill holes in suitable fragments and attach them again to the cuttings. This is waste-free production.
In general, I noticed that the more necessary tools are in use. distributed according to work in the garden, the less running around the site.
Bark, spruce branches, branches, rotten and rotten wood, unusable chipboard and fiberboard are used to shelter the sand from the sun and create an initial fertile layer on the sandy terraces being developed. I rejoice at all the weeds as living mulch and biopumps that pump water into their above-ground parts from the sandy and rocky depths and collect nutrients.
How to make a handle for a shovel with your own hands?
In order for a hand-made shovel handle to be on par with factory specifications in its technical characteristics, attention must be paid not only to its fit, but also to anti-corrosion treatment. The simplest solution, of course, is to buy a blank, but you can make it yourself
The simplest solution, of course, is to buy a blank, but you can make it yourself.
To make an even holder that would really satisfy your requirements, choose a branch with a diameter 2 times larger than the required diameter. If possible, choose one without knots, bends or branches to keep the grain as straight as possible.
2.Adjustment to the desired size
First of all, the cuttings must be dried. 20 days in sunlight will be enough. Next, use a plane to remove the required amount of wood. Align it to the bar or level, scroll it and align it relative to the axis. In this case, there is no need for extremely precise dimensions, but at the same time, it should not be made crooked.
To avoid nicks, we use a special machine or manually grind it. First we go through with coarse-grained sandpaper, then with fine-grained sandpaper. Next, we impregnate it with a special suspension for wood, which can be purchased at almost any specialized store. Let it dry for 24 hours, after which we apply varnish on the entire area in 2 layers and again leave it to dry for 24 hours.
It is worth noting that the last procedure is not necessary, but working with a shovel with a handle treated with varnish will be much more pleasant.
Cuttings for agricultural and gardening tools are on sale all year round, but especially many different types appear in stores in the spring (before the gardening season). The length of the cuttings of most garden tools does not exceed 120 cm - this length is considered standard. The standard and most widespread cutting is round in cross-section.
Products differ in thickness. If the diameter is close to 40 mm, then this is a shovel handle. For a hoe (chopper), cuttings with a diameter of 30 mm are used. From cuttings with a diameter of 35 mm, construction dowels are made, used for assembling log structures and log houses. Those with a diameter of 20-25 mm are suitable for a rake or broom. Thin, 20 mm in diameter, cuttings are used to make mops; sometimes a thread is made at the working end of such a product to install a brush. They are also used to make gymnastic sticks. For a braid you will need a longer product with a diameter of 30 mm. A special handle should be attached to it, which is installed perpendicular to the handle at the level of the mower’s belt; if you place the scythe vertically, this is the only way to get a tool that will be most comfortable for mowing.
Rectangular cuttings up to 130 cm long are produced for the popular garden tool - the Fokin flat cutter. The industry produces special wooden handles for axes, hammers and sledgehammers. There are special strength requirements for these products. The most common material is also solid birch. The last two differ in size. The length of the hammer handle does not exceed 30 cm. The sledgehammer handle is more massive and can be from 50 to 80 cm long. What these products have in common is their rectangular shape in cross-section.
The ax handle has the most complex shape, combining ergonomics with elasticity and strength. The sizes of these products are also different and depend on the size and weight of the ax head. Long, massive axes of simplified shape are produced for cleavers. Currently, you can find quite expensive axes on sale that have a rubberized plastic handle. Using such a product is quite convenient, but it will not be possible to repair damaged expensive equipment. For motorists and tourists, they produce collapsible or folding tools (axes and shovels) with lightweight wooden handles.
Depending on the quality of raw materials and execution, cuttings can be of the highest, first or second grade. Higher quality ones are characterized by the absence of knots, kernels and other defects. Traces of knots are acceptable on first grade products. The second grade, in addition to knots, may be characterized by some deformations: it may be bent or twisted. The best material for making any cuttings is considered to be solid birch.
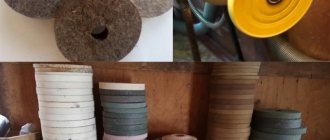
Secrets of production
As we already wrote above, holders are not made manually, since this is associated with high labor costs, and the process takes a lot of time. Therefore, you will need a specialized machine for producing cuttings. Today on the market there are several types of machines made in America, Europe, China and Russia. We recommend choosing either European or Russian machines. The fact is that American ones are quite expensive, although they are considered the most reliable. At the same time, it is almost impossible to find spare parts for them.
European machines are cheaper than American ones and are of good quality. They are designed to last, but require regular professional maintenance. Russian machines are simple and reliable, but they also need to be repaired on time. Asian devices are inexpensive, but not very high quality. You need to know which manufacturer of machine to buy and which model, so that your production does not end up being idle more than it is working.
Before you start making holders, you need to understand what exactly you will be using them for. The fact is that different tools require different cuttings. You also need to select wood for each tool, because the load on one is minimal, and the load on the second is maximum. For example, for a broom and rake, something simple like poplar or birch will do. For axes or sledgehammers, hard and durable wood is used: acacia, oak, ash. When manufacturing, it is recommended to adhere to the following standards:
- For brooms and rakes, the holders are made 25 mm thick.
- For hoes and hoes, the holders are made 30 mm thick.
- For shovels, cuttings 40 mm thick are used.
Cuttings are available in different lengths and diameters
For axes and hammers, handles are usually made by hand, but it all depends on the intended shape and model. If you wish, you can expand the range with similar handles if you still have material for blanks, but you should know that they are not bought so often. Today, almost all modern axes and hammers are produced with a fiberglass handle, which does not break or dry out like a regular one.
What kind of wood are shovel handles made from?
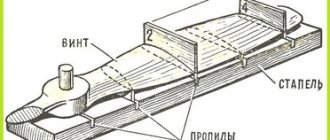
In such a tool, if you insert a workpiece into it, then when rotated, you will get a round cylinder. The second block, with a hole, will serve as a stop when almost half of the cutting blank begins to dangle around.
We attach both bars to the table using clamps. Then we take a workpiece, usually a square block, plan the corners and get something like an octagon. We round one side of the workpiece so that it fits into the hole of the block with a knife, and on the other side we make a cut in the middle, at the end, to insert a feather drill into it. The cut, after inserting the feather drill, can be compressed with a metal clamp.
We insert the drill into the drill, and the second part of the workpiece into the hole of the block, with a knife, while trying to keep the workpiece parallel to the table and at a right angle. Turn on the drill and slowly feed the workpiece, working the surface in a circle. When processing almost half of the workpiece, insert the processed part into the guide hole of the second block.
Round parts make good cuttings for shovels, rakes, dowels and other cylindrical products. Author RVT
Other articles on this topic:
What it is?
The wooden handle is a necessary part of most modern hand tools to enable manipulation. Being a part of hammers or axes, the handle allows you to fully use the weight of the working part of the tool, accelerating it and creating a lever, without which the tool would not be able to perform work at all. The wooden element creates the same effect for shovels, rakes, hoes, scythes or forks.
Relatively inexpensive equipment is produced by many woodworking enterprises. They are used for all types of garden tools. The requirements for a modern wooden handle are dictated by rules developed over thousands of years: strength and convenience.
The surface of the products is processed so that there are no nicks, irregularities or cracks that could rub the callus. Often the product is varnished. The dimensions of the equipment are calculated depending on a number of factors: load, lightness, strength, convenience. The length of the cuttings is also not the same. It is determined not only by the nature of the instrument, but also by the height of the person who will work with it. The cross-section of cuttings comes in different shapes. For shovels and other garden tools, it is made round, and for axes, sledgehammers and hammers, the shape is chosen taking into account the fact that the tool should fit clearly in the hand. Sometimes a cutting with a square cross-section is used.
How to make a shovel handle
The classic shape of the shovel handle is round. It is ideal if the work involves rotation in your hands. Most of the products on the market are round in shape, but there are also square cuttings. They are less popular and are used solely as desired. In the instructions described below, we will talk about making a round-shaped cutting. With basic carpentry skills, any patient and hardworking owner can handle the job.
Making a handle for a shovel occurs in several stages:
How to put a shovel on a handle
A lot depends on how well the shovel is mounted on the handle. First of all, ease of use and productivity.
This process can be divided into several stages:
Finally, we suggest watching a useful video that shows in detail the process of making a wooden handle for a shovel:
Sales options
The advantage of this business is the fact that you do not need to think about advertising. All you need is to establish sales channels. And they are cuttings in Africa too. The main thing is to build high-quality sales channels. Please note that it is necessary to agree on delivery in advance, before the start of the season. A few examples:
- Construction stores,
- Construction markets,
- Dacha cooperatives,
- Administrative institutions (housekeeping department),
- Schools, kindergartens,
- Correctional facilities,
- HOA,
- Farms,
- Other organizations that use manual labor.
One of the forms of retail trade is outbound trade near the transport routes of summer residents.
Questions and answers on the topic
No questions have been asked about the material yet, you have the opportunity to be the first to do so
How to make
In the age of progressive development of science and technology, assembling a shovel yourself is not so difficult. There is no need to look for material, take it to the forge, or wait until the canvas is forged according to your wishes. You just need to go to the nearest gardening equipment store and pick up the components. You can purchase ready-made shovels or individual parts. For example, a bayonet shovel without a handle is sold in all corners of the world.
Required material
The material of the shovel blade plays a key role in how easy it is for you to work. One of the most important factors is the tendency to rust. Agree, if a few weeks after purchase the canvas becomes covered with rust, this will not only complicate the work, but will also make you think about the money thrown away.
The most popular material for manufacturing is rail steel. Despite the fact that such a tool will be heavy, it will serve you for many years, especially if the steel is of high quality. Steel retains the strength of the plate for a long time (that is, the blade will not burst out of the blue). When choosing a bucket in a store, focus on the sound - good steel rings when struck.
The next most popular material is titanium mixture. It is the titanium base of the material that makes it possible to reduce the weight of the tool and its adhesive properties when in contact with the ground. Buckets made of this material usually have no bends. One of the obvious disadvantages is that the canvas does not bend, so it can burst with great force.
The last material on the list is stainless steel. In addition to increased resistance to rust, stainless steel, also known as stainless steel, is more durable than low-carbon steel. Increased strength allows you to use the tool longer without worrying about unscheduled replacement of the blade.
Choosing a Bucket Shape
The shape of the bucket is the next important point after determining the material from which it is made. The surface of the canvas must be smooth, without visible flaws, chips or cracks.
Conventional scoop buckets have a rectangular shape and are preferably used for working with sand, fine gravel, that is, bulk materials. An indispensable assistant in preparing mixtures of fertilizers or concrete. The bayonet blade is flat with steps to prevent the accumulation of soil. Ideal for breaking soil, digging up soil in the fall or when the soil is wet.
A snow bucket is similar to a shovel, but has more steps and depth. The bucket for tourist shovels has rounded edges and is at an angle of 45 degrees in relation to the handle. Such a shovel is convenient for clearing a place, digging small trenches, holes, holes.
Handle length and handle material
The handle of the shovel affects productivity and ease of work. The main criterion when choosing a cutting is its height. When choosing, be guided by the fact that the stalk should be 10 cm lower than your shoulder or elbow.
Wood is the most common material for making cuttings. Be sure to ensure that there are no cracks, knots, or splinters on the wooden handle that could injure you. Usually pine, acacia, oak or larch are used. Plastic is no less popular, but more fragile than wood. Plastic cuttings are much lighter, but are not suitable for many jobs with hard materials.
Steel is the choice for physically strong people. Such a stalk is not easy to break, but at the same time it will be much more difficult to cope with it. The handle, or the top of the handle, is an optional element, but it makes the work much easier. There are D-shaped, round and triangular shapes. Its main purpose is to nullify the rotation of the shovel during work, that is, when digging a hole and throwing earth, you will not worry that the handle will turn in your hands and the earth will spill back into the hole. The handle also helps guide physical effort, especially when working with hard soil or clay. The material used for manufacturing is very diverse - steel, wood, plastic.
It is best to choose wooden handles: your hands will not stick to them, the likelihood of chipping or breaking is reduced, and you can work at any temperature. As you can see, putting together your own shovel is not a difficult task. The main thing is to decide on the scope of work, purchase the components and, in a few minutes, assemble them into a ready-made tool for processing household farming or construction work. This option will allow you to maximally adjust the parameters of the shovel to suit you, and this, in turn, will significantly increase productivity and pleasure from work.