A miniature New Year tree made of foamiran and organza will decorate your home or holiday table, it is easy to make with your own hands, and you will get great pleasure from needlework.
By spending a little time, you can prepare original gifts for your loved ones. The Christmas tree will last for several years without losing its decorativeness and attractiveness. Even a child can handle the job, the main thing is accuracy and perseverance.
How to decorate?
Today, organza is widely used in all kinds of needlework, because this fabric perfectly holds its shape and is very easy to work with. Organza is a fairly lightweight material that is perfect for stylish and sophisticated home decoration.
To decorate your home before the New Year holidays, it is best to make an organza Christmas tree.
The big advantage of this craft is that it is quite possible to determine the color and size of the finished product yourself.
A decoration made of organza is a rather interesting and unusual craft.
A do-it-yourself figure using organza can be made quite quickly; with such a craft, everyone can celebrate the holidays in an original way.
To conduct a master class, you need to prepare the following equipment:
- a piece of cardboard;
- organza;
- glue;
- mesh or tulle;
- scissors;
- all kinds of decorations.
The size of the finished product depends entirely on the size of the selected cardboard, which is why, in order to get a fairly large product, you need to secure several album sheets of cardboard.
From one prepared cardboard sheet, you need to cut out a small semicircle, then twist it in the form of a certain cone, which needs to be firmly fastened, because this will be the basis.
After this, you need to cut out medium-sized triangles from tulle and organza and make a tube out of them. Using glue, you need to glue the rolled tubes directly to the base.
For convenience, it is best to start gluing the triangles from the bottom and you should definitely try to ensure that the prepared tubes are glued evenly on absolutely all tiers.
To ensure stability of the structure, it is necessary to place the tree on a base made of felt.
Champagne
In the same way, as described in the previous master class, you can make a Christmas tree, but with a base from a champagne bottle.
- empty bottle of champagne;
- two-way cattle;
- 500 – 700 g of sweets.
- Carefully wipe the glass of the bottle with a dry cloth, otherwise the tape will not stick.
- Starting at the base, apply a strip of double-sided tape to the bottle. You can “wrap” it in a spiral, or in parallel rows. Whatever you like best.
- After gluing the tape, tear off the top layer of tape and glue the tails of the candies in a row, placing them vertically. Repeat step for each row. Try to make the top row of candies slightly overlap the bottom.
- The top of the bottle can be decorated with a flat candle or a paper star.
Master class on making
There are a huge number of methods for making Christmas tree crafts. The master class on making a Christmas tree from organza is quite interesting and original. It is quite possible to use various materials for production.
In addition to a piece of cardboard, foam plastic, which must first be covered with foil, is ideal as a base. When the base is prepared, you can proceed to decorating the Christmas tree. The finishing is done using organza, which must be cut into squares of the same size.
To decorate the Christmas tree, you need to pierce several squares with toothpicks and secure the fabric beautifully with glue. Then, when all the squares are completely ready, you need to fill the entire base with them, simply inserting toothpicks into the foam.
The finished product must be placed in a flower pot and decorated beautifully with the help of original decorative ribbons, as well as a variety of beads.
This tree looks very beautiful and original, and the master class is quite simple, which is why even children can easily repeat it.
If you wish, you can make such a Christmas tree using candies, in which case the finished Christmas tree will not only be very beautiful, but also quite tasty.
The completed figure looks very attractive, because a person can easily choose the size and color of the future product.
In addition, it is quite possible to conduct a master class with your children and thereby have a fun and interesting time with them.
Sweet story
Beautiful and sweet crafts made by craftsmen from sweets and various decorative materials (mainly from floral corrugated paper) are made using the sweet design technique. This name comes from the English word sweet - sweet. The creation of such compositions is inextricably linked with the history of the appearance of sweets.
The first sweets appeared in Europe at the end of the 18th century. With the development of technological progress, confectioners realized that small sweets in beautiful packaging sell better than large and unpackaged ones. This is how candy wrappers were invented. The French packed sweets in special boxes - bonbonnieres. They were made from precious metals. The Germans adopted this tradition from the French. Traditionally, at the beginning of the school year, their children received a huge bag, decorated with various decorative materials, as a gift. This little bag was filled with sweets and school supplies. Sweets came to Russia at the beginning of the 20th century. The widespread cultivation of sugar beets made it possible to reduce the cost of sugar production. Accordingly, the price of candy fell and began to be sold freely. The children's favorite treat was lollipops, which they bought in large quantities.
How to make an interesting and unusual product?
The decoration looks very beautiful and original, which is why during the holidays it can become the best product for absolutely any home. The master class on making such a Christmas tree is quite simple, but you need to prepare all the necessary equipment and be patient.
You can make a pine figure from thick wire and organza. To make such a Christmas tree, you need to take thick wire, material of any color, ribbons, glue and decorative ornaments.
The thick wire must be bent slightly near the edge and completely wrapped with decorative ribbon. It is necessary to make a large number of separate, rather large petals from the main material and fasten them to the wire in such a way as to create a lush and beautiful figure.
The finished product must be placed in a plastic cup and secured. Then you need to decorate everything to your liking. This master class will appeal to everyone, and you can do it with the whole family.
Options for Christmas tree balls using photo printing
You can approach making a toy from a creative side if you have a printer at home. When working, a foam blank or a transparent plastic base is still used. Making Christmas balls with a photograph will vary depending on the technique:
This version of the toy is considered the lightest and most original. It can be placed on a Christmas tree or hung on a lamp hook in the room. It will remind you of the moments spent and create a festive atmosphere.
If you constantly make toys yourself, you can put an individual stamp on your Christmas tree balls. To do this, it is recommended to use a rubber eraser, where the master’s logo will be depicted. By dipping the eraser into the paint, you will be able to leave an original imprint on the surface of the product. It will characterize the work of the artisan.
Using handmade Christmas balls to decorate your home interior will bring warmth, tranquility and comfort. The products will lift your spirits by adding bright colors to the snowy weather outside your window.
What to make from leftover tulle and organza - a tablecloth: photo
Tablecloth made from remnants of tulle and organza.
A piece of lace tulle can be used as an independent tablecloth in the country house or veranda. What else can you make from leftover tulle and organza?
Tablecloth made from remnants of tulle and organza
Another option is to lay transparent tulle with a floral pattern on top of the main tablecloth, as in the photo above. A smooth piece without patterns can be laid under the main tablecloth. In the latter version, the tulle lower tablecloth should be quite long, almost touching the floor. In any case, treat the edge with a ribbon or flounce made of the same fabric. Look how beautiful a tablecloth made from old tulle looks even in the living room.
Tablecloth made from remnants of tulle and organza
We have to:
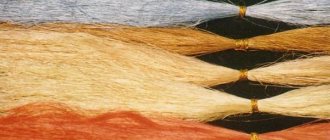
- dark green organza fabric;
- yellow yarn;
- whatman paper A3;
- newspaper;
- beads and half-beads of red, yellow and some white;
- Christmas ball;
- candies;
- pencil;
- a glass of yogurt;
- building gypsum;
- PVA glue, stapler, scissors, hot gun.
First, let's make a base - a cone. For this we take whatman paper A3 (if you want a small Christmas tree, you can also take A4).
We lay it vertically, marking the center on the top side. We take in our hands a thread a little more than 40 cm long. We tie one end to a pencil. We hold the second with the thumb of our left hand in the marked center. We stretch the thread and draw a pencil from one side of the sheet to the other. It turns out to be part of an oval. Cut along the marked line.
From the center we draw two lines - one to the beginning of the oval, the second to the end. We cut the sheet along them.
Coat with PVA glue and connect the sides. There should be a 1 cm hole at the top. Trim the bottom a little, and our cone is ready.
We strengthen it with the help of newspaper: we crumple the sheets and fill the void inside the cone with them. We cut out a circle to the size of the bottom plus 1 cm. We make cuts on this centimeter, the distance between them is 1 cm. We bend it. Coat the inside of the cone with PVA glue and insert the bottom. You can lightly paint the cone with paint or a felt-tip pen so that the white color shows through less.
We cut the organza into squares 7 cm by 7 cm. And we twist it into little balls: we add two opposite corners (we get a triangle), and to the same top a second pair of opposite corners. The sides are hidden in a little bag. We fasten with a stapler at the base.
We put the cone on the jar to make it easier to work, and take a hot gun. Drop a drop of glue onto the base of the bag and glue it to our workpiece.
Rows with glue at a distance of 1.5 cm-2 cm. Place the bags in a checkerboard pattern.
So we gradually get to the top.
For a pot, take a yogurt jar with a capacity of at least 500 grams. At a distance of 1 cm from the bottom, coat it with PVA glue, apply yarn and wrap the jar lightly. We gradually rise to the top, periodically fixing it with glue.
Make a hole in the center of the bottom of the cone, pour hot glue into it and insert a pencil. We try it on the pot and adjust the height: the bottom of the Christmas tree should lie on the rim of the pot, and the pencil is just an additional support.
Pour plaster into the pot and fill it with water until it reaches the consistency of liquid sour cream. Insert a pencil with a herringbone pattern. We check from all sides - it should stand straight, and leave to dry for at least two hours.
When the workpiece has dried, take a hot gun and candies and glue them into the spaces between the rows.
Coat the ball with hot glue and insert it into the hole at the top of the cone. We cut one square of organza into four parts and twist small bags. Glue them around the ball.
At this stage the Christmas tree looks like this:
We add bright beads and half-beads, in general, everything that is at hand - just follow the color scheme. You can add more white beads, but they should be in a minimal quantity. We glue all the decorations with a hot gun.
That's all, our craft or gift is ready. You can safely admire the work done.
Interior decor from remnants of tulle and organza - lampshade: description, photo, video
You can cover, wrap, wrap, or drape almost any item in the house with tulle or organza, and it will sparkle with new warm notes. The originality of country style in the interior can also be emphasized with a tulle accent. Here is a description of the process that will help you create a lampshade - a beautiful interior decor from leftover tulle and organza:
Interior decor from remnants of tulle and organza - lampshade
First option:
- Cover the frame of an old country lampshade with bright organza.
- The fabric can be secured with thread or a glue gun.
- Decorate the joints with lace, colored fabric cord or tulle bow.
Interior decor from remnants of tulle and organza - lampshade
Second option:
- Cover the finished lampshade with tulle with a pronounced pattern, as in the photo above.
- Fancy floral shadows will fall on the walls and ceiling and create a romantic mood.
Thanks to this decor in the interior, sitting down for evening tea, in a cozy soft diffused light, will be a favorite time for the whole family. Watch in the video how a craftswoman makes a lampshade to decorate the interior of her apartment:
DIY magical snow globes
In fact, such jewelry is very easy to make yourself. To do this you will need: a glass container with a screw-on lid, a figurine toy, glitter or small snowflakes, water, glue and glycerin. We glue the toy to the lid, pour glitter into the jar, add water and a few drops of glycerin, screw the lid on properly, turn it over - our magical New Year's snow globe is ready!
Before the New Year holidays, there is an incredible desire to decorate the house, decorate the Christmas tree, and make beautiful gifts. To bring your ideas to life, it is proposed to make Christmas tree balls with your own hands - such original crafts will become worthy toys for the New Year's tree. They are much better than factory products, as they contain a particle of human thought and warmth.