As children, we were all passionate about collecting change in piggy banks. So, we tried to fulfill our imperishable dreams of major purchases, new toys and sweets. However, the years go by, and over time the piggy bank went to gather dust on the mezzanine of the wardrobe.
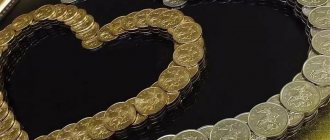
Do you have a huge amount of copper coins? We have an amazing DIY project! How do you like the idea of laying them on the floor as a mosaic? This may seem very labor-intensive, but believe me, the result will exceed all your expectations!
Before work, you should get a good night's sleep, then working with pennies will not seem so tiring to you.
Vases
Required materials: coins, base (any vase you want to decorate), glue.
Progress of work: paste coins over the vase taken as a basis.
Additionally, for such a vase you can make branches and place them inside.
Letters or numbers
Required materials: coins, glue, base (cardboard, plywood, foam).
Work progress: cut out letters or numbers from the existing base. Cover the base with coins.
This extremely simple decor can be used to decorate a photo zone at any photo shoot, any holiday or event.
Minuses
Price. Compared to other types of coating, you will have to fork out more for coin coating. It’s unlikely that anyone actually has a piggy bank at home with several tens of thousands of identical coins. Therefore, you will have to buy them, for example, from a bank.
In America, the cost of one square meter of such a floor will cost almost $30 - and this is only the price for coins, not counting other materials. Time. Picking up coins, arranging them in patterns, and gluing them is a task for the patient. This will take a lot of time, but the result is certainly worth it!
Difficult to dismantle. On the one hand, the durability of such a floor is a plus. But on the other hand, this is an option for “eternal” use. It is almost impossible to dismantle such a floor.
Important! To make installation of such a creative floor easier, there are special clamp templates. You can order them or make them yourself, and they significantly speed up the process of laying out coins
Various options and combinations
Floors made of coins can be very diverse, as you can see by looking at the presented photos. You can not only combine details of different sizes and colors, but also find decorative coins that have completely different shades. This way you can give the floor either a specific color or lay out a bright contrasting pattern.
Combining completely different materials can also be an interesting design option for such a floor. Coins can be combined with:
- natural wood, cut at different angles and in different directions;
- shells and sand - which will create the impression of the seabed;
- other drawings when creating a three-dimensional filling composition - this way you can get, for example, an image of a chest with coins scattered inside it;
- combine with various stones.
By making a self-leveling floor with various decorative elements and coins, you can get an exclusive, designer finish for the room. In this case, nothing limits the flight of imagination. The main thing is that all the elements of the interior are in harmony with themselves, creating a single space in perception.
Things to consider
There are several important points, without taking them into account, there is a risk of getting a bad result in the end. Therefore, it is worth listing the main nuances that require your attention when choosing such an unusual and original floor finish:
- Coins must be of the same denomination or selected in such a way as to create a single and integral composition.
- The color of the parts matters.
- The surface on which everything is to be laid out must first be carefully leveled. Otherwise, the result of the work will disappoint you - everything will turn out uneven and crooked.
- Stacking coins is a very painstaking process, although not complicated. It is better to involve assistants in this operation. Otherwise, you may spend too much time at this finishing stage.
- After pouring, epoxy resin may emit an unpleasant odor and harmful substances for some time. At this time, it is better not to stay indoors for a long time. After hardening, it becomes harmless to health.
You can create an alternative version of this floor by using cement or another similar solution instead of epoxy resin. In this case, it is necessary to fill in such a way that the front part of the coins is above the surface of the poured solution. After the cement has hardened, the entire surface must be covered with several layers of varnish.
Floor made of coins
Have you ever walked around with money in the truest sense of the word? No?! But it is possible, and we will tell you how to make an original floor from coins with your own hands
It will attract the attention of guests and truly become the center of your home.
Laying options
You can place them in one continuous carpet of identical coins or by “weaving” patterns. Drawings and ornaments will require a preliminary sketch, calculation of pennies and perseverance, because the work is very painstaking.
Another design option is to lay them out randomly, but in this case it is more difficult to calculate the required quantity. It is better to take the same type, but if they are of different sizes, then choose a pattern so that all the circles fit harmoniously into it.
You can lay out a pattern around the perimeter of the room or make the covering with rhombuses, triangles, and the like. Depending on the pattern, coins can be of different sizes and denominations, different states, colors, and shades. Also, small metal money can be combined with pebbles and sand.
1. Start by making the base.
Coins are placed on a concrete or cement base, although it is best to place them on a thin self-leveling floor. It is cleaned of dirt and dust, dusted, puttied, and primer is applied.
2. Prepare materials and tools.
You will need glue, coins, a glue brush, and a mixture for finishing the floor. Use a self-leveling transparent floor based on epoxy resin.
It is better to sort the collected money, collecting it in columns or piles in accordance with their denomination.
3. Calculate how many pieces you will need
The first calculation option is if the coins are of the same type, lay them out in a small square with sides of 10*10 or 100*100 cm and calculate how many are included. Place in a checkerboard pattern. Then draw the floor into cells with the same dimensions. Multiply the number of cells by the number of coins in 1 cell, you will get the required number of pieces. We advise you to add 5-10% of the total number of pennies as a last resort.
The second calculation option is to lay out an element of a pattern or ornament of a certain size and calculate how many similar patterns will fit on the surface.
4. Prepare the coins.
To begin with, you need to wash them with water and soap, clean them of large dirt, and air dry them. Be sure to remove any dark deposits from the coins and polish them to add shine.
It is important that they begin to sparkle, because after you lay them and fill them with a polymer floor, they are unlikely to ever be polished to a shine. To remove plaque, use special products for metal, copper or silver products; pasty, dry products are suitable
Arm yourself with a toothbrush or small brush and rub the money. Place cleaned coins in stacks of the same size according to their face value. This will make it easier to count and navigate when laying out.
5. Be patient and start posting.
There are two options for laying out coins
The first is to lay out rows sequentially, circle by circle, starting from the center of the room, laying in segments. If the idea is to lay it in a single sheet without a pattern, then it is better to lay it in a checkerboard pattern, thus leaving a smaller gap between them. Use a brush to smear a stripe on the surface and carefully place the money, trying not to dislodge it.
The second option is to use squares of self-adhesive construction mesh. It must first be cut into squares of the required size. Lubricate the fabric with glue and lay out the pennies.
After this, all that remains is to fix the blanks on the floor, just do not forget to remove the protective film from the back of the squares. Press the coins harder onto the floor and smooth them out.
Record the result
Prepare a solution and pour the epoxy self-leveling floor onto the neatly laid mosaic tile and let it dry for at least three days.
Attention! While the epoxy self-leveling floor is drying, lock the doors to the room and close the ventilation hole. This will prevent animal fur, hair and dust from getting on the surface! It will be impossible to remove them, and it is difficult to dismantle
It is worth noting that by making a coin floor, you will not only give the money a second life, and it will finally stop lying around under your feet, but also provide a finishing coating. And if you believe Eastern philosophy, treating coins with respect will attract wealth and prosperity to your home.
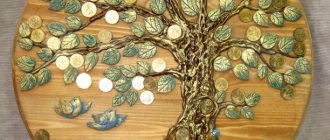
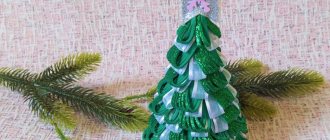
Money Tree
Various crafts trees made from coins are very relevant and fit perfectly into any interior. It is also believed that money trees attract prosperity and prosperity to the house, so this decorative element will definitely be useful to you. To create a money tree you need to use the following materials:
- Clay;
- Wire;
- Coins;
- Glue;
- Dye;
Clay is used to sculpt the base; it should be round and of medium thickness. You need to make a tree trunk and branches from wire; you can make it thicker or thinner.
The finished tree needs to be glued onto the clay base; the base is decorated with glued coins. Coins are glued to the branches of the tree, after which the tree must be painted gold. The tree trunk can be decorated with thick woolen threads of brown, green or black.
DIY coin crafts
DIY crafts and decorations from ceiling tiles for the New Year
In fact, coins in jewelry and souvenirs are not a new thing at all. Remember the gypsy monistos, created from many tiers of coins of different denominations. They also decorated the edges of scarves, and during dances they jingled cheerfully in time with the movements of the dancer. Various pendants, keychains, and talismans were made from coins. Recently, various Chinese trinkets such as money trees, souvenir toads and gods sitting on coin deposits have been revived. It is believed that this is not only cute, but also very symbolic, as it accompanies the material well-being of the owner of such a toy. Who knows, maybe Feng Shui will work, but at least it certainly won’t get worse. But a funny souvenir made from coins, and even made with your own hands, will certainly please the eye. And the process of making it can be an excellent relaxer. Working with coins and other little things can be so captivating that it will become a real outlet in a world of bustle, eternal haste and endless problems. You only have to try it once! Moreover, souvenirs made from coins
made with your own hands, with your soul put into them, can be a wonderful gift for a birthday or a wedding of friends.
Using coins of different shapes and colors, you can achieve the effect of a play of light on a picture of coins. By gluing it onto a canvas, it would be a good idea to hang such a picture in the house and it will bring financial success. At the Olympics in London, they laid out such a mosaic of stumps.
The pennies were laid out in several layers.
Where can I get coins? And stale piggy banks, and compartments of women's handbags, wallets or pockets littered with small change, and Soviet rarities lying around unnecessarily, stored just in case! Or maybe this is exactly the case? So, let’s clear out all the stash and get to work!
If you have enough coins, you can decorate the walls with them!
Coins in the interior will look even better than Italian tiles.
Some hotels make walls out of coins.
Old furniture can be decorated with coins and varnished.
The first, simplest option is to make an original souvenir that will serve as a real talisman that will attract financial well-being and good luck to you. To make it, you need to prepare some voluminous object with smooth lines, for example, an old vase, jug or even a simple bottle. You will also need plasticine and a lot of small coins - preferably they are of the same denomination. Penny coins are best suited; due to their small size, the souvenir will look more subtle and elegant. The process of making such crafts from coins with your own hands is simple to the point of primitiveness. To begin with, a thin layer of plasticine is evenly applied over the surface of a vase or other object that you decide to work with, and then coins are attached one row after another according to the principle of scales - from the bottom of the vessel to the top. In this case, you need to carefully monitor the distance between the rows, avoiding too wide gaps. If the coins are of different denominations and qualities, then you will have to sort them before starting work, separating the newest and shiny coins, especially pleasing to your eye, to decorate the top of the dishes.
An old vase that has been remade will shine with new colors.
For the vase, it is better to choose bright shiny new coins or clean off old ones. Cover the vase with black varnish or paint and glue the coins. You can use Moment glue for iron and porcelain.
Don't forget to ventilate the room. The glue is toxic.
This is the vase we got. Looks very solid, doesn't it?
The largest and dullest coins should be placed at the bottom of the vase. If the object to which the plasticine with money layers is attached is too large in size, then coins of different colors and denominations will look very appropriate on it. For example, from white and yellow metal you can form real patterns over the entire surface. Nothing limits your imagination here. After completing the work, the finished craft must be protected from darkening of coins and dust by covering it with several layers of transparent varnish. After the varnish has dried, you will get a beautiful work of art that will make you proud of yourself: after all, you created a real masterpiece with your own hands!
To make this ring, we used two one-cent coins and a two-cent coin (the base).
To work you will need: nail polish, a base ring and three coins.
Paint two coins with nail polish and glue them together like we did.
The coins will also make wonderful earrings.
floating cup
This souvenir looks so impressive that it can be given as a gift. It is made quite simply; you need to prepare the following materials from the necessary materials:
- Cup and saucer
- Fork
- Coins
- Dye
- Glue
The fork must be bent on both sides so that you can put a cup on it, and glue the other end to the saucer. The base needs to be wrapped with threads, then the coins need to be glued inside the cup onto the fork, gradually going down to the saucer, which also needs to be decorated with coins.
If desired, the coins can be painted gold or silver, so the craft will look more impressive. A master class of all kinds of coins will help you see the finished result and understand the manufacturing process in more detail.
General information
In reality, covering the floor with coins is not as difficult as it might seem at first glance.
The only thing you should be prepared for is that very painstaking work awaits you. The whole process can be divided into several stages:
- Calculation of the required amount of material;
- Preparation of the base;
- Applying money to the base;
- Securing the coating.
Laying money on the floor surface
Tip 2
If there are no decorative leaves, then you can take fabric and cut them out of it, after which the resulting leaves must be painted with green paint.
You can glue some beautiful shiny rhinestone between the leaves. The resulting apple should be placed on a plate and decorated with various accessories that you have at home.
Installation of coins on the floor
Counting the required number of coins
Rows of coins should be placed in a checkerboard pattern. How many of them are needed to completely cover the floor surface area must be calculated in advance. It is quite possible that the piles that you have on hand will not be enough.
The calculation is performed in the following order:
- To accomplish this task, you can use a square-shaped cardboard sheet with sides of one meter.
- The cardboard must be laid on the table and filled with coins. If you are afraid that the rows will get confused due to accidental movement, then each circle can be outlined with a pen.
- When the sheet is filled, you need to count the number of coins that fit on it.
- Next, use a tape measure to measure the dimensions with money.
- Then you need to multiply the width and length to calculate the area. Having received the number of square meters, it is not difficult to find out the required number of coins by multiplying this indicator by their number in one square.
Surface preparation
Before proceeding with installation, it is necessary to carefully prepare the base.
This is done as follows:
- First of all, you need to remove the finishing coating of the floor of the apartment or cottage in the entire room, if any.
- After dismantling the old surface, it is necessary to prepare the base - get rid of all dirt, grease and dust. Degreasing can be done using detergent.
- If the surface is uneven, then it must be puttied or even a finishing screed.
Laying
There are two ways to deposit money. The first method is suitable if several people will be doing the installation.
The instructions look like this:
- Each worker must “arm” himself with a bucket of glue, a brush and a jar of coins.
- On the floor, apply an adhesive strip 10 cm wide from the edge of the wall.
- After this, coins are placed on the glue from the middle to the edges. Those. you need to start putting money away from the center.
- When the first row is completed, you can begin the next one.
The second method can be used if you do the installation yourself.
The work is carried out as follows:
- First of all, you need to prepare the self-adhesive fiberglass fabric. It can be purchased exactly according to the square, and then cut into squares of one meter. Since you have already measured the floor, the number of squares is known.
- Then you need to lay out the coins on the fiberglass, after smearing each with glue.
- Then you need to draw a grid on the floor of the room with chalk in a checkerboard pattern to make it easier to lay the workpieces and the coating will be without distortions.
- Then you should place the squares with coins on the floor one by one, after first tearing off the protective film from them. The workpieces must be pressed evenly to achieve high-quality adhesion of the glue to the base.
Securing the coating
After the coating is laid, it needs to be poured with an adhesive solution, thanks to which the coins will be firmly attached to the floor.
To do this you need to do the following:
- First you need to make an adhesive composition, for this you need to mix a UV blocker with epoxy sealant.
- To reach the far wall without damaging the coating, you should lay a board on the coins.
- From there, the adhesive composition should be poured over the money, filling all the gaps between the coins.
- Then you need to wait a certain time until the glue dries.
Now the work is finished, all that remains is to rejoice at the excellent result!
Panel
The basis for the panel can be a rectangular sheet of plywood or fiberboard. This method of storing travel souvenirs is much more convenient and effective than keeping “trophies” in bulk.
Designing a panel in the form of three-dimensional letters is as easy as shelling pears. We cut out symbols from plywood or cardboard (you can use thick foam or other convenient material) and glue coins of various denominations and sizes (currencies of different countries) onto droplets of hot glue.
Frame decor with coins
Painting from different coins
Decorations
Coins have long been used to decorate clothes, make jewelry and talismans from them. Moreover, the money in the product did not lose its purchasing power. A bracelet or monisto could be exchanged for food.
Modern craftsmen drill holes in coins and connect them together with wires, forming chains (sometimes in several tiers). You can make a pendant, earrings, or bracelet from coins with a hole. In the latter case, pennies can be attached to a chain with small rings made of thin wire or connected by braided cord.
Making a ring is a little more difficult, but the craftsman is afraid, so nothing is impossible for a handy man.
Securing the coating
Recommendations and video: how to glue a ceiling plinth to a stretch ceiling
If you want to lay out a floor made of coins, the photos from our article will help you get inspired and decide on a pattern. Moreover, you will understand how to act and where to start. After the base of the floor is completely covered, it is filled with an adhesive solution, which will reliably fix the fragile structure.
Once the compound has dried, you can mix the epoxy sealant with a UV blocker and apply the mixture to the surface. It will fill any gaps between the coins and the fiberglass. It is strictly forbidden to walk on the floor until it is completely dry. It may take up to three days to dry completely.
- https://vse-postroim-sami.ru/materials/flooring-tile/5088_kak-sdelat-pol-iz-monet-poshagovaya-instrukciya/
- https://pol-inform.ru/drugie/kak-sdelat-pol-iz-monet/
- https://podelki.pro/podelki-iz-monet/
- https://furniturelab.ru/pol-monet/
- https://fb.ru/article/366137/kak-sdelat-pol-iz-monet-svoimi-rukami
Conclusion
We looked at several ways to make a floor out of coins. Regardless of which one you choose, this decor will look very impressive indeed. True, the price of such a coating largely depends on the coins themselves.
Often, old Soviet piggy banks are shaken out for these purposes, which allows you to decorate the floor almost free of charge. Additional information on this topic can be obtained from the video in this article.
If you need to buy a SVP tile leveling system in Moscow, call or write, we will be glad to have mutually beneficial cooperation. We sell sets of SVP parts (wedges and clamps designed for different seam widths in different quantitative variations (sets with different numbers of parts)). Contact us, we will be glad to cooperate! See you in touch!