Weaving figures from rubber bands is very popular among children and teenagers. To learn how to create things from rubber bands yourself, you don’t need expensive equipment or special skills. Before you start weaving, you only need to purchase the following devices: a slingshot; elastic bands of different colors; machine; hook (plastic or crochet).
The creator of this type of needlework is Chong Chun Ng. Together with his family, he started producing weaving machines. His children tried to weave figurines and bracelets from rubber bands, however, they experienced difficulties. To help his daughters, he invented a machine, which was a board with nails on it.
Instead of rubber bands, Chong took pieces of tubes of different colors. The master's invention helped his children improve their weaving skills. To support the man, his family invested all their savings in this project. To help future buyers, family members filmed master classes in video format.
Unique collection
Serious interest in the process and hard work will lead to excellent results. If you are guided by imagination and perseverance, you can create entire compositions.
It is better for beginners to try their hand at weaving figures from rubber bands on a slingshot; the work will proceed easier and faster. Once you gain experience, you can try more complex and unique products of various shapes and sizes.
The abundance of proposed options for the finished work of art is amazing. Using detailed instructions, in which all the subtleties of the work are explained in clear language, you will be able to achieve tremendous success in needlework.
Each person will find something new and exclusive for themselves; animals, plants or various molds will perfectly decorate the interior of the house.
Important! Fascinating weaving of rubber bands into figures that are close to your liking will bring pleasure and peace to the master.
In general terms about devices
There are special devices for crafts of this kind or plastic molds. Some craftsmen adapt disposable cutlery and design on them.
To achieve the most productive results, you can use both solid and collapsible structures. The main thing is that working on creating a figurine from rubber bands is simple, and the activity is enjoyable.
Among the analogues, the following quite convenient and practical specimens are noted:
- Using a hook.
- Pencils.
- Ballpoint pens.
- Fingers.
The differences between a slingshot and a machine can be seen immediately; the first will have 2-4 columns, and the second will have at least eight. The manipulations will also be slightly different, but in general terms all the techniques are similar.
Having dealt with the most important stages, the machine on which everything will be produced will no longer be of particular importance. And with some practice, more complex designs will seem easy and trivial.
Note!
- How to make wooden shelves with your own hands - original design options
- Kinusaiga technique for beginners: what is it, a description of creating paintings from threads
How to make flowers with your own hands from paper, fabric and scrap materials. We create bouquets of homemade artificial flowers
What will you need for your job?
There are entire sets on sale called “rainbow machines” - Rainbow loom. Their equipment may vary, so you need to choose the most suitable option for yourself. In these sets you can find:
- a certain number of elastic bands (material - hypoallergenic latex) of different colors and shades;
- machine (there are original models that can be disassembled so that you can change the shape or make a long product, there are also non-dismountable ones) with several rods for fixation;
- hooks (thin or thick, plastic / plastic / metal);
- beads, pendants, clips for fastening and decoration.
Many people even use a regular crochet hook. Perhaps it will be more convenient for you to weave this way too.
The specificity of this type of needlework is that it does not have generally accepted manuals or diagrams, but there are master classes on video that allow you to quickly learn how to make wonderful toys from rubber bands.
Types of supporting documents
For beginning craftsmen, video instructions on weaving with rubber bands on a slingshot will be useful. Using a clear example, you can quickly figure out what’s going on and start creating your own achievements.
For some, detailed descriptions in the form of text with interesting and high-quality photographs will be suitable. The comments and advice they contain are always sensible and quite practical, so you should listen to them.
Each of the options is good in its own way; if possible, it is better to familiarize yourself with both and then choose the appropriate one. It is acceptable to combine instructions, an image of how to weave animals from rubber bands is placed on the table, and the video is turned to for clarification of unclear points.
Coordinated actions will help you achieve great heights and high-quality crafts of varying complexity.
Making crafts from rubber bands using a fork
Few people realize that using a fork you can weave exclusive jewelry.
Step-by-step instruction:
- Take three elastic bands and put them on the fork according to the following pattern:
- Place the first elastic band on the three left teeth, twist it in the shape of a figure eight and pull it over the three right teeth.
- Place the second elastic band on 4 teeth, and put the remaining back part on the two middle ones.
- With the third rubber ring, do the same manipulations as with the second.
- Hook the left loop located at the bottom with your hook, remove it from the fork and thread it through the middle rows. Do the same manipulations with the second loop.
- Put on the new rubber band according to the following pattern:
- Place it on 4 teeth, and extend the back part to the two middle ones.
- Using a crochet hook, pull out the loops on both sides in sequence.
- Periodically remove the bracelet from the fork in order to hook the upper elastic bands and carefully pull them up.
- Remove the bracelet and return the two outer loops to their original position.
- Continue and complete the weaving.
- Attach the S-shaped fastener.
Without exception, all methods of weaving elastic bands are based on the principles of knitting or twisting. Therefore, having mastered several techniques for working with elastic bands, you can continue your creative search on your own, using the experience gained.
Special offer
Well-thought-out and complete creativity kits are sold at the market and in craft stores. In the question of how to learn to weave from rubber bands, such things have a positive impact on the development of skills. The box contains the following ingredients:
Note!
- How to make flowers from cold porcelain: chic floristry and DIY crafts for the New Year step by step
How to make cold porcelain from potato, corn starch, liquid, without soda. Recipes and cooking methods
- How to properly make a birdhouse with your own hands from scrap materials: we create an original birdhouse according to sketches
- Machine.
- Slingshot.
- Clips.
Additionally, you can purchase multi-colored rings; they are packaged in bags that are very easy to use.
Advice! Be sure to pay attention to the price; cheap materials tear or become deformed in the process. Such negative properties will lead to a bad mood and even unnecessary anger.
The confusion that occurred at the end of weaving a figure on a hook from rubber bands will even lead to alterations in some areas. No one wants to face such problems, so they approach the procurement issue scrupulously.
Tools slingshot and hook
A slingshot for weaving is sold in stores with almost every set of elastic bands. This is the most common lumigurumi tool due to its compactness and ease of use.
A mini-machine slingshot is a plastic device with two “horns” and a handle for holding the tool. The horns on one side are convex, which gives shape to the elastic and protects it from twisting. On the other hand, they are equipped with concave grooves, from which it is easy to pick up the elastic band. When working, the slingshot is positioned with its horns facing up.
Also, the lumigurumi kit usually includes a small plastic hook. It is very convenient for them to remove the rubber bands from the slingshot, moving it into the groove. If this tool is not included in the kit, you can use a regular crochet hook.
Types of material
As for the basic workpiece, thanks to the development of technology, quite interesting new items began to appear on the stationery market. Such innovations include the structure of stretchable parts.
All kinds of sparkles are added to them; visually, the presentation of keychains made from rubber bands looks very impressive. The use of transparent models adds elegance and style to the design. For those who like to experiment, the proposal with two-color rings will be interesting.
Note!
- How to make candles with your own hands: instructions for making wax, gel, scented, homemade decorative candles with a wick
- What you can make from foamiran with your own hands: we create flowers, Christmas tree decorations, snowflakes, three-dimensional paintings (photo + video)
- DIY glass crafts: what can be made from glass bottles, liquid glass, broken glass (photo + video)
Thanks to the extensive selection of color variations, it's easy to bring your deepest desires to life. Bright and dull shades will harmoniously highlight any image if used in decoration. And the animals and molds look very natural and natural with such materials.
The simplest master class
When thinking about what you can make from rubber bands for weaving in your first work, the answer will be obvious - it’s a strawberry.
For production you need a minimum of material and time, to understand the techniques and get a chic keychain, this idea will be most suitable. In terms of color characteristics, the product is very similar to a real berry. And the volume of the finished composition adds attractiveness. For work you need:
- Hook.
- Green blanks for the tail.
- Red elements for the base.
The first red ring must be twisted twice and placed on the right side of the device. Guided by the order, further string the remaining parts already stretched at both ends. Carefully remove the twisted piece and place it in the center of a long cord. After these manipulations, the initial state is restored.
Machine for weaving from rubber bands
It is necessary to place it conveniently on the table and continue the action. Two blanks from the left ledge are moved partially closer to the top. For greater comfort, pull on one part first, and then the second part.
The next pair comes after, and the lower loops are thrown onto the left half. A small tail is formed from green rings, reminiscent of a natural berry twig.
Basic weaving techniques
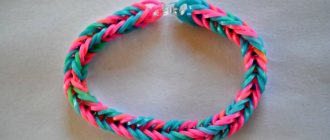
One of the simplest techniques is the so-called “fishtail”. Using this basic method, you can quickly and easily make a beautiful bracelet. The product can be woven on a mini-loom, a regular fork, or even just on your fingers. First you need to take one rubber band and, twisting it in a figure eight, put it on the frame of the machine. Put another one on top, but without twisting it, and on them, do the same with a third one. Next, start weaving: hooking the first (lower) elastic band, pull it through the remaining two to the center. Then do the same, but on the other side. Put the new elastic band on top again, without twisting, and then fold the bottom elastic band from both sides to the center.
And according to this pattern you need to weave until your product acquires the required appearance and size. Once you get the hang of it, you can then make this pattern inside out.
- A technique called the “French braid” will be a little more complex and elegant. To weave a product in this way, you need to put on a slingshot (or mini-loom) an elastic band twisted in a figure eight, and on top of it two rows of elastic bands that do not need to be twisted. After this, pry up the bottom elastic band on one side, pulling it to the center, and behind it the middle one - on the other side (in the same direction). As you can see, you are almost continuing to make the same fishtail, but you will be removing different cutters from the center. The weaving of the product ends the same way everywhere: a hook-fastener or a clip is attached.
- Another well-known technique – “sidewalk” – will help you make a more massive and voluminous bracelet. Here, initially you put on two twisted elastic bands, and on top of them two untwisted ones. The lower ones will need to be hooked to the center on one side only (right or left). Then, putting on two new ones, on the other, but not one, but two double loops. And then follow the same pattern: put on two elastic bands, removing two loops on each side in turn, going to the length you need.
Having 5 minutes of free time
It’s better not to rush into making your own, but if you have the opportunity, you can design a banana. A craft made from rubber bands for weaving on a slingshot will not take much time and effort, and the resulting toy will entertain you for days.
If you work hard, you can easily create a whole bunch that will not leave any person indifferent. The colors used are black and yellow, the contrast is so unique and harmonious that the finished design looks very believable and attractive.
The small tip and tail are dark, and the skin will be light. Having figured out how to make a toy from rubber bands for weaving, you need to move on to the actual process.
Recommendation! The auxiliary things will be both a slingshot and a hook; each master is free to choose the most convenient device for himself.
Making a bracelet on a machine
Step-by-step instruction:
- choose elastic bands of 3 colors;
- Place the first rubber ring on the middle post, and then on the left one. In this case, the machine should be turned towards you with the arrow;
- Throw the next ring onto the left column, which already has the first elastic band, and pull it onto the central post, while the elastic bands should be arranged in a zigzag pattern;
- then work should continue with the column closest to you. Using a hook, grab the elastic band of the middle row located below and thread it through the top, swapping places with the adjacent loop;
- Pull the removed elastic band onto the adjacent row. You should get a figure 8 shape. The same actions must be done with all the elastic bands located below;
- you should adhere to the rule - always weave to the left;
- remove the loops from the posts with a crochet hook;
- to put a bracelet on your hand, special clips in the shape of the letter S are attached to its ends. They can be purchased at specialized retail outlets or complete with elastic bands for braiding;
- Connect the ends of the bracelet with a clasp.
Practical and fun
Small molds of animals, ice cream or fruit will take their place on the keys to the apartment. Vehicle owners can hang them on the rear view glass or on the front panel.
Students will have fun during production, and then decorate the fountain pen with the resulting work of art. Parents will explain how to knit figures from elastic bands in the first stages, and after understanding the algorithm of actions, young masters will get to work themselves.
Some entertaining games or exciting trips around the apartment can easily be diversified by introducing such a plan with products. Favorite toys can be effectively decorated with cute keychains; to do this, you need to hang the created 3D figures from rubber bands on the hand of a doll or animal.
Circular weaving
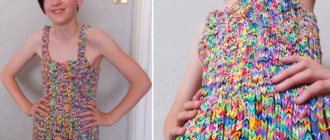
Using a hook you can create quite large and voluminous products. Almost everything that is crocheted from yarn can be repeated from elastic bands. Masters even came up with the idea of making clothes from this material.
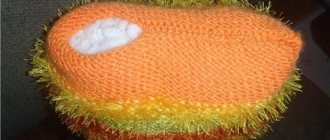
I would especially like to note the lumigurumi technique. It takes its roots from a type of circular crochet called amigurumi. Only rubber bands are used instead of threads. A wide palette of colors allows you to create very beautiful things and toys. For example, this owl is knitted using the lumigurumi technique.
Related article: How to correctly make a collage of wishes according to Feng Shui with your own hands: pictures and photos
Gift on an important day
On the eve of the New Year, it would be appropriate to design a Christmas tree.
Once you receive an invitation to attend a birthday party, you won’t have to think twice about it. Having taken out a special set, you can safely begin new achievements. A voluminous scarlet rose will definitely evoke positive emotions on the birthday boy. How to weave a 3D figurine from rubber bands is easy to understand from the available master classes and detailed instructions. After bringing one flower to life, you will definitely want to make a whole bouquet of beautiful bright plants.
Advice! A beautiful Easter egg made of harmoniously selected colors will diversify the basket and add even more joy to the church holiday.
When meeting a friend, you can easily exchange such souvenirs and appreciate each other’s imagination. The attributes of the celebration are painted in different colors, so there is something to experiment with.
The design called “monster tail” will perfectly help in creating a three-dimensional figure. The manipulations will be easy and relaxed, and the time will be required to a minimum.
Patterns on a fork
In the implementation of various kinds of objects similar to animals, you first need to master the technique using a regular kitchen appliance. Sometimes it works better with a fork than with a plastic holder.
How to use a kitchen appliance:
- Remake the thing like a number 8 and put it on the tip.
- Repeat and place around the edges.
- Repeat a third time.
- Then tighten it to secure it.
- Catch the bottom one and pull it.
- Repeat with the second center.
- Do it until there is enough volume.
- At the end of the part from below, lift up.
- Then flip the tip over and attach the clasp.
Touches of humor
Fans of jokes will appreciate products in the form of a snake with a protruding tongue. You immediately want to take such masterpieces into your palm and crush them a little. The long body allows you to wrap all your fingers in cold blood, this activity will greatly amuse and relax you.
Having figured out how to weave a shark from a famous cartoon series out of rubber bands, you can surprise your relatives. Such predators, unlike real ones, do not bite, and playing with them brings a lot of positive emotions.
Making a fishtail bracelet from rubber bands on a machine
Stages of work:
- An elastic band is put on the machine and twisted in the shape of a figure eight.
- The next one is put on without twisting, and the third is twisted like the first.
- The bottom elastic band is pulled through the other two to the center.
- After this, the next elastic band is put on top without twisting.
- Both extreme parts of the lower elastic band are moved to the center.
- The next rows are woven similarly until the planned size is achieved.
The result should be a small flagellum resembling a fish tail. To connect the ends of the product into a closed shape, special fasteners are used, often included in craft kits.
The created products are complemented with decorative elements. The most successful examples of such crafts can be found on the Internet on special websites.
Benefits for everyone
By telling how to weave a figure out of rubber bands for their child, parents can become very close to their beloved child. And the young designer, in turn, will gain valuable skills in needlework. Children develop fine motor skills and attentiveness well. These qualities will be very useful to young people in the future, and they will be grateful for this to the closest people in the world.
Advice from professionals
Anyone who wants to make not just a decoration, but a small masterpiece, must carry out the preparatory work correctly and choose the highest quality material. The attractive appearance of the finished product will depend on its characteristics.
Before weaving clothes for dolls, you must strictly follow the instructions of professional needlework masters. This will help beginners avoid most mistakes and make a truly beautiful product.
Experienced craftsmen advise the following:
- The first thing you should do is find a store in your locality that specializes in selling handicrafts and buy elastic bands or a weaving kit. Professionals advise using only high-quality and proven materials.
- Rubber bands should be selected according to color. It is best to use bright and contrasting shades.
- Before starting creative work, you need to prepare not only the materials, but also the weaving pattern. This will greatly simplify the whole process and make it more understandable and enjoyable.
- Experienced needlewomen advise beginners to mark the most difficult places and approach their weaving as carefully as possible.
- You can involve your children in working on crafts. This will not only help develop their fine motor skills, but also teach accuracy and attentiveness.
- You should not stop at one method and technique of weaving, but it is important to constantly develop and improve your abilities.
How to weave a figure from rubber bands: photo ideas for beginners
Please repost
1+