In the process of life, we acquire unnecessary and old things. There are things that can already be thrown away. But some things can be reused. What can be done from old and unnecessary magazines? DIY crafts from magazines. Ideas for what to make from magazines. Today we will use them to create interesting and beautiful things.
I recommend articles:
What can be made from vinyl records?
What can be done from old tiles. 16 ideas
How to use video tapes that are not needed.
A soft rug made from old magazines.
Prepare:
- Magazines
- Glue
- Threads with scissors
- Scotch
- Wooden sticks
Let's start making the rug. We wrap the magazine sheets on wooden sticks to make tubes. We fix the tubes with glue and tie them into one sheet using threads.
For additional fixation of the tubes, we glue the entire structure with tape on the back side of the mat. The protruding parts are cut to fit the size of the rug.
Choosing a craft and preparing the material
Before you start making something, decide what exactly you want to get as a result. Look through all sorts of photos of newspaper crafts on the Internet and find what you like best.
Check in advance what additional materials are needed for the product and whether you have them on hand. And when everything is ready, start creating!
Curtains from old magazines
And finally, the curtains. You've probably seen such curtains on elderly relatives or friends. The technique is very simple. We will need:
- Fishing line
- Scissors
- Ball pen
- Varnish
- Ruler and needle
We cut the magazine sheets into squares and roll them into tubes. We fix everything with glue. To make beads, cut out elongated triangles from a magazine. Roll it into a bead on a needle and glue the tip. We coat the finished beads and tubes with varnish.
We form the future curtain from ready-made tubes and beads, stringing them on a fishing line. We attach our garlands of beads and tubes to the rail. We attach the rail to the doorway. The curtain is ready.
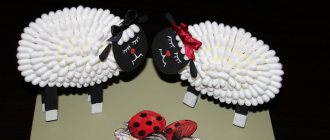
Stylish holiday decor
To decorate your home or school classroom for the holiday, you can make stylish hanging crafts from newspapers and magazines. All you need is an ordinary black and white newspaper, thick thread (preferably jute, but colored thread is also possible), a glue stick and scissors.
First, choose a shape - a heart, a butterfly, whatever, the main thing is symmetrical. You can draw a shape or print it on a printer.
We recommend reading:
Crafts from natural materials - a step-by-step master class on creating original crafts for children and adults (100 photos)Wood crafts - the best craft options, instructions for beginners and ideas for making wooden crafts (85 photos)
- Fabric crafts - the best ideas and the most practical crafts and toys made from various types of fabrics
Cut out your blank from paper, this will be a template, trace it on the newspaper and cut out several identical figures from it.
Next, take three of these identical figures, put them together, fold them in half and glue them together along the central fold.
Then glue the rope along this central seam. So you need to “plant” several multi-layered figures on a string at a short distance from each other.
Don’t forget to fluff each figure so that the newspaper leaves stick out in different directions. It is fashionable to paint part of a room with such threads; it will look unusual and beautiful!
Plates from a magazine
We will use the forgotten papier-mâché technique. Prepare:
- Petrolatum
- Tassels
- White napkin
- Plate and paints
- Paper glue
We coat the plate with Vaseline and stick small pieces of napkin on it. Then glue the pieces of the magazine, generously lubricating it with glue.
We make 5-6 layers to strengthen the plate. We make the final layer from a white napkin. Let it dry for a couple of days and remove it from the plate.
Papier mache
When talking about how to make a craft from newspapers, one cannot fail to mention this wonderful technique. You can make anything from papier-mâché! In addition to newspapers, you will need the most ordinary plasticine and paste.
Paste is a glue made from flour that is very easy to make at home. Take a couple of tablespoons of plain flour, pour into a bowl and pour in a small amount of boiling water. There is no need to cook anything.
Just stir well, the consistency should be like liquid sour cream. Cool and use; can be stored in the refrigerator for a couple of days. No other glue will work! Also for the craft we need gouache, brushes, any varnish and white emulsion paint.
We tear the newspaper into many small pieces (we don’t cut it, we tear it, then the edges will be soft and thin). We mold the desired figure from plasticine and paste it with pieces of newspaper using paste.
We recommend reading:
Crafts from isolon - a manufacturing master class, nuances of working with the material and step-by-step instructions on how to make a craft (85 photos)- Crafts from saw cuts: stylish and beautiful options for decorating the garden and interior with your own hands (130 photos)
- Crafts from toothpicks - interesting ideas, manufacturing examples and the best crafts for children (120 photos)
We make five or six layers. When it dries, cut the figure in half with a knife, take out the plasticine, connect the halves and glue it with newspaper. Then we cover it with emulsion, paint it and varnish it. The beautiful figurine is ready!
We create a picture from the colored strips of a magazine
To implement our idea you will need:
- Frames for a future painting
- Rug
- Sharp knife
- Black or brown paper
- Glue
Cut the magazine into colored strips. We take out the cardboard backing from the picture and stick on our multi-colored stripes, and trim the edges with a knife. Then the black paper is cut to the size of the painting. Using a template, the contours of any images are cut into black paper: houses, trees, people, etc.
All that remains is to assemble the picture into a single whole. Dark paper with the outlines of the images is placed on the base with glued stripes and tucked into the frame. The picture is ready.
Beautiful panel
You don't need to know how to draw to create a beautiful picture and decorate your wall. There is an idea for a great DIY newspaper craft for beginners - a simple panel made from newspaper.
Take a blank - a cardboard candy box with a frame border. Cover it with brown craft paper or colored paper; the background can be anything you like.
Cut out the panel details from newspapers:
- flowers,
- thin strips - grass,
- butterflies.
- Glue it on the panel
and leave the volumetric details for example:
- attach butterfly wings and flower petals with glue only in the middle,
- and lift the petal itself up so that it sticks out.
- The result will be a laconic and voluminous panel!
Fungus for the garden
To decorate the garden with decorative wicker fungus you need to prepare:
- newspaper tubes;
- glue;
- scissors;
- deep bowl.
How to do:
- We take 8 tubes as a basis. For a stronger base, you can insert wire inside. The base is like a square that needs to be braided.
- To give the base a convex shape, place the base over a bowl and braid until a mushroom cap is formed.
- To create a leg, bend the tubes as in the photo and continue braiding. In the middle of the leg you need to make a small bulge and braid it to the end.
Owl
To make an owlet you need:
- 7 tubes - 5 dark and 2 light;
- glue.
How to make an owlet:
- The ends of two light tubes must be flattened, twisted in a spiral and secured with glue.
- We place a dark tube bent in an arc over the eyes, and above it another tube, with the ends glued to the middle.
- We place the working third dark tube from below, as in the photo.
- We begin to braid the owlet’s body using the “swaddling” method, passing either the right or the left end of the tube through the middle.
- Having completed two rows in this way, we move the wing-loops to the sides and continue working until the body reaches the required length.
- We glue the ends of the tubes on the back side of the product.
- The light tube-legs must be cut off at an angle, and the tassel ears of the owlet should be made from the remains. We make a beak from scraps of dark tubes and glue it to the owlet.
Photo frame
You can use newspaper tubes twisted into spirals to update an old photo frame.
What do you need:
- newspaper tubes;
- old photo frame;
- glue;
- clear nail polish.
Step-by-step instruction:
- We make spirals of different sizes from flattened paper tubes. The end of the tube on each spiral is secured with glue.
- Glue the spirals in random order to the photo frame, starting with the largest ones, and filling the remaining space with the small ones.
- Once the glue has dried, coat the frame with clear varnish for durability.
A couple of final tips
Handmade is fun and interesting! It doesn’t matter whether you’re crafting for yourself, for a gift, or with your child, the most important thing is to have fun doing it. Check out the photos and videos for inspiration!
And most importantly, do not copy “one to one”. Creativity always involves creating something unique, so feel free to compose, add something of your own to existing ideas, and use your imagination.And create unique crafts with pleasure!
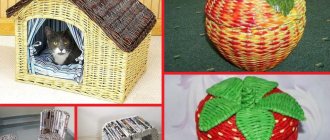
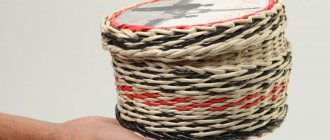
Box-house
Craftswomen who have already mastered the basics of weaving can try to make unusual crafts from newspaper tubes. This can be considered a “house” job. It can be made whole, as a decorative part of the interior, or the roof can be woven separately to make a box.
For such a hut the size of a half-liter jar, you will need at least 250 newspaper rods. The sequence of work is as follows:
- The bottom of the “house” is formed from a flat circle. For it we make a “sun” - a cross made of 12 paper rods. Then we braid the rays in a circle with working tubes. Lengthening/extension is carried out by the usual placement of the next tube on the previous one.
- Having passed 6 rows in a spiral, we separate the ray rods and braid each one separately. Due to this, the diameter of the circle increases. When the required size is reached, the rods are cut off, the edges are hidden and glued.
- The walls of the house will not “grow” from the very edge of the base, but will be slightly shifted towards the center. To do this, we vertically thread new wall posts through the base in a certain row of weaving. The distance between them should be about 2 cm.
- Going around the racks, we weave the walls of the house with working tubes. You need to decide: the walls will be straight or at an angle. You can place a bowl/jar of the required diameter in the center so that the work moves outward slightly and becomes more rounded. Having reached the required height, the base can be removed, then the diameter of the house will decrease and it will become thinner.
- When the desired height is reached, we bend or cut the base rods. The result was the lower hollow part of the box.
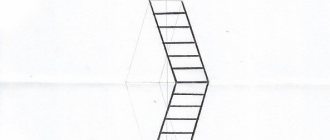
- For the lid/roof you need to take 6 newspaper twigs - this is the base. They are twisted together into a tight bundle and a loop is made, secured with an elastic band. This loop will be on the roof of the hut. The twigs from the bundle are spread into the sun and woven in a circle between these rays with a working tube. This weaving produces a cone whose diameter gradually increases.
- The work is completed at the stage when the lid fits well on the walls of the original house. The working rods must be carefully bent and glued.
Mastering the skills of weaving paper tubes will take time and dedication. It’s better to start with simple products; Having mastered the basics, move on to more complex ones. The pleasure gained from the creative process will more than repay the time spent.
How to make newspaper tubes?
Before you start weaving, you need to prepare the base - tubes. More experienced craftsmen in this matter use thicker paper from magazine covers, but for children it is better to make tubes from ordinary newspapers.
To make tubes you will need:
- old newspapers;
- thin knitting needle or wooden stick;
- glue;
- scissors;
- ruler.
The most convenient way to make tubes from newspapers is on the floor, placing something hard under the newspaper.
Step-by-step instruction:
- We lay out the newspaper and, placing a ruler perpendicular to the long side of the newspaper, make marks every 9 cm and cut the newspaper into strips.
- We place the knitting needle or stick on the corner of the newspaper strip at an angle of 45 to 60 degrees and wind the newspaper around the knitting needle. The density of the future newspaper tube depends on the angle. If you need denser tubes that can be used for the base of the product, then the angle should be 45 degrees. If you need more flexible tubes to design the product, then place the knitting needle on the paper at an angle of 60 degrees.
- At the end of winding, drip glue onto the remaining corner and glue the edge. This way the tube will not unwind.
- Remove the stick from the tube.
You can paint newspaper tubes before starting work or when the product is ready. To give the color of natural vine, stains are used; for painting in brighter colors, ordinary gouache mixed with PVA glue is used. The nuances of making straws for beginners are discussed in the video:
The secrets of coloring are discussed here:
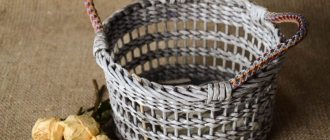
Dish holder
Those who are interested in crafts from newspaper tubes for beginners can safely take on weaving a coaster for dishes. Even a child can cope with such work.
An additional advantage of the craft is the use of a small number of rods (up to 50 pcs.). The product will serve as an original souvenir and a very valuable tool in the kitchen. The weaving is as follows:
- To begin with, take 12 tubes. You need to arrange them 6*6 (crosswise), these will be racks.
- From the base of the intersection, these 12 rods begin to be braided in a circle. The rows will go in a spiral, gradually increasing the radius.
- As the circle of the stand increases, the stands will separate. At the end of the row, the tubes of the row will be braided around one tube of the base.
- Once the desired diameter has been reached, the rack is cut off, and the edge of the tubes of the rows is hidden, having previously coated the cut with glue.
- The finished stand can be painted. If you are planning a stand for hot dishes, then it is better not to open it with varnish.