0
Share
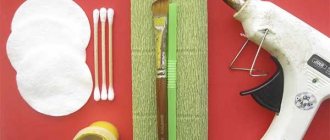
Cotton swabs have long been used not only for their intended purpose, but also as a material for creativity. Acrylic paints or gouache are ideal for painting crafts made from this material; in addition, sometimes you can find colored cotton swabs on sale that do not need to be painted, but such material requires a special idea and color scheme.
Children from 3 years of age can work with such creative material; they will not taste cotton swabs and will not swallow the cotton head. As a basis for three-dimensional crafts made from cotton swabs, you can use polystyrene foam, polymer clay and ordinary plasticine.
Cotton swabs are convenient to use as counting sticks, for drawing, using as a brush, or to give a drawing a special texture; in addition, cotton swabs can be used to make wonderful crafts.
- Sheep note holder
- Volumetric sheep made from cotton swabs
- Rabbit made from cotton swabs
- Snowman made from cotton swabs
- Panda made from cotton swabs
- Unusual flowers
- DIY delicate snowflakes made from cotton swabs
- Big snowflakes
- New Year's house made of cotton swabs and Christmas tree
Crafts from cotton swabs for children
At an early age, a child begins to develop creative abilities. Crafts will help him show his imagination and thinking, diversify his leisure time and surprise him in kindergarten, because using such an ordinary object, you can make amazing things. DIY crafts made from cotton swabs will teach your child to handle objects carefully and appreciate their work.
They can also be used to create a greeting card or gift for family members and friends. The child will be pleased to hear praise for his work. Below are crafts made from cotton pads and sticks with their step-by-step production
LiveInternetLiveInternet
—Categories
- Everything you need to make a diary. (413)
- Flash material (75)
- Buttons - transitions (59)
- Flash (55)
- My diary patterns (38)
- Lessons, different codes (38)
- Diary diagrams (36)
- Dividers (27)
- Seamless background (20)
- Animated backgrounds (19)
- Diary decorations (15)
- Transparent backgrounds (13)
- Design kits (10)
- Text frames (10)
- My seamless backgrounds (3)
- Photoshop (206)
- Photoshop tutorials. (71)
- Clipart (61)
- Photoshop lessons from Elena (33)
- Masks for Photoshop (16)
- Create a frame in Photoshop (10)
- Video tutorials on Photoshop (7)
- Fonts (5)
- Backgrounds for Photoshop (2)
- Holidays (193)
- New Year (92)
- 14.02 Valentine's Day (40)
- Easter (29)
- Postcards (22)
- March 8 (8)
- halloween (4)
- February 23, gifts for men. (4)
- MK miscellaneous. (140)
- Made from natural materials (29)
- Clay (25)
- MK Casket (17)
- From plastic bottles (15)
- Jute thread (14)
- Wool felting, wool paintings (4)
- Flowers, butterflies, various techniques (137)
- Cold porcelain, polymer clay (27)
- Flowers (and other) made of nylon (20)
- Flowers (and other) from Thomas (1)
- Floristry (129)
- A little about flowers (50)
- Floristry, master classes. (24)
- Floristry for beginners (20)
- Wedding floristry (9)
- Bouquets (8)
- Floristry, ROSES (cut) (7)
- Weaving from branches and wire for bouquets, frames (5)
- Vases (5)
- Beads, macrame, ribbons (117)
- Macrame (38)
- Jewelry (32)
- Hair jewelry (24)
- Beads (22)
- Activities with children (109)
- Crafts with children (77)
- Drawing with children (20)
- Video lessons for children. (4)
- Educational games and activities for children (4)
- Beauty and health. (94)
- Body care (24)
- Tinctures, creams, oils (21)
- Masks (15)
- For face (13)
- For arms and legs (9)
- Hair care (8)
- Elixirs (6)
- Eyes (4)
- Tips, recipes, medicines (2)
- Cooking (91)
- Snacks. (29)
- Bakery. (24)
- Hot. (19)
- Salads (8)
- Pasta, maroons (6)
- Drinks, cocktails, smoothies (5)
- My dishes (1)
- Candles (50)
- Candles, candle decor. (21)
- Candlesticks (13)
- Gel candles (11)
- Paper (39)
- Origami (22)
- Knitting (28)
- Crochet (18)
- Knitting (5)
- Knitting for a doll (3)
- Interior (26)
- This is interesting (25)
- Decor and decoupage (24)
- Decoupage bottles (10)
- Floristry (5)
- Videos (20)
- Movies (15)
- Music videos (4)
- My works and my girls' works (20)
- Crafts, drawings (ours) (10)
- My works in Photoshop (8)
- My frames. (2)
- Travel (19)
- Amazing places on our planet (12)
- Egypt (7)
- Soap, soap dishes, washcloths (18)
- Washcloths and soap dishes (16)
- Soap making (2)
- Packaging, boxes, bags, etc. (17)
- Useful links and programs (12)
- Tests and fortune telling (10)
- Cutting and sewing))) (6)
- Humor (4)
- Music (3)
Application "Little Snowman"
You will need: cotton pads, cardboard, colored paper, scissors, glue. We form snowdrifts from cotton pads and glue them to the bottom of a sheet of cardboard. We use two disks to create a snowman, and cut out a hat, scarf, hands, eyes, nose and mouth from colored paper. We glue everything.
We recommend reading:
Crafts from isolon - a manufacturing master class, nuances of working with the material and step-by-step instructions on how to make a craft (85 photos)- Crafts from saw cuts: stylish and beautiful options for decorating the garden and interior with your own hands (130 photos)
- Crafts from toothpicks - interesting ideas, manufacturing examples and the best crafts for children (120 photos)
House from a glass jar - step-by-step MK how to make it yourself
Let's make decorative houses from a jar and salt dough. You need to prepare a jar with a lid and foil. We roll strips of different thicknesses from foil. Wrap the strip around the bottom of the jar and glue it. In the same way we make a window, a door and a tubercle on the roof. Give the tubercle the shape of a mushroom. We attach the chimney from wire. Cover all parts with salt dough. We give relief to the bottom using a stick. We push pebbles on the door and window. We make a rough surface with an old toothbrush. Cover the surface of the jar with a thin layer of dough. We cut out a window and several holes in the walls. We place crossbars in the windows. Create a wood effect on the door. Cover the chimney and mushroom with dough. We complement the house with details in the form of a door handle, mushrooms, bricks. We paint the house with watercolors or gouache paints. The result is a magical house made from salt dough.
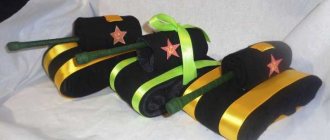
Application "Sheep"
You will need: cotton swabs, cotton pads, cardboard, 2 black beads, 1 white button, colored paper, paints, glue, scissors. We cut out grass, flowers, clouds from paper and glue everything onto cardboard.
The disk will be the sun, paint it yellow, dry it and glue it. If you wish, you can paint everything with paints. We make a sheep from the discs, using cotton swabs to create the legs. The two black beads are the eyes, and the button is the nose. Eyes can also be cut out of paper and glued or simply drawn.
Needlework
It's time to use your hands and create a cute Easter animal. We take the head, glue, and glue it to the edge of the oval. Take the second head and glue it next to it. We take the third... and so on. The sheep looks most beautiful if the cotton heads are glued in rows, and not fenced in the garden.
In the upper part of the oval body, you need to leave a free area for the head. But before you glue it, you need to give the sheep an angelic face. On top of the circle we glue 5-7 cotton heads in a row, which imitate a “hairstyle”. On the sides we also attach one sideburn on both sides. Next, use a pen or felt-tip pen to draw features: eyes, mouth, nose. How does it work out? As a final element, place a ribbon bow on top.
You can use any craft glue that sets quickly enough. For example, “Moment” and its analogues. PVC will also work, but you will have to wait longer for it to stick. Do not use instant superglue. It contains, firstly, toxic substances, and secondly, chemical elements that corrode plastic.
The most practical way is to use a glue gun. It uses polymer rods, which, after heating, quickly harden, are safe for health and hold the structure tightly.
Tell me, why do we need clothespins? These will be the legs of a cute creature. The paper body is simply glued to the pieces of wood with the wrong side. If the ends of the clothespins are straight, the sheep will stand. If they are slightly rounded, you can glue supports to the side.
A simple but beautiful craft is ready!
Found a violation? Report content
Application "Bear"
You will need: cotton swabs, stencil, paints, cardboard, colored paper, scissors, glue. Using a stencil, draw a bear on cardboard.
We paint cotton swabs, dry them and cut off the soft ends. Fill the bear with cotton wool blanks and glue them. We cut out the eyes from colored paper and also glue them on. You can make any animal using this principle. Below are photos of animal crafts made from cotton swabs.
DIY winter house made from paper tubes
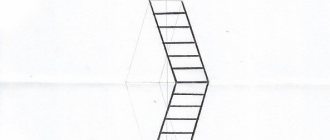
We divide the A4 sheets into 3 parts. We twist each strip and seal it with glue. We lay out the tubes around the perimeter of the square. We continue to add tubes, leaving gaps for windows and doors. On the inside of the house we insert a blue background on the windows. We make crossbars and a window sill. We place a long tube in the center and place a roof on it. We glue a row of tubes and wrap them with paper. We install it as a ladder. We make railings from thin tubes. We cover the top of the house with paper tiles. You can add a swing to the house, made using the same technique from paper tubes.
Volumetric flowers
You will need: cotton swabs, foam balls, paints, green colored paper, skewers, glue, scissors.
We color the cotton swabs, dry them and cut off the soft tip on one side. We insert sticks and a skewer into the foam ball, having previously painted it green. Cut out a piece of paper and glue it onto a skewer.Instructions for Beginners
Making a flower from round balls is no more difficult than from long ones.
Inflate and tie the balloons for the petals. To ensure that the workpieces are the same, it is recommended to calculate the number of presses on the pump. For a flower with five petals, the optimal number is four.
Now you need to tie the balls together in twos. To do this, twist the tails of the balls 2-3 times. The twist is fixed with knots. We screw the fifth petal into one of the twos.
After this, you need to tie two blanks together so that all 5 petals are fastened together.
The next stage of the scheme for creating a flower from a balloon involves inflating the core. Remember that the middle part should be smaller than the petals.
After this, you need to thread the tail of the central part through the bunch of petals.
Now you need to inflate a stem from a long green ball, divide it into five equal parts, twisting it with each other, and connect it into a ring.
The resulting bubbles need to be twisted into loops to create a green chamomile-shaped base.
The base must be wound to the round balls with tails and secured with the tail from the core.
From the second long green ball you need to make a stem. We twist two small bubbles and secure them together. We make a castle out of them and attach it to the base of the flower, fixing it with the tail from the middle.
Using approximately the same scheme, you can make a flower with six petals.
Vase with callas
You will need: cotton swabs, cotton pads, green cocktail straws, yellow paint, tape, a vase, scissors.
Paint the sticks yellow, dry and insert into cocktail tubes. Wrap the resulting stems in two discs in turn and secure with tape. The number of flowers is limited by desire and the size of the vase.
We recommend reading:
- Crafts from natural materials - a step-by-step master class on creating original crafts for children and adults (100 photos)
- Wood crafts - the best craft options, instructions for beginners and ideas for making wooden crafts (85 photos)
- Fabric crafts - the best ideas and the most practical crafts and toys made from various types of fabrics
Sophisticated daffodils
For one flower you will need 8 cotton pads:
- Prepare material for stamens. To do this, half a cotton pad should be moistened in gouache or yellow watercolor diluted with water, squeezed out and allowed to dry.
- Meanwhile, form 6 volumetric petals from the remaining cotton pads, and also cut out a circle of the desired diameter.
- Collect a flower from the resulting fragments. Glue the petals to the round base, pressing each one for a few minutes with your hands.
- Return to the painted disk. Make several notches for the stamens on the rounded side, roll it into a tube, glue it and attach it to the middle. An alternative is felt or paper napkin.
- You already know what to make the lower part of the plant from.
Roses
You will need: cotton pads, PVA glue, paints. We form the center of the rose from the disks, coat it with glue and glue several more cotton disks sheet by sheet, depending on the required size.
It is important to seal the edges of the disc well. This will prevent the formation of lint. After complete drying, the rose needs to be painted and dried again.
The finished flower is usually used to create bouquets, wreaths, baskets and voluminous cards.
Execution technique
Cut out the trunk and branches of a tree from brown paper, and stars from yellow paper. We glue the tree on the left side, and the stars on the right side.
Now you need to assemble an owl from disks; we glue the body and head of the owl from two solid disks. The owl's wings will be cut into halves of the disk. You need to cut out small triangles from the whole disk and glue them in place of the eyebrows.
To make the owl appear three-dimensional and have “wings,” the edges of the discs need to be cut a little.
Glue buttons instead of eyes, and cut out a beak from brown paper in a triangular shape.
Christmas tree
You will need: cardboard, cotton pads, glue, scissors, stapler, various decorative elements for decoration. We roll the cardboard into a cone and secure it with a stapler.
Fold the disk in half twice to form a sector. Gradually moving from bottom to top in a circle, we cover the entire tree with sectors. For decoration you can use beads, rhinestones, ribbons, stickers, cones, buttons.
It is important to remember that when making crafts with your own hands, you can use a wide variety of materials and not be limited to found templates.
How to create a topiary
A little more difficult, but more interesting to make from topiary. Topiary is a small sculptural tree. Various available materials are used as a crown. To create a topiary you need to prepare the following:
- cotton pads;
- small pot; you can use different containers you like: a mug, a jar;
- a plastic ball or foam blank in the form of a circle; A piece of paper compressed into a ball is quite suitable;
- satin ribbons, beads, rhinestones, and other decorative elements for decoration;
- glue gun, PVA glue.
So, to make topiary, the following steps are performed:
- Preparing the base for the crown. Any round shape will do, even a piece of paper.
- We connect the crown to the trunk. As a trunk, you can use a plastic stick, a small branch, several wooden skewers tied together, or other elements resembling a trunk.
- We prepare small flowers from the circles. You can shape them to look like roses or lilies. Roses are glued together with glue from several cut out petals. Flowers in the shape of a lily are prepared using a stapler (a cotton circle is folded into four parts and fastened with a staple in the corner), or simply twisted to form an open bud (fixed on the narrow side with white threads). If desired, the blanks can be painted in the color you like.
- Glue all the prepared flowers to the ball. Of course, the ideal option would be a ball of absolutely even shape; gluing workpieces to it will be much easier. It is better to place flowers very close to each other, leaving no empty spaces. To make the crown look original, in addition to flowers, bows, ribbons, rhinestones, beads, and other decorative elements are glued to the ball.
- Next, you need to prepare a pot or some other container-stand for the tree. Purchase a ready-made small plastic or ceramic flower pot. You can make a pot yourself from a jar by covering it with satin ribbons, lace, fabric, and beads.
- After all the topiary elements are made, they are connected to each other. Crown with a trunk and then with a pot. To do this, gypsum diluted in water is poured into the pot. A trunk with a crown is inserted into the hardening composition. The barrel can be decorated with rhinestones, beads and other small details.
Photos of crafts made from cotton swabs
0
2
House in the snow and Christmas tree
The application can also be voluminous. But in this case, the baby will need your help. We are building a house:
- place two sticks parallel to each other;
- then two more parallel to each other and perpendicular to the previous ones;
- continue until you have built a house of a suitable size;
- For fixation it is better to use a glue gun.
How to make a roof:
- Glue a row of sticks parallel to each other onto a rectangular base made of white cardboard;
- bend the resulting base in half;
- stick to the walls of the house.
The basis of the Christmas tree will be a plasticine cone. In a circle, in rows, stick the cut-off cotton swabs into it. It is better to prepare them in advance.
Attach the resulting masterpieces to the base and decorate. Let your child use his imagination and decorate the craft himself. You can make not just one, but a whole round dance of winter stars.
Master class on making silk earrings from soutache
Snowflake
There are two options for making a three-dimensional snowflake:
1. Several sticks need to be glued together. The snowflake will become more interesting and fabulous if you glue cut cotton heads to each “twig”.
2. Here you will need a snowflake template cut out of cardboard. Glue the fluffy parts of the sticks onto it. You can tie a ribbon loop to a snowflake and hang it on the Christmas tree.
And the child will figure out how to decorate it himself. Just prepare beads, small buttons, beads or sequins.